
Recommandé
Contenu connexe
Tendances
Tendances (20)
En vedette
Similaire à Edit image in lomography style with warmer colors
Similaire à Edit image in lomography style with warmer colors (20)
Plus de callumharrison
Plus de callumharrison (20)
Dernier
Dernier (20)
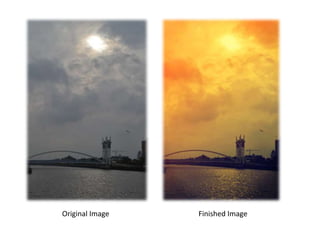
Edit image in lomography style with warmer colors
- 2. I wanted to edit my image so that it was in a lomography style having a vintage look to it with warmer colours as the original was very plain due to the overcast weather. I started with the original image, experimenting with the different colour curves trying to create more contrast and a green colour. Adding a Blue Solid Colour on a New Layer (changing the blending mode to screen). Add a Orange Linear Gradient Colour on a new layer and then a Cream Solid Colour on a new layer (setting the blending mode to soft light).
- 3. Changing the Hue Saturation and The Brightness and Contrast of the image to increase the colours in the image. Trying to lower the blue colours. Adding a Almost Black Solid Colour on a new layer select the Elliptical Tool I cut out an oval shape adding a mask and feathering it to 200px. Change the opacity and fill to blend with the background.
- 4. Finally, experimenting with Hue and Levels, increase the colours and saturation to increase colours for the finished image.
- 5. Original Image Change Curves Add Gradient. Orange, Blue, Cream Change Contrast, Brightness and add A Black Background and create a mask. Finished Image