Micromodule Mural On/Off Z-Wave Plus AN179 Smart Home Europe manual english
•
0 j'aime•6,624 vues

Micromodule Mural On/Off Z-Wave Plus AN179 Smart Home Europe manual

Recommandé
Recommandé
Contenu connexe
Tendances
Tendances (20)
En vedette
En vedette (16)
Similaire à Micromodule Mural On/Off Z-Wave Plus AN179 Smart Home Europe manual english
Similaire à Micromodule Mural On/Off Z-Wave Plus AN179 Smart Home Europe manual english (20)
Plus de Domotica daVinci
Plus de Domotica daVinci (20)
Dernier
Dernier (20)
Micromodule Mural On/Off Z-Wave Plus AN179 Smart Home Europe manual english
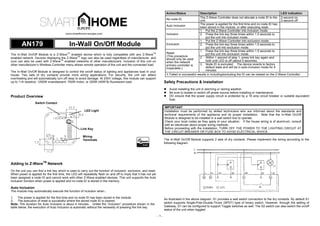
- 1. - 1 - AN179 In-Wall On/Off Module The In-Wall On/Off Module is a Z-Wave TM enabled device which is fully compatible with any Z-Wave TM enabled network. Devices displaying the Z-Wave TM logo can also be used regardless of manufacturer, and ours can also be used with Z-Wave TM enabled networks of other manufacturers. Inclusion of this unit on other manufacturer’s Wireless Controller menu allows remote operation of the unit and the connected load. The In-Wall On/Off Module is designed to control the on/off status of lighting and appliances load in your house. Two sets of dry contacts provide more wiring applications. For security, the unit can detect overheating and will automatically turn off relay to avoid damage. At 230V voltage, this module can support up to 11A resistive, 1200W incandescent, 700W motor, or 320W (40W*8) fluorescent load. Product Overview Adding to Z-Wave TM Network On the unit you can find a link key which is used to carry out the function of inclusion, exclusion, and reset. When power is applied for the first time, the LED will repeatedly flash on and off to imply that it has not yet been assigned a node ID and cannot work with other Z-Wave enabled devices. This unit supports the Auto Inclusion function when power is applied and no node ID is stored in the memory. Auto Inclusion The module may automatically execute the function of inclusion when... 1. The power is applied for the first time and no node ID has been stored in the module. 2. The execution of reset is successful where the stored node ID is cleared. Note: The duration for Auto Inclusion is about 4 minutes. Unlike the “inclusion” procedure shown in the table below, the execution of Auto Inclusion is automatic without the necessity of pressing the link key. Action/Status Description LED indication No node ID The Z-Wave Controller does not allocate a node ID to the unit. 2-second on, 2-second off Auto Inclusion The power is applied for the first time and no node ID has been stored in the module, or after executing reset. Inclusion 1. Put the Z-Wave Controller into inclusion mode. 2. Press the link key three times within 1.5 seconds to put the unit into inclusion mode. Exclusion 1. Put the Z-Wave Controller into exclusion mode. 2. Press the link key three times within 1.5 seconds to put the unit into exclusion mode. Reset (This procedure should only be used when the network primary controller is inoperable.) 1. Press the link key three times within 1.5 seconds to put the unit into exclusion mode. 2. Within 1 second of step 1, press link key again and hold until LED is off (about 5 seconds). 3. Node ID is excluded. The device reverts to factory default state and will be in auto-inclusion mode for 4 minutes. ø Failed or successful results in including/excluding the ID can be viewed on the Z-Wave Controller. Safety Precautions & Installation l Avoid installing the unit in storming or raining weather. l Be sure to isolate or switch off power source before installing or maintenance. l DO ensure that the power supply circuit is protected by a 16 amp circuit breaker or suitable equivalent fuse. IMPORTANT Installation must be performed by skilled technicians who are informed about the standards and technical requirements of the appliance and its proper installation. Note that the In-Wall On/Off Module is designed to be installed in a wall switch box to operate. Check your local codes as they apply to your situation. If the house wiring is of aluminum, consult with an electrician about proper wiring methods. Before proceeding with the installation, TURN OFF THE POWER TO THE LIGHTING CIRCUIT AT THE CIRCUIT BREAKER OR FUSE BOX TO AVOID ELECTRICAL SHOCK. The In-Wall On/Off Module supports 2 sets of dry contacts. Please implement the wiring according to the following diagram. As illustrated in the above diagram, S1 provides a wall switch connection to the dry contacts. By default S1 switch supports Single-Pole-Double-Throw (SPDT) type of binary switch. However, through the setting of Gateway, S1 can be configured to support Toggle switches as well. The S2 switch can also switch the on/off status of the unit when toggled. LED Light Link Key Switch Contact Wiring Terminals
- 2. - 2 - Note: Please use 1.25m m 2 wires. When there are two or more wires, please use the appropriate external terminal wiring as shown above. Also refer to the following diagram for the jumper setting needed between L and LS1 on 2-wire scheme. Operation Under normal operation mode, press the button on the unit to control the on/off status of the connected load. The LED indicator will also turn on or off accordingly. The unit can also be controlled by receiving command signals from the Z-Wave Controller. The unit is able to remember the status of the relay when power is cut off (such as power black-out). When power is supplied again, the unit will resume the last status of the relay (on or off) automatically. Note: Pressing the button on the unit for over 5 seconds but no more than 8 seconds can switch the operation mode of the dry contacts. The LED will flash 3 times rapidly upon successful switch. Programming Z-Wave Group Support The unit supports two association groups with 1 node support for Grouping 1 and 4 nodes support for Grouping 2. This has the effect that when the unit is operating, all devices associated with the unit will receive the relevant reports. l When the unit is powered up and was already a part of a Z-Wave network, the unit will send a Notification Report to the node in Group 1. l When setting the unit or changing the unit’s status, the unit will send a Binary Switch Report to the node of Group 1. l When performing Reset the unit will send Device Reset Locally Notification to the node of Group1. l The minimum interval time between two reports sent from this unit to the node of Group 1 is 3 seconds. Refer to Configuration parameter 2 for more information. l When the button on the unit or the wall switch (S1) is pressed, the unit will send a Basic Set command to the nodes of Group 2. When the unit is OFF, Basic Set Value = 0x00. When the unit is ON, Basic Set Value = 0xFF. Z-Wave Plus Info Role Type Node Type Installer Icon User Icon Slave Always On Z-Wave Plus node On/Off Power Switch On/Off Power Switch Version Protocol Library 3 (Slave_Enhance_232_Library) Protocol Version 3.95 ( 6.51.02) Manufacturer Manufacturer ID Product Type Product ID 0x0060 0x0004 0x0008 AGI (Association Group Information) Table Group Profile Command Class & Command (List) N bytes Group Name(UTF-8) 1 General:NA Binary Switch Report, Notification Report, Device Reset Locally Notification Lifeline 2 Control:Key1 Basic Set On/Off control (Button1) Basic l Basic Get: Inquire about the status of the device. l Basic Report: Report the status of the device. l Basic Set: Set the status of the device. Notification The device will send notifications (Notification Type =0x08, Event = 0x01) upon being powered on.
- 3. - 3 - Configuration The configurable values are as following: Basic Set Command value: Parameter Number Size Range Default 1 2 0~99 , 255(0xFF) 255 (0xFF) The delaying time to report to Group 1: Parameter Number Size Range Default 2 1 3 - 25 (seconds) 3 Remember the last status: Parameter Number Size Range Default 3 1 1/0 1: remember (0: do not remember) Switch 1 switching type: Parameter Number Size Range Default 4 1 1/0 0: Single Pole Double Throw (1: Toggle switch) Command Classes The module supports Command Classes including… l COMMAND_CLASS_ZWAVEPLUS_INFO_V2 l COMMAND_CLASS_VERSION_V2 l COMMAND_CLASS_MANUFACTURER_SPECIFIC_V2 l COMMAND_CLASS_DEVICE_RESET_LOCALLY_V1 l COMMAND_CLASS_ASSOCIATION_V2 l COMMAND_CLASS_ASSOCIATION_GRP_INFO_V1 l COMMAND_CLASS_POWERLEVEL_V1 l COMMAND_CLASS_BASIC_V1 l COMMAND_CLASS_NOTIFICATION_V4 l COMMAND_CLASS_CONFIGURATION_V1 l COMMAND_CLASS_SWITCH_BINARY_V1 l COMMAND_CLASS_SWITCH_ALL_V1 l COMMAND_CLASS_FIRMWARE_UPDATE_MD_V2 Additional Command Classes Supported l Power Level: For test purpose during product installation. l Binary Switch: Refer to Basic. l Switch All: The unit turns on when it receives “Switch All On”, and turns off upon receiving “Switch All Off”. l Firmware Update: For OTA function. Troubleshooting Symptom Cause of Failure Recommendation Device not responding and LED not displaying The device is not wired to the mains power correctly Check if wiring is correct, or voltage is too high or too low Device malfunction Send the device to be repaired LED displaying, but cannot control On/Off status of connected load The connected load has its own on/off switch Turn the switch of the connected load to On. Can press button to control, but cannot control by RF RF interference is occurring. Someone nearby might be emitting RF signal of the same frequency Wait for a while and retry the operation Specification Power Input 220-240V/50Hz Maximum Power Load Resistive load Max.11A, Incandescent load Max. 1200W, Fluorescent load Max.320W Transmission Range 30 meters (Indoor; Open space) Working Temperature -10°C - 40°C *Specifications are subject to change without notice 2014/08 Warning: Non-replaceable thermal cut-off (15A/103°C or 15A/147°C) protection used. Do not dispose of electrical appliances as unsorted municipal waste. Please use separate collection facilities instead. Contact your local government for information regarding the available collection systems. If electrical appliances are disposed of in landfills or dumps, hazardous substances can leak into the groundwater and get in to the food chain, damaging your health and well-being. When replacing old appliances, the retailer is legally obligated to take back your old appliances for disposal free of charge.