Mridang lodha starting bloc essay 1
•Download as PPTX, PDF•
1 like•251 views

Essay 1 for the Starting bloc BOS 12 Application

Recommended
More Related Content
Similar to Mridang lodha starting bloc essay 1
Similar to Mridang lodha starting bloc essay 1 (20)
Recently uploaded
Recently uploaded (20)
Mridang lodha starting bloc essay 1
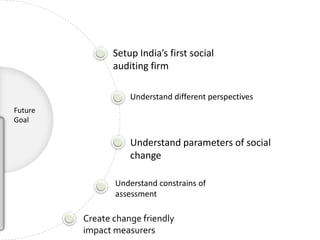
- 1. Setup India’s first social auditing firm Understand different perspectives Future Goal Understand parameters of social change Understand constrains of assessment Create change friendly impact measurers
- 2. Community to Solve issues The Big Idea network Starting Bloc BOS’12 Diversity Increase Impact Intrinsic Value
- 3. Community to Solve Issues Social Auditing measures social impact • Social impact is made through social ideas Social ideas revolve around social issues • Large community will help broaden vision of global impact and issues
- 4. “Although the web has been made global, people still think local” Mark Zukerberg The Big Idea Network • Common global issues Issues • Wide web of interrelated issues • Each idea can support other Impact • Complimentary ideas work together • Understand the options of social chance Interest • Same aim achieved through different means
- 5. Geo Understand the Sec Different sector- Soc Impact has Different aims; role of different social How to measure Governance meanings impact Understand Design processes them and how to for different use them in areas Auditing Social Diversity Setups Sector Geographical
- 6. Merge older ideas Replicate current models Refine previous Ideas Increase Impact
- 7. Apply for Starting Bloc BOS’12 Attend the fellowship Step 1 Step 2 Step 3 Get Selected and ensure participation
- 8. Understand and appreciate Work by people and understand their concept of social impact Step 4 Step 5 Draw a picture of social impact and unders
- 9. Plan and prepare pilots for a few fellow projects Step 6 Step 7 Study and talk about country models For accessing social impact
Editor's Notes
- Custom animation effects: object spins on end(Advanced)To reproduce the background effects on this slide, do the following:On the Home tab, in theSlides group, click Layout, and then click Blank.Right-click the slide background area, and then click Format Background. In the Format Background dialog box, click Fill in the left pane, and then select Solid fill in the Fill pane. Click the button next to Color, and then under Theme Colors click White, Background 1 (first row, first option from the left).To reproduce the rectangle on this slide, do the following:On the Home tab, in the Drawing group, click Shapes, and then under Rectangles click Rounded Rectangle (second option from the left). On the slide, drag to draw a rounded rectangle.Select the rectangle. Drag the yellow diamond adjustment handle to the left to decrease the amount of rounding on the corners. With the rounded rectangle still selected, under Drawing Tools, on the Format tab, in the Size group, do the following:In the Shape Height box, enter 3.5”.In the Shape Width box, enter 0.25”.Under Drawing Tools, on the Format tab, in the bottom right corner of the Shape Styles group, click the Format Shape dialog box launcher. In the Format Shape dialog box, click Fill in the left pane. In the Fill pane, select Solid fill, click the button next to Color, and then under Theme Colors click White, Background 1, Darker 15% (third row, first option from the left).Also in the Format Shape dialog box, click Line Color in the left pane. In the Line Color pane, select No line. Also in the Format Shape dialog box, click Shadow in the left pane. In the Shadow pane, click the button next to Presets, under Outer select Offset Bottom (first row, second option from the left), and then do the following:In the Transparency box, enter 0%.In the Sizebox, enter 100%.In the Blur box, enter 8.5 pt.In the Angle box, enter 90°.In the Distance box, enter 1 pt.Also in the Format Shape dialog box, click 3-D Format in the left pane. In the 3-D Format pane, do the following:Under Bevel, click the button next to Top, and then under Bevel click Circle (first row, first option from the left). Next to Top, in the Width box, enter 5 pt, and in the Height box, enter 5 pt.Under Surface, click the button next to Material, and then under Standard clickMatte (first row, first option from the left).Click the button next to Lighting, and then under Neutral click Soft (first row, third option from the left).On the slide, select the rounded rectangle. On the Home tab, in the Clipboard group, click the arrow under Paste, and then click Duplicate.Select the duplicate rectangle. On the Home tab, in the Drawing group, do the following:Click the arrow next to Shape Fill, and then click No Fill.Click the arrow next to Shape Outline, and then click No Outline.Drag the second rectangle above the first rectangle until the lower edge overlays the top edge of the first rectangle. (Note: When the spinning animation effect is created later for these rectangles, the spin will center where the edges of the rectangles meet.)Press and hold CTRL, and then select both rectangles. On the Home tab, in the Drawing group, click Arrange, and do the following:Point to Align, and then click Align Selected Objects.Point to Align, and then click Align Center.Click Group. On the slide, drag the group until it is centered horizontally on the left edge of the slide (straddling the edge).On the Home tab, in the Drawing group, click Arrange, point to Align, and then do the following:Click Align to Slide.Click Align Middle.To reproduce the dashed arc on this slide, do the following:On the Home tab, in the Drawing group, click Shapes, and then under Basic Shapes click Arc (third row, 12th option from the left). On the slide, drag to draw an arc.Select the arc. Under Drawing Tools, on the Format tab, in the Size group, do the following:In the Shape Height box, enter 7.5”.In the Shape Width box, enter 7.5”.With the arc still selected, on the Home tab, in the Drawing group, click the arrow next to Shape Outline,and then do the following:Under Theme Colors, click White, Background 1, Darker 15% (third row, first option from the left).Point to Dashes, and then click Dash (fourth option from the top).On the slide, drag the yellow diamond adjustment handle on the right side of the arc to the bottom of the arc to create a half circle.Drag the arc until the yellow diamond adjustment handles are on the left edge of the slide.With the arc still selected, on the Home tab, in the Drawing group, click Arrange, point to Align, and then do the following:Click Align to Slide. Click Align Middle. To reproduce the half circle on this slide, do the following:On the slide, select the arc. On the Home tab, in the Clipboard group, click the arrow under Paste, and then click Duplicate.Select the duplicate arc. Under Drawing Tools, on the Format tab, in the Size group, do the following:In the Shape Height box, enter 3.33”.In the Shape Width box, enter 3.33”.With the second arc still selected, under Drawing Tools, on the Format tab, in the Shape Styles group, click the arrow next to Shape Fill, and then under Theme Colors click White, Background 1, Darker 5% (second row, first option from the left).Under Drawing Tools, on the Format tab, in the Shape Styles group, click the arrow next to Shape Outline,and then click No Outline.Under Drawing Tools, on the Format tab, in the Shape Styles group, click Shape Effects, point to Shadow, and then click ShadowOptions. In the Format Shape dialog box, click Shadow in the left pane. In the Shadow pane, click the button next to Presets, under Inner click Inside Right (second row, third option from the left), and then do the following:In the Transparency box, enter 86%.In the Blur box, enter 24 pt.In the Angle box, enter 315°.In the Distance box, enter 4 pt.On the slide, drag the second arc until the yellow diamond adjustment handles are on the left edge of the slide. On the Home tab, in the Drawing group, click Arrange, and then do the following:Point to Align, and then click Align to Slide. Point to Align, and then click Align Middle. Click Send to Back.To reproduce the button shapes on this slide, do the following:On the Home tab, in the Drawing group, click Shapes, and then under Basic Shapes click Oval (first row, second option from the left). On the slide, drag to draw an oval.Select the oval. Under Drawing Tools, on the Format tab, in the Size group, do the following:In the Shape Height box, enter 0.34”.In the Shape Width box, enter 0.34”.Under Drawing Tools, on the Format tab, in the Shape Styles group, click More, and then click Light 1 Outline, Colored Fill – Dark 1 (third row, first option from the left).Under Drawing Tools, on the Format tab, in the bottom right corner of the Shape Styles group, click the Format Shape dialog box launcher. In the Format Shape dialog box, click Fill in the left pane. In the Fill pane, select Solid Fill. Click the button next to Color, and then under Theme Colors click Olive Green, Accent 3, Lighter 80°(second row, seventh option from the left).Also in the Format Shape dialog box, click Line Color in the left pane. In the Line Color pane, select No line. Also in the Format Shape dialog box, click Shadow in the left pane. In the Shadow pane, click the button next to Presets, under Outer click Offset Bottom (first row, second option from the left), and then do the following:In the Transparency box, enter 0%.In the Size box, enter 100%.In the Blur box, enter 8.5 pt.In the Angle box, enter 90°.In the Distance box, enter 1 pt.Also in the Format Shape dialog box, click 3-D Format in the left pane, and then do the following in the 3-D Format pane:Under Bevel, click the button next to Top, and then under Bevel click Art Deco (third row, fourth option from the left). Next to Top, in the Width box, enter 5 pt, and in the Height box, enter 5 pt.UnderContour, click the button next to Color, and then under Theme Colors click White, Background 1 (first row, first option from the left). In the Size box, enter 3.5 pt.Under Surface, click the button next to Material, and then under Standard click Matte (first row, first option from the left). Click the button next to Lighting, and then under Neutral click Soft (first row, third option from the left).On the slide, select the oval. Under Drawing Tools, on the Format tab, in the bottom right corner of the Size group, click the Size and Position dialog box launcher. In the Size and Position dialog box, on the Position tab, do the following:In the Horizontal box, enter 2.98”.In the Vertical box, enter 1.5”.Select the oval. On the Home tab, in the Clipboard group, click the arrow under Paste, and then click Duplicate.Select the duplicate oval. Under Drawing Tools, on the Format tab, in the bottom right corner of the Size group, click the Size and Position dialog box launcher. In the Size and Position dialog box, on the Position tab, do the following:In the Horizontal box, enter 3.52”.In the Vertical box, enter 2.98”. Repeat step 9 two more times, for a total of four ovals. Under Drawing Tools, on the Format tab, in the bottom right corner of the Size group, click the Size and Position dialog box launcher. In the Size and Position dialog box, on the Position tab, do the following to position the third and fourth ovals:Select the third oval on the slide, and then enter 3.52” in theHorizontal box and 4.27” in the Vertical box.Select the fourth oval on the slide, and then enter 2.99” in theHorizontal box and 5.66” in the Vertical box.To reproduce the text on this slide, do the following:On the Insert tab, in the Text group, click Text Box, and then on the slide, drag to draw the text box. Enter text in the text box and select the text. On the Home tab, in the Font group, do the following: In the Font list, select Corbel.In the Font Size list, select 22.Click the arrow next to Font Color, and then under Theme Colors click White, Background 1, Darker 50% (sixth row, first option from the left).On the Home tab, in the Paragraph group, click Align Text Left to align the text left in the text box.On the slide, drag the text box to the right of the first oval.Select the text box. On the Home tab, in the Clipboard group, click the arrow under Paste, and then click Duplicate. Click in the text box and edit the text. Drag the second text box to the right of the second oval.Repeat steps 5-7 to create the third and fourth text boxes, dragging them to the right of the third and fourth ovals. To reproduce the animation effects on this slide, do the following:On the Animations tab, in the Animations group, click Custom Animation.On the Home tab, in the Editing group, click Select, and then click Selection Pane. In the Selection and Visibility pane, select the rectangle group. In the CustomAnimation task pane, do the following:Click AddEffect, point to Emphasis, and then click More Effects. In the Add Emphasis Effect dialog box, under Basic, click Spin. Select the animation effect (spin effect for the rectangle group). Under Modify: Spin, do the following:In theStart list, selectWith Previous. In the Amount list, in the Custom box, enter 123°,and then press ENTER. Also in the Amount list, clickCounterclockwise.In the Speedlist, select Fast. On the slide, select the first oval. In the CustomAnimation task pane, do the following:Click AddEffect, point to Emphasis, and then click More Effects. In the Add Emphasis Effect dialog box, under Basic, click Change Fill Color. Select the second animation effect (change fill color effect for the first oval). Under Modify: Change Fill Color, do the following:In the Startlist, select After Previous. In the Fill Color list, click More Colors. In the Colors dialog box, on the Custom tab, enter values for Red: 130, Green: 153, Blue: 117. In the Speedlist, select Very Fast.On the slide, select the first text box. In the CustomAnimation task pane, do the following:Click Add Effect, point to Entrance,and then click More Effects. In the Add Entrance Effect dialog box, under Subtle, clickFade. Select the third animation effect (fade effect for the first text box). Under Modify: Fade, do the following:In theStart list, selectWith Previous.In the Speed list, select Very Fast. In the Selection and Visibility pane, select the rectangle group. In the CustomAnimation task pane, do the following:Click AddEffect, point to Emphasis, and then click More Effects. In the Add Emphasis Effect dialog box, under Basic, click Spin. Select the fourth animation effect (spin effect for the rectangle group). Under Modify: Spin, do the following:In theStart list, selectOn Click. In the Amount list, in the Custom box, enter 22°, and then press ENTER. Also in the Amount list, click Clockwise.In the Speed list, select Very Fast.On the slide, select the second oval. In the CustomAnimation task pane, do the following:Click AddEffect, point to Emphasis, and then click More Effects. In the Add Emphasis Effect dialog box, under Basic, click Change Fill Color. Select the fifth animation effect (change fill color effect for the second oval). Under Modify: Change Fill Color, do the following:In the Startlist, select After Previous. In the Fill Color list, click More Colors. In the Colors dialog box, on the Custom tab, enter values for Red: 130, Green: 153, Blue: 117. In the Speedlist, select Very Fast.On the slide, select the second text box. In the CustomAnimation task pane, do the following:Click Add Effect, point to Entrance and then click More Effects. In the Add Entrance Effect dialog box, under Subtle, clickFade. Select the sixth animation effect (fade effect for the second text box). Under Modify: Fade, do the following:In theStart list, selectWith Previous.In the Speed list, select Very Fast. On the slide, select the third oval. In the CustomAnimation task pane, do the following:Click AddEffect, point to Emphasis, and then click More Effects. In the Add Emphasis Effect dialog box, under Basic, click Change Fill Color. Select the seventh animation effect (change fill color effect for the third oval). Under Modify: Change Fill Color, do the following:In the Startlist, select After Previous. In the Fill Color list, click More Colors. In the Colors dialog box, on the Custom tab, enter values for Red: 130, Green: 153, Blue: 117. In the Speedlist, select Very Fast.On the slide, select the third text box. In the CustomAnimation task pane, do the following:Click Add Effect, point to Entrance and then click More Effects. In the Add Entrance Effect dialog box, under Subtle, clickFade. Select the eighth animation effect (fade effect for the third text box). Under Modify: Fade, do the following:In theStart list, selectWith Previous.In the Speed list, select Very Fast. On the slide, select the fourth oval. In the CustomAnimation task pane, do the following:Click AddEffect, point to Emphasis, and then click More Effects. In the Add Emphasis Effect dialog box, under Basic, click Change Fill Color. Select the ninth animation effect (change fill color effect for the fourth oval). Under Modify: Change Fill Color, do the following:In the Startlist, select After Previous. In the Fill Color list, click More Colors. In the Colors dialog box, on the Custom tab, enter values for Red: 130, Green: 153, Blue: 117. In the Speedlist, select Very Fast.On the slide, select the fourth text box. In the CustomAnimation task pane, do the following:Click Add Effect, point to Entrance,and then click More Effects. In the Add Entrance Effect dialog box, under Subtle, clickFade. Select the 10th animation effect (fade effect for the fourth text box). Under Modify: Fade, do the following:In theStart list, selectWith Previous.In the Speed list, select Very Fast.
- Custom animation effects: object spins on end(Advanced)To reproduce the background effects on this slide, do the following:On the Home tab, in theSlides group, click Layout, and then click Blank.Right-click the slide background area, and then click Format Background. In the Format Background dialog box, click Fill in the left pane, and then select Solid fill in the Fill pane. Click the button next to Color, and then under Theme Colors click White, Background 1 (first row, first option from the left).To reproduce the rectangle on this slide, do the following:On the Home tab, in the Drawing group, click Shapes, and then under Rectangles click Rounded Rectangle (second option from the left). On the slide, drag to draw a rounded rectangle.Select the rectangle. Drag the yellow diamond adjustment handle to the left to decrease the amount of rounding on the corners. With the rounded rectangle still selected, under Drawing Tools, on the Format tab, in the Size group, do the following:In the Shape Height box, enter 3.5”.In the Shape Width box, enter 0.25”.Under Drawing Tools, on the Format tab, in the bottom right corner of the Shape Styles group, click the Format Shape dialog box launcher. In the Format Shape dialog box, click Fill in the left pane. In the Fill pane, select Solid fill, click the button next to Color, and then under Theme Colors click White, Background 1, Darker 15% (third row, first option from the left).Also in the Format Shape dialog box, click Line Color in the left pane. In the Line Color pane, select No line. Also in the Format Shape dialog box, click Shadow in the left pane. In the Shadow pane, click the button next to Presets, under Outer select Offset Bottom (first row, second option from the left), and then do the following:In the Transparency box, enter 0%.In the Sizebox, enter 100%.In the Blur box, enter 8.5 pt.In the Angle box, enter 90°.In the Distance box, enter 1 pt.Also in the Format Shape dialog box, click 3-D Format in the left pane. In the 3-D Format pane, do the following:Under Bevel, click the button next to Top, and then under Bevel click Circle (first row, first option from the left). Next to Top, in the Width box, enter 5 pt, and in the Height box, enter 5 pt.Under Surface, click the button next to Material, and then under Standard clickMatte (first row, first option from the left).Click the button next to Lighting, and then under Neutral click Soft (first row, third option from the left).On the slide, select the rounded rectangle. On the Home tab, in the Clipboard group, click the arrow under Paste, and then click Duplicate.Select the duplicate rectangle. On the Home tab, in the Drawing group, do the following:Click the arrow next to Shape Fill, and then click No Fill.Click the arrow next to Shape Outline, and then click No Outline.Drag the second rectangle above the first rectangle until the lower edge overlays the top edge of the first rectangle. (Note: When the spinning animation effect is created later for these rectangles, the spin will center where the edges of the rectangles meet.)Press and hold CTRL, and then select both rectangles. On the Home tab, in the Drawing group, click Arrange, and do the following:Point to Align, and then click Align Selected Objects.Point to Align, and then click Align Center.Click Group. On the slide, drag the group until it is centered horizontally on the left edge of the slide (straddling the edge).On the Home tab, in the Drawing group, click Arrange, point to Align, and then do the following:Click Align to Slide.Click Align Middle.To reproduce the dashed arc on this slide, do the following:On the Home tab, in the Drawing group, click Shapes, and then under Basic Shapes click Arc (third row, 12th option from the left). On the slide, drag to draw an arc.Select the arc. Under Drawing Tools, on the Format tab, in the Size group, do the following:In the Shape Height box, enter 7.5”.In the Shape Width box, enter 7.5”.With the arc still selected, on the Home tab, in the Drawing group, click the arrow next to Shape Outline,and then do the following:Under Theme Colors, click White, Background 1, Darker 15% (third row, first option from the left).Point to Dashes, and then click Dash (fourth option from the top).On the slide, drag the yellow diamond adjustment handle on the right side of the arc to the bottom of the arc to create a half circle.Drag the arc until the yellow diamond adjustment handles are on the left edge of the slide.With the arc still selected, on the Home tab, in the Drawing group, click Arrange, point to Align, and then do the following:Click Align to Slide. Click Align Middle. To reproduce the half circle on this slide, do the following:On the slide, select the arc. On the Home tab, in the Clipboard group, click the arrow under Paste, and then click Duplicate.Select the duplicate arc. Under Drawing Tools, on the Format tab, in the Size group, do the following:In the Shape Height box, enter 3.33”.In the Shape Width box, enter 3.33”.With the second arc still selected, under Drawing Tools, on the Format tab, in the Shape Styles group, click the arrow next to Shape Fill, and then under Theme Colors click White, Background 1, Darker 5% (second row, first option from the left).Under Drawing Tools, on the Format tab, in the Shape Styles group, click the arrow next to Shape Outline,and then click No Outline.Under Drawing Tools, on the Format tab, in the Shape Styles group, click Shape Effects, point to Shadow, and then click ShadowOptions. In the Format Shape dialog box, click Shadow in the left pane. In the Shadow pane, click the button next to Presets, under Inner click Inside Right (second row, third option from the left), and then do the following:In the Transparency box, enter 86%.In the Blur box, enter 24 pt.In the Angle box, enter 315°.In the Distance box, enter 4 pt.On the slide, drag the second arc until the yellow diamond adjustment handles are on the left edge of the slide. On the Home tab, in the Drawing group, click Arrange, and then do the following:Point to Align, and then click Align to Slide. Point to Align, and then click Align Middle. Click Send to Back.To reproduce the button shapes on this slide, do the following:On the Home tab, in the Drawing group, click Shapes, and then under Basic Shapes click Oval (first row, second option from the left). On the slide, drag to draw an oval.Select the oval. Under Drawing Tools, on the Format tab, in the Size group, do the following:In the Shape Height box, enter 0.34”.In the Shape Width box, enter 0.34”.Under Drawing Tools, on the Format tab, in the Shape Styles group, click More, and then click Light 1 Outline, Colored Fill – Dark 1 (third row, first option from the left).Under Drawing Tools, on the Format tab, in the bottom right corner of the Shape Styles group, click the Format Shape dialog box launcher. In the Format Shape dialog box, click Fill in the left pane. In the Fill pane, select Solid Fill. Click the button next to Color, and then under Theme Colors click Olive Green, Accent 3, Lighter 80°(second row, seventh option from the left).Also in the Format Shape dialog box, click Line Color in the left pane. In the Line Color pane, select No line. Also in the Format Shape dialog box, click Shadow in the left pane. In the Shadow pane, click the button next to Presets, under Outer click Offset Bottom (first row, second option from the left), and then do the following:In the Transparency box, enter 0%.In the Size box, enter 100%.In the Blur box, enter 8.5 pt.In the Angle box, enter 90°.In the Distance box, enter 1 pt.Also in the Format Shape dialog box, click 3-D Format in the left pane, and then do the following in the 3-D Format pane:Under Bevel, click the button next to Top, and then under Bevel click Art Deco (third row, fourth option from the left). Next to Top, in the Width box, enter 5 pt, and in the Height box, enter 5 pt.UnderContour, click the button next to Color, and then under Theme Colors click White, Background 1 (first row, first option from the left). In the Size box, enter 3.5 pt.Under Surface, click the button next to Material, and then under Standard click Matte (first row, first option from the left). Click the button next to Lighting, and then under Neutral click Soft (first row, third option from the left).On the slide, select the oval. Under Drawing Tools, on the Format tab, in the bottom right corner of the Size group, click the Size and Position dialog box launcher. In the Size and Position dialog box, on the Position tab, do the following:In the Horizontal box, enter 2.98”.In the Vertical box, enter 1.5”.Select the oval. On the Home tab, in the Clipboard group, click the arrow under Paste, and then click Duplicate.Select the duplicate oval. Under Drawing Tools, on the Format tab, in the bottom right corner of the Size group, click the Size and Position dialog box launcher. In the Size and Position dialog box, on the Position tab, do the following:In the Horizontal box, enter 3.52”.In the Vertical box, enter 2.98”. Repeat step 9 two more times, for a total of four ovals. Under Drawing Tools, on the Format tab, in the bottom right corner of the Size group, click the Size and Position dialog box launcher. In the Size and Position dialog box, on the Position tab, do the following to position the third and fourth ovals:Select the third oval on the slide, and then enter 3.52” in theHorizontal box and 4.27” in the Vertical box.Select the fourth oval on the slide, and then enter 2.99” in theHorizontal box and 5.66” in the Vertical box.To reproduce the text on this slide, do the following:On the Insert tab, in the Text group, click Text Box, and then on the slide, drag to draw the text box. Enter text in the text box and select the text. On the Home tab, in the Font group, do the following: In the Font list, select Corbel.In the Font Size list, select 22.Click the arrow next to Font Color, and then under Theme Colors click White, Background 1, Darker 50% (sixth row, first option from the left).On the Home tab, in the Paragraph group, click Align Text Left to align the text left in the text box.On the slide, drag the text box to the right of the first oval.Select the text box. On the Home tab, in the Clipboard group, click the arrow under Paste, and then click Duplicate. Click in the text box and edit the text. Drag the second text box to the right of the second oval.Repeat steps 5-7 to create the third and fourth text boxes, dragging them to the right of the third and fourth ovals. To reproduce the animation effects on this slide, do the following:On the Animations tab, in the Animations group, click Custom Animation.On the Home tab, in the Editing group, click Select, and then click Selection Pane. In the Selection and Visibility pane, select the rectangle group. In the CustomAnimation task pane, do the following:Click AddEffect, point to Emphasis, and then click More Effects. In the Add Emphasis Effect dialog box, under Basic, click Spin. Select the animation effect (spin effect for the rectangle group). Under Modify: Spin, do the following:In theStart list, selectWith Previous. In the Amount list, in the Custom box, enter 123°,and then press ENTER. Also in the Amount list, clickCounterclockwise.In the Speedlist, select Fast. On the slide, select the first oval. In the CustomAnimation task pane, do the following:Click AddEffect, point to Emphasis, and then click More Effects. In the Add Emphasis Effect dialog box, under Basic, click Change Fill Color. Select the second animation effect (change fill color effect for the first oval). Under Modify: Change Fill Color, do the following:In the Startlist, select After Previous. In the Fill Color list, click More Colors. In the Colors dialog box, on the Custom tab, enter values for Red: 130, Green: 153, Blue: 117. In the Speedlist, select Very Fast.On the slide, select the first text box. In the CustomAnimation task pane, do the following:Click Add Effect, point to Entrance,and then click More Effects. In the Add Entrance Effect dialog box, under Subtle, clickFade. Select the third animation effect (fade effect for the first text box). Under Modify: Fade, do the following:In theStart list, selectWith Previous.In the Speed list, select Very Fast. In the Selection and Visibility pane, select the rectangle group. In the CustomAnimation task pane, do the following:Click AddEffect, point to Emphasis, and then click More Effects. In the Add Emphasis Effect dialog box, under Basic, click Spin. Select the fourth animation effect (spin effect for the rectangle group). Under Modify: Spin, do the following:In theStart list, selectOn Click. In the Amount list, in the Custom box, enter 22°, and then press ENTER. Also in the Amount list, click Clockwise.In the Speed list, select Very Fast.On the slide, select the second oval. In the CustomAnimation task pane, do the following:Click AddEffect, point to Emphasis, and then click More Effects. In the Add Emphasis Effect dialog box, under Basic, click Change Fill Color. Select the fifth animation effect (change fill color effect for the second oval). Under Modify: Change Fill Color, do the following:In the Startlist, select After Previous. In the Fill Color list, click More Colors. In the Colors dialog box, on the Custom tab, enter values for Red: 130, Green: 153, Blue: 117. In the Speedlist, select Very Fast.On the slide, select the second text box. In the CustomAnimation task pane, do the following:Click Add Effect, point to Entrance and then click More Effects. In the Add Entrance Effect dialog box, under Subtle, clickFade. Select the sixth animation effect (fade effect for the second text box). Under Modify: Fade, do the following:In theStart list, selectWith Previous.In the Speed list, select Very Fast. On the slide, select the third oval. In the CustomAnimation task pane, do the following:Click AddEffect, point to Emphasis, and then click More Effects. In the Add Emphasis Effect dialog box, under Basic, click Change Fill Color. Select the seventh animation effect (change fill color effect for the third oval). Under Modify: Change Fill Color, do the following:In the Startlist, select After Previous. In the Fill Color list, click More Colors. In the Colors dialog box, on the Custom tab, enter values for Red: 130, Green: 153, Blue: 117. In the Speedlist, select Very Fast.On the slide, select the third text box. In the CustomAnimation task pane, do the following:Click Add Effect, point to Entrance and then click More Effects. In the Add Entrance Effect dialog box, under Subtle, clickFade. Select the eighth animation effect (fade effect for the third text box). Under Modify: Fade, do the following:In theStart list, selectWith Previous.In the Speed list, select Very Fast. On the slide, select the fourth oval. In the CustomAnimation task pane, do the following:Click AddEffect, point to Emphasis, and then click More Effects. In the Add Emphasis Effect dialog box, under Basic, click Change Fill Color. Select the ninth animation effect (change fill color effect for the fourth oval). Under Modify: Change Fill Color, do the following:In the Startlist, select After Previous. In the Fill Color list, click More Colors. In the Colors dialog box, on the Custom tab, enter values for Red: 130, Green: 153, Blue: 117. In the Speedlist, select Very Fast.On the slide, select the fourth text box. In the CustomAnimation task pane, do the following:Click Add Effect, point to Entrance,and then click More Effects. In the Add Entrance Effect dialog box, under Subtle, clickFade. Select the 10th animation effect (fade effect for the fourth text box). Under Modify: Fade, do the following:In theStart list, selectWith Previous.In the Speed list, select Very Fast.
- Custom animation effects: object spins on end(Advanced)To reproduce the background effects on this slide, do the following:On the Home tab, in theSlides group, click Layout, and then click Blank.Right-click the slide background area, and then click Format Background. In the Format Background dialog box, click Fill in the left pane, and then select Solid fill in the Fill pane. Click the button next to Color, and then under Theme Colors click White, Background 1 (first row, first option from the left).To reproduce the rectangle on this slide, do the following:On the Home tab, in the Drawing group, click Shapes, and then under Rectangles click Rounded Rectangle (second option from the left). On the slide, drag to draw a rounded rectangle.Select the rectangle. Drag the yellow diamond adjustment handle to the left to decrease the amount of rounding on the corners. With the rounded rectangle still selected, under Drawing Tools, on the Format tab, in the Size group, do the following:In the Shape Height box, enter 3.5”.In the Shape Width box, enter 0.25”.Under Drawing Tools, on the Format tab, in the bottom right corner of the Shape Styles group, click the Format Shape dialog box launcher. In the Format Shape dialog box, click Fill in the left pane. In the Fill pane, select Solid fill, click the button next to Color, and then under Theme Colors click White, Background 1, Darker 15% (third row, first option from the left).Also in the Format Shape dialog box, click Line Color in the left pane. In the Line Color pane, select No line. Also in the Format Shape dialog box, click Shadow in the left pane. In the Shadow pane, click the button next to Presets, under Outer select Offset Bottom (first row, second option from the left), and then do the following:In the Transparency box, enter 0%.In the Sizebox, enter 100%.In the Blur box, enter 8.5 pt.In the Angle box, enter 90°.In the Distance box, enter 1 pt.Also in the Format Shape dialog box, click 3-D Format in the left pane. In the 3-D Format pane, do the following:Under Bevel, click the button next to Top, and then under Bevel click Circle (first row, first option from the left). Next to Top, in the Width box, enter 5 pt, and in the Height box, enter 5 pt.Under Surface, click the button next to Material, and then under Standard clickMatte (first row, first option from the left).Click the button next to Lighting, and then under Neutral click Soft (first row, third option from the left).On the slide, select the rounded rectangle. On the Home tab, in the Clipboard group, click the arrow under Paste, and then click Duplicate.Select the duplicate rectangle. On the Home tab, in the Drawing group, do the following:Click the arrow next to Shape Fill, and then click No Fill.Click the arrow next to Shape Outline, and then click No Outline.Drag the second rectangle above the first rectangle until the lower edge overlays the top edge of the first rectangle. (Note: When the spinning animation effect is created later for these rectangles, the spin will center where the edges of the rectangles meet.)Press and hold CTRL, and then select both rectangles. On the Home tab, in the Drawing group, click Arrange, and do the following:Point to Align, and then click Align Selected Objects.Point to Align, and then click Align Center.Click Group. On the slide, drag the group until it is centered horizontally on the left edge of the slide (straddling the edge).On the Home tab, in the Drawing group, click Arrange, point to Align, and then do the following:Click Align to Slide.Click Align Middle.To reproduce the dashed arc on this slide, do the following:On the Home tab, in the Drawing group, click Shapes, and then under Basic Shapes click Arc (third row, 12th option from the left). On the slide, drag to draw an arc.Select the arc. Under Drawing Tools, on the Format tab, in the Size group, do the following:In the Shape Height box, enter 7.5”.In the Shape Width box, enter 7.5”.With the arc still selected, on the Home tab, in the Drawing group, click the arrow next to Shape Outline,and then do the following:Under Theme Colors, click White, Background 1, Darker 15% (third row, first option from the left).Point to Dashes, and then click Dash (fourth option from the top).On the slide, drag the yellow diamond adjustment handle on the right side of the arc to the bottom of the arc to create a half circle.Drag the arc until the yellow diamond adjustment handles are on the left edge of the slide.With the arc still selected, on the Home tab, in the Drawing group, click Arrange, point to Align, and then do the following:Click Align to Slide. Click Align Middle. To reproduce the half circle on this slide, do the following:On the slide, select the arc. On the Home tab, in the Clipboard group, click the arrow under Paste, and then click Duplicate.Select the duplicate arc. Under Drawing Tools, on the Format tab, in the Size group, do the following:In the Shape Height box, enter 3.33”.In the Shape Width box, enter 3.33”.With the second arc still selected, under Drawing Tools, on the Format tab, in the Shape Styles group, click the arrow next to Shape Fill, and then under Theme Colors click White, Background 1, Darker 5% (second row, first option from the left).Under Drawing Tools, on the Format tab, in the Shape Styles group, click the arrow next to Shape Outline,and then click No Outline.Under Drawing Tools, on the Format tab, in the Shape Styles group, click Shape Effects, point to Shadow, and then click ShadowOptions. In the Format Shape dialog box, click Shadow in the left pane. In the Shadow pane, click the button next to Presets, under Inner click Inside Right (second row, third option from the left), and then do the following:In the Transparency box, enter 86%.In the Blur box, enter 24 pt.In the Angle box, enter 315°.In the Distance box, enter 4 pt.On the slide, drag the second arc until the yellow diamond adjustment handles are on the left edge of the slide. On the Home tab, in the Drawing group, click Arrange, and then do the following:Point to Align, and then click Align to Slide. Point to Align, and then click Align Middle. Click Send to Back.To reproduce the button shapes on this slide, do the following:On the Home tab, in the Drawing group, click Shapes, and then under Basic Shapes click Oval (first row, second option from the left). On the slide, drag to draw an oval.Select the oval. Under Drawing Tools, on the Format tab, in the Size group, do the following:In the Shape Height box, enter 0.34”.In the Shape Width box, enter 0.34”.Under Drawing Tools, on the Format tab, in the Shape Styles group, click More, and then click Light 1 Outline, Colored Fill – Dark 1 (third row, first option from the left).Under Drawing Tools, on the Format tab, in the bottom right corner of the Shape Styles group, click the Format Shape dialog box launcher. In the Format Shape dialog box, click Fill in the left pane. In the Fill pane, select Solid Fill. Click the button next to Color, and then under Theme Colors click Olive Green, Accent 3, Lighter 80°(second row, seventh option from the left).Also in the Format Shape dialog box, click Line Color in the left pane. In the Line Color pane, select No line. Also in the Format Shape dialog box, click Shadow in the left pane. In the Shadow pane, click the button next to Presets, under Outer click Offset Bottom (first row, second option from the left), and then do the following:In the Transparency box, enter 0%.In the Size box, enter 100%.In the Blur box, enter 8.5 pt.In the Angle box, enter 90°.In the Distance box, enter 1 pt.Also in the Format Shape dialog box, click 3-D Format in the left pane, and then do the following in the 3-D Format pane:Under Bevel, click the button next to Top, and then under Bevel click Art Deco (third row, fourth option from the left). Next to Top, in the Width box, enter 5 pt, and in the Height box, enter 5 pt.UnderContour, click the button next to Color, and then under Theme Colors click White, Background 1 (first row, first option from the left). In the Size box, enter 3.5 pt.Under Surface, click the button next to Material, and then under Standard click Matte (first row, first option from the left). Click the button next to Lighting, and then under Neutral click Soft (first row, third option from the left).On the slide, select the oval. Under Drawing Tools, on the Format tab, in the bottom right corner of the Size group, click the Size and Position dialog box launcher. In the Size and Position dialog box, on the Position tab, do the following:In the Horizontal box, enter 2.98”.In the Vertical box, enter 1.5”.Select the oval. On the Home tab, in the Clipboard group, click the arrow under Paste, and then click Duplicate.Select the duplicate oval. Under Drawing Tools, on the Format tab, in the bottom right corner of the Size group, click the Size and Position dialog box launcher. In the Size and Position dialog box, on the Position tab, do the following:In the Horizontal box, enter 3.52”.In the Vertical box, enter 2.98”. Repeat step 9 two more times, for a total of four ovals. Under Drawing Tools, on the Format tab, in the bottom right corner of the Size group, click the Size and Position dialog box launcher. In the Size and Position dialog box, on the Position tab, do the following to position the third and fourth ovals:Select the third oval on the slide, and then enter 3.52” in theHorizontal box and 4.27” in the Vertical box.Select the fourth oval on the slide, and then enter 2.99” in theHorizontal box and 5.66” in the Vertical box.To reproduce the text on this slide, do the following:On the Insert tab, in the Text group, click Text Box, and then on the slide, drag to draw the text box. Enter text in the text box and select the text. On the Home tab, in the Font group, do the following: In the Font list, select Corbel.In the Font Size list, select 22.Click the arrow next to Font Color, and then under Theme Colors click White, Background 1, Darker 50% (sixth row, first option from the left).On the Home tab, in the Paragraph group, click Align Text Left to align the text left in the text box.On the slide, drag the text box to the right of the first oval.Select the text box. On the Home tab, in the Clipboard group, click the arrow under Paste, and then click Duplicate. Click in the text box and edit the text. Drag the second text box to the right of the second oval.Repeat steps 5-7 to create the third and fourth text boxes, dragging them to the right of the third and fourth ovals. To reproduce the animation effects on this slide, do the following:On the Animations tab, in the Animations group, click Custom Animation.On the Home tab, in the Editing group, click Select, and then click Selection Pane. In the Selection and Visibility pane, select the rectangle group. In the CustomAnimation task pane, do the following:Click AddEffect, point to Emphasis, and then click More Effects. In the Add Emphasis Effect dialog box, under Basic, click Spin. Select the animation effect (spin effect for the rectangle group). Under Modify: Spin, do the following:In theStart list, selectWith Previous. In the Amount list, in the Custom box, enter 123°,and then press ENTER. Also in the Amount list, clickCounterclockwise.In the Speedlist, select Fast. On the slide, select the first oval. In the CustomAnimation task pane, do the following:Click AddEffect, point to Emphasis, and then click More Effects. In the Add Emphasis Effect dialog box, under Basic, click Change Fill Color. Select the second animation effect (change fill color effect for the first oval). Under Modify: Change Fill Color, do the following:In the Startlist, select After Previous. In the Fill Color list, click More Colors. In the Colors dialog box, on the Custom tab, enter values for Red: 130, Green: 153, Blue: 117. In the Speedlist, select Very Fast.On the slide, select the first text box. In the CustomAnimation task pane, do the following:Click Add Effect, point to Entrance,and then click More Effects. In the Add Entrance Effect dialog box, under Subtle, clickFade. Select the third animation effect (fade effect for the first text box). Under Modify: Fade, do the following:In theStart list, selectWith Previous.In the Speed list, select Very Fast. In the Selection and Visibility pane, select the rectangle group. In the CustomAnimation task pane, do the following:Click AddEffect, point to Emphasis, and then click More Effects. In the Add Emphasis Effect dialog box, under Basic, click Spin. Select the fourth animation effect (spin effect for the rectangle group). Under Modify: Spin, do the following:In theStart list, selectOn Click. In the Amount list, in the Custom box, enter 22°, and then press ENTER. Also in the Amount list, click Clockwise.In the Speed list, select Very Fast.On the slide, select the second oval. In the CustomAnimation task pane, do the following:Click AddEffect, point to Emphasis, and then click More Effects. In the Add Emphasis Effect dialog box, under Basic, click Change Fill Color. Select the fifth animation effect (change fill color effect for the second oval). Under Modify: Change Fill Color, do the following:In the Startlist, select After Previous. In the Fill Color list, click More Colors. In the Colors dialog box, on the Custom tab, enter values for Red: 130, Green: 153, Blue: 117. In the Speedlist, select Very Fast.On the slide, select the second text box. In the CustomAnimation task pane, do the following:Click Add Effect, point to Entrance and then click More Effects. In the Add Entrance Effect dialog box, under Subtle, clickFade. Select the sixth animation effect (fade effect for the second text box). Under Modify: Fade, do the following:In theStart list, selectWith Previous.In the Speed list, select Very Fast. On the slide, select the third oval. In the CustomAnimation task pane, do the following:Click AddEffect, point to Emphasis, and then click More Effects. In the Add Emphasis Effect dialog box, under Basic, click Change Fill Color. Select the seventh animation effect (change fill color effect for the third oval). Under Modify: Change Fill Color, do the following:In the Startlist, select After Previous. In the Fill Color list, click More Colors. In the Colors dialog box, on the Custom tab, enter values for Red: 130, Green: 153, Blue: 117. In the Speedlist, select Very Fast.On the slide, select the third text box. In the CustomAnimation task pane, do the following:Click Add Effect, point to Entrance and then click More Effects. In the Add Entrance Effect dialog box, under Subtle, clickFade. Select the eighth animation effect (fade effect for the third text box). Under Modify: Fade, do the following:In theStart list, selectWith Previous.In the Speed list, select Very Fast. On the slide, select the fourth oval. In the CustomAnimation task pane, do the following:Click AddEffect, point to Emphasis, and then click More Effects. In the Add Emphasis Effect dialog box, under Basic, click Change Fill Color. Select the ninth animation effect (change fill color effect for the fourth oval). Under Modify: Change Fill Color, do the following:In the Startlist, select After Previous. In the Fill Color list, click More Colors. In the Colors dialog box, on the Custom tab, enter values for Red: 130, Green: 153, Blue: 117. In the Speedlist, select Very Fast.On the slide, select the fourth text box. In the CustomAnimation task pane, do the following:Click Add Effect, point to Entrance,and then click More Effects. In the Add Entrance Effect dialog box, under Subtle, clickFade. Select the 10th animation effect (fade effect for the fourth text box). Under Modify: Fade, do the following:In theStart list, selectWith Previous.In the Speed list, select Very Fast.
- Custom animation effects: object spins on end(Advanced)To reproduce the background effects on this slide, do the following:On the Home tab, in theSlides group, click Layout, and then click Blank.Right-click the slide background area, and then click Format Background. In the Format Background dialog box, click Fill in the left pane, and then select Solid fill in the Fill pane. Click the button next to Color, and then under Theme Colors click White, Background 1 (first row, first option from the left).To reproduce the rectangle on this slide, do the following:On the Home tab, in the Drawing group, click Shapes, and then under Rectangles click Rounded Rectangle (second option from the left). On the slide, drag to draw a rounded rectangle.Select the rectangle. Drag the yellow diamond adjustment handle to the left to decrease the amount of rounding on the corners. With the rounded rectangle still selected, under Drawing Tools, on the Format tab, in the Size group, do the following:In the Shape Height box, enter 3.5”.In the Shape Width box, enter 0.25”.Under Drawing Tools, on the Format tab, in the bottom right corner of the Shape Styles group, click the Format Shape dialog box launcher. In the Format Shape dialog box, click Fill in the left pane. In the Fill pane, select Solid fill, click the button next to Color, and then under Theme Colors click White, Background 1, Darker 15% (third row, first option from the left).Also in the Format Shape dialog box, click Line Color in the left pane. In the Line Color pane, select No line. Also in the Format Shape dialog box, click Shadow in the left pane. In the Shadow pane, click the button next to Presets, under Outer select Offset Bottom (first row, second option from the left), and then do the following:In the Transparency box, enter 0%.In the Sizebox, enter 100%.In the Blur box, enter 8.5 pt.In the Angle box, enter 90°.In the Distance box, enter 1 pt.Also in the Format Shape dialog box, click 3-D Format in the left pane. In the 3-D Format pane, do the following:Under Bevel, click the button next to Top, and then under Bevel click Circle (first row, first option from the left). Next to Top, in the Width box, enter 5 pt, and in the Height box, enter 5 pt.Under Surface, click the button next to Material, and then under Standard clickMatte (first row, first option from the left).Click the button next to Lighting, and then under Neutral click Soft (first row, third option from the left).On the slide, select the rounded rectangle. On the Home tab, in the Clipboard group, click the arrow under Paste, and then click Duplicate.Select the duplicate rectangle. On the Home tab, in the Drawing group, do the following:Click the arrow next to Shape Fill, and then click No Fill.Click the arrow next to Shape Outline, and then click No Outline.Drag the second rectangle above the first rectangle until the lower edge overlays the top edge of the first rectangle. (Note: When the spinning animation effect is created later for these rectangles, the spin will center where the edges of the rectangles meet.)Press and hold CTRL, and then select both rectangles. On the Home tab, in the Drawing group, click Arrange, and do the following:Point to Align, and then click Align Selected Objects.Point to Align, and then click Align Center.Click Group. On the slide, drag the group until it is centered horizontally on the left edge of the slide (straddling the edge).On the Home tab, in the Drawing group, click Arrange, point to Align, and then do the following:Click Align to Slide.Click Align Middle.To reproduce the dashed arc on this slide, do the following:On the Home tab, in the Drawing group, click Shapes, and then under Basic Shapes click Arc (third row, 12th option from the left). On the slide, drag to draw an arc.Select the arc. Under Drawing Tools, on the Format tab, in the Size group, do the following:In the Shape Height box, enter 7.5”.In the Shape Width box, enter 7.5”.With the arc still selected, on the Home tab, in the Drawing group, click the arrow next to Shape Outline,and then do the following:Under Theme Colors, click White, Background 1, Darker 15% (third row, first option from the left).Point to Dashes, and then click Dash (fourth option from the top).On the slide, drag the yellow diamond adjustment handle on the right side of the arc to the bottom of the arc to create a half circle.Drag the arc until the yellow diamond adjustment handles are on the left edge of the slide.With the arc still selected, on the Home tab, in the Drawing group, click Arrange, point to Align, and then do the following:Click Align to Slide. Click Align Middle. To reproduce the half circle on this slide, do the following:On the slide, select the arc. On the Home tab, in the Clipboard group, click the arrow under Paste, and then click Duplicate.Select the duplicate arc. Under Drawing Tools, on the Format tab, in the Size group, do the following:In the Shape Height box, enter 3.33”.In the Shape Width box, enter 3.33”.With the second arc still selected, under Drawing Tools, on the Format tab, in the Shape Styles group, click the arrow next to Shape Fill, and then under Theme Colors click White, Background 1, Darker 5% (second row, first option from the left).Under Drawing Tools, on the Format tab, in the Shape Styles group, click the arrow next to Shape Outline,and then click No Outline.Under Drawing Tools, on the Format tab, in the Shape Styles group, click Shape Effects, point to Shadow, and then click ShadowOptions. In the Format Shape dialog box, click Shadow in the left pane. In the Shadow pane, click the button next to Presets, under Inner click Inside Right (second row, third option from the left), and then do the following:In the Transparency box, enter 86%.In the Blur box, enter 24 pt.In the Angle box, enter 315°.In the Distance box, enter 4 pt.On the slide, drag the second arc until the yellow diamond adjustment handles are on the left edge of the slide. On the Home tab, in the Drawing group, click Arrange, and then do the following:Point to Align, and then click Align to Slide. Point to Align, and then click Align Middle. Click Send to Back.To reproduce the button shapes on this slide, do the following:On the Home tab, in the Drawing group, click Shapes, and then under Basic Shapes click Oval (first row, second option from the left). On the slide, drag to draw an oval.Select the oval. Under Drawing Tools, on the Format tab, in the Size group, do the following:In the Shape Height box, enter 0.34”.In the Shape Width box, enter 0.34”.Under Drawing Tools, on the Format tab, in the Shape Styles group, click More, and then click Light 1 Outline, Colored Fill – Dark 1 (third row, first option from the left).Under Drawing Tools, on the Format tab, in the bottom right corner of the Shape Styles group, click the Format Shape dialog box launcher. In the Format Shape dialog box, click Fill in the left pane. In the Fill pane, select Solid Fill. Click the button next to Color, and then under Theme Colors click Olive Green, Accent 3, Lighter 80°(second row, seventh option from the left).Also in the Format Shape dialog box, click Line Color in the left pane. In the Line Color pane, select No line. Also in the Format Shape dialog box, click Shadow in the left pane. In the Shadow pane, click the button next to Presets, under Outer click Offset Bottom (first row, second option from the left), and then do the following:In the Transparency box, enter 0%.In the Size box, enter 100%.In the Blur box, enter 8.5 pt.In the Angle box, enter 90°.In the Distance box, enter 1 pt.Also in the Format Shape dialog box, click 3-D Format in the left pane, and then do the following in the 3-D Format pane:Under Bevel, click the button next to Top, and then under Bevel click Art Deco (third row, fourth option from the left). Next to Top, in the Width box, enter 5 pt, and in the Height box, enter 5 pt.UnderContour, click the button next to Color, and then under Theme Colors click White, Background 1 (first row, first option from the left). In the Size box, enter 3.5 pt.Under Surface, click the button next to Material, and then under Standard click Matte (first row, first option from the left). Click the button next to Lighting, and then under Neutral click Soft (first row, third option from the left).On the slide, select the oval. Under Drawing Tools, on the Format tab, in the bottom right corner of the Size group, click the Size and Position dialog box launcher. In the Size and Position dialog box, on the Position tab, do the following:In the Horizontal box, enter 2.98”.In the Vertical box, enter 1.5”.Select the oval. On the Home tab, in the Clipboard group, click the arrow under Paste, and then click Duplicate.Select the duplicate oval. Under Drawing Tools, on the Format tab, in the bottom right corner of the Size group, click the Size and Position dialog box launcher. In the Size and Position dialog box, on the Position tab, do the following:In the Horizontal box, enter 3.52”.In the Vertical box, enter 2.98”. Repeat step 9 two more times, for a total of four ovals. Under Drawing Tools, on the Format tab, in the bottom right corner of the Size group, click the Size and Position dialog box launcher. In the Size and Position dialog box, on the Position tab, do the following to position the third and fourth ovals:Select the third oval on the slide, and then enter 3.52” in theHorizontal box and 4.27” in the Vertical box.Select the fourth oval on the slide, and then enter 2.99” in theHorizontal box and 5.66” in the Vertical box.To reproduce the text on this slide, do the following:On the Insert tab, in the Text group, click Text Box, and then on the slide, drag to draw the text box. Enter text in the text box and select the text. On the Home tab, in the Font group, do the following: In the Font list, select Corbel.In the Font Size list, select 22.Click the arrow next to Font Color, and then under Theme Colors click White, Background 1, Darker 50% (sixth row, first option from the left).On the Home tab, in the Paragraph group, click Align Text Left to align the text left in the text box.On the slide, drag the text box to the right of the first oval.Select the text box. On the Home tab, in the Clipboard group, click the arrow under Paste, and then click Duplicate. Click in the text box and edit the text. Drag the second text box to the right of the second oval.Repeat steps 5-7 to create the third and fourth text boxes, dragging them to the right of the third and fourth ovals. To reproduce the animation effects on this slide, do the following:On the Animations tab, in the Animations group, click Custom Animation.On the Home tab, in the Editing group, click Select, and then click Selection Pane. In the Selection and Visibility pane, select the rectangle group. In the CustomAnimation task pane, do the following:Click AddEffect, point to Emphasis, and then click More Effects. In the Add Emphasis Effect dialog box, under Basic, click Spin. Select the animation effect (spin effect for the rectangle group). Under Modify: Spin, do the following:In theStart list, selectWith Previous. In the Amount list, in the Custom box, enter 123°,and then press ENTER. Also in the Amount list, clickCounterclockwise.In the Speedlist, select Fast. On the slide, select the first oval. In the CustomAnimation task pane, do the following:Click AddEffect, point to Emphasis, and then click More Effects. In the Add Emphasis Effect dialog box, under Basic, click Change Fill Color. Select the second animation effect (change fill color effect for the first oval). Under Modify: Change Fill Color, do the following:In the Startlist, select After Previous. In the Fill Color list, click More Colors. In the Colors dialog box, on the Custom tab, enter values for Red: 130, Green: 153, Blue: 117. In the Speedlist, select Very Fast.On the slide, select the first text box. In the CustomAnimation task pane, do the following:Click Add Effect, point to Entrance,and then click More Effects. In the Add Entrance Effect dialog box, under Subtle, clickFade. Select the third animation effect (fade effect for the first text box). Under Modify: Fade, do the following:In theStart list, selectWith Previous.In the Speed list, select Very Fast. In the Selection and Visibility pane, select the rectangle group. In the CustomAnimation task pane, do the following:Click AddEffect, point to Emphasis, and then click More Effects. In the Add Emphasis Effect dialog box, under Basic, click Spin. Select the fourth animation effect (spin effect for the rectangle group). Under Modify: Spin, do the following:In theStart list, selectOn Click. In the Amount list, in the Custom box, enter 22°, and then press ENTER. Also in the Amount list, click Clockwise.In the Speed list, select Very Fast.On the slide, select the second oval. In the CustomAnimation task pane, do the following:Click AddEffect, point to Emphasis, and then click More Effects. In the Add Emphasis Effect dialog box, under Basic, click Change Fill Color. Select the fifth animation effect (change fill color effect for the second oval). Under Modify: Change Fill Color, do the following:In the Startlist, select After Previous. In the Fill Color list, click More Colors. In the Colors dialog box, on the Custom tab, enter values for Red: 130, Green: 153, Blue: 117. In the Speedlist, select Very Fast.On the slide, select the second text box. In the CustomAnimation task pane, do the following:Click Add Effect, point to Entrance and then click More Effects. In the Add Entrance Effect dialog box, under Subtle, clickFade. Select the sixth animation effect (fade effect for the second text box). Under Modify: Fade, do the following:In theStart list, selectWith Previous.In the Speed list, select Very Fast. On the slide, select the third oval. In the CustomAnimation task pane, do the following:Click AddEffect, point to Emphasis, and then click More Effects. In the Add Emphasis Effect dialog box, under Basic, click Change Fill Color. Select the seventh animation effect (change fill color effect for the third oval). Under Modify: Change Fill Color, do the following:In the Startlist, select After Previous. In the Fill Color list, click More Colors. In the Colors dialog box, on the Custom tab, enter values for Red: 130, Green: 153, Blue: 117. In the Speedlist, select Very Fast.On the slide, select the third text box. In the CustomAnimation task pane, do the following:Click Add Effect, point to Entrance and then click More Effects. In the Add Entrance Effect dialog box, under Subtle, clickFade. Select the eighth animation effect (fade effect for the third text box). Under Modify: Fade, do the following:In theStart list, selectWith Previous.In the Speed list, select Very Fast. On the slide, select the fourth oval. In the CustomAnimation task pane, do the following:Click AddEffect, point to Emphasis, and then click More Effects. In the Add Emphasis Effect dialog box, under Basic, click Change Fill Color. Select the ninth animation effect (change fill color effect for the fourth oval). Under Modify: Change Fill Color, do the following:In the Startlist, select After Previous. In the Fill Color list, click More Colors. In the Colors dialog box, on the Custom tab, enter values for Red: 130, Green: 153, Blue: 117. In the Speedlist, select Very Fast.On the slide, select the fourth text box. In the CustomAnimation task pane, do the following:Click Add Effect, point to Entrance,and then click More Effects. In the Add Entrance Effect dialog box, under Subtle, clickFade. Select the 10th animation effect (fade effect for the fourth text box). Under Modify: Fade, do the following:In theStart list, selectWith Previous.In the Speed list, select Very Fast.
- Custom animation effects: object spins on end(Advanced)To reproduce the background effects on this slide, do the following:On the Home tab, in theSlides group, click Layout, and then click Blank.Right-click the slide background area, and then click Format Background. In the Format Background dialog box, click Fill in the left pane, and then select Solid fill in the Fill pane. Click the button next to Color, and then under Theme Colors click White, Background 1 (first row, first option from the left).To reproduce the rectangle on this slide, do the following:On the Home tab, in the Drawing group, click Shapes, and then under Rectangles click Rounded Rectangle (second option from the left). On the slide, drag to draw a rounded rectangle.Select the rectangle. Drag the yellow diamond adjustment handle to the left to decrease the amount of rounding on the corners. With the rounded rectangle still selected, under Drawing Tools, on the Format tab, in the Size group, do the following:In the Shape Height box, enter 3.5”.In the Shape Width box, enter 0.25”.Under Drawing Tools, on the Format tab, in the bottom right corner of the Shape Styles group, click the Format Shape dialog box launcher. In the Format Shape dialog box, click Fill in the left pane. In the Fill pane, select Solid fill, click the button next to Color, and then under Theme Colors click White, Background 1, Darker 15% (third row, first option from the left).Also in the Format Shape dialog box, click Line Color in the left pane. In the Line Color pane, select No line. Also in the Format Shape dialog box, click Shadow in the left pane. In the Shadow pane, click the button next to Presets, under Outer select Offset Bottom (first row, second option from the left), and then do the following:In the Transparency box, enter 0%.In the Sizebox, enter 100%.In the Blur box, enter 8.5 pt.In the Angle box, enter 90°.In the Distance box, enter 1 pt.Also in the Format Shape dialog box, click 3-D Format in the left pane. In the 3-D Format pane, do the following:Under Bevel, click the button next to Top, and then under Bevel click Circle (first row, first option from the left). Next to Top, in the Width box, enter 5 pt, and in the Height box, enter 5 pt.Under Surface, click the button next to Material, and then under Standard clickMatte (first row, first option from the left).Click the button next to Lighting, and then under Neutral click Soft (first row, third option from the left).On the slide, select the rounded rectangle. On the Home tab, in the Clipboard group, click the arrow under Paste, and then click Duplicate.Select the duplicate rectangle. On the Home tab, in the Drawing group, do the following:Click the arrow next to Shape Fill, and then click No Fill.Click the arrow next to Shape Outline, and then click No Outline.Drag the second rectangle above the first rectangle until the lower edge overlays the top edge of the first rectangle. (Note: When the spinning animation effect is created later for these rectangles, the spin will center where the edges of the rectangles meet.)Press and hold CTRL, and then select both rectangles. On the Home tab, in the Drawing group, click Arrange, and do the following:Point to Align, and then click Align Selected Objects.Point to Align, and then click Align Center.Click Group. On the slide, drag the group until it is centered horizontally on the left edge of the slide (straddling the edge).On the Home tab, in the Drawing group, click Arrange, point to Align, and then do the following:Click Align to Slide.Click Align Middle.To reproduce the dashed arc on this slide, do the following:On the Home tab, in the Drawing group, click Shapes, and then under Basic Shapes click Arc (third row, 12th option from the left). On the slide, drag to draw an arc.Select the arc. Under Drawing Tools, on the Format tab, in the Size group, do the following:In the Shape Height box, enter 7.5”.In the Shape Width box, enter 7.5”.With the arc still selected, on the Home tab, in the Drawing group, click the arrow next to Shape Outline,and then do the following:Under Theme Colors, click White, Background 1, Darker 15% (third row, first option from the left).Point to Dashes, and then click Dash (fourth option from the top).On the slide, drag the yellow diamond adjustment handle on the right side of the arc to the bottom of the arc to create a half circle.Drag the arc until the yellow diamond adjustment handles are on the left edge of the slide.With the arc still selected, on the Home tab, in the Drawing group, click Arrange, point to Align, and then do the following:Click Align to Slide. Click Align Middle. To reproduce the half circle on this slide, do the following:On the slide, select the arc. On the Home tab, in the Clipboard group, click the arrow under Paste, and then click Duplicate.Select the duplicate arc. Under Drawing Tools, on the Format tab, in the Size group, do the following:In the Shape Height box, enter 3.33”.In the Shape Width box, enter 3.33”.With the second arc still selected, under Drawing Tools, on the Format tab, in the Shape Styles group, click the arrow next to Shape Fill, and then under Theme Colors click White, Background 1, Darker 5% (second row, first option from the left).Under Drawing Tools, on the Format tab, in the Shape Styles group, click the arrow next to Shape Outline,and then click No Outline.Under Drawing Tools, on the Format tab, in the Shape Styles group, click Shape Effects, point to Shadow, and then click ShadowOptions. In the Format Shape dialog box, click Shadow in the left pane. In the Shadow pane, click the button next to Presets, under Inner click Inside Right (second row, third option from the left), and then do the following:In the Transparency box, enter 86%.In the Blur box, enter 24 pt.In the Angle box, enter 315°.In the Distance box, enter 4 pt.On the slide, drag the second arc until the yellow diamond adjustment handles are on the left edge of the slide. On the Home tab, in the Drawing group, click Arrange, and then do the following:Point to Align, and then click Align to Slide. Point to Align, and then click Align Middle. Click Send to Back.To reproduce the button shapes on this slide, do the following:On the Home tab, in the Drawing group, click Shapes, and then under Basic Shapes click Oval (first row, second option from the left). On the slide, drag to draw an oval.Select the oval. Under Drawing Tools, on the Format tab, in the Size group, do the following:In the Shape Height box, enter 0.34”.In the Shape Width box, enter 0.34”.Under Drawing Tools, on the Format tab, in the Shape Styles group, click More, and then click Light 1 Outline, Colored Fill – Dark 1 (third row, first option from the left).Under Drawing Tools, on the Format tab, in the bottom right corner of the Shape Styles group, click the Format Shape dialog box launcher. In the Format Shape dialog box, click Fill in the left pane. In the Fill pane, select Solid Fill. Click the button next to Color, and then under Theme Colors click Olive Green, Accent 3, Lighter 80°(second row, seventh option from the left).Also in the Format Shape dialog box, click Line Color in the left pane. In the Line Color pane, select No line. Also in the Format Shape dialog box, click Shadow in the left pane. In the Shadow pane, click the button next to Presets, under Outer click Offset Bottom (first row, second option from the left), and then do the following:In the Transparency box, enter 0%.In the Size box, enter 100%.In the Blur box, enter 8.5 pt.In the Angle box, enter 90°.In the Distance box, enter 1 pt.Also in the Format Shape dialog box, click 3-D Format in the left pane, and then do the following in the 3-D Format pane:Under Bevel, click the button next to Top, and then under Bevel click Art Deco (third row, fourth option from the left). Next to Top, in the Width box, enter 5 pt, and in the Height box, enter 5 pt.UnderContour, click the button next to Color, and then under Theme Colors click White, Background 1 (first row, first option from the left). In the Size box, enter 3.5 pt.Under Surface, click the button next to Material, and then under Standard click Matte (first row, first option from the left). Click the button next to Lighting, and then under Neutral click Soft (first row, third option from the left).On the slide, select the oval. Under Drawing Tools, on the Format tab, in the bottom right corner of the Size group, click the Size and Position dialog box launcher. In the Size and Position dialog box, on the Position tab, do the following:In the Horizontal box, enter 2.98”.In the Vertical box, enter 1.5”.Select the oval. On the Home tab, in the Clipboard group, click the arrow under Paste, and then click Duplicate.Select the duplicate oval. Under Drawing Tools, on the Format tab, in the bottom right corner of the Size group, click the Size and Position dialog box launcher. In the Size and Position dialog box, on the Position tab, do the following:In the Horizontal box, enter 3.52”.In the Vertical box, enter 2.98”. Repeat step 9 two more times, for a total of four ovals. Under Drawing Tools, on the Format tab, in the bottom right corner of the Size group, click the Size and Position dialog box launcher. In the Size and Position dialog box, on the Position tab, do the following to position the third and fourth ovals:Select the third oval on the slide, and then enter 3.52” in theHorizontal box and 4.27” in the Vertical box.Select the fourth oval on the slide, and then enter 2.99” in theHorizontal box and 5.66” in the Vertical box.To reproduce the text on this slide, do the following:On the Insert tab, in the Text group, click Text Box, and then on the slide, drag to draw the text box. Enter text in the text box and select the text. On the Home tab, in the Font group, do the following: In the Font list, select Corbel.In the Font Size list, select 22.Click the arrow next to Font Color, and then under Theme Colors click White, Background 1, Darker 50% (sixth row, first option from the left).On the Home tab, in the Paragraph group, click Align Text Left to align the text left in the text box.On the slide, drag the text box to the right of the first oval.Select the text box. On the Home tab, in the Clipboard group, click the arrow under Paste, and then click Duplicate. Click in the text box and edit the text. Drag the second text box to the right of the second oval.Repeat steps 5-7 to create the third and fourth text boxes, dragging them to the right of the third and fourth ovals. To reproduce the animation effects on this slide, do the following:On the Animations tab, in the Animations group, click Custom Animation.On the Home tab, in the Editing group, click Select, and then click Selection Pane. In the Selection and Visibility pane, select the rectangle group. In the CustomAnimation task pane, do the following:Click AddEffect, point to Emphasis, and then click More Effects. In the Add Emphasis Effect dialog box, under Basic, click Spin. Select the animation effect (spin effect for the rectangle group). Under Modify: Spin, do the following:In theStart list, selectWith Previous. In the Amount list, in the Custom box, enter 123°,and then press ENTER. Also in the Amount list, clickCounterclockwise.In the Speedlist, select Fast. On the slide, select the first oval. In the CustomAnimation task pane, do the following:Click AddEffect, point to Emphasis, and then click More Effects. In the Add Emphasis Effect dialog box, under Basic, click Change Fill Color. Select the second animation effect (change fill color effect for the first oval). Under Modify: Change Fill Color, do the following:In the Startlist, select After Previous. In the Fill Color list, click More Colors. In the Colors dialog box, on the Custom tab, enter values for Red: 130, Green: 153, Blue: 117. In the Speedlist, select Very Fast.On the slide, select the first text box. In the CustomAnimation task pane, do the following:Click Add Effect, point to Entrance,and then click More Effects. In the Add Entrance Effect dialog box, under Subtle, clickFade. Select the third animation effect (fade effect for the first text box). Under Modify: Fade, do the following:In theStart list, selectWith Previous.In the Speed list, select Very Fast. In the Selection and Visibility pane, select the rectangle group. In the CustomAnimation task pane, do the following:Click AddEffect, point to Emphasis, and then click More Effects. In the Add Emphasis Effect dialog box, under Basic, click Spin. Select the fourth animation effect (spin effect for the rectangle group). Under Modify: Spin, do the following:In theStart list, selectOn Click. In the Amount list, in the Custom box, enter 22°, and then press ENTER. Also in the Amount list, click Clockwise.In the Speed list, select Very Fast.On the slide, select the second oval. In the CustomAnimation task pane, do the following:Click AddEffect, point to Emphasis, and then click More Effects. In the Add Emphasis Effect dialog box, under Basic, click Change Fill Color. Select the fifth animation effect (change fill color effect for the second oval). Under Modify: Change Fill Color, do the following:In the Startlist, select After Previous. In the Fill Color list, click More Colors. In the Colors dialog box, on the Custom tab, enter values for Red: 130, Green: 153, Blue: 117. In the Speedlist, select Very Fast.On the slide, select the second text box. In the CustomAnimation task pane, do the following:Click Add Effect, point to Entrance and then click More Effects. In the Add Entrance Effect dialog box, under Subtle, clickFade. Select the sixth animation effect (fade effect for the second text box). Under Modify: Fade, do the following:In theStart list, selectWith Previous.In the Speed list, select Very Fast. On the slide, select the third oval. In the CustomAnimation task pane, do the following:Click AddEffect, point to Emphasis, and then click More Effects. In the Add Emphasis Effect dialog box, under Basic, click Change Fill Color. Select the seventh animation effect (change fill color effect for the third oval). Under Modify: Change Fill Color, do the following:In the Startlist, select After Previous. In the Fill Color list, click More Colors. In the Colors dialog box, on the Custom tab, enter values for Red: 130, Green: 153, Blue: 117. In the Speedlist, select Very Fast.On the slide, select the third text box. In the CustomAnimation task pane, do the following:Click Add Effect, point to Entrance and then click More Effects. In the Add Entrance Effect dialog box, under Subtle, clickFade. Select the eighth animation effect (fade effect for the third text box). Under Modify: Fade, do the following:In theStart list, selectWith Previous.In the Speed list, select Very Fast. On the slide, select the fourth oval. In the CustomAnimation task pane, do the following:Click AddEffect, point to Emphasis, and then click More Effects. In the Add Emphasis Effect dialog box, under Basic, click Change Fill Color. Select the ninth animation effect (change fill color effect for the fourth oval). Under Modify: Change Fill Color, do the following:In the Startlist, select After Previous. In the Fill Color list, click More Colors. In the Colors dialog box, on the Custom tab, enter values for Red: 130, Green: 153, Blue: 117. In the Speedlist, select Very Fast.On the slide, select the fourth text box. In the CustomAnimation task pane, do the following:Click Add Effect, point to Entrance,and then click More Effects. In the Add Entrance Effect dialog box, under Subtle, clickFade. Select the 10th animation effect (fade effect for the fourth text box). Under Modify: Fade, do the following:In theStart list, selectWith Previous.In the Speed list, select Very Fast.
- Custom animation effects: object spins on end(Advanced)To reproduce the background effects on this slide, do the following:On the Home tab, in theSlides group, click Layout, and then click Blank.Right-click the slide background area, and then click Format Background. In the Format Background dialog box, click Fill in the left pane, and then select Solid fill in the Fill pane. Click the button next to Color, and then under Theme Colors click White, Background 1 (first row, first option from the left).To reproduce the rectangle on this slide, do the following:On the Home tab, in the Drawing group, click Shapes, and then under Rectangles click Rounded Rectangle (second option from the left). On the slide, drag to draw a rounded rectangle.Select the rectangle. Drag the yellow diamond adjustment handle to the left to decrease the amount of rounding on the corners. With the rounded rectangle still selected, under Drawing Tools, on the Format tab, in the Size group, do the following:In the Shape Height box, enter 3.5”.In the Shape Width box, enter 0.25”.Under Drawing Tools, on the Format tab, in the bottom right corner of the Shape Styles group, click the Format Shape dialog box launcher. In the Format Shape dialog box, click Fill in the left pane. In the Fill pane, select Solid fill, click the button next to Color, and then under Theme Colors click White, Background 1, Darker 15% (third row, first option from the left).Also in the Format Shape dialog box, click Line Color in the left pane. In the Line Color pane, select No line. Also in the Format Shape dialog box, click Shadow in the left pane. In the Shadow pane, click the button next to Presets, under Outer select Offset Bottom (first row, second option from the left), and then do the following:In the Transparency box, enter 0%.In the Sizebox, enter 100%.In the Blur box, enter 8.5 pt.In the Angle box, enter 90°.In the Distance box, enter 1 pt.Also in the Format Shape dialog box, click 3-D Format in the left pane. In the 3-D Format pane, do the following:Under Bevel, click the button next to Top, and then under Bevel click Circle (first row, first option from the left). Next to Top, in the Width box, enter 5 pt, and in the Height box, enter 5 pt.Under Surface, click the button next to Material, and then under Standard clickMatte (first row, first option from the left).Click the button next to Lighting, and then under Neutral click Soft (first row, third option from the left).On the slide, select the rounded rectangle. On the Home tab, in the Clipboard group, click the arrow under Paste, and then click Duplicate.Select the duplicate rectangle. On the Home tab, in the Drawing group, do the following:Click the arrow next to Shape Fill, and then click No Fill.Click the arrow next to Shape Outline, and then click No Outline.Drag the second rectangle above the first rectangle until the lower edge overlays the top edge of the first rectangle. (Note: When the spinning animation effect is created later for these rectangles, the spin will center where the edges of the rectangles meet.)Press and hold CTRL, and then select both rectangles. On the Home tab, in the Drawing group, click Arrange, and do the following:Point to Align, and then click Align Selected Objects.Point to Align, and then click Align Center.Click Group. On the slide, drag the group until it is centered horizontally on the left edge of the slide (straddling the edge).On the Home tab, in the Drawing group, click Arrange, point to Align, and then do the following:Click Align to Slide.Click Align Middle.To reproduce the dashed arc on this slide, do the following:On the Home tab, in the Drawing group, click Shapes, and then under Basic Shapes click Arc (third row, 12th option from the left). On the slide, drag to draw an arc.Select the arc. Under Drawing Tools, on the Format tab, in the Size group, do the following:In the Shape Height box, enter 7.5”.In the Shape Width box, enter 7.5”.With the arc still selected, on the Home tab, in the Drawing group, click the arrow next to Shape Outline,and then do the following:Under Theme Colors, click White, Background 1, Darker 15% (third row, first option from the left).Point to Dashes, and then click Dash (fourth option from the top).On the slide, drag the yellow diamond adjustment handle on the right side of the arc to the bottom of the arc to create a half circle.Drag the arc until the yellow diamond adjustment handles are on the left edge of the slide.With the arc still selected, on the Home tab, in the Drawing group, click Arrange, point to Align, and then do the following:Click Align to Slide. Click Align Middle. To reproduce the half circle on this slide, do the following:On the slide, select the arc. On the Home tab, in the Clipboard group, click the arrow under Paste, and then click Duplicate.Select the duplicate arc. Under Drawing Tools, on the Format tab, in the Size group, do the following:In the Shape Height box, enter 3.33”.In the Shape Width box, enter 3.33”.With the second arc still selected, under Drawing Tools, on the Format tab, in the Shape Styles group, click the arrow next to Shape Fill, and then under Theme Colors click White, Background 1, Darker 5% (second row, first option from the left).Under Drawing Tools, on the Format tab, in the Shape Styles group, click the arrow next to Shape Outline,and then click No Outline.Under Drawing Tools, on the Format tab, in the Shape Styles group, click Shape Effects, point to Shadow, and then click ShadowOptions. In the Format Shape dialog box, click Shadow in the left pane. In the Shadow pane, click the button next to Presets, under Inner click Inside Right (second row, third option from the left), and then do the following:In the Transparency box, enter 86%.In the Blur box, enter 24 pt.In the Angle box, enter 315°.In the Distance box, enter 4 pt.On the slide, drag the second arc until the yellow diamond adjustment handles are on the left edge of the slide. On the Home tab, in the Drawing group, click Arrange, and then do the following:Point to Align, and then click Align to Slide. Point to Align, and then click Align Middle. Click Send to Back.To reproduce the button shapes on this slide, do the following:On the Home tab, in the Drawing group, click Shapes, and then under Basic Shapes click Oval (first row, second option from the left). On the slide, drag to draw an oval.Select the oval. Under Drawing Tools, on the Format tab, in the Size group, do the following:In the Shape Height box, enter 0.34”.In the Shape Width box, enter 0.34”.Under Drawing Tools, on the Format tab, in the Shape Styles group, click More, and then click Light 1 Outline, Colored Fill – Dark 1 (third row, first option from the left).Under Drawing Tools, on the Format tab, in the bottom right corner of the Shape Styles group, click the Format Shape dialog box launcher. In the Format Shape dialog box, click Fill in the left pane. In the Fill pane, select Solid Fill. Click the button next to Color, and then under Theme Colors click Olive Green, Accent 3, Lighter 80°(second row, seventh option from the left).Also in the Format Shape dialog box, click Line Color in the left pane. In the Line Color pane, select No line. Also in the Format Shape dialog box, click Shadow in the left pane. In the Shadow pane, click the button next to Presets, under Outer click Offset Bottom (first row, second option from the left), and then do the following:In the Transparency box, enter 0%.In the Size box, enter 100%.In the Blur box, enter 8.5 pt.In the Angle box, enter 90°.In the Distance box, enter 1 pt.Also in the Format Shape dialog box, click 3-D Format in the left pane, and then do the following in the 3-D Format pane:Under Bevel, click the button next to Top, and then under Bevel click Art Deco (third row, fourth option from the left). Next to Top, in the Width box, enter 5 pt, and in the Height box, enter 5 pt.UnderContour, click the button next to Color, and then under Theme Colors click White, Background 1 (first row, first option from the left). In the Size box, enter 3.5 pt.Under Surface, click the button next to Material, and then under Standard click Matte (first row, first option from the left). Click the button next to Lighting, and then under Neutral click Soft (first row, third option from the left).On the slide, select the oval. Under Drawing Tools, on the Format tab, in the bottom right corner of the Size group, click the Size and Position dialog box launcher. In the Size and Position dialog box, on the Position tab, do the following:In the Horizontal box, enter 2.98”.In the Vertical box, enter 1.5”.Select the oval. On the Home tab, in the Clipboard group, click the arrow under Paste, and then click Duplicate.Select the duplicate oval. Under Drawing Tools, on the Format tab, in the bottom right corner of the Size group, click the Size and Position dialog box launcher. In the Size and Position dialog box, on the Position tab, do the following:In the Horizontal box, enter 3.52”.In the Vertical box, enter 2.98”. Repeat step 9 two more times, for a total of four ovals. Under Drawing Tools, on the Format tab, in the bottom right corner of the Size group, click the Size and Position dialog box launcher. In the Size and Position dialog box, on the Position tab, do the following to position the third and fourth ovals:Select the third oval on the slide, and then enter 3.52” in theHorizontal box and 4.27” in the Vertical box.Select the fourth oval on the slide, and then enter 2.99” in theHorizontal box and 5.66” in the Vertical box.To reproduce the text on this slide, do the following:On the Insert tab, in the Text group, click Text Box, and then on the slide, drag to draw the text box. Enter text in the text box and select the text. On the Home tab, in the Font group, do the following: In the Font list, select Corbel.In the Font Size list, select 22.Click the arrow next to Font Color, and then under Theme Colors click White, Background 1, Darker 50% (sixth row, first option from the left).On the Home tab, in the Paragraph group, click Align Text Left to align the text left in the text box.On the slide, drag the text box to the right of the first oval.Select the text box. On the Home tab, in the Clipboard group, click the arrow under Paste, and then click Duplicate. Click in the text box and edit the text. Drag the second text box to the right of the second oval.Repeat steps 5-7 to create the third and fourth text boxes, dragging them to the right of the third and fourth ovals. To reproduce the animation effects on this slide, do the following:On the Animations tab, in the Animations group, click Custom Animation.On the Home tab, in the Editing group, click Select, and then click Selection Pane. In the Selection and Visibility pane, select the rectangle group. In the CustomAnimation task pane, do the following:Click AddEffect, point to Emphasis, and then click More Effects. In the Add Emphasis Effect dialog box, under Basic, click Spin. Select the animation effect (spin effect for the rectangle group). Under Modify: Spin, do the following:In theStart list, selectWith Previous. In the Amount list, in the Custom box, enter 123°,and then press ENTER. Also in the Amount list, clickCounterclockwise.In the Speedlist, select Fast. On the slide, select the first oval. In the CustomAnimation task pane, do the following:Click AddEffect, point to Emphasis, and then click More Effects. In the Add Emphasis Effect dialog box, under Basic, click Change Fill Color. Select the second animation effect (change fill color effect for the first oval). Under Modify: Change Fill Color, do the following:In the Startlist, select After Previous. In the Fill Color list, click More Colors. In the Colors dialog box, on the Custom tab, enter values for Red: 130, Green: 153, Blue: 117. In the Speedlist, select Very Fast.On the slide, select the first text box. In the CustomAnimation task pane, do the following:Click Add Effect, point to Entrance,and then click More Effects. In the Add Entrance Effect dialog box, under Subtle, clickFade. Select the third animation effect (fade effect for the first text box). Under Modify: Fade, do the following:In theStart list, selectWith Previous.In the Speed list, select Very Fast. In the Selection and Visibility pane, select the rectangle group. In the CustomAnimation task pane, do the following:Click AddEffect, point to Emphasis, and then click More Effects. In the Add Emphasis Effect dialog box, under Basic, click Spin. Select the fourth animation effect (spin effect for the rectangle group). Under Modify: Spin, do the following:In theStart list, selectOn Click. In the Amount list, in the Custom box, enter 22°, and then press ENTER. Also in the Amount list, click Clockwise.In the Speed list, select Very Fast.On the slide, select the second oval. In the CustomAnimation task pane, do the following:Click AddEffect, point to Emphasis, and then click More Effects. In the Add Emphasis Effect dialog box, under Basic, click Change Fill Color. Select the fifth animation effect (change fill color effect for the second oval). Under Modify: Change Fill Color, do the following:In the Startlist, select After Previous. In the Fill Color list, click More Colors. In the Colors dialog box, on the Custom tab, enter values for Red: 130, Green: 153, Blue: 117. In the Speedlist, select Very Fast.On the slide, select the second text box. In the CustomAnimation task pane, do the following:Click Add Effect, point to Entrance and then click More Effects. In the Add Entrance Effect dialog box, under Subtle, clickFade. Select the sixth animation effect (fade effect for the second text box). Under Modify: Fade, do the following:In theStart list, selectWith Previous.In the Speed list, select Very Fast. On the slide, select the third oval. In the CustomAnimation task pane, do the following:Click AddEffect, point to Emphasis, and then click More Effects. In the Add Emphasis Effect dialog box, under Basic, click Change Fill Color. Select the seventh animation effect (change fill color effect for the third oval). Under Modify: Change Fill Color, do the following:In the Startlist, select After Previous. In the Fill Color list, click More Colors. In the Colors dialog box, on the Custom tab, enter values for Red: 130, Green: 153, Blue: 117. In the Speedlist, select Very Fast.On the slide, select the third text box. In the CustomAnimation task pane, do the following:Click Add Effect, point to Entrance and then click More Effects. In the Add Entrance Effect dialog box, under Subtle, clickFade. Select the eighth animation effect (fade effect for the third text box). Under Modify: Fade, do the following:In theStart list, selectWith Previous.In the Speed list, select Very Fast. On the slide, select the fourth oval. In the CustomAnimation task pane, do the following:Click AddEffect, point to Emphasis, and then click More Effects. In the Add Emphasis Effect dialog box, under Basic, click Change Fill Color. Select the ninth animation effect (change fill color effect for the fourth oval). Under Modify: Change Fill Color, do the following:In the Startlist, select After Previous. In the Fill Color list, click More Colors. In the Colors dialog box, on the Custom tab, enter values for Red: 130, Green: 153, Blue: 117. In the Speedlist, select Very Fast.On the slide, select the fourth text box. In the CustomAnimation task pane, do the following:Click Add Effect, point to Entrance,and then click More Effects. In the Add Entrance Effect dialog box, under Subtle, clickFade. Select the 10th animation effect (fade effect for the fourth text box). Under Modify: Fade, do the following:In theStart list, selectWith Previous.In the Speed list, select Very Fast.
- Transition effect for timeline, slide 1(Basic)Tip: This transition works well for graphics that horizontally span more than one slide. To reproduce the shape effects on this slide, do the following:On the Home tab, in the Slides group, click Layout, and then click Blank.On the Home tab, in the Drawing group, click Shapes, and then under Block Arrows clickChevron (second row, eighth option from the left). On the slide, drag to draw a long, horizontal chevron shape.Select the chevron. Under DrawingTools, on the Format tab, in the Size group, do the following:In the Shape Height box, enter 0.7”.In the Shape Width box, enter 9.48”.Drag the chevron until the right end is beyond the right edge of the slide, and the left end of the chevron is approximately one inch to the right of the left edge of the slide.Select the chevron. Under DrawingTools, on the Format tab, in the ShapeStyles group, click the arrow next to ShapeFill, point to Gradient, and then click MoreGradients. In the Format Shape dialog box, click Fill in the left pane, select Gradientfill in the Fill pane, and then do the following:In the Type list, select Linear.Click the button next to Direction, and then click Linear Up (second row, second option from the left).Under Gradient stops, click Add or Remove until a total of four gradient stops appear in the drop-down list. Also under Gradient stops, customize the gradient stops as follows:Select Stop 1 from the list, and then do the following:In the Stop position box, enter 0%.Click the button next to Color, and then under Theme ColorsclickWhite, Background 1 (first row, first option from the left)Select Stop 2 from the list, and then do the following:In the Stop position box, enter 36%.Click the button next to Color, click More Colors, and then in the Colors dialog box, on the Custom tab, enter values for Red: 213, Green: 219, Blue: 221. Select Stop 3 from the list, and then do the following:In the Stop position box, enter 73%.Click the button next to Color, click More Colors, and then in the Colors dialog box, on the Custom tab, enter values for Red: 178, Green: 190, Blue: 194. Select Stop 4 from the list, and then do the following:In the Stop position box, enter 100%.Click the button next to Color, click More Colors, and then in the Colors dialog box, on the Custom tab, enter values for Red: 213, Green: 219, Blue: 221. Also in the Format Shape dialog box, click LineColor in the left pane, and then select No line in the LineColor pane.Also in the Format Shape dialog box, click Shadow in the left pane, and then do the following in the Shadow pane: Click the button next to Presets, and then under Outer click OffsetBottom (first row, second option from the left).In the Transparency box, enter 60%.In the Size box, enter 100%.In the Blur box, enter 4 pt.In the Angle box, enter 90°.In the Distance box, enter 3 pt. Also in the Format Shape dialog box, click 3-DFormat in the left pane. In the 3-D Format pane, under Bevel,click the button next to Top, and then under Bevel click Circle (first row, first option from the left). Next to Top, in the Width box, enter 4 pt, and in the Height box, enter 4 pt.On the Insert tab, in the Text group, click Text Box, and then on the slide, drag to draw the text box.Enter text in the text box, select the text, and then on the Home tab, in the Font group, select Gill Sans MT Condensedfrom the Font list, enter 26 in the Font Size box, click Bold, click the arrow next to Font Color, and then under Theme Colors click White, Background 1, Darker 50% (sixth row, first option from the left).On the Home tab, in the Paragraph group, click Center to center the text in the text box.Select the text box. On the Home tab, in the Clipboard group, click the arrow under Paste, and then clickDuplicate. Repeat this process to create a total of three text boxes.Click in each of the two duplicate text boxes, and then edit the text.Drag the text boxes onto the chevron shape to form a row. Press CTRL+A to select all the objects on the slide. On the Home tab, in the Drawing group, click Arrange, point to Align, and then do the following:Click Align to Slide.ClickAlignMiddle.Press and hold SHIFT, and then select all three text boxes. On the Home tab, in the Drawing group, click Arrange, point to Align, and then do the following:Click Align to Slide.ClickDistributeHorizontally.To reproduce the animation effects on this slide, do the following:On the Animations tab, in the TransitiontoThisSlide group, click More, and then under Pushand Cover clickPushLeft.On the Animations tab, in the TransitionstoThisSlide group, in the Transition Speed list, select Slow.
- Transition effect for timeline, slide 2(Basic)Tip: This transition works well for graphics that horizontally span more than one slide. To reproduce the shape effects on this slide, do the following:On the Home tab, in the Slides group, click Layout, and then click Blank.On the Home tab, in the Drawing group, click Shapes, and then under Block Arrows,clickChevron (second row, eighth option from the left). On the slide, drag to draw a long, horizontal chevron shape.Select the chevron. Under DrawingTools, on the Format tab, in the Size group, do the following:In the Shape Height box, enter 0.7”.In the Shape Width box, enter 11.03”.Drag the chevron until it extends past both the left and right edges of the slide. Select the chevron. Under DrawingTools, on the Format tab, in the ShapeStyles group, click the arrow next to ShapeFill, click Gradient, and then click MoreGradients.In the Format Shape dialog box, click Fill in the left pane, select Gradientfill in the Fill pane, and then do the following:In the Type list, select Linear.Click the button next to Direction, and then click Linear Up (second row, second option from the left).Under Gradient stops, click Add or Remove until a total of four gradient stops appear in the drop-down list. Also under Gradient stops, customize the gradient stops as follows:Select Stop 1 from the list, and then do the following:In the Stop position box, enter 0%.Click the button next to Color, and then under Theme Colorsclick White, Background 1 (first row, first option from the left).Select Stop 2 from the list, and then do the following:In the Stop position box, enter 36%.Click the button next to Color, click More Colors, and then in the Colors dialog box, on the Custom tab, enter values for Red: 213, Green: 219, Blue: 221. Select Stop 3 from the list, and then do the following:In the Stop position box, enter 73%.Click the button next to Color, click More Colors, and then in the Colors dialog box, on the Custom tab, enter values for Red: 178, Green: 190, Blue: 194. Select Stop 4 from the list, and then do the following:In the Stop position box, enter 100%.Click the button next to Color, click More Colors, and then in the Colors dialog box, on the Custom tab, enter values for Red: 213, Green: 219, Blue: 221. Also in the Format Shape dialog box, click LineColor in the left pane, and then select No line in the LineColor pane.Also in the Format Shape dialog box, click Shadow in the left pane. In the Shadow pane, click the button next to Presets, under Outer click OffsetBottom (first row, second option from the left), and then do the following: In the Transparency box, enter 60%.In the Size box, enter 100%.In the Blur box, enter 4 pt.In the Angle box, enter 90°.In the Distance box, enter 3 pt. Also in the Format Shape dialog box, click 3-DFormat in the left pane. In the 3-D Format pane, under Bevel,click the button next to Top, and then under Bevel click Circle (first row, first option from the left). Next to Top, in the Width box, enter 4 pt, and in the Height box, enter 4 pt.On the Insert tab, in the Text group, click Text Box, and then on the slide, drag to draw the text box.Enter text in the text box, select the text, and then on the Home tab, in the Font group, select Gill Sans MT Condfrom the Font list, enter 26 in the Font Size box, click Bold, click the arrow next to Font Color, and then under Theme Colors click White, Background 1, Darker 50% (sixth row, first option from the left).On the Home tab, in the Paragraph group, click Center to center the text in the text box.Select the text box. On the Home tab, in the Clipboard group, click the arrow under Paste, and then clickDuplicate. Repeat this process to create a total of three text boxes.Click in each of the two duplicate text boxes, and then edit the text.Drag the text boxes onto the chevron shape to form a row. Press CTRL+A to select all the objects on the slide. On the Home tab, in the Drawing group, click Arrange, point to Align, and then do the following:Click Align to Slide.ClickAlignMiddle.Press and hold SHIFT, and then select all three text boxes. On the Home tab, in the Drawing group, click Arrange, point to Align, and then do the following:Click Align to Slide.ClickDistributeHorizontally.To reproduce the animation effects on this slide, do the following:On the Animations tab, in the TransitiontoThisSlide group, click More, and then under Pushand Cover clickPushLeft.On the Animations tab, in the TransitionstoThisSlide group, in the Transition Speed list, select Slow.
- Transition effect for timeline, slide 3(Basic)Tip: This transition works well for graphics that horizontally span more than one slide. To reproduce the shape effects on this slide, do the following:On the Home tab, in the Slides group, click Layout, and then click Blank.On the Home tab, in the Drawing group, click Shapes, and then under Block Arrows,clickChevron (second row, eighth option from the left). On the slide, drag to draw a long, horizontal chevron shape.Select the chevron. Under DrawingTools, on the Format tab, in the Size group, do the following:In the Shape Height box, enter 0.7”.In the Shape Width box, enter 9.48”.Drag the chevron so that the left end is beyond the left edge of the slide, and the right end is approximately one inch left of the right edge of the slide. Select the chevron. Under DrawingTools, on the Format tab, in the ShapeStyles group, click the arrow next to ShapeFill, click Gradient, and then click MoreGradients. In the Format Shape dialog box, click Fill in the left pane, select Gradientfill in the Fill pane, and then do the following:In the Type list, select Linear.Click the button next to Direction, and then click Linear Up (second row, second option from the left).Under Gradient stops, click Add or Remove until a total of four gradient stops appear in the drop-down list. Also under Gradient stops, customize the gradient stops as follows:Select Stop 1 from the list, and then do the following:In the Stop position box, enter 0%.Click the button next to Color, and then under Theme Colorsclick White, Background 1 (first row, first option from the left).Select Stop 2 from the list, and then do the following:In the Stop position box, enter 36%.Click the button next to Color, click More Colors, and then in the Colors dialog box, on the Custom tab, enter values for Red: 213, Green: 219, Blue: 221. Select Stop 3 from the list, and then do the following:In the Stop position box, enter 73%.Click the button next to Color, click More Colors, and then in the Colors dialog box, on the Custom tab, enter values for Red: 178, Green: 190, Blue: 194. Select Stop 4 from the list, and then do the following:In the Stop position box, enter 100%.Click the button next to Color, click More Colors, and then in the Colors dialog box, on the Custom tab, enter values for Red: 213, Green: 219, Blue: 221. Also in the Format Shape dialog box, click LineColor in the left pane, and then select No line in the LineColor pane.Also in the Format Shape dialog box, click Shadow in the left pane. In the Shadow pane, click the button next to Presets, under Outer click OffsetBottom (first row, second option from the left), and then do the following: In the Transparency box, enter 60%.In the Size box, enter 100%.In the Blur box, enter 4 pt.In the Angle box, enter 90°.In the Distance box, enter 3 pt. Also in the Format Shape dialog box, click 3-DFormat in the left pane. In the 3-D Format pane, under Bevel,click the button next to Top, and then under Bevel click Circle (first row, first option from the left). Next to Top, in the Width box, enter 4 pt, and in the Height box, enter 4 pt.On the Insert tab, in the Text group, click Text Box, and then on the slide, drag to draw the text box.Enter text in the text box, select the text, and then on the Home tab, in the Font group, select Gill Sans MT Condfrom the Font list, enter 26 in the Font Size box, click Bold, click the arrow next to Font Color, and then under Theme Colors click White, Background 1, Darker 50% (sixth row, first option from the left).On the Home tab, in the Paragraph group, click Center to center the text in the text box.Select the text box. On the Home tab, in the Clipboard group, click the arrow under Paste, and then clickDuplicate. Repeat this process to create a total of three text boxes.Click in each of the two duplicate text boxes, and then edit the text.Drag the text boxes onto the chevron shape to form a row. Press CTRL+A to select all the objects on the slide. On the Home tab, in the Drawing group, click Arrange, point to Align, and then do the following:Click Align to Slide.ClickAlignMiddle.Press and hold SHIFT, and then select all three text boxes. On the Home tab, in the Drawing group, click Arrange, point to Align, and then do the following:Click Align to Slide.ClickDistributeHorizontally.To reproduce the animation effects on this slide, do the following:On the Animations tab, in the TransitiontoThisSlide group, click More, and then under Pushand Cover clickPushLeft.On the Animations tab, in the TransitionstoThisSlide group, in the Transition Speed list, select Slow.