Introduction to Microcontrollers
•Télécharger en tant que PPTX, PDF•
3 j'aime•2,165 vues

This can be considered as tutorial for the project "CID Calculator"

Recommandé
Contenu connexe
Tendances
Tendances (20)
En vedette
Similaire à Introduction to Microcontrollers
Similaire à Introduction to Microcontrollers (20)
Dernier
Dernier (20)
Introduction to Microcontrollers
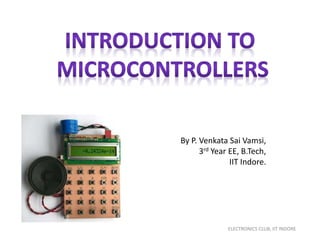
- 1. By P. Venkata Sai Vamsi, 3rd Year EE, B.Tech, IIT Indore. ELECTRONICS CLUB, IIT INDORE
- 2. Outline • • • • • • • Introduction Block Diagrams Classifications in Microcontrollers (Atmega 32A) Integration of Keyboard with the Microcontroller Integration of LCD Display with the Microcontroller CID CALCULATOR Programming
- 3. Introduction (Source – Wikipedia) Microprocessor:- The microprocessor is a multipurpose programmable device that accepts digital data as input, processes it according to instructions stored in its memory, and provides results as output. 8085 MICROPROCESSOR
- 4. Microcontroller:- is a small computer on a single integrated circuit containing a processor core, memory, and programmable input/output peripherals. Example:Microcontroller based Microwave Peripherals:- is a device that is connected to a host computer, but not an integral part of it. It expands the host's capabilities but does not form part of the core computer architecture. It is often, but not always, partially or completely dependent on the host.
- 5. There are three different types of peripherals: I. Input devices (mouse, keyboards, etc.) II. Output devices (monitors, printers, etc.) III. Storage devices (hard drives, flash drives, etc.) Examples:- 4x4 Keypad 16x2 LCD Display
- 6. Microprocessor Block Diagram Ex:- Keyboard MICROPROCESSOR
- 8. Classifications in Microcontrollers (ATMEGA 32A) • Ports:- PORT A, PORT B, PORT C, PORT D Each port consists of 8 pins, to transfer 8 bit data between the Microcontroller and the Peripheral devices. These ports can acts as both input/output ports. • Interrupts:- INT 0, INT 1 interrupt is a signal to the processor emitted by hardware or software indicating an event that needs immediate attention. The processor responds by suspending its current activities, saving its state, and executing a small program called an interrupt handler (or interrupt service routine, ISR) to deal with the event. This interruption is temporary, and after the interrupt handler finishes, the processor resumes execution of the previous thread.
- 9. Edge triggered interrupt:- An edge-triggered interrupt is an interrupt signaled by a level transition on the interrupt line, either a falling edge (high to low) or a rising edge (low to high). ***For more details in using Interrupts contact me pvsvamsi2009@gmail.com Active Low and Active High:- If any port is activated by giving low (0) input, then it is called as Active Low and vice versa. Ex:- Reset is active low
- 10. • ATMEGA 32A Pin Configuration Back
- 11. Integration of Keyboard with the Microcontroller
- 12. Key Board Integration (4x4 Keyboard) Switches Here I connected the keyboard to PortB. Any port will solve the purpose.
- 13. Before Pressing a key
- 15. By following the above procedure, we can get the row no of the key pressed. Question:- How we will find the column no of the key pressed?
- 16. By following the above procedure, we can get the ‘row no’ of the key pressed. Question:- How we will find the ‘column no’ of the key pressed? Answer:- By setting the value of each column to ‘1’ (one at a time), we can observe the change in the state of the row 1 for the corresponding change in the state of column 1 (here we pressed the 1st key). *****This is the end of the keyboard integration*****
- 17. Integration of LCD Display with the Microcontroller Why do we prefer LCD Display to 16/17 segment ALPHA Numeric Display? Reasons:1. Length of the display - In 16x2 LCD Display unit, we can display up to the 32 characters. Whereas, in 16/17 segment ALPHA Numeric Display we require, 32 display units to display the same. 2. Ease of use – Predefined libraries are available for the LCD Display.
- 18. Integration of LCD Display with the Microcontroller Connections with Atmega 32A
- 19. Procedure Add the predefined libraries to your project folder and initialize the LCD subsystem using a call to LCDInit(LS_BLINK|LS_ULINE). To write any text call LCDWriteString("Welcome"); To write any number call void LCDWriteInt(int val,unsigned int field_length); This will print a integer contained in “val”. The field length is the length of field in which the number is printed. Example:- LCDWriteInt(3,4); will print as follows
- 20. Question:- Can any one guess what happens if we write LCDWriteInt(123,5); ?
- 21. Question:- Can any one guess what happens if we write LCDWriteInt(123,5); ? Answer:-
- 22. Next function - void LCDGotoXY(uint8_t x,uint8_t y); Here, uint8_t represents unsigned integer which is 8bit. So, the maximum number it can store = 2^8-1 = 255. LCDGotoXY(11,1); This function changes the cursor position to the given X,Y coordinates.
- 23. LCD Display panel, will retain the previously displayed value. It won’t clear it. Well, does anyone wonder how to clear the display then? Here comes the use of another important function LCDClear(); This will clears the display and reset’s the default cursor position to (0,0). Next function - LCDWriteStringXY(x,y,msg); With this function, user can display the message at his desired coordinates.
- 24. For Example:LCDWriteStringXY(3,0,”hello”); LCDWriteStringXY(8,1,”world”); Similarly there is a function for integers. LCDWriteIntXY(x,y,num,field_length); *****This is the end of the LCD Display integration*****
- 25. FLUXUS 2014 CID CALCULATOR FEB 7th 2014 Basic components required:1. ATMEGA 32A Microcontroller 2. Display unit ( I suggest you to use 16x2 LCD Display unit) 3. 4x4 Keyboard(No restriction with the size) 4. Connecting Wires 5. Circuit Board 6. Battery 7. *HD74LS08 IC (AND Gate) 8. **Programmer *Depends on whether you are going to use interrupts or not. **We do possess one USB Programmer, which can be used for programming. Bread boards, Soldering wire and Soldering irons are available with our electronics club.
- 26. How to start??? I think this is the big question in your mind!!!
- 27. Steps to complete the CID CALCULATOR:- 1. 2. 3. 4. Finish off the connections part. Start programming the microcontroller. Implement your own ideas. Test the functionalities of your design. That’s it!!!
- 28. How to Connect??
- 29. How to Connect?? Connection’s part is already covered!!!
- 30. Programming Software used: Atmel Studio 6.1 Size: Around 900MB (This can be downloaded directly from the atmel website) Language: ‘Embedded C’ There is no much difference between ‘embedded c’ and ‘c’.
- 31. How to connect the Programmer ISP- In System Programming If you remember the pin configuration of ATMEGA 32A MOSI - Pin 6 MISO - Pin 7 SCK - Pin 8 RESET - Pin 9 VCC - Pin 10 GND - Pin 11
- 32. Sample Program Atmel Studio 6.1 To Blink an LED:#define F_CPU 8000000UL //Setting the clock frequency for using delay #include<avr/io.h> #include<avr/interrupt.h> // For Interrupts #include<util/delay.h> // For Delay function int main(void) { DDRD = 0xFF; //setting Port D as output port while(1) //to run the loop continuously { PORTD = 0XFF; //giving high (1) as output to the port D _delay_ms(1000); //giving delay PORTD = 0x00; //giving low (0) as output to the port D _delay_ms(1000); //giving delay }}
- 33. THANK YOU For queries, write to me @ pvsvamsi2009@gmail.com