Vray lighting
•
10 j'aime•8,956 vues

For MAx source file, please visit: https://sites.google.com/site/mitrasharad/download

Recommandé
Contenu connexe
Tendances
Tendances (20)
En vedette
En vedette (20)
Similaire à Vray lighting
Similaire à Vray lighting (20)
Dernier
Dernier (20)
Vray lighting
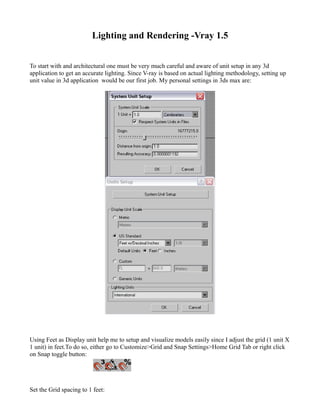
- 1. Lighting and Rendering -Vray 1.5 To start with and architectural one must be very much careful and aware of unit setup in any 3d application to get an accurate lighting. Since V-ray is based on actual lighting methodology, setting up unit value in 3d application would be our first job. My personal settings in 3ds max are: Using Feet as Display unit help me to setup and visualize models easily since I adjust the grid (1 unit X 1 unit) in feet.To do so, either go to Customize>Grid and Snap Settings>Home Grid Tab or right click on Snap toggle button: Set the Grid spacing to 1 feet:
- 2. Now your 1X1 grid is 1X1 feet. Now we start building our interior architecture. If you have your own layout plan u can start modeling on that or else u will find the source file with this tutorial which contains a basic interior model. Room without Doors.rar Room with Doors.rar With no mesh added (appart from walls and doors) we will start looking on Vray render settings before adding up lights..
- 3. 1. With no light in the scene Vray will use default light to render the scene. If the scene has lights then default lights are not rendered unless checked ON. 2. Show GI Only option- When this option is ON, direct lighting will not be included in the final rendering. Note that lights will still be considered for GI calculations, however in the end only the indirect lighting will be shown. 3. Override mtl - This option allows the user to override the scene materials when rendering. All objects will be rendered with the chosen material, if one is selected, or with their default wireframe materials if no material is specified. 4. Image sampler:
- 4. • Fixed - this sampler always takes the same number of samples per pixel; • Adaptive QMC - this sampler takes a variable number of samples per pixel depending on the difference in the intensity of the pixels; • Adaptive subdivision - this sampler divides the image into an adaptive grid-like structure and refines depending on the difference in pixel intensity. 5. Anti-aliasing Filter: Used for filtering the final output based on the requirement (blurry,soft edges, hard edges) 6. Indirect Illumination(GI) Approach: A primary diffuse bounce occurs when a shaded point is directly visible by the camera, or through specular reflective or refractive surfaces. A secondary bounce occurs when a shaded point is used in GI calculations. • Irradiance map - this approach is based on irradiance caching; the basic idea is to compute the indirect illumination only at some points in the scene, and interpolate for the rest of the points. • Photon map - this approach is based on tracing particles starting from the light sources and bouncing around the scene. This is useful for interior or semi-interior scenes with lots of lights or small windows. The photon map usually does not produce good enough results to be used directly; however it can be used as a rough approximation to the lighting in the scene to speed the calculation of GI through direct computation or irradiance map. • Light cache - light caching is a technique for approximating the global illumination in a scene. It is very similar to photon mapping, but without many of its limitations. The light map is built by tracing many many eye paths from the camera. Each of the bounces in the path stores the illumination from the rest of the path into a 3d structure, very similar to the photon map. The light map is a universal GI solution that can be used for both interior or exterior scenes, either directly or as a secondary bounce approximation when used with the irradiance map or the brute force GI method. 7. Irradiance Map Options: Show calc phase - when this option is on, V-Ray will show the irradiance map passes as the irradiance map is calculated. This will give you a rough idea of the indirect illumination even before the final rendering is complete. Note that turning this on slows the calculations a little bit, especially for large images. Show samples - when this option is on, V-Ray will show visually the samples in the irradiance map as small dots in the scene.
- 5. Room rendered with samples ON 8. Render Region Division- The bucket is an essential part of the distributed rendering system of V-Ray. A bucket is a rectangular part of the currently rendered frame that is rendered independently from other buckets. Buckets can be sent to idle LAN machines for processing and/or can be distributed between several CPUs. Because a bucket can be processed only by a single processor the division of the frame in too small a number of buckets can prevent the optimal utilization of computational resources (some CPUs stay idle all the time). However the division of the frame in too many buckets can slow down the rendering because there is a some time overhead related with each bucket (bucket setup, LAN transfer, etc). 9. Frame Stamp- The frame stamp is a convenient way to put some short text over the rendered images. It can be useful in many ways - for example, in network rendering, to quickly determine which frames were rendered by which machine. The frame stamp is one line of text, which appears at the bottom of the image. 10. Light Cache subdivision will be 300.. Following render is done with one omni light (Intensity-.25) in room. The room is rendered in gray because We have override the material slot with Grey shader in place.
- 6. It is good idea to decide upon the time of the day for which lighting has to be done and start setting up basic lighting at the initial stages itself. It will save lot of time while tweaking lot of parameters and
- 7. settings for Vray (with all the models at place, it will take lot of time for calculating vertices, texture maps,bounces, and light cache again and again with each render). So we will start with setting up sunlight outside the room. [Delete the Omni Light placed inside the room.] We can place either a Vray sunlight or direct light for Sun. For Vray sunlight you have to know few things in its parameters: 1. Turbidity - this parameter determines the amount of dust in the air and affects the color of the sun and sky. Smaller values produce a clear and blue sky and sun as you get in the country, while larger values make them yellow and orange as, for example, in a big city. 2. Ozone - this parameter affects the color of the sun light. Available in the range between 0.0 and 1.0. Smaller values make the sunlight more yellow, larger values make it blue. 3. Intensity multiplier - this is an intensity multiplier for the VRaySun. Since the sun is very bright by default, you can use this parameter to reduce its effect. First we would place a VraySun Light in the scene and use the following settings. Render the scene: Settings for VraySun Light For this tutorial we would be using direct light. Now delete the VraySun Light and add a direct light in the scene.
- 8. Render the scene with the following settings: Settings for Direct Light Render with Doors in place
- 9. Once you are comfortable with outside light setup, start with Vray Light placement on the main door (right side door in scene).This light will add on to the GI primary and secondary bounces inside the room which will give a feel of real world actual lighting. Change the color to slight orange( 255,250,245) and reduce the Multiplier value to 10. Sampling Subdivs - this value controls the number of samples V-Ray takes to compute lighting. Lower values mean more noisy results, but will render faster. Higher values produce smoother results but take more time. Following renders are with varying Subdivisions: Sampling Subdivision:8
- 10. Sampling Subdivision:16 Sampling Subdivision:24 With increase in sampling subdivision, the light quality increases but the rendering time too raises a bit. Now we will place one more light in the front door. Copy the main door light and place it on the front door. For quick rendering we will use 8 subdivision for all the light right now but will change it accordingly
- 11. for the final output. Now add another light at the back of the camera (Back Door) with multiplier value10. Render the scene:
- 12. Finally add two Vray Lights on left side Door and Window with the same settings as above (Multiplier 10 and Subdivision 8). Render the scene: Once you are satisfied with the overall settings, apply material to the walls and floor to get a general feel of the room with textures. You can go for any color scheme as per your architectural sense. Render the scene:
- 13. Here we see that after applying material we can see that the light intensity is much more than it should be. Few areas are totally washed out with pure white. We have to reduce the intensity of from the front and side door(Right side). Moreover try rendering the scene with different hue for floor.Change in color will also affect the intensity of light inside the room.Here are three different texture renders with same light intensity: Check the render time also. More bright the hue, more time it takes to render because of the property of colors and light. Bright colors emit more light than dark colors. For this tutorial I am using blue floor texture. Still few setting has to be changed. Direct Light Multiplier: 1.0 Color:(255,245,226) Vray Light: Right Door_Multiplier: 11 Color:(255,245,226) Vray Light: Front Door_Multiplier: 3 Color:(255,245,226)
- 14. Render the Scene: Now with this render it seems that the lighting is nearly done. We just has to tweak few settings to get it proper according to the room. Right now the intensity of light seems not proper on the left side. Since we have a window and a door on the left side too (not visible in the camera), light should also bleed inside from the window and the door. Meanwhile, we have to maintain the intensity on the right side should be more than the other(beacuse of sun light). To get the desired result we have to tweak the light values a bit. Final Light values in the scene: Direct Light Multiplier:1.75 Right side DoorLight Multiplier: 11 FrontDoor Multipilier: 5 LeftSideWindow Multiplier: 10 LeftSideDoor Multiplier: 15 Backdoor Multiplier: 5
- 15. Now we will start placing the models in the scene. Since its a tutorial the placement of models might not be accurate according to the interior design or Vastushastra, it can be a possibility. CompleteModelFile.rar So, the first pass of lighting after placing models......[Models here are not my property but were downloaded from www.evermotion.org for this tutorial purpose.I sinserely thanks Evermotion and all those sincere, hardworking and helpful artist for providing us with such a good stuff free of cost]
- 16. Light seems fine here. Now we have to see whether it appears proper in material view or not. We might have to tweak few shader properties of models which seems out of place in the scene. Render with materials......... Now we just have to tweak the Clock and wall light a bit to get the scene right. Both seems to be a bit too bright. Here is the final render with at the tweaks and modifications:
- 17. These are the final render settings for Vray:
- 19. Hope you enjoyed working with Vray renderer and learned something meaningful from this tutorial. Thanks for reading through this tutorial. Regards, SHARAD MITRA Sr. Technical Artist Exigent Studios