Como adaptar brinquedos para utilização de um switch
1. MAKING A BATTERY INTERRUPTER
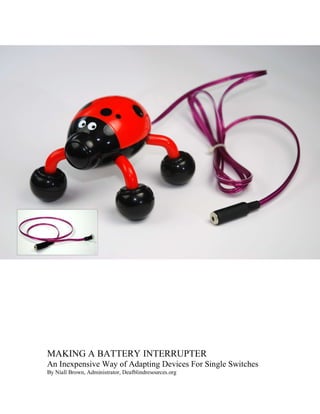
An Inexpensive Way of Adapting Devices For Single Switches
By Niall Brown, Administrator, Deafblindresources.org
2. MAKING A BATTERY INTERRUPTER
An Inexpensive Way of Adapting Devices For Single Switches
By Niall Brown, Administrator, Deafblindresources.org
A battery intrrupter allows some battery powered device to work with an assistive single switch.
The battery interrupter stopps the circuit by blocking the flow of current at the point where the
battery connects to the teminal of the toy. The interrupter diverts the current to to a the assistive
switch so that the current may only flow when the switch is pressed.
ONLY BATTERY POWERD TOYS MAY BE USED FOR THIS
ADAPTION. DO NOT TRY TO ADAPT ANY DEVICE THAT
PLUGS INTO THE WALL.
Choosing a Device:
These are two examples of devices that have been adapted using this method.
The bubble blower has a toggle switch to turn it on and off. This means it will run
indefinitely once the switch has been switched to the on position. This is an ideal toy
because it can be turned on and will allow the new switch to control the current.
The Toy dog will also allow the switch to work, however the toy has an existing switch
that will not stay closed and will interrupt the current. This switch must be removed and
the wires crossed, or the existing switch will interrupt the current.
3. Toys like the ones shown in this image cannot be adapted. There are two reasons for this.
First, they have too many circuits in one toy. You can only adapt one circuit at a time.
Second, the buttons do not stay closed and are too difficult to remove to cross the wires.
Most successful devices will do only one thing and when you turn them on and they will
keep doing that thing indefinitely. This ensures that the current is flowing and will only
be interrupted by the new assistive switch.
What You will need to Make the Battery Interrupter:
Wire that has two pieces running side by side Tinfoil
A 1/4” mini jack Double sided tape
4. A battery (the size the device uses) Electrical tape
A permanent marker Super glue (Please use gloves)
A piece of thin, brittle plastic packaging Scissors
Needle nose pliers with wire strippers (Or Needle nose pliers and wires strippers)
5. Making The Battery Interrupter:
1. Split and strip the wires at both ends of the wire. Leave about 1 inch of exposed wire.
2. Splay the wires on only one end of the wires into a fan shape. Then trim them so that
they approximately match the diameter of the end of the battery size you want to use.
6. 3. Twist off the cap of the mini jack with a pair of needle nose pliers. Attach the wires to
the jack by soldering or by twisting the ends of the wires through the eyelets and
around the terminals. I put a small piece of hard plastic between the terminals to
ensure that the wires do not touch.
4. Twist the cap of the mini jack back on with a pair of needle nose pliers to ensure it is
replaced tightly.
7. 5. Trace the outline of the base of the battery you wish to use on the plastic sheet. Cut
around the line and try to stay close to the inside.
6. You should end up with a small disk of plastic the size of the battery end. Put double
sided tape on both sides of the disk and cut off the excess.
7. Put a tiny amount of super glue on the plastic disk and quickly press the the wires to
the disk using a piece of tinfoil. It is best to put the glue on the disk then push the
wires and tinfoil onto it, so that glue doesn't block the conductivity between the wires
and tinfoil. Ensure that the sheath of the wire is over the edge of the disk so that the
entire exposed wire sits flat on it's surface.
8. 8. Cut or carefully rip the tinfoil around the disk until only the disk is covered.
Repeat steps 7 and 8 with the other wire on the opposite side of the disk. When
finished ensure that the the tinfoil from one side of the disk is not connecting to the
tinfoil on the other at the edges.
9. Place a small amount of glue on the tips of the sheaths of the wires and on the very
edge of the disk to ensure they are not pulled apart.
9. 10. Cut a piece of electrical tape in half and wrap it around the tips of the sheath of the
wires and the very edge of the disk if needed. Note that this may make the Interrupter
to big to fit in some devices so it may be left out if necessary.
11. Place the disk between the terminal of the battery and the terminal of the device. I
usually choose to put the interrupter on the negative terminal with the spring because it
doesn't scrape the tinfoil off when inserting the battery.
When finished you may need to cut a hole in the battery housing so that it can be
replaced. That's all, just hook up your assistive switch and it's ready to use.