Obturation of Root Canal - An Endodontic Overview
•
75 j'aime•15,176 vues

In this lecture I explain the basic concept of root canal filling or what called obturation. The lectures discuss different techniques used in that matter in step-by-step fashion and explanatory pictures. It is directed to the level of undergraduate mind.

Recommandé
Contenu connexe
Tendances
Tendances (20)
Similaire à Obturation of Root Canal - An Endodontic Overview
Similaire à Obturation of Root Canal - An Endodontic Overview (20)
Plus de Iraqi Dental Academy
Plus de Iraqi Dental Academy (20)
Dernier
Dernier (20)
Obturation of Root Canal - An Endodontic Overview
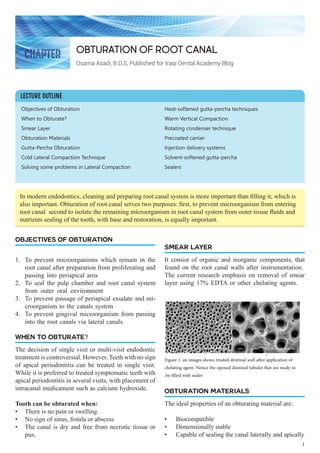
- 1. Objectives of Obturation When to Obturate? Smear Layer Obturation Materials Gutta-Percha Obturation Cold Lateral Compaction Technique Solving some problems in Lateral Compaction Heat-softened gutta-percha techniques Warm Vertical Compaction Rotating condenser technique Precoated carrier Injection delivery systems Solvent-softened gutta-percha Sealers OBJECTIVES OF OBTURATION 1. To prevent microorganisms which remain in the root canal after preparation from proliferating and passing into periapical area 2. To seal the pulp chamber and root canal system from outer oral environment 3. To prevent passage of periapical exudate and mi- croorganism to the canals system 4. To prevent gingival microorganism from passing into the root canals via lateral canals. WHEN TO OBTURATE? The decision of single visit or multi-visit endodontic treatment is controversial. However, Teeth with no sign of apical periodontitis can be treated in single visit. While it is preferred to treated symptomatic teeth with apical periodontitis in several visits, with placement of intracanal medicament such as calcium hydroxide. Tooth can be obturated when: • There is no pain or swelling • No sign of sinus, fistula or abscess • The canal is dry and free from necrotic tissue or pus. SMEAR LAYER It consist of organic and inorganic components, that found on the root canal walls after instrumentation. The current research emphasis on removal of smear layer using 17% EDTA or other chelating agents. OBTURATION MATERIALS The ideal properties of an obturating material are: • Biocompatible • Dimensionally stable • Capable of sealing the canal laterally and apically Obturation of root canal Osama Asadi, B.D.S, Published for Iraqi Dental Academy Blog In modern endodontics, cleaning and preparing root canal system is more important than filling it, which is also important. Obturation of root canal serves two purposes: first, to prevent microorganism from entering root canal second to isolate the remaining microorganism in root canal system from outer tissue fluids and nutrients sealing of the tooth, with base and restoration, is equally important. LECTURE OUTLINE CHAPTER 1 Figure 1. an images shows treated dentinal wall after application of chelating agent. Notice the opened dentinal tubules that are ready to .be filled with sealer
- 2. • Unaffected by tissue fluids and insoluble • Bacteriostatic • Radiopaque • Easily removed from the canal if necessary. • Do not stain the tooth The available obturation materials are: • Gutta-percha • MTA • Hydrophilic polymer • Resilon Outdated materials are: • Silver points • Paste Fillers (Paraformaldehyde, resorcinol, etc..) Gutta-percha is the most commonly used one, and its procedures will be described here. GUTTA-PERCHA OBTURATION Gutta-percha is a natural rubber obtained from topical trees of the sapotaceae family. Gutta-percha points consists of: • Gutta-percha 20% • Zinc oxide 59% • Various waxes, coloring agents, antioxidants, and metal salts to provide radiopacity Properties of gutta-percha points: • Inert (biological inactive) • Dimensionally stable • Non-allergenic • antibacterial • Radiopaque • compactable • Softened by heat • Softened by organic solvents • Removable when needed Methods of filling root canal with gutta-percha can be classified into three groups: 1. Cold gutta-percha 2. Heat-softened gutta-percha 3. Solvent-softened gutta-percha COLD LATERAL COMPACTION TECHNIQUE This technique is taught and practiced throughout the world. It is the technique of choice for many clinicians. And it is fast and easy technique. After canal prepara- tion, master cone that matching the size of master api- cal file is used to fill the canal. Then accessory points are compacted laterally using finger or hand spreader. Procedure in detail: • Irrigate the canal and dry • Select a master cone that is the same size as the master apical file • Set a mark on master cone to the working length • Dip master cone into the sealer and coat the canal wall using up and down motion • Now insert the master cone to the full working length. It should have a tug back (resistance on withdrawal. If not, cut 1 mm from the tip and rein- sert, or choose larger gutta-percha point) • Select a finger spreader that reach to the full work- ing length to the apical stop • Place spreader alongside the master point and compact using firm apical pressure only. • Leave the spreader in place for 3 seconds (to create deformation in the gutta-percha) 2
- 3. • Select accessory points and dip them into the sealer and insert them alongside master cone. • Use spreader to compact accessory points laterally. • Repeat this procedure by adding more accessory points until the canal can not take any more points. • Cut excess gutta-percha using heated plugger. • Place Resin-modified glass ionomer cement and apply final restoration • Take a periapical radiograph for follow-up 3 Figure 2. Lateral compaction under the microscope. Notice the laterally compacted cone
- 4. SOLVING SOME PROBLEMS IN LATERAL COMPACTION Gutta-percha cone reach the working length but it is loose Sometimes there are some gutta-percha cones that are malsized. It is a manufacturing error. So try another .gutta-percha of the same size • If that did not worked, then Cut 1 mm from the tip of the cone with sharp instrument and reinsert again. This increase the tip diameter. • Or select a one size larger gutta-percha cone. Gutta-percha cone passes beyond working length This either results from improper apical stop, or gut- ta-percha cone is small. If apical stop is not prepared well enough, then you either can re-prepare the canal with larger instruments until apical stop is created, or remove 1 mm from the tip of the canal until the cone fits the canal. Gutta-percha does not reach the working length It is the most common situation. It can occur due to several reasons: • The gutta-percha cone is larger than expected, due to manufacturing errors. In this case select a cone of the same diameter and try • Or the canal was not prepared well enough. Use master apical file and prepare the canal until the file is loose. • Blockage of the canal. This can results from insuf- ficient irrigation of the canal with copious sodium hypochlorite. Blocked canals are difficult to clean. Recapitulation with small files and passive ultra- sonic irrigation might help. HEAT-SOFTENED GUTTA-PERCHA TECH? NIQUES When heat softened gutta-percha compacted into the canal, it can flow in the lateral canals, fins and ramifica- tions. This result in superior obturation quality. Heat-softened GP techniques are divided into two subgroups: • Intracanal heating techniques: it involves heating gutta-percha inside root canal 1. Warm Vertical Compaction (Touch N’ heat, System B) 4 2. Rotating Condenser (Gutta-Condenser) • Extracanal heating techniques: it involves heat- ing gutta-percha outside the root canal 1. Precoated carriers (Thermafil) 2. Thermoplastic delivery systems (Obtura III) WARM VERTICAL COMPACTION Also known as schilder’s technique, and continuous wave of compaction technique (with some modifica- tions). This technique is considered the gold standard for endodontic obturation. It is particularly useful in situations such as internal resorption, C-shaped canals, and those with fins and webs. In summary, a non-standradized gutta-percha cone is fitted into the canal. Using a selected plugger (that fits to the working length minus 5-7 mm) heat is applied to the gutta-percha, cooled, and then compacted api- cally. Then the rest of the canal either filled with the same technique or filled with back-filling (injectable gutta-percha technique). Procedure in detail • Fit a gutta-percha cone and mark it at the working length • System-B will be used to heat gutta-percha cone in- side the canal • Select one of the system-B pluggers that fits in the canal 5-7 mm short of the working length. Set a rubber stop at this level. •
- 5. 5 • Also select a conventional plugger to fit to the same distance • Dry the canal with paper points • Apply thin layer of sealer to the apical part of the cone, then insert it inside and coat the wall with sealer by up and down movement. • Insert gutta-percha cone to the full working length. • Set temperature in System-B to 200 Celsius and cut the coronal part of the gutta-percha cone. • The tip of the plugger is placed in the center of the gutta-percha cone, heat is applied, and the plugger is carefully pushed down the canal to the selected depth. This should take 3 seconds. • Then heat is then turned off and the plugger is re- mained in place for a further 10 seconds.
- 6. • With fast motion, turn on the heat and withdraw the plugger. A piece of gutta-percha will come along with the plugger, and the apical piece remain in the canal. • The apical piece is compacted using conventional hand plugger. • The remaining part of the canal is either filled in the same method until the canal is full, or back-filled using other system such as injectable gutta-percha technique: • The a layer of RMGIC is placed and tooth is re- stored. ROTATING CONDENSER TECHNIQUE In this technique an engine-driven compactor is placed into the canal and rotated at 12000 rpm, which gener- ate heat that plasticize and soften the gutta-percha. A rotating stainless steel instrument is used to generate this heat and compact gutta-percha laterally and apical- ly. Although original devices are no longer made, other similar devices such as Gutta-Condenser, Thermal Lat- eral Condenser are available. Most of these devices are made from Ni-Ti and rotated at 8000 rpm. The technique in summary: a gutta-percha cone is fitted into the canal and the the condenser is insert into the canal alongside master gutta-percha cone and rotated at 800 rpm. The generated heat will plasticize the gut- ta-percha and compact it laterally and apically. Concern has been found regarding the possibility of apical extrusion of the plasticized gutta-percha and modifications to the original technique has been sug- gested. The modification involve lateral compaction of gutta-percha master cone and a few accessory points, which will seal the apical part of the canal, then the condenser is introduced and rotated to fill the rest of the canal. Additional cones are added to the canal and plasticized if needed. PRECOATED CARRIERS In this technique a carrier made of plastic that is coat- ed with gutta-percha is introduced into a softening ma- chine and then it inserted into the canal. Most common device is Thermafil. It should be noted that this technique require canal preparation with files of at least 0.04 taper. Canals pre- pared with hand files of taper 0.02 will not work. Procedure • Dry the canal • Use carrier verifier of estimated size and insert it to the full working length and a radiograph is taken to confirm the position. Figure 3. Gutta-Condenser bur, which resemble inverted Hedstorm file. It should be engine-driven at 8000 rpm 6
- 7. • Coat the canal with sealer • Coated carrier of the same size as verifier is insert- ed in the conditioning oven for appropriate time • The heated carrier is then inserted into the canal shorter of the working length by 0.5 mm. • After gutta-percha has been cooled, the carrier is cut and condensed vertically. Additional gutta-per- cha can be added if needed. One modifications of this technique is to use cold compaction for the apical part of the canal and then using a coated carrier for the rest of the canal. INJECTION DELIVERY SYSTEMS In this technique the gutta-percha is heated in a spe- cial device (gutta-percha gun) and delivered into the canal as creamy softened gutta-percha. This tech- nique require a very definitive apical stop, and the possibility of apical extrusion is very high. Some modification of this technique called sectional injection technique, in which a piece of gutta-percha is melted to a plugger of suitable size and then in- troduced into the apical portion of the canal. Then gutta-percha can be injected for the rest of the canal. Injection delivery systems are very popular for back-filling the middle and coronal portion following warm vertical compaction or lateral compaction. Commercially available injection delivery systems is Obtura series. Figure 4. Coated carrier and verifier along each other 7
- 8. SOLVENT-SOFTENED GUTTA-PERCHA One technique is to fill the root canal with solution of rosin in chloroform, and the master cone is seated into the canal. Chloroform soften the surface of master cone and made it swell, and the rosin act as a glue to make the mass stick to the canal walls. Also some ready products are available such as Kloroperka, and Chloro-percha. Another technique is called chloroform dip technique. In this technique, the apical 2-5 mm of the master cone is dipped in chloroform for a few second and then with- drawn. The cone is left to dry. Chloroform soften the outer layer of master cone, and when seated into the canal it take its shape. SEALERS Sealers are used to fill the space between obturation mass and prepared dentinal wall. Objective of using a sealer are: • Cementing obturation material to the canal • Filling the spaces between obturation material and the canal • Act as lubricant • Act as antibacterial agent Ideal properties of sealer are: • Not irritating to periapical tissue • Insoluble in tissue fluids • Dimensionally stable • Good sealing ability • radiopaque • bacteriostatic • Good adhesion properties • Ease of manipulation • Non-staining to dentin • Easily removed when necessary Sealers that are available in use today: • Zinc oxide-eugenol sealers • Calcium hydroxide sealers • Resin sealers • Glass ionomer sealers • Silicone-based sealers Zinc oxide-eugenol sealers • Most commonly used sealers • Available products: Tubli-Seal, Roth Sealer, Pulp Canal Sealer. • Also modified products with extended working time are also available • They are porous and susceptible to dissolution in presence of tissue fluids • They are cytotoxic if extended beyond the apex, and causes cellular response, although it is clinical- ly insignificant. Calcium hydroxide sealers • Their sealing ability is similar to zinc oxide-euge- nol sealers • May be soluble in tissue fluids • Available products are: Sealapex, Apexit Plus, Acroseal Resin-based Sealers • Less popular than zinc oxide-eugenol sealer • AH Plus product has good sealing ability, less cyto- toxicity and low solubility • EndoREZ product is recommended for use with EndoREZ points, to increase bonding of obturation mass to dentin • Other available products are: Hybrid Root SEAL, MetaSEAL Glass Ionomer Sealers • It has sealing ability similar to traditional sealers • Activ GP product is used with Activ GP points Silicone-based Sealers • RoekoSeal product manufacturer claim this seal- er expand slightly on setting, and is highly radi- opaque, and has good sealing ability. However, no difference were noted between this sealer and AH Plus • GuttaFlow product is also expandable slightly on setting, and has less cytotoxicity than some other sealers REFERENCES 1. Harty’s Endodontics in Clinical Practice - Churchill Livingstone; 6 edition (May 18, 2010) 2. Endodontology, Michael A. Baumann 3. Pocket Atlas of Endodontics 4. A Clinical Guide to Endodontics, P. Carrotte, Brit- ish Dental Journal.