Dr pre1
•Télécharger en tant que DOCX, PDF•
1 j'aime•2,100 vues

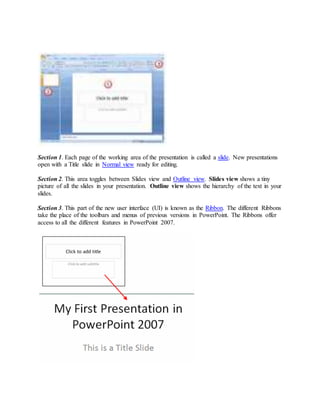
Section 1: Each slide in a PowerPoint presentation is called a slide. A new presentation opens with a Title slide ready for editing in Normal view. Section 2: The Slides/Outline pane toggles between Slides view and Outline view. Slides view shows thumbnails of all slides while Outline view shows the text hierarchy. Section 3: The new user interface in PowerPoint 2007 is called the Ribbon. The Ribbons replace toolbars and menus and provide access to all PowerPoint features.

Recommandé
Contenu connexe
Tendances
Tendances (20)
En vedette
Similaire à Dr pre1
Similaire à Dr pre1 (20)
Plus de Dara Corporates
Plus de Dara Corporates (20)
Dernier
Dernier (20)
Dr pre1
- 1. Section 1. Each page of the working area of the presentation is called a slide. New presentations open with a Title slide in Normal view ready for editing. Section 2. This area toggles between Slides view and Outline view. Slides view shows a tiny picture of all the slides in your presentation. Outline view shows the hierarchy of the text in your slides. Section 3. This part of the new user interface (UI) is known as the Ribbon. The different Ribbons take the place of the toolbars and menus of previous versions in PowerPoint. The Ribbons offer access to all the different features in PowerPoint 2007.
- 2. The Title Slide When you open a new presentation in PowerPoint 2007, the program assumes that you will begin your slide show with a Title slide. Adding a title and subtitle to this slide layout is as easy as clicking in the text boxes provided and typing. Add newsilde The New Slide buttonislocatedat the leftendof the Home Ribbon.Itcontainstwoseparate feature buttons.The default slide layoutforanew slide isthe Title and Contenttype of slide. 1. If the currently selected slide is a Title slide, or if this will be the second slide added to the presentation, the default slide layout Title and Content type will be added. Subsequent new slides will be added using the current slide type as a model. For example, if the current slide on screen was created using the Picture with Caption slide layout, the new slide will also be of that type. 2. The lower button will open the contextual menu showing the nine different slide layouts for you to choose from.
- 3. Title and Content Slide Layout for Text The Title and Content slide layout replaces both the bulleted list and content layout slides in earlier versions of PowerPoint. Now this one slide layout can be used for either of these two features. When using the bulleted text option, you simply click on the large text box and type your information. Each time you press the Enter key on the keyboard, a new bullet appears for the next line of text.
- 4. Title and Content Slide Layout for Content To add content other than text to the Title and Content slide layout, you would click on the appropriate colored icon in the set of six different content types. These choices include - table chart SmartArt picture clip art media clip
- 5. Charts Are Commonly Usedin PowerPoint Slides One of the most commonly used features shown on PowerPoint slides are charts. There are many different chart types available to reflect your particular type of content. Clicking the Chart icon on any content type of slide in PowerPoint opens the Insert Chart dialog box. Here you will select the best type of chart type to reflect your data. Once you have chosen the chart type, Microsoft Excel 2007 will open as well. A split window will show the chart in one window and the Excel window will show sample data for the chart. Making changes to the data in the Excel window, will reflect those changes in your chart.
- 6. Two Miniature Views The Slides/Outline pane is located on the left side of the PowerPoint 2007 screen. The default setting is for Slides. This shows thumbnail views of the slides in your presentation. Clicking on the Outline tab, will show a text outline of each slide in your presentation.
- 7. The Layout Button Any slide layout can be changed at any time, simply by clicking on the Layout button on the Home Ribbon. The list of slide layouts are as follows - 1. Title Slide - Used at the start of your presentation, or to divide sections of your presentation. 2. Title and Content - The default slide layout and the most commonly used slide layout. 3. Section Header - Use this slide type to separate different sections of the same presentation, rather than use an additional Title slide. It can also be used as an alternate to the Title slide layout. 4. Two Content - Use this slide layout if you wish to show text in addition to a graphic content type. 5. Comparison - Similar to the Two Content slide layout, but this slide type also includes a heading text box over each type of content. Use this type of slide layout to - o compare two types of the same content type (for example - two different charts) o show text in addition to a graphic content type
- 8. 6. Title Only - Use this slide layout if you want to place only a title on the page, rather than a title and subtitle. You can then insert other types of objects such as clip art, WordArt, pictures or charts if desired. 7. Blank - A blank slide layout is often used when a picture or other graphic object that needs no further information, will be inserted to cover the whole slide. 8. Content with Caption - Content (most often a graphic object such as a chart or picture) will be placed on the right side of the slide. The left side allows for a title and text to describe the object. 9. Picture with Caption - The upper part of the slide is used to place a picture. Under the slide you can add a title and descriptive text if desired. It isimportantto rememberthatyouare notlimitedtothe layoutof a slide asit firstappearsin PowerPoint2007. You mayadd, move or remove textboxesorotherobjectsatanytime on any slide.
- 9. Different Ways to View PowerPoint 2007 Slides Use the Slide View That is Right for the Task Slides in any PowerPoint presentation can be viewed in a variety of ways depending on the task at hand. To access all the different slide views, click on the View ribbon at the top of the screen. On the left end of the View tab of the ribbon you will see the different choices for methods to view your slides. 1. Normal View orSlide View as itis more commonlyknown, isthe mostoftenusedview while creatinga PowerPointpresentation. Whenyoufirststart the program,the screenopensinNormal View.Workingonalarge versionof a slide ishelpfulwhendesigningyourpresentation. 2. Slide Sorter View shows miniature versions of all the slides in horizontal rows. These miniature versions of the slides are called thumbnails. Slides can be easily deleted or rearranged quickly in this view. 3. NotesPages showa smallerversionof the slide withanareabelow forprintednotes.Eachslide iscreatedon itsown notespage.The speakercanprintthese pagesoutto use as a reference while makinghispresentation.The notesdonotshow onthe screenduringthe presentation. 4. Slide Show view is the view used for presenting to an audience. The whole screen is taken over by your PowerPoint 2007 presentation. Slide Show view can be accessed from the View tab of the ribbon or by pressing the F5 key on the keyboard. 5. Outline View can be accessed by selecting the Outline tab on the Slides/Outline pane at the left of the PowerPoint 2007 screen. Outline view shows all the text of all slides in a list. No graphics are shown in Outline view. Outline view is useful for quick editing purposes and can be exported out as a Word document to use as a summary handout. Quick Access Buttons
- 10. It is not necessary to switch to the View ribbon in order to quickly see your slides in a different view. At the bottom right corner of the PowerPoint screen, you will see the quick access buttons. These handy buttons are the same as in previous versions of PowerPoint. The screen shot above indicates the different buttons and their uses. You can quickly switch to Slide Sorter view, Normal (or Slide) view, or Slide Show view. You can also zoom in or out on the current view, or fit the current slide to the window. Background Colors and Graphics in PowerPoint 2007 The DesignRibbon The Design ribbon contains the features you will need to add or change a background in PowerPoint. Click on the background button on the right end of the Design ribbon. This will open the Format Background dialog box.
- 11. Notes 1. Backgroundscan be appliedtoindividual slides ortoall slidesinthe presentation. Use the Solid Fill Option Solid color choices are shown in the Fill section of the Format Background dialog box. 1. Click the Color drop down button to reveal standard color choices. 2. Select a color shown or click on the More Colors... option to reveal more color choices.
- 12. More Solid Color Options Solid background colors in PowerPoint can be chosen from the Standard or Custom color selections. Standard Background Colors Click the Standard tab at the top of the Colors dialog box. Click on a background color for your PowerPoint presentation. Click OK.
- 13. Use a Preset Gradient PowerPoint has several preset gradient fills available for you to choose as a background for your slides. Gradient colors can be effective as a PowerPoint background if chosen wisely. Be sure to consider the audience clientele when you choose the preset gradient background colors for your presentation. 1. Click the option for Gradient fill. 2. Click the drop down Preset colors button 3. Select a preset gradient fill 4. Click the Close button or the Apply to All button.
- 14. Five Different Gradient Fill Types Once you have chosen to apply a gradient fill to your PowerPoint background, you have five different options for the gradient fill type. 1. linear o the gradient colors flow in lines which can be from preset angles or a precise angle on the slide 2. radial o colors flow in a circular fashion from your choice of five different directions 3. rectangular o colors flow in a rectangular fashion from your choice of five different directions 4. path o colors flow from the center out to form a rectangle 5. shade from title o colors flow from the the title out to form a rectangle Background Textures Use textured backgrounds in PowerPoint carefully. They are often busy and make text difficult to read. This can detract from your message. When opting to choose a textured background for your PowerPoint presentation, choose a subtle design and make sure that there is good contrast between the background and the text.
- 15. Clip Art or Photographs as PowerPoint Backgrounds Photographs or clip art can be added as a background for your PowerPoint presentations. When you insert a picture or clip art as the background, PowerPoint will stretch it to cover the whole slide, if the object is small. This can often cause distortion to the graphic object and therefore some photos or graphics can be poor choices for backgrounds. If the graphic object is small, it can be tiled over the slide. This means that the picture or clip art object will be placed repeatedly across the slide in rows to completely cover the slide. Test your picture or clip art object to see which method works the best. The illustration above shows both methods. Choose to Offset a Picture Background You may wish to use a picture for your PowerPoint background, but not want it to be tiled or to cover the whole slide. A solution to this is to offset the picture from the edges of the slide. Once the picture is chosen as the background, edit the text boxes for the amount of offset you want from each edge of the slide. These measurements are in percentages. Note - It is wise to make the offset amount the same for all four sides of the slides. This will maintain the proportion ratio of the picture.
- 16. Fade the Picture Background In most cases, the picture background you choose should not be the focal point of the PowerPoint presentation. Once you have chosen the picture as a background, you can easily make it transparent by typing in a specific transparency percentage or by using the Transparent slider to get the effect that you want. Color Options for Picture Backgrounds
- 17. Once you have chosen a picture for the background, you may wish to change the effect. This is done in the Format Background dialog box. 1. Select the picture to become the PowerPoint background. 2. Click on the Picture link on the left side of the Format Background dialog box. 3. Click on the Recolor button. 4. Select an effect for your background picture. 5. Click on the Close button or Apply to All button Design Themes in PowerPoint 2007 Design themes are a new addition to PowerPoint 2007. They work in a similar way as the design templates in earlier versions of PowerPoint. A really nice feature of the design themes, is that you can immediately see the effect reflected on your slides, before making your decision. Access the DesignRibbon 1. Clickon the Design tab to access the Design ribbon. 2. Hoveryour mouse overanyof the designthemesshown. 3. The designisreflectedimmediatelyonyour slide. 4. Clickthe designtheme whenyoufindone thatsuitsyourneeds.
- 18. Test Out More Design Themes The design themes that are immediately visible on the Design ribbon are not all the themes available. You can scroll through the existing design themes by clicking on the up or down arrows to the right of the themes shown, or click the drop down arrow to reveal all of the available design themes at one time. More design themes are available to download from the Microsoft site, by clicking on that link.
- 19. DesignTheme Color Schemes Once you have selected a style of design theme that you like for your PowerPoint presentation, you are not limited to the color of the theme as it is currently applied. 1. Clickon the Colors buttonat the right endof the designthemesonthe Design ribbon. 2. Hoveryour mouse overthe variouscolorschemesshowninthe dropdownlist.The current choice will be reflectedonthe slide. 3. Clickthe mouse whenyoufindthe rightcolorscheme.
- 20. Select a Font Family Each design theme is assigned a font family. Once you have selected the design theme for your PowerPoint presentation, you can change the font family to one of the many groupings within PowerPoint 2007. 1. Click the Fonts button at the right end of the design themes shown on the Design ribbon. 2. Hover your mouse over any of the font families to see how this group of fonts will look in your presentation. 3. Click the mouse when you have made your selection. This font family will be applied to your presentation.
- 21. Change the Background Style Just as you were able to change the background on a plain PowerPoint slide, you can do the same while using one of the many design themes. 1. Clickthe Background Styles buttononthe Design ribbon. 2. Hoveryour mouse overanyof the backgroundstyles. 3. The backgroundstyle will be reflectedonthe slide foryoutoevaluate. 4. Clickthe mouse whenyoufindabackgroundstyle thatyou like.
- 22. Background Graphics Can Be Hidden Sometimes you want to show your slides with no background graphics. This is often the case for printing purposes. The background graphics will remain with the design theme, but can be hidden from view. 1. Check the Hide Background Graphics box on the Design ribbon. 2. The background graphics will disappear from your slides, but can be turned back on at any later time, by simply removing the check mark in the box. Add Clip Art and Pictures to PowerPoint 2007 Slides
- 23. Use A Content Slide Layout PowerPoint 2007 offers you a number of different ways to add clip art and pictures to a presentation. Perhaps the easiest way to do so is to select a slide layout that contains a placeholder for content such as clip art and pictures. On the Home ribbon either click on the New Slide button or change the current slide layout by clicking on the drop down arrow beside Layout. There are a number of different Content slide layouts available for you to choose from. To add a single picture or a piece of clip art, click on a simple layout such as Title and Content and the layout of your current slide will change to match your choice.
- 24. Adding Clip Art If you have chosen one of the simple content layouts, your PowerPoint 2007 slide should resemble the above graphic. The content icon in the middle of the slide contains links to six diffent types of content that you can add to the slide. The clip art button is in the middle of the bottom row of icons. Tip - If in doubt about which button to use, simply place your mouse over a button until the little help balloon appears. These balloons or Tool Tips will identify what the button is used for.
- 25. Using the Search Feature Clicking on the clip art icon activates PowerPoint 2007's clip art gallery. Type your search term(s) in the Search for - box and then click on the Go button. When the samples appear, scroll through the thumbnail images. When you have made your choice either double click on the image or click once to select the image and then click the OK button. Notes 1. If you didnot install the Clip Art Gallery whenyouinstalledPowerPoint2007 to yourcomputer, youwill needtobe connectedtothe internetinorderforPowerPointtosearchthe Microsoft Website for the clipart. 2. You are notlimitedtousingclipartfrom Microsoft.Anyclipart can be used,butif it isfrom anothersource, itmust firstbe savedto yourcomputeras a file. Thenyouwouldinsertthisclip art as if itwas a picture.
- 26. Resize Clip Art Clip art comes in different sizes. Some will be larger than your slide while others will be tiny. Either way you may need to resize the image you want to include in your presentation. When you click on a clip art image, a border and tiny white circles appear on the edges of the image. These circles are called resizing handles (or selection handles). Dragging one of these handles allows you to enlarge or shrink your picture. The best way to resize clip art or any picture, is to use the resizing handles located on corners of the picture, rather than the ones at the top, bottom or sides of the picture. Using the corner handles will keep your image in proportion as you resize it. If you don't maintain your image's proportion it is likely to end up looking distorted or fuzzy in your presentation.
- 27. Inserting Photos Like clip art, photographs and other pictures can be added to a slide by choosing a Content Layout slide and clicking on the appropriate icon (for pictures it's the mountain icon). An alternative to this method is to select the Insert ribbon and click on the Picture icon, as shown in the picture at the top of this page. An advantage of using this approach for either pictures or clip art is that you do not need to use one of the preset slide layouts containing a content icon to insert an image into your slide. The example shown in the following pages, inserts the picture into a Title slide layout. Search Your Computer for the Photos If you have made no changes to the settings in PowerPoint 2007 since the original install, PowerPoint will default to the My Pictures folder to look for your pictures. If this is where you have stored them, then select the correct picture and click on the Insert button. If your pictures are located elsewhere on your computer, use the drop-down arrow at the end of the Look in box and find the folder containing your pictures.
- 28. Drag the Resizing Handles Just as you did for the clip art, resize the photograph on the slide, by dragging the corner resizing handles. Using the corner resizing handles will ensure that there is no distortion to your picture. When you hover your mouse over a resizing handle, the mouse pointer changes to a two headed arrow. To move the picture to a new location, hover your mouse over the center of the picture. The mouse pointer becomes a four headed arrow. This is a move arrow in all graphic programs. Note - It is important to note that even if you resize your photo to a small visual size on the slide, it still retains its original large file size. For better use of large pictures on slides you are wise to optimize the pictures first, before inserting them into the slide. Modifying Slide Layouts in PowerPoint 2007
- 29. Change the Slide Layout to Suit Your Needs Click on the Layout drop down list on the Home ribbon to select a slide layout. If there isn't a slide layout that is perfect for your presentation, select one that comes close to what you want and edit it. It is an easy matter to add or delete objects from a slide.
- 30. Entering Text Entering a title or other text is easy in PowerPoint. Simply click in the appropriate text box and type your text. The text will take on the formatting that has been applied to the design theme. Pictures Enhance a Presentation Content layout slides, such as the slide in this example, have a button shown on the slide to click, to add the type of content you want in that section of the slide. Content options available are inserttable insertchart insertSmartArtgraphics insertpicture insertclipart insertmediaclip To followthisexample,youneedtoclickthe buttonto insertapicture.Locate the picture onyour computer.
- 31. Note - If you have not chosen a Content layout type of slide you can easily insert a picture from the ribbon. Clickon the Insertribbon. Clickon the Picture icon Locate the picture onyour computer. Delete Unwanted Graphic Objects Text boxes or other graphic objects can be deleted using the mouse and the keyboard. Steps to delete a text box 1. Click on the border of the text box. If you click in the text box itself, PowerPoint assumes that you wish to add or edit text. In order to delete the whole text box, you must click on the border of the text box. 2. Press the Delete key on the keyboard.
- 32. Insert a New Text Box If your slide does not have a text box already, you can quickly add one using the Text Box button. This button is found on the Insert ribbon. Click the Text Box button and then drag the mouse on the slide to create a text box in the location and width of your choice. The text box will expand lengthwise as you type to accommodate your text. Use the selection handles to widen the text box further if necessary.
- 33. Steps for Resizing pictures 1. Click on the picture to select it. 2. Place your mouse over one of the corner resizing handles. All resizing handles appear as white circles. The mouse cursor will change to a two-headed arrow. Dragging the corner handle to resize the picture will retain its proportions. Steps for Moving pictures 1. Place the mouse anywhere over the picture. The mouse cursor will change to a four- headed arrow. 2. Drag the picture to the new location on the screen. Tips Using the corner resizing handles will always keep your picture in the correct proportions. Using the top or side handles will cause distortion in your picture. The mouse cursor will always change to a two-headed arrow when placed over a resize handle on a graphic. Two-headed arrows are always resize arrows. This is standard for all programs. The mouse cursor will always change to a four-headed arrow when placed over a picture or the border of a graphic object. Four-headed arrows are always move arrows. This is standard for all programs.
- 34. Add, Delete or Rearrange PowerPoint 2007 Slides New Slide Button Click on the New Slide button on the Home tab of the ribbon to add a new slide to your presentation. Choose a slide layout that suits your needs from the samples shown.
- 35. Selectthe Slide On the Slides tab of the Slides / Outline task pane on the left of your screen, click on the thumbnail of the slide you wish to delete. Press the Delete key on your keyboard. Miniature Slide Versions Alternatively, you may wish to use the slide sorter view to delete slides.
- 36. To switch to Slide Sorter view, select the View tab on the ribbon and click on the Slide Sorter button at the left side of the ribbon. MovingSlides Slide sorter view also shows thumbnails of all the slides in your presentation. Steps to move slides in Slide Sorter view 1. Clickon the slide youwishtomove. 2. Drag the slide tothe newlocation. 3. A vertical line appearsasyoudrag the slide.Whenthe vertical line isinthe correctlocation, release the mouse. 4. The slide movestothisnewlocation.
- 37. Steps to move slides in the Slides / Outline pane 1. Click on the slide you wish to move. 2. Drag the slide to the new location. 3. A horizontal line appears as you drag the slide. When the horizontal line is in the correct location, release the mouse. 4. The slide moves to the new location. Use Slide Transitions to Add Movement to PowerPoint 2007 Slides
- 38. Choose a Slide Transition Click on the Animations tab of the ribbon to access the slide transition options. The most common slide transitions are shown as icons on the ribbon. Click the drop down arrow to see the complete list of transitions available, or scroll through the list, one row at a time. A Variety of Slide Transition Options There are several options that you can choose to add to your PowerPoint 2007 slides. Transition Sound Transition Speed Whether to apply to this slide or Apply to All
- 39. How to advance the slide o on mouse click o or automatically after a set number of seconds Many Sound Effects to Choose From Sound effects can be effective if applied wisely to PowerPoint slide transitions. For example -- a presentation that is about the increasing sales figures might be effective with a cash register sound effect on a slide transition. There is also an option to Loop Until Next Sound which you can apply to the slide transition. In my opinion, this should be used only sparingly, and only in certain situations (such as a presentation for small children). The sound effect will keep repeating until another sound effect is reached, and could be very distracting to the audience. A single sound effect will certainly make your point. Apply Custom Animations in PowerPoint 2007
- 40. Animations Tab on the Ribbon 1. Clickthe Animations tabon the ribbon. 2. Selectthe objecttobe animated.Forexample atextbox,ora graphicobject. 3. Clickthe drop downbuttonbeside the CustomAnimation buttonlocatedbeside Animate: 4. The listof optionsshownallowsyoutoquicklyaddone of the mostcommonlyusedanimation types.
- 41. Openthe Custom AnimationsTask Pane There are many more animation options available. Simply click on the Custom Animations button on the Animations section of the ribbon. This opens the Custom Animations task pane on the right side of the screen. This will look familiar to users of earlier versions of PowerPoint.
- 42. Animate Text or Graphic Objects 1. Choose the title, a picture or clip art, or a bulleted list to apply the first animation. o Select graphics by clicking on the object. o Select a title or bulleted list by clicking on the border of the text box. 2. Once an object has been selected, the Add Effect button becomes active in the Custom Animations task pane.
- 43. Choose an Animation Effect With the first object selected, the Add Effect button becomes active in the Custom Animation task pane. Select a style of effect, such as Entrance, Emphasis, Exit or Motion Path. Choosing one of these styles will reveal a sub-menu with selections of animations. Click on different animations and you will see a preview of the effect on your slide. Make your selection.
- 44. Selectthe Effectto be Modified To modify the custom animation effect, select the drop-down arrow beside each of the three categories - Start, Direction and Speed. 1. Start o On click - start the animationonthe mouse click o Withprevious - start the animationatthe same time asthe previousanimation(could be anotheranimationonthisslide orthe slide transition of thisslide) o Afterprevious - startthe animationwhenthe previousanimationortransitionhas finished 2. Direction o Thisoptionwill varydependingonwhich Effectyouhave chosen.Directionscanbe from top,from rightside,frombottomandso on 3. Speed o SpeedsvaryfromVerySlow toVeryFast
- 45. Move Animation Effects Up or Down in the List After applying more than one animation to a slide, you may wish to re-order them so that the title appears first and objects appear as you refer to them. 1. Click on the animation you wish to move. 2. Use the Re-Order arrows at the bottom of the Custom Animation task pane to move the animation up or down in the list. Previewthe Slide Show Check to make sure the AutoPreview box is checked. Whenyouclick the Play buttonat the bottomof the CustomAnimation taskpane,thissingle slide will playinthe currentwindow,showinganyanimationsappliedtothe slide. Whenyouclick the Slide Show buttonat the bottomof the CustomAnimation taskpane,the slide show will playinfullscreen,startingfromthiscurrentslide. Clickthe Slide Show tab onthe ribbon andmake a choice,or pressthe F5 keyonthe keyboard to playthe complete showinfull screen. Afterviewingthe slide show,youcanmake any necessaryadjustmentsandpreview once again.