ERP System Implementation Kubernetes Cluster with Sticky Sessions

ERP System Implementation on Kubernetes Cluster with Sticky Sessions: 01. Security Features Enabled in Kubernetes Cluster. 02. SNMP, Syslog and audit logs enabled. 03. Enabled ERP no login service user. 04. Auto-scaling enabled both ESB and Jboss Pods. 05. Reduced power consumption using the scale in future during off-peak days. 06. NFS enables s usual with ERP service user. 07. External Ingress( Load Balance enabled). 08. Cluster load balancer enabled by default. 09. SSH enabled via both putty.exe and Kubernetes management console. 10. Network Monitoring enabled on Kubernetes dashboard. 11. Isolated Private and external network ranges to protect backend servers (pods). 12. OS of the pos is updated with the latest kernel version. 13. Core Linux OS will reduce security threats. 14. Lightweight OS over small HDD space 15. Less amount of RAM usage has been enabled. 16. AWS ready. 17. Possible for exporting into Public cloud ENV. 18. L7 and L4 Heavy Load Balancing Enabled. 19. Snapshot Versioning Control Enabled. 20. Many More ………etc.

Recommandé
Contenu connexe
Tendances
Tendances (20)
Similaire à ERP System Implementation Kubernetes Cluster with Sticky Sessions
Similaire à ERP System Implementation Kubernetes Cluster with Sticky Sessions (20)
Plus de Chanaka Lasantha
Plus de Chanaka Lasantha (20)
Dernier
Dernier (20)
ERP System Implementation Kubernetes Cluster with Sticky Sessions
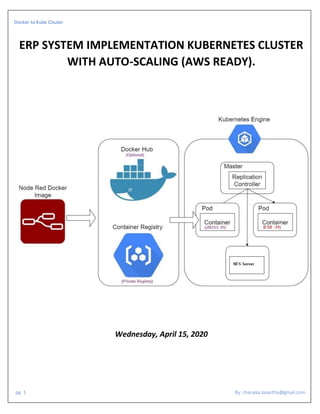
- 1. Docker to Kube Clsuter pg. 1 By: chanaka.lasantha@gmail.com ERP SYSTEM IMPLEMENTATION KUBERNETES CLUSTER WITH AUTO-SCALING (AWS READY). Wednesday, April 15, 2020
- 2. Docker to Kube Clsuter pg. 2 By: chanaka.lasantha@gmail.com CREATING NFS SERVER: apt -y install nfs-kernel-server vim /etc/exports /opt/bkpdata *(rw,async,no_wdelay,insecure_locks,no_root_squash) root@master:/var/sheared# showmount -e 192.168.2.28 Export list for 192.168.2.28: /opt/bkpdata * MOUNT NFS CLIENT ON ALL NODES AND MASTER: apt -y install nfs-common vim /etc/fstab 192.168.2.28:/opt/bkpdata /var/sheared nfs rw 0 0 mount /var/sheared df -hT 192.168.2.28:/opt/bkpdata nfs4 49G 9.0G 38G 20% /var/sheared DOCKERFILE OF EBS: # Base system is the latest LTS version of Ubuntu. FROM ubuntu # Make sure we don't get notifications we can't answer during building. ENV DEBIAN_FRONTEND non-interactive # Prepare scripts and configs ADD supervisor.conf /etc/supervisor.conf # Download and install everything from the repos. RUN apt-get -q -y update; apt-get -q -y upgrade && apt-get -q -y install sudo openssh-server supervisor vim iputils-ping net-tools curl htop tcpdump unzip alien && apt-get clean all && mkdir /var/run/sshd # Create script folder RUN mkdir -p /app/scripts # Set working dir WORKDIR /app # Adding Jboss PID kill script into the docker container with permission. #RUN chmod 775 -R /app/scripts/* # Adding JDK package as deb install. COPY jdk-7u76-linux-x64.rpm /app RUN alien --scripts -i /app/jdk-7u76-linux-x64.rpm # Adding Jboss application into the /app folder. COPY wso2esb-4.8.0.zip /app RUN unzip /app/wso2esb-4.8.0.zip RUN chmod 775 -R /app/wso2esb-4.8.0 # Set custom ENV for the node ENV JAVA_HOME=/usr/java/jdk1.7.0_76/bin/java
- 3. Docker to Kube Clsuter pg. 3 By: chanaka.lasantha@gmail.com # Set ENV CMD ["source /etc/profile"] # Set root password RUN echo 'root:z80cpu' >> /root/passwdfile # Create user and it's password RUN useradd -m -G sudo chanakan RUN echo 'chanakan:z80cpu' >> /root/passwdfile # Apply root password RUN chpasswd -c SHA512 < /root/passwdfile RUN rm -rf /root/passwdfile # Enable ROOT access for the root user (Optional) RUN sed -i 's/#PermitRootLogin prohibit-password/PermitRootLogin yes/g' /etc/ssh/sshd_config # Port 22 is used for ssh EXPOSE 22 8280 8243 9443 11111 35399 9999 9763 # Assign /data as static volume. VOLUME ["/data"] # Starting sshd CMD ["supervisord", "-c", "/etc/supervisor.conf"] USER root DOCKERFILE OF JBOSS: # Base system is the latest LTS version of Ubuntu. FROM ubuntu # Make sure we don't get notifications we can't answer during building. ENV DEBIAN_FRONTEND non-interactive # Prepare scripts and configs ADD supervisor.conf /etc/supervisor.conf # Download and install everything from the repos. RUN apt-get -q -y update; apt-get -q -y upgrade && apt-get -q -y install sudo openssh-server supervisor vim iputils-ping net-tools curl unzip tcpdump alien && apt-get clean all && mkdir /var/run/sshd # Create script folder RUN mkdir -p /app/scripts RUN mkdir -p /app/JAVADIR RUN mkdir -p /app/logs RUN mkdir -p /opt/images/temp/daily/ RUN mkdir -p /opt/images/approval/ RUN mkdir -p /opt/images/documents/ RUN mkdir -p /opt/images/signatures/ RUN mkdir -p /opt/images/documents/insurance/renewal RUN mkdir -p /opt/images/documents/officerupload RUN mkdir -p /opt/images/documents/cheque/statementUpload
- 4. Docker to Kube Clsuter pg. 4 By: chanaka.lasantha@gmail.com RUN mkdir -p /opt/images/documents/budget/ RUN mkdir -p /opt/images/documents/finance/jrnlUpload/ RUN mkdir -p /opt/images/documents/bulkReceipt/ RUN mkdir -p /opt/images/documents/recovery/bulkInteract/ RUN mkdir -p /opt/images/documents/borrow/scheduleUpload/ # Set working dir WORKDIR /app # Adding Jboss PID kill script into the docker container with permission. COPY JBOSS_STOP.sh /app/scripts RUN chmod 775 -R /app/scripts/* # Adding JDK package as deb install. COPY jdk-7u76-linux-x64.rpm /app RUN alien --scripts -i /app/jdk-7u76-linux-x64.rpm # Adding Jboss application into the /app folder. COPY jboss-as-7.1.3.Final.zip /app RUN unzip /app/jboss-as-7.1.3.Final.zip RUN chmod 775 -R /app/jboss-as-7.1.3.Final #ADD cc-erp-ear-4.0.0.ear /app/jboss-as-7.1.3.Final/standalone/deployments/ #RUN chown root:root /app/jboss-as-7.1.3.Final/standalone/deployments/cc-erp-ear-4.0.0.ear # Set custom ENV for the node ENV JAVA_HOME=/usr/java/jdk1.7.0_76/bin/java RUN echo "export JBOSS_HOME=/app/jboss-as-7.1.3.Final" >> /etc/profile # Set ENV CMD ["source /etc/profile"] # Set root password RUN echo 'root:z80cpu' >> /root/passwdfile # Create user and it's password RUN useradd -m -G sudo chanakan RUN echo 'chanakan:z80cpu' >> /root/passwdfile # Apply root password RUN chpasswd -c SHA512 < /root/passwdfile RUN rm -rf /root/passwdfile # Enable ROOT access for the root user (Optional) RUN sed -i 's/#PermitRootLogin prohibit-password/PermitRootLogin yes/g' /etc/ssh/sshd_config # Port 22 is used for ssh EXPOSE 22 9191 # Assign /data as static volume. VOLUME ["/data"] # Starting sshd CMD ["supervisord", "-c", "/etc/supervisor.conf"] USER root
- 5. Docker to Kube Clsuter pg. 5 By: chanaka.lasantha@gmail.com SUPERVISOR CONFIG FOR JBOSS (supervisor.conf): [supervisord] nodaemon=true [program:sshd] directory=/usr/local/ command=/usr/sbin/sshd -D autostart=true autorestart=true redirect_stderr=true [program:jboss7] command=/app/jboss-as-7.1.3.Final/bin/standalone.sh -b 0.0.0.0 -c standalone.xml stdout_logfile=NONE stderr_logfile=NONE autorestart=true autostart=true user=root directory=/app/jboss-as-7.1.3.Final environment=JAVA_HOME=/usr/java/jdk1.7.0_76,JBOSS_HOME=/app/jboss-as-7.1.3.Final,JBOSS_BASE_DIR=/app/jboss-as- 7.1.3.Final/standalone,RUN_CONF=/app/jboss-as-7.1.3.Final/bin/standalone.conf stopasgroup=true SUPERVISOR CONFIG FOR ESB (supervisor.conf): [supervisord] nodaemon=true [program:sshd] directory=/usr/local/ command=/usr/sbin/sshd -D autostart=true autorestart=true redirect_stderr=true [program:esb] command=/app/wso2esb-4.8.0/bin/wso2server.sh & stdout_logfile=NONE stderr_logfile=NONE autorestart=true autostart=true user=root directory=/app/wso2esb-4.8.0 environment=JAVA_HOME=/usr/java/jdk1.7.0_76 stopasgroup=true
- 6. Docker to Kube Clsuter pg. 6 By: chanaka.lasantha@gmail.com BUILD AND RUN THE DOCKER IMAGE(FOR TESTING): root@master:~/SSH# docker build -t cclk/jboss_ssh . root@master:~/SSH# docker images root@master:~/SSH# docker run -h "LKCOAPP19DOCKER" -it -d --privileged=true --name LKCOAPP19DOCKER --restart unless-stopped -p 2202:22 -p 9191:9191 cclk/jboss_ssh root@master:~/SSH# ssh root@192.168.2.28 -p 2202 root@LKCOAPP19DOCKER# tail -f /app/jboss-as-7.1.3.Final/standalone/log/server.log root@master:~/SSH# docker stop LKCOAPP19DOCKER root@master:~/ESB# docker build -t cclk/esb_ssh . root@master:~/ESB# docker images root@master:~/ESB# docker rm LKCOAPP19DOCKER root@master:~/ESB# docker run -h "LKCOAPP17DOCKER" -it -d --privileged=true --name LKCOAPP17DOCKER --restart unless-stopped -p 2203:22 -p 9443:9443 -p 8280:8280 -p 8243:8243 -p 11111:11111 -p 35399:35399 -p 9999:9999 -p 9763:9763 cclk/esb_ssh root@master:~/ESB# docker ps root@master:~/SSH# ssh root@192.168.2.28 -p 2203 root@LKCOAPP19DOCKER# tail -f /app/jboss-as-7.1.3.Final/standalone/log/server.log root@master:~/SSH# docker stop LKCOAPP19DOCKER DOCKER CONTAINER TO AN IMAGE CONVENTION: root@master:~/SSH# docker commit LKCOAPP19DOCKER root@master:~/SSH# docker images REPOSITORY TAG IMAGE ID CREATED SIZE <none> <none> cd414eeb0789 24 seconds ago 4.98GB root@master:~/SSH# docker tag cd414eeb0789 jboss_ready root@master:~/SSH# docker images REPOSITORY TAG IMAGE ID CREATED SIZE jboss_ready latest cd414eeb0789 2 minutes ago 4.98GB
- 7. Docker to Kube Clsuter pg. 7 By: chanaka.lasantha@gmail.com DELETE OLDEST CONTAINER AND POWERUP LATEST CONTAINER TO VERYFY: root@master:~/SSH# docker rm LKCOAPP19DOCKER -f root@master:~/ESB# docker rm LKCOAPP17DOCKER -f root@master:~/SSH# docker run -h "LKCOAPP19DOCKERNEW" -it -d --privileged=true --name LKCOAPP19DOCKERNEW --restart unless-stopped -p 2202:22 -p 9191:9191 jboss_ready docker run -h "LKCOAPP17DOCKERNEW" -it -d --privileged=true --name LKCOAPP17DOCKERNEW --restart unless-stopped -p 2203:22 -p 9443:9443 -p 8280:8280 -p 8243:8243 -p 11111:11111 -p 35399:35399 -p 9999:9999 -p 9763:9763 cclk/esb_ssh root@master:~/SSH# ssh root@192.168.2.28 -p 2202 root@master:~/SSH# ssh root@192.168.2.28 -p 2203 PUSHING INTO DOCKER PRIVATE REGISTRY: root@master:~# docker image tag jboss_ready lkcodockerreg.cclk.lk:5000/jboss_ready root@master:~# docker push lkcodockerreg.cclk.lk:5000/jboss_ready root@master:~# docker image tag esb_ready lkcodockerreg.cclk.lk:5000/esb_ready root@master:~# docker push lkcodockerreg.cclk.lk:5000/esb_ready root@master:~# docker images
- 8. Docker to Kube Clsuter pg. 8 By: chanaka.lasantha@gmail.com DEFINE PV (PERSISTENT VOLUME) OBJECT ON MASTER NODE: vim pv-volume.yaml kind: PersistentVolume apiVersion: v1 metadata: name: task-pv-volume labels: type: local annotations: pv.beta.kubernetes.io/gid: "1234" spec: storageClassName: manual capacity: storage: 10Gi accessModes: - ReadWriteOnce hostPath: path: "/var/sheared" kubectl apply -f pv-volume.yaml --validate=false DEFINE PVC (PERSISTENT VOLUME CLAIM) OBJECT ON MASTER NODE: vim pv-claim.yaml kind: PersistentVolumeClaim apiVersion: v1 metadata: name: task-pv-claim spec: storageClassName: manual accessModes: - ReadWriteOnce resources: requests: storage: 3Gi kubectl apply -f pv-claim.yaml --validate=false
- 9. Docker to Kube Clsuter pg. 9 By: chanaka.lasantha@gmail.com EDIT YAML OF JBOSS CLSUTER: root@master:~# vim test-ssh.yaml kind: Service apiVersion: v1 metadata: name: test-ssh annotations: service.beta.kubernetes.io/do-loadbalancer-algorithm: least_connections service.beta.kubernetes.io/do-loadbalancer-protocol: "http" service.beta.kubernetes.io/do-loadbalancer-sticky-sessions-type: "cookies" service.beta.kubernetes.io/do-loadbalancer-sticky-sessions-cookie-name: "example" service.beta.kubernetes.io/do-loadbalancer-sticky-sessions-cookie-ttl: "3600" service.beta.kubernetes.io/do-loadbalancer-healthcheck-port: "9191" service.beta.kubernetes.io/do-loadbalancer-healthcheck-path: "/cc-erp/private/loginSuccess.view.control" service.beta.kubernetes.io/do-loadbalancer-healthcheck-check-interval-seconds: "3" service.beta.kubernetes.io/do-loadbalancer-healthcheck-response-timeout-seconds: "5" service.beta.kubernetes.io/do-loadbalancer-healthcheck-unhealthy-threshold: "3" service.beta.kubernetes.io/do-loadbalancer-healthcheck-healthy-threshold: "5" namespace: default labels: app: test-ssh spec: type: LoadBalancer clusterIP: deprecatedPublicIPs: - 192.168.2.28 externalIPs: - 192.168.2.28 type: NodePort selector: app: test-ssh # This is necessary for sticky-sessions to avoid NAT confusion on the way in. externalTrafficPolicy: Local ports: - name: management protocol: TCP port: 2202 targetPort: 22 nodePort: 32759
- 10. Docker to Kube Clsuter pg. 10 By: chanaka.lasantha@gmail.com - name: jboss protocol: TCP port: 9191 targetPort: 9191 nodePort: 32767 --- apiVersion: apps/v1 kind: Deployment metadata: name: test-ssh labels: app: test-ssh spec: replicas: 2 selector: matchLabels: app: test-ssh template: metadata: labels: app: test-ssh spec: volumes: - name: nfs-share persistentVolumeClaim: claimName: task-pv-claim containers: - name: test-ssh image: lkcodockerreg.cclk.lk:5000/jboss_ready ports: - containerPort: 22 volumeMounts: - mountPath: "/opt/images" name: nfs-share readOnly: false # This is necessary for sticky-sessions because it can only # consistently route to the same nodes, not pods. affinity: podAntiAffinity: requiredDuringSchedulingIgnoredDuringExecution: - labelSelector: matchLabels: app: test-ssh topologyKey: kubernetes.io/hostname TO APPLY SERVICE AND DEPLOYMENT: root@master:~# kubectl apply -f test-ssh.yaml deployment.apps/test-ssh created service/test-ssh created root@master:~# watch -n 0.2 'kubectl get pods --all-namespaces -o wide'
- 11. Docker to Kube Clsuter pg. 11 By: chanaka.lasantha@gmail.com AFTER DEPLOYMENT (TESING): root@master:~# kubectl describe service test-ssh root@master:~# ssh root@192.168.2.28 -p 2202 EDIT YAML OF ESB CLSUTER: root@master:~# vim esb-ssh.yaml kind: Service apiVersion: v1 metadata: name: esb-ssh annotations: service.beta.kubernetes.io/do-loadbalancer-algorithm: least_connections service.beta.kubernetes.io/do-loadbalancer-protocol: "https" service.beta.kubernetes.io/do-loadbalancer-tls-passthrough: "true" service.beta.kubernetes.io/do-loadbalancer-sticky-sessions-type: "cookies" service.beta.kubernetes.io/do-loadbalancer-sticky-sessions-cookie-name: "exampleesb" service.beta.kubernetes.io/do-loadbalancer-sticky-sessions-cookie-ttl: "3600" service.beta.kubernetes.io/do-loadbalancer-healthcheck-port: "9443" service.beta.kubernetes.io/do-loadbalancer-healthcheck-path: "/carbon/admin/login.jsp" service.beta.kubernetes.io/do-loadbalancer-healthcheck-check-interval-seconds: "3" service.beta.kubernetes.io/do-loadbalancer-healthcheck-response-timeout-seconds: "5" service.beta.kubernetes.io/do-loadbalancer-healthcheck-unhealthy-threshold: "3" service.beta.kubernetes.io/do-loadbalancer-healthcheck-healthy-threshold: "5" namespace: default labels: app: esb-ssh spec: clusterIP: deprecatedPublicIPs: - 192.168.2.28 externalIPs:
- 12. Docker to Kube Clsuter pg. 12 By: chanaka.lasantha@gmail.com - 192.168.2.28 type: NodePort selector: app: esb-ssh # This is necessary for sticky-sessions to avoid NAT confusion on the way in. externalTrafficPolicy: Local ports: - name: management protocol: TCP port: 2203 targetPort: 22 nodePort: 31760 - name: esbsoap protocol: TCP port: 8280 targetPort: 8280 nodePort: 31768 - name: esbauth protocol: TCP port: 8243 targetPort: 8243 nodePort: 31769 - name: esbgui protocol: TCP port: 9443 targetPort: 9443 nodePort: 31770 --- apiVersion: apps/v1 kind: Deployment metadata: name: esb-ssh labels: app: esb-ssh spec: replicas: 2 selector: matchLabels: app: esb-ssh template: metadata: labels: app: esb-ssh spec: volumes: - name: nfs-share persistentVolumeClaim: claimName: task-pv-claim containers: - name: esb-ssh image: lkcodockerreg.cclk.lk:5000/esb_ready ports: - containerPort: 22 volumeMounts: - mountPath: "/opt/images" name: nfs-share
- 13. Docker to Kube Clsuter pg. 13 By: chanaka.lasantha@gmail.com readOnly: false # This is necessary for sticky-sessions because it can only consistently route to the same nodes, not pods. affinity: podAntiAffinity: requiredDuringSchedulingIgnoredDuringExecution: - labelSelector: matchLabels: app: esb-ssh topologyKey: kubernetes.io/hostname TO APPLY SERVICE AND DEPLOYMENT: root@master:~# kubectl apply -f esb-ssh.yaml root@master:~# watch -n 0.2 'kubectl get pods --all-namespaces -o wide' root@master:~# kubectl describe service esb-ssh RESTART A CONTAINER INSIDE OF POD: root@master:~/ESB# kubectl delete pod esb-ssh-675995598d-szwp7 You can use the following command to clean these components root@master:~/ESB# docker system prune will be showed the message below: WARNING! This will remove: - all stopped containers - all volumes not used by at least one container - all networks not used by at least one container - all dangling images
- 14. Docker to Kube Clsuter pg. 14 By: chanaka.lasantha@gmail.com RESOURCE REQUESTS AND LIMITS OF POD AND CONTAINER: Each Container of a Pod can specify one or more of the following: spec.containers[].resources.limits.cpu spec.containers[].resources.limits.memory spec.containers[].resources.limits.hugepages-<size> spec.containers[].resources.requests.cpu spec.containers[].resources.requests.memory spec.containers[].resources.requests.hugepages-<size> Although requests and limits can only be specified on individual Containers, it is convenient to talk about Pod resource requests and limits. A Pod resource request/limit for a particular resource type is the sum of the resource requests/limits of that type for each Container in the Pod. MEANING OF CPU: Limits and requests for CPU resources are measured in cpu units. One cpu, in Kubernetes, is equivalent to 1 vCPU/Core for cloud providers and 1 hyperthread on bare-metal Intel processors. Fractional requests are allowed. A Container with spec.containers[].resources.requests.cpu of 0.5 is guaranteed half as much CPU as one that asks for 1 CPU. The expression 0.1 is equivalent to the expression 100m, which can be read as “one hundred millicpu”. Some people say “one hundred millicores”, and this is understood to mean the same thing. A request with a decimal point, like 0.1, is converted to 100m by the API, and precision finer than 1m is not allowed. For this reason, the form 100m might be preferred. CPU is always requested as an absolute quantity, never as a relative quantity; 0.1 is the same amount of CPU on a single-core, dual-core, or 48-core machine. MEANING OF MEMORY: Limits and requests for memory are measured in bytes. You can express memory as a plain integer or as a fixed-point integer using one of these suffixes: E, P, T, G, M, K. You can also use the power-of-two equivalents: Ei, Pi, Ti, Gi, Mi, Ki. For example, the following represent roughly the same value: 128974848, 129e6, 129M, 123Mi Here’s an example. The following Pod has two Containers. Each Container has a request of 0.25 cpu and 64MiB (226 bytes) of memory. Each Container has a limit of 0.5 cpu and 128MiB of memory. You can say the Pod has a request of 0.5 cpu and 128 MiB of memory, and a limit of 1 cpu and 256MiB of memory. apiVersion: v1 kind: Pod metadata: name: frontend spec: containers: - name: db image: mysql env: - name: MYSQL_ROOT_PASSWORD value: "password" resources: requests: memory: "64Mi" cpu: "250m" limits: memory: "128Mi" cpu: "500m" - name: wp image: wordpress resources:
- 15. Docker to Kube Clsuter pg. 15 By: chanaka.lasantha@gmail.com requests: memory: "64Mi" cpu: "250m" limits: memory: "128Mi" cpu: "500m" TO SET THE RESOURCE / REVOKE REQUESTS AND LIMITS OF THE DEPLOYMENT: root@master:~# kubectl set resources deployment test-ssh --limits cpu=200m,memory=512Mi --requests cpu=100m,memory=256Mi root@master:~# kubectl set resources deployment nginx --limits cpu=0,memory=0 --requests cpu=0,memory=0 root@master:~# watch -n 0.2 'kubectl get pods -o wide' TO SCALE UP: root@master:~# kubectl scale deployment test-ssh --replicas=3 root@master:~# kubectl scale deployment esb-ssh --replicas=3 root@master:~# watch -n 0.2 'kubectl get pods -o wide' CREATE HORIZONTAL POD AUTOSCALER: The following command will create a Horizontal Pod Autoscaler that maintains between 1 and 10 replicas of the Pods controlled by the test-ssh and esb- ssh deployment we created in the first step of these instructions. Roughly speaking, HPA will increase and decrease the number of replicas (via the deployment) to maintain an average CPU utilization across all Pods of 50% (since each pod requests 200 milli-cores by kubectl run), this means average CPU usage of 100 milli-cores). See here for more details on the algorithm. root@master:~# kubectl autoscale deployment test-ssh --cpu-percent=50 --min=1 --max=10 root@master:~# kubectl autoscale deployment esb-ssh--cpu-percent=50 --min=1 --max=10 TO EXPOSE PORT 2202 FOR EXTERNAL ACCESS(Optional): root@master:~# kubectl expose deployment test-ssh --port=2202 --target-port=22 root@master:~# kubectl expose deployment test-ssh --port=9191 --target-port=9191 CEARTE SSL CERTIFICATES FRO HAPROXY – SELFSIGNED: root@master# apt -y install haproxy root@master# mkdir -p /etc/pki/tls/certs root@master# openssl req -x509 -nodes -newkey rsa:2048 -keyout /etc/pki/tls/certs/haproxy.pem -out /etc/pki/tls/certs/haproxy.pem -days 3650 root@master# chmod 600 /etc/pki/tls/certs/haproxy.pem
- 16. Docker to Kube Clsuter pg. 16 By: chanaka.lasantha@gmail.com CONFIGURE HAPROXY LOAD BALANCER(vim /etc/haproxy/haproxy.cfg): vim /etc/haproxy/haproxy.cfg global log 127.0.0.1 local2 info chroot /var/lib/haproxy pidfile /var/run/haproxy.pid tune.ssl.cachesize 100000 tune.ssl.lifetime 600 tune.ssl.maxrecord 1460 ssl-default-bind-ciphers ECDHE-RSA-AES128-GCM-SHA256:ECDHE-ECDSA-AES128-GCM-SHA256:ECDHE-RSA-AES256-GCM-SHA384:ECDHE-ECDSA- AES256-GCM-SHA384:DHE-RSA-AES128-GCM-SHA256:DHE-DSS-AES128-GCM-SHA256:kEDH+AESGCM:ECDHE-RSA-AES128-SHA256:ECDHE-ECDSA- AES128-SHA256:ECDHE-RSA-AES128-SHA:ECDHE-ECDSA-AES128-SHA:ECDHE-RSA-AES256-SHA384:ECDHE-ECDSA-AES256-SHA384:ECDHE-RSA-AES256- SHA:ECDHE-ECDSA-AES256-SHA:DHE-RSA-AES128-SHA256:DHE-RSA-AES128-SHA:DHE-DSS-AES128-SHA256:DHE-RSA-AES256-SHA256:DHE-DSS- AES256-SHA:DHE-RSA-AES256-SHA:!aNULL:!eNULL:!EXPORT:!DES:!RC4:!3DES:!MD5:!PSK ssl-server-verify none maxconn 100000 maxsslconn 256 tune.ssl.default-dh-param 2048 user haproxy group haproxy daemon nbproc 16 stats socket /var/lib/haproxy/stats defaults log global mode http retries 1 option redispatch option dontlognull timeout connect 3s timeout queue 300s timeout client 3000s timeout server 3000s #timeout http-request 30s #timeout http-keep-alive 30s #timeout client-fin 1s #timeout server-fin 1s frontend JBOSS_LIVE_CLUSTER_L7 bind 192.168.2.28:8080 option tcp-smart-accept acl is_cc-erp path_beg -i /cc-erp use_backend MODULE_CC-ERP if is_cc-erp acl is_cc-cr-web path_beg -i /cc-cr-web use_backend MODULE_CC-CR-WEB if is_cc-cr-web acl is_cc-tr-web path_beg -i /cc-tr-web use_backend MODULE_CC-TR-WEB if is_cc-tr-web
- 17. Docker to Kube Clsuter pg. 17 By: chanaka.lasantha@gmail.com acl is_cc-ry-web path_beg -i /cc-ry-web use_backend MODULE_CC-RY-WEB if is_cc-ry-web acl is_cc-le-web path_beg -i /cc-le-web use_backend MODULE_CC-LE-WEB if is_cc-le-web acl is_cc-rp-web path_beg -i /cc-rp-web use_backend MODULE_CC-RP-WEB if is_cc-rp-web acl is_cc-fd-web path_beg -i /cc-fd-web use_backend MODULE_CC-FD-WEB if is_cc-fd-web default_backend MODULE_CC-ERP backend MODULE_CC-ERP mode http balance roundrobin option abortonclose option tcp-smart-connect cookie SERVERID insert indirect nocache option httpclose option forwardfor reqirep ^([^ :]*) /cc-erp/(.*) 1 /cc-erp/2 server LIVE-JBOSS-192.168.2.29:32767 192.168.2.29:32767 maxconn 2500 check cookie LIVE-JBOSS-192.168.2.29:32767 inter 1000 server LIVE-JBOSS-192.168.2.30:32767 192.168.2.30:32767 maxconn 2500 check cookie LIVE-JBOSS-192.168.2.30:32767 inter 1000 backend MODULE_CC-CR-WEB mode http balance roundrobin option abortonclose option tcp-smart-connect cookie SERVERID insert indirect nocache option httpclose option forwardfor reqirep ^([^ :]*) /cc-cr-web/(.*) 1 /cc-cr-web/2 server LIVE-JBOSS-192.168.2.29:32767 192.168.2.29:32767 maxconn 2500 check cookie LIVE-JBOSS-192.168.2.29:32767 inter 1000 server LIVE-JBOSS-192.168.2.30:32767 192.168.2.30:32767 maxconn 2500 check cookie LIVE-JBOSS-192.168.2.30:32767 inter 1000 backend MODULE_CC-TR-WEB mode http balance roundrobin option abortonclose option tcp-smart-connect cookie SERVERID insert indirect nocache option httpclose option forwardfor reqirep ^([^ :]*) /cc-tr-web/(.*) 1 /cc-tr-web/2 server LIVE-JBOSS-192.168.2.29:32767 192.168.2.29:32767 maxconn 2500 check cookie LIVE-JBOSS-192.168.2.29:32767 inter 1000 server LIVE-JBOSS-192.168.2.30:32767 192.168.2.30:32767 maxconn 2500 check cookie LIVE-JBOSS-192.168.2.30:32767 inter 1000 backend MODULE_CC-RY-WEB mode http balance roundrobin option abortonclose option tcp-smart-connect cookie SERVERID insert indirect nocache option httpclose option forwardfor reqirep ^([^ :]*) /cc-ry-web/(.*) 1 /cc-ry-web/2 server LIVE-JBOSS-192.168.2.29:32767 192.168.2.29:32767 maxconn 2500 check cookie LIVE-JBOSS-192.168.2.29:32767 inter 1000 server LIVE-JBOSS-192.168.2.30:32767 192.168.2.30:32767 maxconn 2500 check cookie LIVE-JBOSS-192.168.2.30:32767 inter 1000
- 18. Docker to Kube Clsuter pg. 18 By: chanaka.lasantha@gmail.com backend MODULE_CC-RP-WEB mode http balance roundrobin option abortonclose option tcp-smart-connect cookie SERVERID insert indirect nocache option httpclose option forwardfor reqirep ^([^ :]*) /cc-rp-web/(.*) 1 /cc-rp-web/2 server LIVE-JBOSS-192.168.2.29:32767 192.168.2.29:32767 maxconn 2500 check cookie LIVE-JBOSS-192.168.2.29:32767 inter 1000 server LIVE-JBOSS-192.168.2.30:32767 192.168.2.30:32767 maxconn 2500 check cookie LIVE-JBOSS-192.168.2.30:32767 inter 1000 backend MODULE_CC-LE-WEB mode http balance roundrobin option abortonclose option tcp-smart-connect cookie SERVERID insert indirect nocache option httpclose option forwardfor reqirep ^([^ :]*) /cc-le-web/(.*) 1 /cc-le-web/2 server LIVE-JBOSS-192.168.2.29:32767 192.168.2.29:32767 maxconn 2500 check cookie LIVE-JBOSS-192.168.2.29:32767 inter 1000 server LIVE-JBOSS-192.168.2.30:32767 192.168.2.30:32767 maxconn 2500 check cookie LIVE-JBOSS-192.168.2.30:32767 inter 1000 backend MODULE_CC-FD-WEB mode http balance roundrobin option abortonclose option tcp-smart-connect cookie SERVERID insert indirect nocache option httpclose option forwardfor reqirep ^([^ :]*) /cc-fd-web/(.*) 1 /cc-fd-web/2 server LIVE-JBOSS-192.168.2.29:32767 192.168.2.29:32767 maxconn 2500 check cookie LIVE-JBOSS-192.168.2.29:32767 inter 1000 server LIVE-JBOSS-192.168.2.30:32767 192.168.2.30:32767 maxconn 2500 check cookie LIVE-JBOSS-192.168.2.30:32767 inter 1000 frontend TCP_SOAP_L4_A_FRN bind 192.168.2.28:8078 mode tcp option tcplog backlog 4096 default_backend TCP_SOAP_L4_A backend TCP_SOAP_L4_A mode tcp option tcplog option log-health-checks option tcpka balance roundrobin server ESB-SERVER-SOAP-192.168.2.29 192.168.2.29:31768 maxconn 2500 check inter 1000 server ESB-SERVER-SOAP-192.168.2.30 192.168.2.30:31768 maxconn 2500 check inter 1000 frontend HTTPS_AUTH_L4_A_FRN bind 192.168.2.28:8041 mode tcp option tcplog backlog 4096 default_backend HTTPS_AUTH_L4_A backend HTTPS_AUTH_L4_A
- 19. Docker to Kube Clsuter pg. 19 By: chanaka.lasantha@gmail.com mode tcp option tcplog option log-health-checks option tcpka balance roundrobin reqadd X-Forwarded-Proto: http server ESB-MANAGEMENT-INTERFACE-192.168.2.29 192.168.2.29:31769 maxconn 512 check inter 1000 server ESB-MANAGEMENT-INTERFACE-192.168.2.30 192.168.2.30:31769 maxconn 512 check inter 1000 frontend www-http-wso2 bind 192.168.2.28:10000 ssl crt /etc/pki/tls/certs/haproxy.pem mode http reqadd X-Forwarded-Proto: https default_backend servers backend servers http-request set-header X-Forwarded-Port %[dst_port] http-request add-header X-Forwarded-Proto https if { ssl_fc } balance roundrobin option httpclose cookie SERVERID insert indirect nocache cookie JSESSIONID prefix nocache option forwardfor reqadd X-Forwarded-Proto: http server ESB-MANAGEMENT-INTERFACE-192.168.2.29 192.168.2.29:31770 maxconn 2500 check cookie check ssl verify none inter 1000 server ESB-MANAGEMENT-INTERFACE-192.168.2.30 192.168.2.30:31770 maxconn 2500 check cookie check ssl verify none inter 1000 frontend STATICTICS bind 192.168.2.28:3128 ssl crt /etc/pki/tls/certs/haproxy.pem reqadd X-Forwarded-Proto: http default_backend stats backend stats mode http option abortonclose option httpclose log global stats enable stats hide-version stats refresh 15s stats show-node stats auth admin:z80cpu stats uri /haproxy?stats bind-process root@master# systemctl restart haproxy HAPROXY Dashboard: https://192.168.2.28:3128/haproxy?stats
- 20. Docker to Kube Clsuter pg. 20 By: chanaka.lasantha@gmail.com
- 21. Docker to Kube Clsuter pg. 21 By: chanaka.lasantha@gmail.com LOGIN PANNEL: TO ACCESS THE CONTAINER CLSUTER: root@master:~# root@master:~# ssh root@192.168.2.28 -p 32767
- 22. Docker to Kube Clsuter pg. 22 By: chanaka.lasantha@gmail.com IN THE KUBE DASHBOARD:
- 23. Docker to Kube Clsuter pg. 23 By: chanaka.lasantha@gmail.com
- 24. Docker to Kube Clsuter pg. 24 By: chanaka.lasantha@gmail.com