VIP Model Call Girls Budhwar Peth ( Pune ) Call ON 8005736733 Starting From 5...
Shatford actual projects
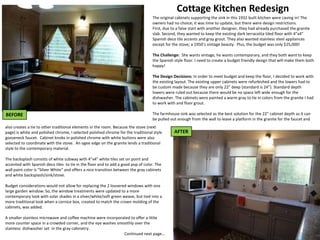
1. The original cabinets supporting the sink in this 1932 built kitchen were caving in! The
owners had no choice; it was time to update, but there were design restrictions.
First, due to a false start with another designer, they had already purchased the granite
slab. Second, they wanted to keep the existing dark terracotta tiled floor with 4”x4”
Spanish deco tile accents and gray grout. They also wanted stainless steel appliances
except for the stove; a 1950’s vintage beauty. Plus, the budget was only $25,000!
The Challenge: She wants vintage, he wants contemporary, and they both want to keep
the Spanish style floor. I need to create a budget friendly design that will make them both
happy!
The Design Decisions: In order to meet budget and keep the floor, I decided to work with
the existing layout. The existing upper cabinets were refurbished and the lowers had to
be custom made because they are only 22” deep (standard is 24”). Standard depth
lowers were ruled out because there would be no space left wide enough for the
dishwasher. The cabinets were painted a warm gray to tie in colors from the granite I had
to work with and floor grout.
The farmhouse sink was selected as the best solution for the 22” cabinet depth as it can
be pulled out enough from the wall to leave a platform in the granite for the faucet and
also creates a tie to other traditional elements in the room. Because the stove (next
page) is white and polished chrome, I selected polished chrome for the traditional style
gooseneck faucet. Cabinet knobs in polished chrome with white buttons were also
selected to coordinate with the stove. An ogee edge on the granite lends a traditional
style to the contemporary material.
The backsplash consists of white subway with 4”x4” white tiles set on point and
accented with Spanish deco tiles to tie in the floor and to add a good pop of color. The
wall paint color is “Silver White” and offers a nice transition between the gray cabinets
and white backsplash/sink/stove.
Budget considerations would not allow for replacing the 2 louvered windows with one
large garden window. So, the window treatments were updated to a more
contemporary look with solar shades in a silver/white/soft green weave, but tied into a
more traditional look when a cornice box, created to match the crown molding of the
cabinets, was added.
A smaller stainless microwave and coffee machine were incorporated to offer a little
more counter space in a crowded corner, and the eye washes smoothly over the
stainless dishwasher set in the gray cabinetry.
Continued next page…
BEFORE
AFTER
Cottage Kitchen Redesign
2. Getting all the functionality the owners wanted in this corner was a challenge. It
is a 40” stove on a 58” wall. The perpendicular wall (66”) would have afforded
more space for surrounding cabinetry and counter space but would have
required moving gas lines, electricity, and vent pipes; all of which was
prohibited by budget. Also, there was no lighting in this corner and the owners
often found themselves cooking in the dark.
The only venting was a hole in the ceiling which often shed balls of greasy dust
onto the cooktop. This space was vintage through and through and needed
some contemporary elements to make the husband happy.
The stove was centered between 8” cabinets. To maximize functionality of the narrow cabinets, I decided
to forego drawers in favor of using their full height for storage of trays, platters, baking sheets
and racks. Frequently used utensils are placed in a red vintage crock pot, and the pot rack (sans
farmyard animals) remained for accessibility to everything needed for cooking in this corner.
The stainless and glass Miele range hood adds the contemporary element needed. The glass insert makes
it lighter and airier than if it were solid stainless and the arch in the design of the hood works well with the
curved corners and gently curved handles of the stove. The bottom of the hood was purposely set at the
highest possible recommended height from the cooktop because the tall owner didn’t want to constantly
hit his head on it. However, we are still searching for just the right wall decoration to fill In the large gap
and to bring a little more color into the space. But, the best thing about this hood? It has four halogen
lamps that brilliantly and evenly illuminate the cooktop so the owners are no longer cooking in the dark!
Given the profile of the stove, a backsplash was not essential. However I included it for two reasons 1) to
unify this corner with the rest of the kitchen, and 2)to provide flexibility of choice in case the owners ever
decide to replace the stove.
Finally, nothing says “Vintage” these days like an old, analog electric wall clock! I liked this one from the
original kitchen, but I did have a recessed outlet put into the wall behind it so it doesn’t stick out with
visible cords anymore.
Continued Next Page
AFTER
BEFORE
Cottage Kitchen, the cooking corner
3. Here, the owners wanted a larger, French-door fridge (in stainless of course).
They also were bothered that the cabinet above the fridge was not centered
in the space.
Two more requests were made; 1)electrical outlets for appliances along the
cabinet wall, and 2)better illumination of the counter top for food
preparation.
AFTER
BEFORE
The French door fridge they thought they wanted would not be fully
functional in the space because the left door would open Into the
adjacent wall. After consultation, they decided they would prefer a full
180 degree swing. This fridge, which opens on the left, was selected for
full swing and still gives them the bottom pull out freezer they were
looking for. So, the niche space was enlarged to accommodate the larger
fridge and a custom cabinet was installed and centered above.
Look ma, no electrical outlets on the backsplash! The underside of the
upper cabinets were put to full use with 1) a strip of electrical outlets
and, 2) a strip of LEDs to provide task lighting (don’t worry, all work was
done by an electrician and proper circuits were added)
Finally, the oil rubbed bronze lantern style light fixture was selected with
the same finish as the existing pot rack and sconce above the sink. It also
adds a nice rustic touch that works nicely with the Spanish style floors
and deco tiles. (The white dog also coordinates well here )
Continued on Next Page
The Cottage Kitchen Saga Continues
4. In order to make the room feel more spacious,
the dutch door leading to the laundry room was
removed. A new door to the back yard was
installed (the doggie door was big enough for a
large mountain lion to get through!) and the
laundry room walls and trim were painted the
same as the kitchen.
Et, Voila!
Bath Decorating Project Next Page
And, finally……..
The owners really want to be able to entertain a
couple of guests while they are preparing meals.
Since there was not enough floor space to
comfortably fit a table or island, I placed 2 1950’s
vintage bar stools in the space. These stools can
be easily moved and serve as a good perch for
friends.
BEFORE
AFTER
5. AFTER
BEFORE
This master bath has nice bones; an original tub with architectural lines, beautiful vintage tile, and lots of space. However, it is located directly across
the hall from the home’s kitchen. The problem? Who wants a direct shot of a toilet from the place where you are preparing food? I had a mere $1000
to solve this problem and decorate in a way that would tone down the pink cast in the tiles and provide the owners with a sophisticated retreat.
First, I found a cabinet in the owner’s garage that blocked the view of the toilet and, as a bonus, provides some nice additional storage. Next, I decided
to paint the walls a warm taupe color that served to neutralize the slight pinkish tones in the tile. White paint for the window trim was chosen to
provide a crisp contrast. For window treatments, I selected roller shades in a soft taupe/cream jacquard print and topped them with a white cornice box
that has similar lines as the tub. The “Hollywood” vanity lights were replaced with an elegant 3-light crystal sconce in polished chrome to coordinate
with the existing plumbing fixtures.
For accessorizing, I took my cue from the tile design and selected black as the primary color for sophistication and popped it with cyan accents. I
purchased a large painting containing all the colors in the room from art.com and I simply couldn’t resist the big fish planter in cyan to add a little fun
and whimsy.
Full Bath Remodel Project Next Page:
Bath Redecorating Project
6. AFTERBEFORE
This bathroom was cramped; there was no
counter or storage space, and there was a small
shower stall (32”x32”) immediately to the right
as one entered the door. The window actually
opened into another room!
Obviously, this room needed a makeover, but I
was scratching my head when the owners said
they wanted a full bath with a double sink vanity!
They also wanted a calm, spa-like space that would
Integrate some of the 1930’s vintage style found
elsewhere in the home.
Mission accomplished! Room for the double vanity
was made by taking out the shower stall walls.
I put the tub/shower across the back wall. I took out
the window and a solatube skylight was installed to
wash the room in natural light during the day.
The toilet was moved to the previous window wall,
And a pony wall was constructed to block direct view
from the doorway.
A monochromatic color scheme of celadon green, white, and gray was employed to create a soothing , clean, and elegant space. The white octagon
floor tiles were grouted in DeLorean gray, rather than white, to accent the architectural lines of the tile. The field tiles for the tub surround are white
subways with a clean and simple ¼” inch pencil line accent all the way around. The pencil tile is Celedon, as is the color on the walls, in the storage
niche located on the back wall of the shower (reflected in the mirror), and as accent dots on the floor.
Traditionally styled plumbing and light fixtures compliment the traditional tile scheme. The traditional vanity was selected for it’s simple styling. Both
the vanity and pony wall were topped with Carrera marble to add the final touch of traditional luxury.
A Full Bath Remodel