Electron Machine Refractometer Sensing Head Replacement
•
0 j'aime•1,166 vues

This paper illustrates the correct way to replace the sensing head on MPR E-Scan and MDS-Divert systems from Electron Machine Corporation.

Recommandé
Contenu connexe
En vedette
Dernier
Dernier (20)
Electron Machine Refractometer Sensing Head Replacement
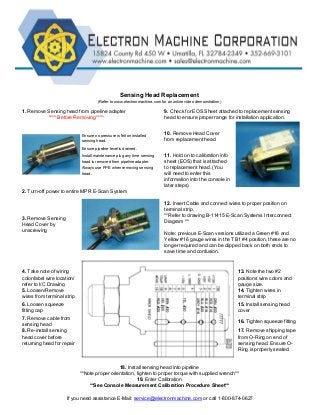
- 1. If you need assistance E-Mail: service@electronmachine.com or call 1-800-874-0627 Sensing Head Replacement (Refer to www.electronmachine.com for an online video demonstration) 1. Remove Sensing head from pipeline adapter **** Before Removing**** 9. Check for EOS Sheet attached to replacement sensing head to ensure proper range for installation application. Ensure no pressure is felt on installed sensing head. 10. Remove Head Cover from replacement head Ensure pipeline level is drained. Install maintenance plug any time sensing head is removed from pipeline adapter. 11. Hold on to calibration info sheet (EOS) that is attached to replacement head. (You will need to enter this information into the console in later steps) Always use PPE when removing sensing head. 2. Turn-off power to entire MPR E-Scan System 3. Remove Sensing Head Cover by unscrewing 12. Insert Cable and connect wires to proper position on terminal strip. **Refer to drawing B-11415 E-Scan Systems Interconnect Diagram ** Note: previous E-Scan versions utilized a Green #16 and Yellow #16 gauge wires in the TB1 #4 position, these are no longer required and can be clipped back on both ends to save time and confusion. 4. Take note of wiring color/label wire location/ refer to I/C Drawing 13. Note the two #2 positions wire colors and gauge size. 5. Loosen/Remove wires from terminal strip 14. Tighten wires in terminal strip 6. Loosen squeeze fitting cap 15. Install sensing head cover 7. Remove cable from sensing head 16. Tighten squeeze fitting 8. Re-install sensing head cover before returning head for repair 17. Remove shipping tape from O-Ring on end of sensing head. Ensure O- Ring is properly seated. 18. Install sensing head into pipeline **Note proper orientation, tighten to proper torque with supplied wrench** 19. Enter Calibration **See Console Measurement Calibration Procedure Sheet**