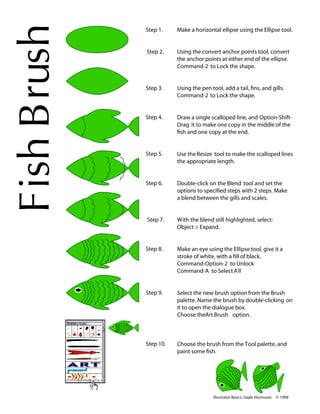
SlideShare une entreprise Scribd logo
1  sur  1
Télécharger pour lire hors ligne
hsurBhsiF
Illustrator Basics: Gayle Hurmuses © 1999
Step 1. Make a horizontal ellipse using the Ellipse tool.
Step 2. Using the convert anchor points tool, convert
the anchor points at either end of the ellipse.
Command-2 to Lock the shape.
Step 3. Using the pen tool, add a tail, fins, and gills.
Command-2 to Lock the shape.
Step 4. Draw a single scalloped line, and Option-Shift-
Drag it to make one copy in the middle of the
fish and one copy at the end.
Step 5. Use theResize tool to make the scalloped lines
the appropriate length.
Step 6. Double-click on the Blend tool and set the
options to specified steps with 2 steps. Make
a blend between the gills and scales.
Step 8. Make an eye using the Ellipse tool, give it a
stroke of white, with a fill of black.
Command-Option-2 to Unlock
Command-A to Select All
Step 9. Select the new brush option from the Brush
palette. Name the brush by double-clicking on
it to open the dialogue box.
Choose theArt Brush option.
Step 10. Choose the brush from the Tool palette, and
paint some fish.
Step 7. With the blend still highlighted, select:
Object > Expand.

Contenu connexe

Tendances (7)

Photoshop
Photoshop Photoshop
Photoshop
 
Illustrator 9
Illustrator 9Illustrator 9
Illustrator 9
 
Atsuto hiraide
Atsuto hiraideAtsuto hiraide
Atsuto hiraide
 
Ai tot d-distort,reflect,compound,gradient
Ai tot d-distort,reflect,compound,gradientAi tot d-distort,reflect,compound,gradient
Ai tot d-distort,reflect,compound,gradient
 
Photoshop Hacks: How to Make the Best Use of your Photoshop
Photoshop Hacks: How to Make the Best Use of your PhotoshopPhotoshop Hacks: How to Make the Best Use of your Photoshop
Photoshop Hacks: How to Make the Best Use of your Photoshop
 
Working With Images
Working With ImagesWorking With Images
Working With Images
 
Illustrator Asa
Illustrator AsaIllustrator Asa
Illustrator Asa
 

Similaire à FishieBrush

How to create a flipchart in activ inspire
How to create a flipchart in activ inspireHow to create a flipchart in activ inspire
How to create a flipchart in activ inspire
Lara Daniel
 
Photoshop editing booklet 2019
Photoshop editing booklet 2019Photoshop editing booklet 2019
Photoshop editing booklet 2019
missfcmay
 
Skills Development Badge
Skills Development BadgeSkills Development Badge
Skills Development Badge
HayleyMcCarthy
 
How To Make A Lineart And Color It In Photoshop
How To Make A Lineart And Color It In PhotoshopHow To Make A Lineart And Color It In Photoshop
How To Make A Lineart And Color It In Photoshop
Sonia Campos
 
#3 4th ppt gr.1 microsoft paint
#3   4th ppt gr.1 microsoft paint#3   4th ppt gr.1 microsoft paint
#3 4th ppt gr.1 microsoft paint
Shirley Valera
 
Working with selections
Working with selectionsWorking with selections
Working with selections
Jake Bennett
 

Similaire à FishieBrush (20)

Writing ED material
Writing ED materialWriting ED material
Writing ED material
 
Lesson 7 123 design
Lesson 7 123 designLesson 7 123 design
Lesson 7 123 design
 
d_ltr_print
d_ltr_printd_ltr_print
d_ltr_print
 
d_ltr_print
d_ltr_printd_ltr_print
d_ltr_print
 
How to create a flipchart in activ inspire
How to create a flipchart in activ inspireHow to create a flipchart in activ inspire
How to create a flipchart in activ inspire
 
learn sketchup (for the beginners)
learn sketchup (for the beginners)learn sketchup (for the beginners)
learn sketchup (for the beginners)
 
Photoshop editing booklet 2019
Photoshop editing booklet 2019Photoshop editing booklet 2019
Photoshop editing booklet 2019
 
Skills Development Badge
Skills Development BadgeSkills Development Badge
Skills Development Badge
 
Tools
ToolsTools
Tools
 
Colour Magic Graphics
Colour Magic GraphicsColour Magic Graphics
Colour Magic Graphics
 
How To Make A Lineart And Color It In Photoshop
How To Make A Lineart And Color It In PhotoshopHow To Make A Lineart And Color It In Photoshop
How To Make A Lineart And Color It In Photoshop
 
dr_1
dr_1dr_1
dr_1
 
dr_1
dr_1dr_1
dr_1
 
Tutorial
TutorialTutorial
Tutorial
 
#3 4th ppt gr.1 microsoft paint
#3   4th ppt gr.1 microsoft paint#3   4th ppt gr.1 microsoft paint
#3 4th ppt gr.1 microsoft paint
 
Crazy Photos: An Introduction to GIMP
Crazy Photos: An Introduction to GIMPCrazy Photos: An Introduction to GIMP
Crazy Photos: An Introduction to GIMP
 
Working with selections
Working with selectionsWorking with selections
Working with selections
 
Working with selections
Working with selectionsWorking with selections
Working with selections
 
Std 11 Computer Chapter 2 Animation Tool: synfig (Part 2 Different Tools in ...
Std 11 Computer Chapter 2 Animation Tool:  synfig (Part 2 Different Tools in ...Std 11 Computer Chapter 2 Animation Tool:  synfig (Part 2 Different Tools in ...
Std 11 Computer Chapter 2 Animation Tool: synfig (Part 2 Different Tools in ...
 
Adobe Photoshop: Drawing and Type tool
Adobe Photoshop: Drawing and Type toolAdobe Photoshop: Drawing and Type tool
Adobe Photoshop: Drawing and Type tool
 

FishieBrush

  • 1. hsurBhsiF Illustrator Basics: Gayle Hurmuses © 1999 Step 1. Make a horizontal ellipse using the Ellipse tool. Step 2. Using the convert anchor points tool, convert the anchor points at either end of the ellipse. Command-2 to Lock the shape. Step 3. Using the pen tool, add a tail, fins, and gills. Command-2 to Lock the shape. Step 4. Draw a single scalloped line, and Option-Shift- Drag it to make one copy in the middle of the fish and one copy at the end. Step 5. Use theResize tool to make the scalloped lines the appropriate length. Step 6. Double-click on the Blend tool and set the options to specified steps with 2 steps. Make a blend between the gills and scales. Step 8. Make an eye using the Ellipse tool, give it a stroke of white, with a fill of black. Command-Option-2 to Unlock Command-A to Select All Step 9. Select the new brush option from the Brush palette. Name the brush by double-clicking on it to open the dialogue box. Choose theArt Brush option. Step 10. Choose the brush from the Tool palette, and paint some fish. Step 7. With the blend still highlighted, select: Object > Expand.