Image manipulation - Photoshop
•Télécharger en tant que DOC, PDF•
0 j'aime•210 vues

The basics of image manipulation. A guide for students.

Recommandé
Contenu connexe
Tendances
Tendances (20)
Similaire à Image manipulation - Photoshop
Similaire à Image manipulation - Photoshop (20)
Plus de Cardinal Newman Catholic School
Plus de Cardinal Newman Catholic School (20)
Dernier
Dernier (20)
Image manipulation - Photoshop
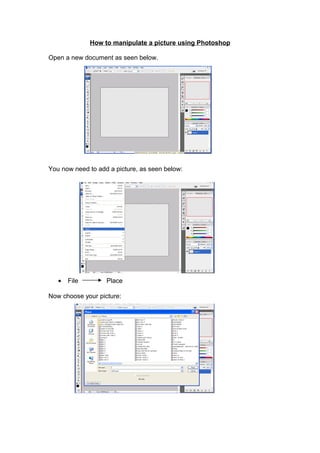
- 1. How to manipulate a picture using Photoshop Open a new document as seen below. You now need to add a picture, as seen below: • File Place Now choose your picture:
- 2. Once you have chosen the picture you wish to manipulate, it will appear on the screen with a faint cross in the middle of the box. If you want to resize your picture you must do this before you ‘place’ it into Photoshop. Use the black boxes around the picture to resize it. Right click the black cursor (move tool). This will place the picture into Photoshop. You will have an option to ‘place’ the picture (look below), click on the ‘place’ option. Faint line in box Black cursor – (move tool) Place option Black boxes to resize
- 3. Now you can start to manipulate the image. Before you begin manipulating the image, it is best to zoom in on the area you are going to work on. This enables you to see the edges of parts of the picture. • Use the zoom slider to make your image larger or smaller. • You can move the red box to focus the area of the picture you wish to manipulate. • The whole picture can now only be seen in the profile box (above the zoom slider). • Your chosen area of the image is now seen in the centre of your screen. One the main tools you will use, is the lasso tool. This can be found in the tool bar on the left hand side of your screen. There are three different lassoes that you can use to manipulate your image (look at the image below). To choose your lasso tool, right click on the lasso. Moveable red box Zoom Slider Zoomed image Lasso tool
- 4. Choose the magnetic lasso tool. You do this by right clicking the lasso tool and scrolling down: Once you have selected the magnetic lasso tool you can start to delete parts of the image you no longer want. Once this area is selected you can press the ‘delete’ button on your keyboard. This area will then be deleted. Choice of lassoes: 1. Lasso Tool 2. Polygonal Lasso Tool 3. Magnetic Lasso Tool Magnetic lasso tool Lasso tool Selected area (dotted line).
- 5. This tool is best used for removing large areas of an image that does not require close up editing. To edit the image smoothly, zoom into an area of the image you wish to edit using the zoom slider (look at previous pages). Once you have chosen the area of the image you want to edit, select the magic wand tool. • Right click • Select the quick selection tool This tool allows you to select a large area to be edited closely. Click on the area you wish to edit with the quick selection tool. This will automatically select an area which can be deleted using the ‘delete’ key on your keyboard. This will then give you a close edit of an image. Deleted area Deleted area Image required for close up editing. Magic Wand Tool Quick Selection Tool
- 6. To edit an area that can be difficult due to the closeness of the pixels (the colours are very similar) you can use the eraser tool. It is best if you zoom closer to the object you are editing so you can smoothly edit the image. You can also change the size of the eraser tool by right clicking you mouse. Selected area to be deleted Eraser Tool (it looks like a rubber!) Tools to change the eraser style to suit your image.
- 7. Your image is now ready to be placed onto another image or document. Ensure you save the document each time you make a change that you are happy about. How to use the edited image with a background To put the image on a background you need to add a new layer. The layers are used to enable you to manipulate areas of an image without changing the work you have already done. The area highlighted in blue is the ‘active layer’. This is the layer that you will be editing. Create a new layer New layer Original layer