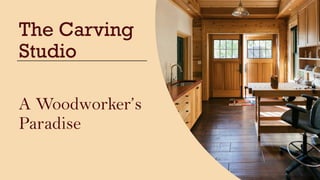
Carving studio
•
0 j'aime•595 vues

A presentation of a beautiful Carving Studio remodeled from a garage. This Carving Studio remodel has won several awards, including a National CotY and Master Design Awards.

Recommandé
Contenu connexe
Tendances
Tendances (20)
Similaire à Carving studio
Similaire à Carving studio (20)
Dernier
Dernier (20)
Carving studio
- 2. We remodeled this Carving Studio out of an existing garage. The original house was built over 85 years ago. The garage was a mere 10’ 6” wide, which is not effective as a garage for cars of today’s size. The homeowners used the garage for storage. It was underutilized and honestly a waste of space. Our client was using a small corner in an overcrowded basement as his woodshop. We saw an opportunity to create a Carving Studio to give the owner his own personal space. It opens to the Keeping Room, so he’s near the heart of the home. The Studio was built under a permit, separate from the main house. It has its own HVAC system, high speed Internet, tankless water heater, a fine particulate air filter, ample display room for carvings, and a remote controlled insect screen with the added feature of a privacy section to cover the glass. The carriage doors offer the homeowner the dual opportunity to easily transport tools and large pieces of wood into the studio, and, also, experience the outdoors while carving.
- 3. The Carving Studio includes a sink, work bench, TV, spot lighting from recessed cans, and decorative general lighting. The cabinets offer storage for items, such as grinders, power tool sharpeners, and hand tools, and for conveniences, such as laptops and printers.
- 5. The picture on the top right shows a grill. It is the return air, mounted on a secret access panel, as pictured open in the top left photo and closed in the top right photo. The bottom right photo illustrates how the access panel and ceiling were framed. Also shown is the soffit detail required for containment of the split system air handler and slot diffuser. Heating & Air is provided through a mini split system. The slot diffuser is both attractive and functional.
- 6. Here we see a portion of the vacuum ducting using spiral ducting material. The duct route begins at the workbench (see above photo), travels through the wall and into the soffit, and is then exposed on its path to the floor at the opposite side of the shop (see picture to right). All dust and debris is vacuumed into a container in the lower level, where the ducting terminates. A vacuum system was a major requirement of the owner.
- 7. The garage had a 9’ ceiling with lookouts that supported the cornice on the two exterior walls. We wanted to vault the ceiling and decided that our best plan would be to create soffits, allowing the original lookouts to remain for the cornice. After consulting with our engineer, we created a new gable, slightly lower and of a different pitch, beneath the existing slate roof. Note: the top left photo shows the new dropped gable being built below the original rafters. This ensured we did not disturb the slate roof. This “necessity” became an asset in this design. Our engineer’s drawing
- 8. Note: Scuttle hole sealed because of vaulted ceiling. Also, notice the lookouts supporting the cornice. Existing roof structure with 9' high flat original ceiling
- 9. During the process of demolition, we noticed evidence of wood rot. We decided to further investigate by removing some stucco from the garage interior walls and ceiling. We discovered that most of the wall studs had rotted at the bottom due to the fact that the original slab was poured below the top of the block foundation wall. Water easily entered the structure. It was evident that the stucco had been the only thing holding the garage structure together. The wall framing needed to be replaced. The challenge was to support the garage structure and slate roof while we replaced the rotten section of the wall. We poured a new stem wall to waterproof and protect the inside from water intrusion.
- 10. Our new stem wall allowed us to properly waterproof and protect the interior. Note the angle on the curb face and how we did the form work. Per our engineer’s requirements, we inserted hooked dowels into the existing concrete, then epoxied them into place. Note: Picture to the right showing our finished wall. The rot is gone! The windows and wall are properly flashed and waterproofed. Pictured left: our engineer’s drawing
- 11. The original garage slab was above a 6’ high crawlspace. We encapsulated the crawlspace below with a vapor barrier and insulated with foam. Tapered wood floor framing was required due to the slope of the slab. The framing was glued and mechanically fastened. Because of its superior performance, we used structured plywood for sheathing. We then installed a solid hickory floor with an engineered finish. Note: This photo also shows the stem walls that we poured.
- 12. We constructed a temporary door and temporary lighting for our subs. Later we installed the carriage doors, with an expanded header and columns on either side to house the remote controlled screen and mechanisms. The framing over the former garage door was done over 85 years ago. The original framing was a truss header, which surprisingly lasted years. We replaced the header with two new LVLs. Pictured above: the engineer’s ceiling plan Note: the original brick wall.
- 13. Our homeowner wanted to carve while enjoying the outside. We are proud of our unique design that allows a screen to be hidden in an expanded header above the carriage doors. It is remotely controlled, and can be stopped at any point. It was fabricated with an opaque section at the bottom that can be used to cover the windows for privacy when it is partially lowered (as seen on the upper right picture). Illustrated on the bottom right, the screen can be fully extended, allowing for a view without the bugs. The far left picture demonstrates how the room looks with the doors opened and the screen fully recessed. This innovative use of material allows the homeowner to be comfortable while enjoying a nice, sunny day. The Disappearing Screen Innovations
- 14. Pictured left: We used the old coal chute in the garage to access the basement for vacuum ducting, electrical, and compressed air piping. Note photo to right: the spiral ducting and compressed air as they enter the studio through the old coal chute. Just like houses, the Carving Studio has its own mechanical room. There was an old coal storage room in the basement, not located directly under the Studio, but close enough to allow for access. The shop vacuum is pictured in the top left photo. Next to the vacuum system is the air compressor, whose piping travels with the duct work through the former coal chute into the Studio, where the tubing is connected to a pressure regulator and quick connect coupling. Innovative Means of Construction
- 15. Note the bookmatched hickory on the cabinets. This attention to detail adds a special flair to the aesthetics of the Carving Studio. The 1 ¾” Bubinga plank style countertop complements the cabinets in a very dramatic manner.
- 16. Great care was taken to create the Western Red Cedar soffits and beams. Because they were larger than standard sized material, we grain matched, glued, and milled the cedar on site to create exceptional bookmatched sizes that we needed. The dimensional sized timbers were cut so that we could create boxed beams without seams. Note the baseboard detailing, which created a ledge for the cedar on the walls.
- 17. The hook on which the apron (pictured above) is hung was hand-carved by our client. There is plenty of opportunity to display the homeowner’s carvings. Being able to intersperse creations from the homeowner with our design adds a special personalized touch to this Carving Studio. The homeowner can comfortably store tools within various sized drawers (pictured above). Larger items, i.e. grinders and tool sharpeners, are stored within the tall cabinets.
- 18. The apron is off; the Carving Studio has fulfilled its purpose.