
Recommandé
Contenu connexe
En vedette
Similaire à Doublebookings2
Similaire à Doublebookings2 (16)
Dernier
Dernier (20)
Doublebookings2
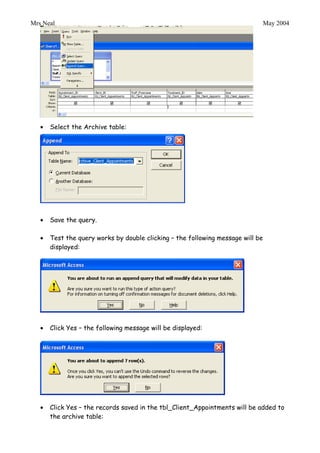
- 1. Mrs Neal May 2004 • Select the Archive table: • Save the query. • Test the query works by double clicking – the following message will be displayed: • Click Yes – the following message will be displayed: • Click Yes – the records saved in the tbl_Client_Appointments will be added to the archive table:
- 2. Mrs Neal May 2004 Task 7. We now need to delete records from the tbl_Client_Appointments, which completes the archive. • Start a new query, add tbl_Client_Appointments and select all fields. • Select Query from the toolbar and choose Delete Query: • Save the query. • Double click the query although do not run – you do not want to delete all records yet. Task 8. You will now produce a query using a calculation to total each clients individual bill. • Produce the following query using the relevant tables shown: • Once you have typed in the calculation click the Totals icon: • From the Total row, within the calculation column, use the drop down menu to select sum.
- 3. Mrs Neal May 2004 • Save and view your query. FORMS Task 9. You will now create a form to record appointments made – open a blank form in Design View based on the tbl_Client_Appointments table. • Client name needs to be shown on the form – for easy data entry create a combo box: o Position the combo box where required – the wizard will automatically be displayed: o Choose tbl_Client: o Select Client_ID & Forename: o Ensure Client_ID is hidden (this will be done automatically):
- 4. Mrs Neal May 2004 o Choose Store This Value in This Field and select Client_ID (because we want Client_ID to be saved into tbl_Client_Appointments): o Client forenames should now be listed: o In Design View, Right-Click and select Properties. o Ensure the All tab is selected and change the Control Source to Client_ID.
- 5. Mrs Neal May 2004 • Use a combo box to create a list of staff forenames (tbl_Staff_Details), ensure you store the value in this field – store as Staff_Forename. Remember to set the Control Source. • Use a combo box to create a list of treatments (tbl_treatments), ensure you store the value in this field – store as Treatment_ID. Remember to set the Control Source • You will now create a blank text box where today’s date will always be displayed a s a default value (this can be changed): o Use the Text Box icon, and position where required. o Rename text box DATE. o Right-click text box and select Properties. Enter =date() as a default (Remember to set the Control Source): • Create a combo box for Time – when the Wizard is displayed click Cancel. • Right-click and choose Properties. • Ensure the All tab is selected – Click Query Builder in Row Source and create the following query using qry_appointments_free:
- 6. Mrs Neal May 2004 • If you view your form you will notice that when click on the Time combo box is blank – this is fine, you need to select Forename etc. then the relevant free appointment times will be displayed (Remember to set the Control Source). •• Use the Command Button Tool to create a Save button • Use the Wizard to complete your button:
- 7. Mrs Neal May 2004 • Add a button to add and print a record and to close the form.