SlideShare une entreprise Scribd logo
1  sur  16
1
Manual /Booklet Orientation for Adobe
InDesign CC
Last Updated: 8/19/15 by
Kelly
Before class begins:
 Prepare the orientation book.
 Ask the instructor whether he or she prefers Headers or Footers.
 Ask instructor whether he or she prefers Booklet or Manual style.
 Ask instructor whether he or she wants you to include a tutorial for the Table
of Contents and/or Index.
When class starts:
 Go to Start > Computer > Scratch (P:).
 Search for the "OrientationFiles" folder in the Scratch drive.
 Find the JPG file titled "7. indesignmanual diagram.jpg".
 Project 7. indesignmanual diagram.jpg onto the SMART board.
 Explain the manual diagram to students.
 Inform students that this orientation will create a template for future
booklets/manuals.
 Ask students to open Adobe InDesign CC.
o Go to Start > Programs > Adobe InDesignCC
OR
o Double click on the Adobe InDesign CC icon in your taskbar.
1. Changing Units & Increments
1. Go to Edit > Preferences > Units & Increments.
A "Preferences" dialog box should appear.
2. Change the Horizontal Ruler Units to Inches.
3. Change the Vertical Ruler Units to Inches.
4. Click OK.
The "Preferences" dialog boxshould close.
2
Manual /Booklet Orientation for Adobe
InDesign CC
Last Updated: 8/19/15 by
Kelly
2. Creating a New Manual (Manual style)
If the instructor wants you to create a template for booklet style, skip this
sectionand go to the next sectiontitled: "Creating a New Document
(Booklet style)."
1. Go to File > New Document.
A "New Document" dialog box will appear.
2. Change the Number of Pages to 19.
3. Make sure that the Page Size is set to Letter.
4. Click the chain icon toward the bottom of dialog box to unlink the margins.
The chain should "break" after you click on it.
5. Change the Top margin to 0.5 inches.
If the instructor wants footers instead of headers, leave the Top
margin at 1 inch and change the Bottom margin to 0.5 inches instead.
6. Click OK.
The "New Document" dialog box will close.
2. Creating a New Booklet (Booklet style)
If the instructor wants you to create a template for manual style AND you
have already completedthe steps in the previous section, titled "Creating a
New Document(Manual style)," then you can go to the next sectiontitled
"Creating Master Page A: Cover Page."
1. Go to File > New > Document.
A "New Document" dialog box will appear.
2. Change the Number of Pages to 19.
3. Change the Page Size to Legal-Half.
4. Change the Page Orientation to Portrait.
5. Change all Margins to .25 inches.
6. Click OK.
The "New Document" dialog box will close.
3
Manual /Booklet Orientation for Adobe
InDesign CC
Last Updated: 8/19/15 by
Kelly
3. Creating Master Page A: Cover Page
Explain to students the differencebetweenregular pages and master
pages. Master pages allow you to create a template and assign that
template to regularpages.Elements featured on master pages are
locked and cannot be edited,moved,or deleted from a regular page.
When you assign a master page to a regular page, anything on the master
page will appear on the regular page. Students should only put static
contenton master pages.Students should put dynamic content on
regular pages.
1. Click on the Pages panel on the right of
the screen.
2. Right click on one of the mirrored A-
Master pages.
3. Select "Delete Master Page."
4. Click OK when the error message
appears.
5. Right-click on the page titled A-Master.
6. Select Master Options for "A-Master"….
A "Master Options" dialog box will
appear.
7. Change the Name to “Cover”.
8. Click OK.
The "Master Options" dialog box will close.
4. Creating Master Page B: Table of Contents
1. Open the Pages panel on the right side of the screen.
2. Click on the Panel Box Menu inthe top right corner of the Pages panel.
3. Click New Master.
A "New Master" dialog box will appear.
4. Change the Name to “Table of Contents”.
5. Change Number of Pages to 1.
6. Click OK.
The "New Master" dialog box will close.
InDesign allows you to color label your
master pages, so you can easily identify
which master page is applied where. To
color label your master pages:
1.Right click on the master page you
want to label.
2.Go to Page Attributes > Color Label.
3.Select the color you want to use to
label the master page.
The color label will appear
beneath the master page as
pictured above.
4
Manual /Booklet Orientation for Adobe
InDesign CC
Last Updated: 8/19/15 by
Kelly
5. Inserting Page Numbers and Headers: Master Page B (Table
of Contents)
1. Select the Text tool from the toolbar on the left of the screen.
2. Click and drag from the upper-right margin to create a small text box that
is 0.5 inches by 0.5 inches.
The text box should be inside the margins. You will insert your page
numbers into this text box.
3. Go to Type > Insert Special Character > Markers > Current Page Number.
The letter B should appear in the text box. The letter will be left
aligned.
4. Highlight the "B" in your page-number text box.
5. Click the right-align button in the control panel at the top of the screen.
6. Draw another text box that covers the rest of the width of the top and has
the same height as the page number text box.
This text box should be inside the margins. This text box will be your
header.
Manual measurements: 8 inches X 0.5 inches for manualstyle.
Bookletmeasurements:6 inches X 0.5 inches for bookletstyle.
7. Type "Table of Contents" into the longest textbox.
6. Creating a New Paragraph Style: Header
1. Open the Paragraph Styles panel on the right-hand side of the screen.
5
Manual /Booklet Orientation for Adobe
InDesign CC
Last Updated: 8/19/15 by
Kelly
2. Click the Panel Menu Box inthe upper-right corner of the
Paragraph Styles panel.
3. Click New Paragraph Style.
A "New Paragraph Style" dialog box will open.
4. Change the Style Name of the style to “Header”.
5. Change Based On: to [No Paragraph Style].
6. Change Next Style: to [No Paragraph Style].
7. Click Reset to Base.
8. Select Basic Character Formats inthe menu on the left of the dialog box.
9. Change the Font to Arial.
10. Change the Font Size to 12 pt.
11. Click OK.
The "New Paragraph Style" dialog box will close.
7. Applying the "Header" Paragraph Style
1. Click in the text box that cover the width of the top of the page.
This text box is your header.
2. Highlight "Table of Contents".
3. Open the Paragraph Styles panel on the right of the screen.
4. Click the "Header" paragraph style.
InDesignwill apply the Header style to "Table of Contents".
8. Creating Master Page C: Introduction
1. Open the Pages panel on the right
side of the screen.
2. Right click on B-Table of Contents.
3. Select Duplicate Master Spread“B-
Table of Contents”.
4. Right-click on C-Master.
5. Select Master Options for C Master.
A "Master Options" dialog box
will open.
6. Change the Name to “Introduction”.
7. Click OK.
When you duplicate a spread in
InDesign,everything is copied
from the original to the
duplicate. If you duplicate a
page or spread,then you have
to resetthe page count each
time. To resetthe page count:
1. Highlight the letter or
number inside the page-
number text box.
2. Go to Type > Insert Special
Character > Markers >
Current Page Number
3. Right align the letter or
number.
6
Manual /Booklet Orientation for Adobe
InDesign CC
Last Updated: 8/19/15 by
Kelly
The "Master Options" dialog box will close.
8. Highlight Table of Contents inthe header text box.
9. Replace Table of Contents with Introduction inthe header text box.
9. Creating Master Page D: Fly Pages
1. Open the Pages panel on the right side of the screen.
2. Click the Panel Box Menu.
3. Select New Master.
A "New Master" dialog box will open.
4. Change the Name to “Fly Page”.
5. Change the Number of Pages to 1.
6. Click OK.
The "New Master" dialog box will close.
This master page should remain blank. Fly pages do not have headers
or page numbers on them.
10. Creating Master Page E: Odd Pages for Chapter One
Each new chapter will have different headers than the other chapters. Each
new chapter has differentodd pages because the title of the chapter goes
in the upper-leftcorner of each odd page. For example, if a student's
manual goes to Chapter 3, then they will need to create another master
page for the odd pages in Chapter 3.
1. Open the Pages panel on the right side of the screen.
2. Right click on "C-Introduction".
3. Select Duplicate Master Spread“C-Introduction.”
4. Right-click on E-Master.
5. Select Master Options for E Master.
A "Master Options" dialog box will open.
6. Change the Name to “Chapter 1 Odd.”
7. Click OK.
The "Master Options" dialog box will close.
8. Highlight Introduction inthe header text box.
9. Replace Introduction with “Chapter 1” inthe header text box.
7
Manual /Booklet Orientation for Adobe
InDesign CC
Last Updated: 8/19/15 by
Kelly
Explain to students that they will need to change Chapter 1 to
whatever the title of their Chapter 1 is. For example, if students are
writing a manual on how to wash a dog,then they will need to change
"Chapter 1" to "Shampooing Your Pup".
11. Creating Master Page F: Even Pages
The title of the manual should go in the right corner of the header/footeron
even pages – this will stay the same throughout every even page in the
manual. The page number should go in the left corner of the header/footer
– this will de differenton every even page.
1. Open the Pages panel on the right side of the screen.
2. Right click on "E-Chapter 1 Odd".
3. Select Duplicate Master Spread“E-Chapter 1 Odd.”
4. Right-click on F-Master.
5. Select Master Options for F Master.
A "Master Options" dialog box will open.
6. Change the Name to “Even”.
7. Click OK.
The "Master Options" dialog box will close.
12. Establishing Even Page Headers
1. Click on master page F-Even if you do not already have it selected.
2. Click on the Selection tool inthe toolbar on the left of the screen.
The Selectiontool is the single, black arrow at the top of the toolbar.
3. Click and drag the page-number text box into the upper-left corner.
The text box should remain inside the margins.
4. Click and drag the header text box into the upper-right corner.
The text box should remain inside the margins.
5. Highlight the current page number.
6. Go to Type > Insert Special Characters > Markers > Current Page Number
if the page letter does not automatically change.
8
Manual /Booklet Orientation for Adobe
InDesign CC
Last Updated: 8/19/15 by
Kelly
The letter F should now appear in the left corner.
7. Click the left-align button in the control panel at the top of the screen.
8. Click into the Header text box.
9. Replace Chapter 1 with “Title of Manual”.
Explain to students that they will need to change "Title of Manual" to
the actual title of their manual. For example, if students are writing a
manual on how to wash a dog, then students will need to replace
"Title of Manual" with "How to Wash a Dog".
10. Highlight "Title of Manual".
11. Click the right-align button in the control panel at the top of the screen.
13. Creating Master Page G: Odd Pages for Chapter 2
1. Open the Pages panel on the right of the screen.
2. Right click on "E-Chapter 1 Odd".
3. Select Duplicate Master Spread“E-Chapter 1 Odd”.
4. Right-click on G-Master.
5. Select "Master Options for G Master".
A "Master Options" dialog box will open.
6. Change the Name to “Chapter 2 Odd”.
7. Click OK.
The "Master Options" dialog box will close.
8. Highlight “Chapter 1” in the header text box.
9. Replace Chapter 1 with “Chapter 2”.
14. Assigning Master Pages to Pages
1. Open the Pages panel on the right side of the screen.
2. Click and drag A-Cover to the first page to assign A-Cover to page 1.
3. Click and drag the master page [None] to page 2.
9
Manual /Booklet Orientation for Adobe
InDesign CC
Last Updated: 8/19/15 by
Kelly
This page will be the back of the Cover page. NO CONTENT should
go on this page.
4. Click and drag master page B-Table of Contents to page 3.
5. Click and drag the master page [None] to page 4.
This page will be the back of the Table of Contents page. NO
CONTENT should go on this page.
6. Click and drag master page C-Introduction to page 5.
7. Click and drag the master page [None] to page 6.
This page will be the back of the Introduction page. NO CONTENT
should go on this page.
8. Click and drag master page D-Fly Page to page 7.
9. Click and drag the master page [None] to page 8.
This page will be the back of the Chapter 1 Fly Page. NO CONTENT
should go on this page.
10. Click and drag master page E-Chapter 1 Odd to page 9.
This will be the first page of Chapter 1.
11. Click and drag master page F-Even to page 10.
12. Click and drag master page E-Chapter 1 Odd to page 11.
13. Click and drag master page F-Even to page 12.
This will be the end of Chapter 1. If students need more pages for a
chapter, they can add pages by clicking on the New Page icon at the
bottom of the Pages panel.
14. Click and drag master D-Fly Page to page 13 to start a new chapter section.
15. Click and drag the master page [None] to page 14.
This page will be the back of the Chapter 2 Fly Page. NO CONTENT
should go on this page.
16. Click and drag master page G-Chapter 2 Odd to page 15.
This will be the first page of Chapter 2.
17. Click and drag master page F-Even to page 16.
18. Click and drag master page G-Chapter 2 Odd to page 17.
19. Do not assign a master page to page 18 nor page 19. The Index will go on
page 19 and does not require a master page.
15. Defining Pages Numbers: Front Matter
1. Open the Pages panel on the right side of the screen.
10
Manual /Booklet Orientation for Adobe
InDesign CC
Last Updated: 8/19/15 by
Kelly
2. Click on page 1 inthe Pages panel.
3. Go to Layout > Numbering andSectionOptions.
A "Numbering & Section Options" dialog box will open.
4. Select Start Section Numbering at Page 1.
5. Change the Page Numbering Style from Arabic numerals to lowercase
romannumerals.
6. Click OK.
The "Numbering & Section Options" dialog box will close.
Page 1 should change to Roman numeral i in the Pages panel.
16. Defining Page Numbers: Body Matter
1. Open the Pages panel on the right side of the screen.
2. Click on page 7 (vii) inthe Pages panel.
3. Go to Layout > Numbering andSectionOptions.
A "Numbering & Section Options" dialog box will open.
4. Select Start Section Numbering at Page 1.
5. Change the Page Numbering Style from lowercase Roman numerals to
single Arabic numerals.
6. Click OK.
11
Manual /Booklet Orientation for Adobe
InDesign CC
Last Updated: 8/19/15 by
Kelly
The "Numbering & Section Options" dialog box will close.
All of the pages after page 7 should have Arabic numerals
underneath them in the Pages panel. Pages 1 through 6 should have
lowercase Roman numerals underneath them in the Pages panel.
17. Exporting the Document as an Adobe PDF file
Printing directly from InDesigndoes not work. Tell students to always
export their .INDD file to a .PDF file before trying to print. Tell students to
keep an .INDD file copy, so they can continue working or edit their
documentlater.
1. Go to File > Export….
An "Export" dialog box will open.
2. Change the File Name: to the title of the manual.
3. Make sure that Save As Type: is set to Adobe PDF (Print)(.*pdf).
4. Click Save.
An "Export Adobe PDF" dialog box will replace the "Export" dialog
box.
5. Click Export.
The "Export Adobe PDF" dialog box will close.The PDF version of
the documentshould openshortly after.
18. Printing the PDF Manual (Manual style)
If the instructor wants bookletstyle, then you can go to the next section
titled "Printing the PDF Version (Booklet style)."
1. Open the PDF version of the manual if it is not open already.
2. Go to File > Print.
A "Print" dialog box will open.
3. Select the printer you want to print from.
4. Check the box beside Print onboth sides of paper.
5. Make sure that the document will flip on the long edge.
6. Click Print.
12
Manual /Booklet Orientation for Adobe
InDesign CC
Last Updated: 8/19/15 by
Kelly
The "Print" dialog box will close.
18. Printing the PDF Booklet (Booklet style)
If the instructor wants a manual style documentAND you have already
completedthe previous section, titled "Printing the PDF Version (Manual
Style), then then you can go to the next section titled "Generating a Table
of Contents." If the instructor does not want to include a Table of Contents
or Index, then this is the end of the orientation.
1. Open the PDF version of the manual if it is not already open.
2. Go to File > Print.
A “Print” dialog box will open.
3. Select the appropriate printer from the Printer: dropdown menu.
4. Click the box next to Print on both sides of paper.
5. Change the print orientation to Flip onthe short edge.
6. Click Booklet under Page Sizing & Handling.
The Preview Pane on the right of the dialog box should change to
look like something like this:
7. Click Print.
The “Print” dialog box will close.
19. Generating a Table of Contents
1. Select the Type tool from the toolbar on the left of the screen.
2. Draw a text box in the upper-left corner of each Fly Page in your document
(not the master Fly Page).
3. Type Chapter Title into the textbox on the Fly Pages.
Proceed to the following sections if the instructor wants a Table of
Contents or Index included in the manual or booklet.
If the instructor wants neither a Table of Contents nor Index, this
marks the end of the orientation.
13
Manual /Booklet Orientation for Adobe
InDesign CC
Last Updated: 8/19/15 by
Kelly
Explain to students that they will need to change Chapter Title to the
actual title of the chapter in their manual. For example, if students are
writing a manual on how to wash a dog,then they will need to change
Chapter Title to "Shampooing your Pup" for chapter 1 and "Rinsing
the Shampoo" for chapter 2.
4. Open the Paragraph Style panel on the right of the screen.
5. Click on the Panel Box Menu inthe upper-left corner of the Paragraph
Styles panel.
6. Select New Paragraph Style…
A "New Paragraph Style" dialog box will open.
7. Change the Name to Chapter Heading.
8. Click Basic Character Formats inthe menu options on the left of the dialog
box.
9. Change the Font to Arial.
10. Change the Style to Regular.
11. Change the Font Size to 18 pt.
12. Click OK.
The "New Paragraph Style" dialog box will close.
13. On each fly page, apply the Chapter Heading paragraph style to the
Chapter Title text you wrote in step 1.
20. Making a Paragraph for the Table of Contents
1. Make sure that you are on page iii.
2. Select the Text tool.
3. Click and drag from the bottom-left of the header to the bottom-right
margin.
The textbox should remain inside the margins but cover the entire
page.
4. Open the Paragraph Style panel on the right of the screen.
5. Click on the Panel Box Menu inthe upper-left corner of the Paragraph
Styles panel.
6. Select New Paragraph Style…
A "New Paragraph Style" dialog box will open.
7. Change the Name to Table of Contents.
14
Manual /Booklet Orientation for Adobe
InDesign CC
Last Updated: 8/19/15 by
Kelly
8. Click Basic Character Formats inthe menu options on the left of the dialog
box.
9. Choose what font family and font size you want for the body of your Table
of Contents.
10. Click on Tabs inthe menu on the left of the dialog box.
11. Double click on left –tab stop.
12. Click and drag the bottom triangle to 6 inches.
13. Click and drag the top triangle to 1 inch.
14. Double click on right-tab stop.
15. Click on ruler before your bottom triangle (5.7 in).
16. Type in a single period(.) inthe Leader field.
17. Click OK.
The "New Paragraph Style" dialog box will close.
21. Generating a Table of Contents
1. Go to Layout > Table of Contents...
2. Label the table of contents in the Title field.
3. Choose the TOC Title inthe Style.
4. Highlight Chapter Heading inOther Styles.
5. Click on «Add.
6. Choose TOC Body Text inEntry Style.
7. Click OK.
Your cursor should be loaded with text.
22. Applying Paragraph Styles: Table of Contents
1. Open the Pages panel on the right of the screen if it is not already open.
2. Scroll to your Table of Contents page (ii).
3. Click in the body of the Table of Contents.
4. Highlight the Table of Contents body text.
5. Open the Paragraph Styles panel on the right of the screen.
6. Click the Table of Contents paragraph style.
Note: If you
make changes
to the
document,
you will need
to click on the
Table of
Contents with
the black
arrow, and
then choose
Layout>
Update Table
of Contents
15
Manual /Booklet Orientation for Adobe
InDesign CC
Last Updated: 8/19/15 by
Kelly
InDesignwill apply the style to the Table of Contents.
23. Adding an Index
To insert your index (or at least bring it into view so you can work with it):
1. Go to Window > Type & Tables > Index
2. Drag and drop the Index panel box into the workspace on the right side of the
screen.
3. Open the Pages panel.
4. Double click on the C-Introduction master page.
5. Select the Text tool.
6. Draw a text box anywhere on the page.
7. Go to Type > FillWith Placeholder Text.
8. Highlight a word that you want to use in your Index.
9. Open the Index panel box menu.
10. Select New Page Reference… from the dropdown menu.
11. Click on Add All.
12. Click Done.
24. Creating a Master Page: Index
1. Open the Pages Panel inthe workspace on the right of the screen if it is not
open already.
2. Right-click on master page G-Chapter 2 Odd.
3. Select Duplicate Master Spread“G-Chapter 2 Odd.”
4. Right-click on the new Master page.
5. Select Master Options…
6. Change the Name to Index.
7. Replace all instances of Chapter 2 with Index.
8. Apply the Index Master Page to the last odd page.
16
Manual /Booklet Orientation for Adobe
InDesign CC
Last Updated: 8/19/15 by
Kelly
9. Click on the Generate Index buttonat the bottom of the Index panel box.
10. Click OK.
Your cursor should be loaded with your Index.
11. Click on your index page to place the index.
End of orientation

Contenu connexe

En vedette

Intl ACAC Webinar Wednesday Using MOOCs for Counselors & Students
Intl ACAC Webinar Wednesday Using MOOCs for Counselors & StudentsIntl ACAC Webinar Wednesday Using MOOCs for Counselors & Students
Intl ACAC Webinar Wednesday Using MOOCs for Counselors & StudentsOACACcom
 
trabajos de informática
trabajos de informática trabajos de informática
trabajos de informática John Herrera
 
Configuring and Managing Results Sources in SharePoint 2013
Configuring and Managing Results Sources in SharePoint 2013Configuring and Managing Results Sources in SharePoint 2013
Configuring and Managing Results Sources in SharePoint 2013SurfRay
 
Usability Report - Roca Inc.
Usability Report - Roca Inc.Usability Report - Roca Inc.
Usability Report - Roca Inc.Jessica Fisher
 
Tecnologia.pptx yenibeth
Tecnologia.pptx yenibethTecnologia.pptx yenibeth
Tecnologia.pptx yenibethroquyalvino
 
Intl ACAC Webinar Coalition Access
Intl ACAC Webinar Coalition Access Intl ACAC Webinar Coalition Access
Intl ACAC Webinar Coalition Access OACACcom
 
Primary colours for play Group
Primary colours for play GroupPrimary colours for play Group
Primary colours for play Groupmangala87
 
Cooking without fire
Cooking without fire Cooking without fire
Cooking without fire anjukir77
 
5 armonicos
5 armonicos5 armonicos
5 armonicos____
 
Armonicos causas, efectos y minimizacion
Armonicos causas, efectos y minimizacionArmonicos causas, efectos y minimizacion
Armonicos causas, efectos y minimizacionRamon Pinyol
 
New microsoft office power point presentation
New microsoft office power point presentationNew microsoft office power point presentation
New microsoft office power point presentationShiksha Niketan
 

En vedette (18)

Tallerliderazgo
TallerliderazgoTallerliderazgo
Tallerliderazgo
 
Investitutre cermony
Investitutre cermonyInvestitutre cermony
Investitutre cermony
 
Desarrollo epsi
Desarrollo epsiDesarrollo epsi
Desarrollo epsi
 
Intl ACAC Webinar Wednesday Using MOOCs for Counselors & Students
Intl ACAC Webinar Wednesday Using MOOCs for Counselors & StudentsIntl ACAC Webinar Wednesday Using MOOCs for Counselors & Students
Intl ACAC Webinar Wednesday Using MOOCs for Counselors & Students
 
Summer camp 2016
Summer camp 2016Summer camp 2016
Summer camp 2016
 
trabajos de informática
trabajos de informática trabajos de informática
trabajos de informática
 
Election
ElectionElection
Election
 
Configuring and Managing Results Sources in SharePoint 2013
Configuring and Managing Results Sources in SharePoint 2013Configuring and Managing Results Sources in SharePoint 2013
Configuring and Managing Results Sources in SharePoint 2013
 
Usability Report - Roca Inc.
Usability Report - Roca Inc.Usability Report - Roca Inc.
Usability Report - Roca Inc.
 
Tecnologia.pptx yenibeth
Tecnologia.pptx yenibethTecnologia.pptx yenibeth
Tecnologia.pptx yenibeth
 
Intl ACAC Webinar Coalition Access
Intl ACAC Webinar Coalition Access Intl ACAC Webinar Coalition Access
Intl ACAC Webinar Coalition Access
 
Primary colours for play Group
Primary colours for play GroupPrimary colours for play Group
Primary colours for play Group
 
Graduation Day 2016
Graduation Day 2016Graduation Day 2016
Graduation Day 2016
 
Parafilias
Parafilias Parafilias
Parafilias
 
Cooking without fire
Cooking without fire Cooking without fire
Cooking without fire
 
5 armonicos
5 armonicos5 armonicos
5 armonicos
 
Armonicos causas, efectos y minimizacion
Armonicos causas, efectos y minimizacionArmonicos causas, efectos y minimizacion
Armonicos causas, efectos y minimizacion
 
New microsoft office power point presentation
New microsoft office power point presentationNew microsoft office power point presentation
New microsoft office power point presentation
 

Similaire à 8. InDesign Manual-original

Introduction to InDesign
Introduction to InDesignIntroduction to InDesign
Introduction to InDesignDUSPviz
 
Directions for Developing Forms Using Word 2013NOTE The form .docx
Directions for Developing Forms Using Word 2013NOTE The form .docxDirections for Developing Forms Using Word 2013NOTE The form .docx
Directions for Developing Forms Using Word 2013NOTE The form .docxduketjoy27252
 
A Skills Approach Excel 2016 Chapter 4 Formatting Worksheets.docx
A Skills Approach Excel 2016 Chapter 4 Formatting Worksheets.docxA Skills Approach Excel 2016 Chapter 4 Formatting Worksheets.docx
A Skills Approach Excel 2016 Chapter 4 Formatting Worksheets.docxransayo
 
Excel Printing Tips2007
Excel Printing Tips2007Excel Printing Tips2007
Excel Printing Tips2007simply_coool
 
APA Formatting in a Word Document
APA Formatting in a Word DocumentAPA Formatting in a Word Document
APA Formatting in a Word DocumentAmanda M Richards
 
Practice test 2 solution
Practice test 2 solutionPractice test 2 solution
Practice test 2 solutionLaTaraYAllen
 
A2WPress Slice Theme Documentation
A2WPress Slice Theme DocumentationA2WPress Slice Theme Documentation
A2WPress Slice Theme DocumentationA2WPress
 
IMED 1416 Chapter 01
IMED 1416 Chapter 01IMED 1416 Chapter 01
IMED 1416 Chapter 01Bobby Rivera
 
Advanced InDesign Techniques
Advanced InDesign TechniquesAdvanced InDesign Techniques
Advanced InDesign TechniquesRadford Bean
 
Micro Soft Access - Editing Forms
Micro Soft Access - Editing FormsMicro Soft Access - Editing Forms
Micro Soft Access - Editing FormsFaHaD .H. NooR
 
Grade 4 computer module 4th quarter even no. pages
Grade 4   computer module 4th quarter even no. pagesGrade 4   computer module 4th quarter even no. pages
Grade 4 computer module 4th quarter even no. pagesAndreacordero30
 
Grade 4 computer module 4th quarter even no. pages
Grade 4   computer module 4th quarter even no. pagesGrade 4   computer module 4th quarter even no. pages
Grade 4 computer module 4th quarter even no. pagesAndreaCordero34
 

Similaire à 8. InDesign Manual-original (20)

Newest-indesign
Newest-indesignNewest-indesign
Newest-indesign
 
Introduction to InDesign
Introduction to InDesignIntroduction to InDesign
Introduction to InDesign
 
Directions for Developing Forms Using Word 2013NOTE The form .docx
Directions for Developing Forms Using Word 2013NOTE The form .docxDirections for Developing Forms Using Word 2013NOTE The form .docx
Directions for Developing Forms Using Word 2013NOTE The form .docx
 
2 MS Word PPT.pptx
2 MS Word PPT.pptx2 MS Word PPT.pptx
2 MS Word PPT.pptx
 
Tutorial Coreldraw_2
Tutorial Coreldraw_2Tutorial Coreldraw_2
Tutorial Coreldraw_2
 
A Skills Approach Excel 2016 Chapter 4 Formatting Worksheets.docx
A Skills Approach Excel 2016 Chapter 4 Formatting Worksheets.docxA Skills Approach Excel 2016 Chapter 4 Formatting Worksheets.docx
A Skills Approach Excel 2016 Chapter 4 Formatting Worksheets.docx
 
Apa paper setup
Apa paper setupApa paper setup
Apa paper setup
 
Modifying text 2
Modifying text 2Modifying text 2
Modifying text 2
 
Formatting text 1
 Formatting text 1 Formatting text 1
Formatting text 1
 
Excel Printing Tips2007
Excel Printing Tips2007Excel Printing Tips2007
Excel Printing Tips2007
 
Word basics 2 class
Word basics 2 classWord basics 2 class
Word basics 2 class
 
APA Formatting in a Word Document
APA Formatting in a Word DocumentAPA Formatting in a Word Document
APA Formatting in a Word Document
 
Practice test 2 solution
Practice test 2 solutionPractice test 2 solution
Practice test 2 solution
 
A2WPress Slice Theme Documentation
A2WPress Slice Theme DocumentationA2WPress Slice Theme Documentation
A2WPress Slice Theme Documentation
 
IMED 1416 Chapter 01
IMED 1416 Chapter 01IMED 1416 Chapter 01
IMED 1416 Chapter 01
 
Advanced InDesign Techniques
Advanced InDesign TechniquesAdvanced InDesign Techniques
Advanced InDesign Techniques
 
Beginner word class_2
Beginner word class_2Beginner word class_2
Beginner word class_2
 
Micro Soft Access - Editing Forms
Micro Soft Access - Editing FormsMicro Soft Access - Editing Forms
Micro Soft Access - Editing Forms
 
Grade 4 computer module 4th quarter even no. pages
Grade 4   computer module 4th quarter even no. pagesGrade 4   computer module 4th quarter even no. pages
Grade 4 computer module 4th quarter even no. pages
 
Grade 4 computer module 4th quarter even no. pages
Grade 4   computer module 4th quarter even no. pagesGrade 4   computer module 4th quarter even no. pages
Grade 4 computer module 4th quarter even no. pages
 

Plus de Jessica Fisher

Plus de Jessica Fisher (10)

rocafinal1-interactive
rocafinal1-interactiverocafinal1-interactive
rocafinal1-interactive
 
User Experience Poster
User Experience PosterUser Experience Poster
User Experience Poster
 
Usability Test
Usability TestUsability Test
Usability Test
 
Submitted-Proposal
Submitted-ProposalSubmitted-Proposal
Submitted-Proposal
 
Poster
PosterPoster
Poster
 
Flyer
FlyerFlyer
Flyer
 
Business Card
Business CardBusiness Card
Business Card
 
Original Flyer
Original FlyerOriginal Flyer
Original Flyer
 
Revised Employee Handbook
Revised Employee HandbookRevised Employee Handbook
Revised Employee Handbook
 
Original Employee Handbook
Original Employee HandbookOriginal Employee Handbook
Original Employee Handbook
 

8. InDesign Manual-original

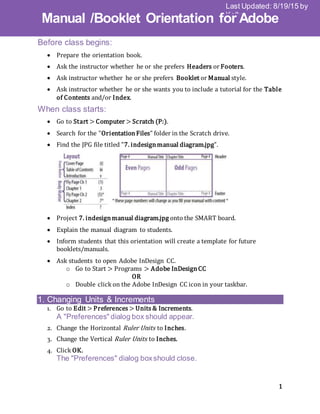
  • 1. 1 Manual /Booklet Orientation for Adobe InDesign CC Last Updated: 8/19/15 by Kelly Before class begins:  Prepare the orientation book.  Ask the instructor whether he or she prefers Headers or Footers.  Ask instructor whether he or she prefers Booklet or Manual style.  Ask instructor whether he or she wants you to include a tutorial for the Table of Contents and/or Index. When class starts:  Go to Start > Computer > Scratch (P:).  Search for the "OrientationFiles" folder in the Scratch drive.  Find the JPG file titled "7. indesignmanual diagram.jpg".  Project 7. indesignmanual diagram.jpg onto the SMART board.  Explain the manual diagram to students.  Inform students that this orientation will create a template for future booklets/manuals.  Ask students to open Adobe InDesign CC. o Go to Start > Programs > Adobe InDesignCC OR o Double click on the Adobe InDesign CC icon in your taskbar. 1. Changing Units & Increments 1. Go to Edit > Preferences > Units & Increments. A "Preferences" dialog box should appear. 2. Change the Horizontal Ruler Units to Inches. 3. Change the Vertical Ruler Units to Inches. 4. Click OK. The "Preferences" dialog boxshould close.
  • 2. 2 Manual /Booklet Orientation for Adobe InDesign CC Last Updated: 8/19/15 by Kelly 2. Creating a New Manual (Manual style) If the instructor wants you to create a template for booklet style, skip this sectionand go to the next sectiontitled: "Creating a New Document (Booklet style)." 1. Go to File > New Document. A "New Document" dialog box will appear. 2. Change the Number of Pages to 19. 3. Make sure that the Page Size is set to Letter. 4. Click the chain icon toward the bottom of dialog box to unlink the margins. The chain should "break" after you click on it. 5. Change the Top margin to 0.5 inches. If the instructor wants footers instead of headers, leave the Top margin at 1 inch and change the Bottom margin to 0.5 inches instead. 6. Click OK. The "New Document" dialog box will close. 2. Creating a New Booklet (Booklet style) If the instructor wants you to create a template for manual style AND you have already completedthe steps in the previous section, titled "Creating a New Document(Manual style)," then you can go to the next sectiontitled "Creating Master Page A: Cover Page." 1. Go to File > New > Document. A "New Document" dialog box will appear. 2. Change the Number of Pages to 19. 3. Change the Page Size to Legal-Half. 4. Change the Page Orientation to Portrait. 5. Change all Margins to .25 inches. 6. Click OK. The "New Document" dialog box will close.
  • 3. 3 Manual /Booklet Orientation for Adobe InDesign CC Last Updated: 8/19/15 by Kelly 3. Creating Master Page A: Cover Page Explain to students the differencebetweenregular pages and master pages. Master pages allow you to create a template and assign that template to regularpages.Elements featured on master pages are locked and cannot be edited,moved,or deleted from a regular page. When you assign a master page to a regular page, anything on the master page will appear on the regular page. Students should only put static contenton master pages.Students should put dynamic content on regular pages. 1. Click on the Pages panel on the right of the screen. 2. Right click on one of the mirrored A- Master pages. 3. Select "Delete Master Page." 4. Click OK when the error message appears. 5. Right-click on the page titled A-Master. 6. Select Master Options for "A-Master"…. A "Master Options" dialog box will appear. 7. Change the Name to “Cover”. 8. Click OK. The "Master Options" dialog box will close. 4. Creating Master Page B: Table of Contents 1. Open the Pages panel on the right side of the screen. 2. Click on the Panel Box Menu inthe top right corner of the Pages panel. 3. Click New Master. A "New Master" dialog box will appear. 4. Change the Name to “Table of Contents”. 5. Change Number of Pages to 1. 6. Click OK. The "New Master" dialog box will close. InDesign allows you to color label your master pages, so you can easily identify which master page is applied where. To color label your master pages: 1.Right click on the master page you want to label. 2.Go to Page Attributes > Color Label. 3.Select the color you want to use to label the master page. The color label will appear beneath the master page as pictured above.
  • 4. 4 Manual /Booklet Orientation for Adobe InDesign CC Last Updated: 8/19/15 by Kelly 5. Inserting Page Numbers and Headers: Master Page B (Table of Contents) 1. Select the Text tool from the toolbar on the left of the screen. 2. Click and drag from the upper-right margin to create a small text box that is 0.5 inches by 0.5 inches. The text box should be inside the margins. You will insert your page numbers into this text box. 3. Go to Type > Insert Special Character > Markers > Current Page Number. The letter B should appear in the text box. The letter will be left aligned. 4. Highlight the "B" in your page-number text box. 5. Click the right-align button in the control panel at the top of the screen. 6. Draw another text box that covers the rest of the width of the top and has the same height as the page number text box. This text box should be inside the margins. This text box will be your header. Manual measurements: 8 inches X 0.5 inches for manualstyle. Bookletmeasurements:6 inches X 0.5 inches for bookletstyle. 7. Type "Table of Contents" into the longest textbox. 6. Creating a New Paragraph Style: Header 1. Open the Paragraph Styles panel on the right-hand side of the screen.
  • 5. 5 Manual /Booklet Orientation for Adobe InDesign CC Last Updated: 8/19/15 by Kelly 2. Click the Panel Menu Box inthe upper-right corner of the Paragraph Styles panel. 3. Click New Paragraph Style. A "New Paragraph Style" dialog box will open. 4. Change the Style Name of the style to “Header”. 5. Change Based On: to [No Paragraph Style]. 6. Change Next Style: to [No Paragraph Style]. 7. Click Reset to Base. 8. Select Basic Character Formats inthe menu on the left of the dialog box. 9. Change the Font to Arial. 10. Change the Font Size to 12 pt. 11. Click OK. The "New Paragraph Style" dialog box will close. 7. Applying the "Header" Paragraph Style 1. Click in the text box that cover the width of the top of the page. This text box is your header. 2. Highlight "Table of Contents". 3. Open the Paragraph Styles panel on the right of the screen. 4. Click the "Header" paragraph style. InDesignwill apply the Header style to "Table of Contents". 8. Creating Master Page C: Introduction 1. Open the Pages panel on the right side of the screen. 2. Right click on B-Table of Contents. 3. Select Duplicate Master Spread“B- Table of Contents”. 4. Right-click on C-Master. 5. Select Master Options for C Master. A "Master Options" dialog box will open. 6. Change the Name to “Introduction”. 7. Click OK. When you duplicate a spread in InDesign,everything is copied from the original to the duplicate. If you duplicate a page or spread,then you have to resetthe page count each time. To resetthe page count: 1. Highlight the letter or number inside the page- number text box. 2. Go to Type > Insert Special Character > Markers > Current Page Number 3. Right align the letter or number.
  • 6. 6 Manual /Booklet Orientation for Adobe InDesign CC Last Updated: 8/19/15 by Kelly The "Master Options" dialog box will close. 8. Highlight Table of Contents inthe header text box. 9. Replace Table of Contents with Introduction inthe header text box. 9. Creating Master Page D: Fly Pages 1. Open the Pages panel on the right side of the screen. 2. Click the Panel Box Menu. 3. Select New Master. A "New Master" dialog box will open. 4. Change the Name to “Fly Page”. 5. Change the Number of Pages to 1. 6. Click OK. The "New Master" dialog box will close. This master page should remain blank. Fly pages do not have headers or page numbers on them. 10. Creating Master Page E: Odd Pages for Chapter One Each new chapter will have different headers than the other chapters. Each new chapter has differentodd pages because the title of the chapter goes in the upper-leftcorner of each odd page. For example, if a student's manual goes to Chapter 3, then they will need to create another master page for the odd pages in Chapter 3. 1. Open the Pages panel on the right side of the screen. 2. Right click on "C-Introduction". 3. Select Duplicate Master Spread“C-Introduction.” 4. Right-click on E-Master. 5. Select Master Options for E Master. A "Master Options" dialog box will open. 6. Change the Name to “Chapter 1 Odd.” 7. Click OK. The "Master Options" dialog box will close. 8. Highlight Introduction inthe header text box. 9. Replace Introduction with “Chapter 1” inthe header text box.
  • 7. 7 Manual /Booklet Orientation for Adobe InDesign CC Last Updated: 8/19/15 by Kelly Explain to students that they will need to change Chapter 1 to whatever the title of their Chapter 1 is. For example, if students are writing a manual on how to wash a dog,then they will need to change "Chapter 1" to "Shampooing Your Pup". 11. Creating Master Page F: Even Pages The title of the manual should go in the right corner of the header/footeron even pages – this will stay the same throughout every even page in the manual. The page number should go in the left corner of the header/footer – this will de differenton every even page. 1. Open the Pages panel on the right side of the screen. 2. Right click on "E-Chapter 1 Odd". 3. Select Duplicate Master Spread“E-Chapter 1 Odd.” 4. Right-click on F-Master. 5. Select Master Options for F Master. A "Master Options" dialog box will open. 6. Change the Name to “Even”. 7. Click OK. The "Master Options" dialog box will close. 12. Establishing Even Page Headers 1. Click on master page F-Even if you do not already have it selected. 2. Click on the Selection tool inthe toolbar on the left of the screen. The Selectiontool is the single, black arrow at the top of the toolbar. 3. Click and drag the page-number text box into the upper-left corner. The text box should remain inside the margins. 4. Click and drag the header text box into the upper-right corner. The text box should remain inside the margins. 5. Highlight the current page number. 6. Go to Type > Insert Special Characters > Markers > Current Page Number if the page letter does not automatically change.
  • 8. 8 Manual /Booklet Orientation for Adobe InDesign CC Last Updated: 8/19/15 by Kelly The letter F should now appear in the left corner. 7. Click the left-align button in the control panel at the top of the screen. 8. Click into the Header text box. 9. Replace Chapter 1 with “Title of Manual”. Explain to students that they will need to change "Title of Manual" to the actual title of their manual. For example, if students are writing a manual on how to wash a dog, then students will need to replace "Title of Manual" with "How to Wash a Dog". 10. Highlight "Title of Manual". 11. Click the right-align button in the control panel at the top of the screen. 13. Creating Master Page G: Odd Pages for Chapter 2 1. Open the Pages panel on the right of the screen. 2. Right click on "E-Chapter 1 Odd". 3. Select Duplicate Master Spread“E-Chapter 1 Odd”. 4. Right-click on G-Master. 5. Select "Master Options for G Master". A "Master Options" dialog box will open. 6. Change the Name to “Chapter 2 Odd”. 7. Click OK. The "Master Options" dialog box will close. 8. Highlight “Chapter 1” in the header text box. 9. Replace Chapter 1 with “Chapter 2”. 14. Assigning Master Pages to Pages 1. Open the Pages panel on the right side of the screen. 2. Click and drag A-Cover to the first page to assign A-Cover to page 1. 3. Click and drag the master page [None] to page 2.
  • 9. 9 Manual /Booklet Orientation for Adobe InDesign CC Last Updated: 8/19/15 by Kelly This page will be the back of the Cover page. NO CONTENT should go on this page. 4. Click and drag master page B-Table of Contents to page 3. 5. Click and drag the master page [None] to page 4. This page will be the back of the Table of Contents page. NO CONTENT should go on this page. 6. Click and drag master page C-Introduction to page 5. 7. Click and drag the master page [None] to page 6. This page will be the back of the Introduction page. NO CONTENT should go on this page. 8. Click and drag master page D-Fly Page to page 7. 9. Click and drag the master page [None] to page 8. This page will be the back of the Chapter 1 Fly Page. NO CONTENT should go on this page. 10. Click and drag master page E-Chapter 1 Odd to page 9. This will be the first page of Chapter 1. 11. Click and drag master page F-Even to page 10. 12. Click and drag master page E-Chapter 1 Odd to page 11. 13. Click and drag master page F-Even to page 12. This will be the end of Chapter 1. If students need more pages for a chapter, they can add pages by clicking on the New Page icon at the bottom of the Pages panel. 14. Click and drag master D-Fly Page to page 13 to start a new chapter section. 15. Click and drag the master page [None] to page 14. This page will be the back of the Chapter 2 Fly Page. NO CONTENT should go on this page. 16. Click and drag master page G-Chapter 2 Odd to page 15. This will be the first page of Chapter 2. 17. Click and drag master page F-Even to page 16. 18. Click and drag master page G-Chapter 2 Odd to page 17. 19. Do not assign a master page to page 18 nor page 19. The Index will go on page 19 and does not require a master page. 15. Defining Pages Numbers: Front Matter 1. Open the Pages panel on the right side of the screen.
  • 10. 10 Manual /Booklet Orientation for Adobe InDesign CC Last Updated: 8/19/15 by Kelly 2. Click on page 1 inthe Pages panel. 3. Go to Layout > Numbering andSectionOptions. A "Numbering & Section Options" dialog box will open. 4. Select Start Section Numbering at Page 1. 5. Change the Page Numbering Style from Arabic numerals to lowercase romannumerals. 6. Click OK. The "Numbering & Section Options" dialog box will close. Page 1 should change to Roman numeral i in the Pages panel. 16. Defining Page Numbers: Body Matter 1. Open the Pages panel on the right side of the screen. 2. Click on page 7 (vii) inthe Pages panel. 3. Go to Layout > Numbering andSectionOptions. A "Numbering & Section Options" dialog box will open. 4. Select Start Section Numbering at Page 1. 5. Change the Page Numbering Style from lowercase Roman numerals to single Arabic numerals. 6. Click OK.
  • 11. 11 Manual /Booklet Orientation for Adobe InDesign CC Last Updated: 8/19/15 by Kelly The "Numbering & Section Options" dialog box will close. All of the pages after page 7 should have Arabic numerals underneath them in the Pages panel. Pages 1 through 6 should have lowercase Roman numerals underneath them in the Pages panel. 17. Exporting the Document as an Adobe PDF file Printing directly from InDesigndoes not work. Tell students to always export their .INDD file to a .PDF file before trying to print. Tell students to keep an .INDD file copy, so they can continue working or edit their documentlater. 1. Go to File > Export…. An "Export" dialog box will open. 2. Change the File Name: to the title of the manual. 3. Make sure that Save As Type: is set to Adobe PDF (Print)(.*pdf). 4. Click Save. An "Export Adobe PDF" dialog box will replace the "Export" dialog box. 5. Click Export. The "Export Adobe PDF" dialog box will close.The PDF version of the documentshould openshortly after. 18. Printing the PDF Manual (Manual style) If the instructor wants bookletstyle, then you can go to the next section titled "Printing the PDF Version (Booklet style)." 1. Open the PDF version of the manual if it is not open already. 2. Go to File > Print. A "Print" dialog box will open. 3. Select the printer you want to print from. 4. Check the box beside Print onboth sides of paper. 5. Make sure that the document will flip on the long edge. 6. Click Print.
  • 12. 12 Manual /Booklet Orientation for Adobe InDesign CC Last Updated: 8/19/15 by Kelly The "Print" dialog box will close. 18. Printing the PDF Booklet (Booklet style) If the instructor wants a manual style documentAND you have already completedthe previous section, titled "Printing the PDF Version (Manual Style), then then you can go to the next section titled "Generating a Table of Contents." If the instructor does not want to include a Table of Contents or Index, then this is the end of the orientation. 1. Open the PDF version of the manual if it is not already open. 2. Go to File > Print. A “Print” dialog box will open. 3. Select the appropriate printer from the Printer: dropdown menu. 4. Click the box next to Print on both sides of paper. 5. Change the print orientation to Flip onthe short edge. 6. Click Booklet under Page Sizing & Handling. The Preview Pane on the right of the dialog box should change to look like something like this: 7. Click Print. The “Print” dialog box will close. 19. Generating a Table of Contents 1. Select the Type tool from the toolbar on the left of the screen. 2. Draw a text box in the upper-left corner of each Fly Page in your document (not the master Fly Page). 3. Type Chapter Title into the textbox on the Fly Pages. Proceed to the following sections if the instructor wants a Table of Contents or Index included in the manual or booklet. If the instructor wants neither a Table of Contents nor Index, this marks the end of the orientation.
  • 13. 13 Manual /Booklet Orientation for Adobe InDesign CC Last Updated: 8/19/15 by Kelly Explain to students that they will need to change Chapter Title to the actual title of the chapter in their manual. For example, if students are writing a manual on how to wash a dog,then they will need to change Chapter Title to "Shampooing your Pup" for chapter 1 and "Rinsing the Shampoo" for chapter 2. 4. Open the Paragraph Style panel on the right of the screen. 5. Click on the Panel Box Menu inthe upper-left corner of the Paragraph Styles panel. 6. Select New Paragraph Style… A "New Paragraph Style" dialog box will open. 7. Change the Name to Chapter Heading. 8. Click Basic Character Formats inthe menu options on the left of the dialog box. 9. Change the Font to Arial. 10. Change the Style to Regular. 11. Change the Font Size to 18 pt. 12. Click OK. The "New Paragraph Style" dialog box will close. 13. On each fly page, apply the Chapter Heading paragraph style to the Chapter Title text you wrote in step 1. 20. Making a Paragraph for the Table of Contents 1. Make sure that you are on page iii. 2. Select the Text tool. 3. Click and drag from the bottom-left of the header to the bottom-right margin. The textbox should remain inside the margins but cover the entire page. 4. Open the Paragraph Style panel on the right of the screen. 5. Click on the Panel Box Menu inthe upper-left corner of the Paragraph Styles panel. 6. Select New Paragraph Style… A "New Paragraph Style" dialog box will open. 7. Change the Name to Table of Contents.
  • 14. 14 Manual /Booklet Orientation for Adobe InDesign CC Last Updated: 8/19/15 by Kelly 8. Click Basic Character Formats inthe menu options on the left of the dialog box. 9. Choose what font family and font size you want for the body of your Table of Contents. 10. Click on Tabs inthe menu on the left of the dialog box. 11. Double click on left –tab stop. 12. Click and drag the bottom triangle to 6 inches. 13. Click and drag the top triangle to 1 inch. 14. Double click on right-tab stop. 15. Click on ruler before your bottom triangle (5.7 in). 16. Type in a single period(.) inthe Leader field. 17. Click OK. The "New Paragraph Style" dialog box will close. 21. Generating a Table of Contents 1. Go to Layout > Table of Contents... 2. Label the table of contents in the Title field. 3. Choose the TOC Title inthe Style. 4. Highlight Chapter Heading inOther Styles. 5. Click on «Add. 6. Choose TOC Body Text inEntry Style. 7. Click OK. Your cursor should be loaded with text. 22. Applying Paragraph Styles: Table of Contents 1. Open the Pages panel on the right of the screen if it is not already open. 2. Scroll to your Table of Contents page (ii). 3. Click in the body of the Table of Contents. 4. Highlight the Table of Contents body text. 5. Open the Paragraph Styles panel on the right of the screen. 6. Click the Table of Contents paragraph style. Note: If you make changes to the document, you will need to click on the Table of Contents with the black arrow, and then choose Layout> Update Table of Contents
  • 15. 15 Manual /Booklet Orientation for Adobe InDesign CC Last Updated: 8/19/15 by Kelly InDesignwill apply the style to the Table of Contents. 23. Adding an Index To insert your index (or at least bring it into view so you can work with it): 1. Go to Window > Type & Tables > Index 2. Drag and drop the Index panel box into the workspace on the right side of the screen. 3. Open the Pages panel. 4. Double click on the C-Introduction master page. 5. Select the Text tool. 6. Draw a text box anywhere on the page. 7. Go to Type > FillWith Placeholder Text. 8. Highlight a word that you want to use in your Index. 9. Open the Index panel box menu. 10. Select New Page Reference… from the dropdown menu. 11. Click on Add All. 12. Click Done. 24. Creating a Master Page: Index 1. Open the Pages Panel inthe workspace on the right of the screen if it is not open already. 2. Right-click on master page G-Chapter 2 Odd. 3. Select Duplicate Master Spread“G-Chapter 2 Odd.” 4. Right-click on the new Master page. 5. Select Master Options… 6. Change the Name to Index. 7. Replace all instances of Chapter 2 with Index. 8. Apply the Index Master Page to the last odd page.
  • 16. 16 Manual /Booklet Orientation for Adobe InDesign CC Last Updated: 8/19/15 by Kelly 9. Click on the Generate Index buttonat the bottom of the Index panel box. 10. Click OK. Your cursor should be loaded with your Index. 11. Click on your index page to place the index. End of orientation