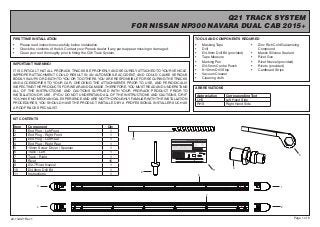
SlideShare une entreprise Scribd logo
1  sur  6
Télécharger pour lire hors ligne
Page 1 of 6
Q21 TRACK SYSTEM
FOR NISSAN NP300 NAVARA DUAL CAB 2015+
TOOLS AND COMPONENTS REQUIRED
•	 Masking Tape
•	 Drill
•	 Ø4.9mm Drill Bit (provided)
•	 Tape Measure
•	 Marking Pen
•	 Ø4-5mm Centre Punch
•	 8-10mm Drill Stop
•	 Vacuum Cleaner
•	 Cleaning cloth
FIRST TIME INSTALLATION
•	 Please read instructions carefully before installation.
•	 Check the contents of the kit. Contact your Prorack dealer if any parts appear missing or damaged.
•	 Clean your roof thoroughly prior to fitting the Q21 Track System.
IMPORTANT WARNING!
IT IS CRITICAL THAT ALL PRORACK TRACKS BE PROPERLY AND SECURELY ATTACHED TO YOUR VEHICLE.
IMPROPER ATTACHMENT COULD RESULT IN AN AUTOMOBILE ACCIDENT, AND COULD CAUSE SERIOUS
BODILY INJURY OR DEATH TO YOU OR TO OTHERS.YOU ARE RESPONSIBLE FOR SECURING THE TRACKS
AND ACCESSORIES TO YOUR CAR, CHECKING THE ATTACHMENTS PRIOR TO USE, AND PERIODICALLY
INSPECTING THE PRODUCTS FOR WEAR AND DAMAGE.THEREFORE, YOU MUST READ AND UNDERSTAND
ALL OF THE INSTRUCTIONS AND CAUTIONS SUPPLIED WITH YOUR PRORACK PRODUCT PRIOR TO
INSTALLATION OR USE. IF YOU DO NOT UNDERSTAND ALL OF THE INSTRUCTIONS AND CAUTIONS, OR IF
YOU HAVE NO MECHANICAL EXPERIENCE AND ARE NOT THOROUGHLY FAMILIAR WITH THE INSTALLATION
PROCEDURES, YOU SHOULD HAVE THE PRODUCT INSTALLED BY A PROFESSIONAL INSTALLER SUCH AS
A ROOF RACK SPECIALIST.
Item Component Qty
1 End Plug - Left Front 1
2 End Plug - Right Front 1
3 End Plug - Left Rear 1
4 End Plug - Right Rear 1
5 10mm Screw Driver / Spanner 1
6 Track - Left 1
7 Track - Right 1
8 Rivet 16
9 Ø2.7 Rivet Nozzel 1
10 Ø4.9mm Drill Bit 1
11 Instructions 1
22-13-021 Rev 1
KIT CONTENTS
ABBREVIATIONS
•	 Zinc Rich Cold Galvanizing
Compound
•	 Mastic Silicone Sealant
•	 Rivet Gun
•	 Rivet Nozzel (provided)
•	 Rivets (provided)
•	 Cardboard Strips
5
Abbreviation Corresponding Text
LHS Left Hand Side
RHS Right Hand Side
3
4
1
2
7
6
8
10
9
Page 1 of 6
Q21 TRACK SYSTEM
FOR NISSAN NP300 NAVARA DUAL CAB 2015+
TOOLS AND COMPONENTS REQUIRED
• Masking Tape
• Drill
• Ø4.9mm Drill Bit (provided)
• Tape Measure
• Marking Pen
• Ø4-5mm Centre Punch
• 8-10mm Drill Stop
• Vacuum Cleaner
• Cleaning cloth
FIRST TIME INSTALLATION
• Please read instructions carefully before installation.
• Check the contents of the kit. Contact your Prorack dealer if any parts appear missing or damaged.
•
IMPORTANT WARNING!
IT IS CRITICAL THAT ALL PRORACK TRACKS BE PROPERLY AND SECURELY ATTACHED TO YOUR VEHICLE.
IMPROPER ATTACHMENT COULD RESULT IN AN AUTOMOBILE ACCIDENT, AND COULD CAUSE SERIOUS
BODILY INJURY OR DEATH TO YOU OR TO OTHERS.YOU ARE RESPONSIBLE FOR SECURING THE TRACKS
AND ACCESSORIES TO YOUR CAR, CHECKING THE ATTACHMENTS PRIOR TO USE, AND PERIODICALLY
INSPECTING THE PRODUCTS FOR WEAR AND DAMAGE.THEREFORE, YOU MUST READ AND UNDERSTAND
ALL OF THE INSTRUCTIONS AND CAUTIONS SUPPLIED WITH YOUR PRORACK PRODUCT PRIOR TO
INSTALLATION OR USE. IF YOU DO NOT UNDERSTAND ALL OF THE INSTRUCTIONS AND CAUTIONS, OR IF
YOU HAVE NO MECHANICAL EXPERIENCE AND ARE NOT THOROUGHLY FAMILIAR WITH THE INSTALLATION
PROCEDURES, YOU SHOULD HAVE THE PRODUCT INSTALLED BY A PROFESSIONAL INSTALLER SUCH AS
A ROOF RACK SPECIALIST.
Item Component Qty
1 End Plug - Left Front 1
2 End Plug - Right Front 1
3 End Plug - Left Rear 1
4 End Plug - Right Rear 1
5 10mm Screw Driver / Spanner 1
6 Track Assembly - Left 1
7 Track Assembly - Right 1
8 Rivet 16
9 Ø2.7 Rivet Nozzel 1
10 Ø4.9mm Drill Bit 1
11 Q21 Instructions 1
22-00-021 Rev 2
KIT CONTENTS
ABBREVIATIONS
• Zinc Rich Cold Galvanizing
Compound
• Mastic Silicone Sealant
• Rivet Gun
• Rivet Nozzel (provided)
• Rivets (provided)
• Cardboard Strips
5
Abbreviation Corresponding Text
LHS Left Hand Side
RHS Right Hand Side
3
4
1
2
7
6
8
10
9
11
11
Page 2 of 6
TRACK INSTALLATION GUIDE FOR NISSAN NP300 DUAL CAB 2
1
TRACK POSITIONING
43 VEHICLE MASKING TRACK PREPARATION
Apply lengths of masking tape along window and door seals.
NOTE: This prevents drill swarf from getting caught.
Using the Ø4.9mm drill bit provided, run through the foam covering the centre holes.
Q21 Track System
BEFORE BEGINNING INSTALLATION
Remove parts from package and check kit contents. If any parts are missing, please
contact your nearest store.
Clean roof thoroughly and allow drying before beginning installation.
Identify left hand (LH) and right hand (RH) tracks as shown.
The front of each track is identified by a red circle sticker. Please note the front of the
track is to be positioned with the front of the vehicle.
REAR OF TRACK FRONT OF TRACK
Red Circle Sticker
LH RH
Page 3 of 6
6 REAR OF TRACK MEASUREMENT
87 POSITION AND SECURE TRACKS AS SHOWN MARK DRILL HOLES
Place tracks onto vehicle. Take note of all
marked measurements and the red front of
track sticker.
Once positioned, secure well in place with
masking tape.
5 FRONT OF TRACK MEASUREMENT
Apply masking tape along the outer edge of the roof channel. NOTE: This will provide
a surface for which measurements can be recorded.
Measure and mark a line 246mm from the front corner radius of the roof channel to
the start of the track.
Place track on outer section of roof. Use masking tape to assist if required. Ensure front
of track aligns with reference mark and sits parallel to roof channel.
Record rear of track position as shown then remove.
At the front and rear reference lines, measure and record 5mm from the outside edge of
the roof channel onto the masking tape. NOTE: Track corners will be positioned where
the lines intersect.
Q21 Track System
246mm
5mm
REAR OF TRACK
FRONT OF TRACK
ROOF CENTRE
REAR OF TRACKFRONT OF TRACK
Using a tape measure, re-
check the measurements and
orientation of the track.
Using a marking pen, record
the location of each track hole
through the track onto the
masking tape.
Remove track.
FRONT OF VEHICLE
Page 4 of 6
10 DRILL ROOF
1211 REMOVE SWARF APPLY PROTECTIVE SEALANTS
Using a vacuum cleaner carefully remove swarf from roof, taking care not to scratch
the vehicle.
Remove all masking tape and gently wipe clean with a damp cloth.
Protect roof channel by applying liberal amounts of protective sealants, as described.
Stage 1
Apply a zinc rich cold galvanising compound to the inside surface and surrounds of
each drilled hole. Ensure the solution has adequate time to become touch dry before
proceeding with Stage 2, (approx. 10 minutes depending product used).
Stage 2
Apply a mastic silicone sealant to the inside surface and surrounds of each hole.
9 CENTRE PUNCH HOLES BEFORE DRILLING
Lightly centre punch all marked hole positions with a Ø4-5mm pin punch tool.
Place tracks back onto vehicle and check to see if all centre punch marks line up with
track holes. If necessary, re-measure to confirm.
Using the Ø4.9mm drill bit provided and a 8-10mm drill stop, carefully drill through the
roof at each centre punched location. Ensure a drilling angle perpendicular to the roof
surface is maintained throughout.
NOTE: A drill stop is used to avoid drilling into the second roof skin of the vehicle.
Q21 Track System
Stage 1 Stage 2
Page 5 of 6
14 POSITION TRACK BACK ONTO VEHICLE
1615 RIVETING TACK TO VEHICLE TRACK INSTALLATION COMPLETE
Place cardboard strips either side of the track prior to riveting to
prevent accidental scratching of the roof body should the rivet gun slip.
Good pressure must be applied to the track when riveting. For ease of
installation, we recommend an assistant hold the track firmly in place.
Attach the rivet nozzle to a rivet gun with the provided 10mm screw
driver/spanner. Rivet the centre of the track. Continue to rivert in an
alternating pattern out towards the end of the track.
Check both tracks are secured to the vehicle as per these installation instructions. For
assistance, contact your local dealer.
13 FIT END PLUGS TO TRACKS
Identify the front and rear end plugs.
Align end plug and slide into position.
Place track back onto vehicle, taking note of
correct orientation. Insert rivets through track
holes and end plugs to align.
Once located, secure well with masking tape.
Q21 Track System
Insert rivet through end plug.
6
8 7
6 64 62 61 63 65
REAR OF TRACK FRONT OF TRACK
Red Circle Sticker
End plug locates
above track base
REAR OF TRACK FRONT OF TRACK
Page 6 of 6
WARRANTY & DISCLAIMER
Yakima Australia Pty Ltd
17 Hinkler Court, Brendale
QLD 4500, Australia
Freephone
AU: 1800 143 548
NZ: 0800 4776 722
RECOMMENDATIONS
•	 Check accessory is securely attached whenever you refit accessories to the vehicle. If the
tracks feels loose, refer to the fitting instructions or contact your local roof rack specialist.
•	 Regularly check all fasteners. This includes all attached accessories and roof racks.
CAUTION
•	 A loaded roof rack system can alter the performance of your vehicle. Be especially aware
of the effects of side winds, changing of direction, and braking performance. Avoid rapid
acceleration and deceleration. Drive Carefully.
•	 Make sure all loads are securely fastened with non-elastic straps. Check regularly during
longer journeys.
•	 Always remove roof racks from tracks before entering a car wash.
•	 Do not exceed the vehicle manufacturer’s roof load rating. Total load equals weight of
tracks + roof racks + accessories + cargo/equipment.
Yakima Australia Pty Ltd ABN 58 154 440 221
17 Hinkler Court, Brendale QLD 4500
Tel: 0800 4776 722 (NZ) or 1800 143 548 (AU)
Email: warranty@yakima.co.nz or warranty@yakima.com.au
1.	 	Where the product is supplied to the customer for other than business purposes within the meaning of section 43 of the New
Zealand Consumer Guarantees Act 1993, the provisions of that Act shall apply. It is important that anyone who fits or uses this
product does so in accordance with the manufacturer’s instructions.
2.	 Where the product is supplied to the customer for business purposes within the meaning of section 43 of the New Zealand
Consumer Guarantees Act 1993, the provisions of that Act and all other representations or terms (including any conditions or
warranty expressed or implied by law, statute or otherwise) not expressly included in this leaflet are hereby expressly excluded
shall have no effect and the clauses (a) and (b) shall apply.
3.	 Subject to the Additional Information (Australia), where the product is supplied and purchased in Australia, the following
shall apply:
(a).	 THE SUPPLIER WARRANTS the product to be free from defects in materials and/or workmanship for a period of three (3) years
from the date of original purchase (the warranty period). Proof of purchase is required. Subject to the limitations and exclusions
set out below, the Supplier hereby agrees to remedy any defects in materials or workmanship becoming apparent during the
warranty period, by replacing or repairing any defective product or component (at its option) free of charge to the purchaser in
respect of replacement parts or labour. Any defective product or component must be notified and where practicable, returned at
the purchaser’s expense to the Supplier immediately upon discovery of the alleged defect and no attempt made on the part of the
purchaser to repair it.
(b).	 EXCEPTIONS, EXCLUSIONS AND LIMITATIONS TO WARRANTY. The product and/or its components must be fitted/assembled
and loaded in accordance with the Supplier’s written instructions and any requirements set out in the car’s owner manual. This
warranty does not cover defects, loss or damage resulting from circumstances beyond the Supplier’s control including, but not
limited to misuse, overloading, or failure to assemble and/or fit the product or component in accordance with the Supplier’s
written instructions. Nor does the warranty cover defects, loss or damage resulting from accidents, unlawful use of the vehicle or
defects/inconsistencies in the vehicle on which the product or component is fitted. Liability for direct, indirect, special, punitive,
incidental, exemplary, contractual or consequential damage or loss arising from defects, faulty materials or design omissions
or negligence or workmanship in the product or its components is hereby expressly excluded subject to the following. Certain
Commonwealth legislation, including the Competition and Consumer Act 2010 (Cth), and other State and Territorial legislation
confers upon purchasers rights which cannot be excluded from or be restricted or modified by contract. Any conditions,
guarantees and/or warranties implied by law and incapable of exclusion are deemed to be expressly incorporated herein. Nothing
herein contained is intended nor shall be permitted to be inconsistent with any such conditions, guarantees and/or warranties. To
the extent permitted by legislation all conditions, guarantees and/or warranties such as implied warranties which are capable of
exclusion are hereby expressly excluded and negatived.
 
ADDITIONAL INFORMATION ( AUSTRALIA )
This information should be read in conjunction with clauses (a) and (b).
IMPORTANT LEGAL NOTICE
Our goods come with guarantees that cannot be excluded under the Australian Consumer Law. You are entitled to a
replacement or refund for a major failure and for compensation for any other reasonably foreseeable loss or damage.
You are also entitled to have the goods repaired or replaced if the goods fail to be of acceptable quality and the failure
does not amount to a major failure.
This warranty does not change or take away your rights under the Australian Consumer Law. Your right to claim under
this policy for the benefits covered is in addition to other rights and remedies you have under the law in relation to
the product.
Where you become aware of defects in materials or of workmanship, and wish to make a claim under this warranty you
must do the following for the warranty to be honoured by your Prorack dealer or Yakima Australia Pty Ltd ABN 58 154
440 221 (Yakima):
1.	 Make a claim as soon as practicable by contacting the Prorack dealer from whom you purchased the product, who
will give you instructions on how to proceed.
2.	 If you are unable to contact the Prorack dealer, or the dealer is not able to remedy the defect, you should contact
Yakima as soon as practicable at:
	 Call: 	 0800 4776 722 (NZ) or 1800 143 548 (AU)
	 Email:	 warranty@yakima.co.nz or warranty@yakima.com.au
Alternately, you can write to Yakima at 17 Hinkler Court, Brendale QLD Australia 4500 in order to make a claim
under your warranty.
3.	 Upon contacting Yakima directly, you should explain as fully as possible the defect. A Yakima representative will
provide you with appropriate instructions for returning the product together with a copy of the original purchase
invoice or receipt to Yakima.
4.	 The costs and expenses associated with making a claim under your warranty including the costs of complying with
those instructions and of returning the product to Yakima or the Prorack dealer will be borne by you.
Following receipt of the product and purchase invoice or receipt, Yakima or the Prorack dealer must inspect the product
to determine whether the claim falls within the warranty. If:
4.1	 the claim falls within the warranty, Yakima will remedy any defects in materials or workmanship becoming
apparent during the warranty period, by replacing or repairing any defective product or component (at its
option) free of charge to the purchaser in respect of replacement parts or labour.
4.2	 the claim does not fall within the warranty, Yakima will return the product to you at your expense.
Document Developed By: Jessica Smith
Revision: 1 | Issue Date: 28/10/2015
Q21 Track System

Contenu connexe

En vedette

OpenDataHK Meetup 13 June 2013 What is Open Data?
OpenDataHK Meetup 13 June 2013 What is Open Data? OpenDataHK Meetup 13 June 2013 What is Open Data?
OpenDataHK Meetup 13 June 2013 What is Open Data? Mr. Bill Proudfit
 
How to succeed with social communication. From social media to social busines...
How to succeed with social communication. From social media to social busines...How to succeed with social communication. From social media to social busines...
How to succeed with social communication. From social media to social busines...Christian Brosstad
 
37번 여의주 예방논문2 발표
37번 여의주 예방논문2 발표37번 여의주 예방논문2 발표
37번 여의주 예방논문2 발표Benedict Choi
 
42번 이민주 예방논문1 발표
42번 이민주 예방논문1 발표42번 이민주 예방논문1 발표
42번 이민주 예방논문1 발표Benedict Choi
 
RESTAURACIÓN MATRIMONIO
RESTAURACIÓN MATRIMONIORESTAURACIÓN MATRIMONIO
RESTAURACIÓN MATRIMONIOSarah Oro
 

En vedette (7)

OpenDataHK Meetup 13 June 2013 What is Open Data?
OpenDataHK Meetup 13 June 2013 What is Open Data? OpenDataHK Meetup 13 June 2013 What is Open Data?
OpenDataHK Meetup 13 June 2013 What is Open Data?
 
El texto.
El texto.El texto.
El texto.
 
How to succeed with social communication. From social media to social busines...
How to succeed with social communication. From social media to social busines...How to succeed with social communication. From social media to social busines...
How to succeed with social communication. From social media to social busines...
 
37번 여의주 예방논문2 발표
37번 여의주 예방논문2 발표37번 여의주 예방논문2 발표
37번 여의주 예방논문2 발표
 
42번 이민주 예방논문1 발표
42번 이민주 예방논문1 발표42번 이민주 예방논문1 발표
42번 이민주 예방논문1 발표
 
RESTAURACIÓN MATRIMONIO
RESTAURACIÓN MATRIMONIORESTAURACIÓN MATRIMONIO
RESTAURACIÓN MATRIMONIO
 
El jaguar
El jaguarEl jaguar
El jaguar
 

Example_Nissan Navara NP300 Track Mount

  • 1. Page 1 of 6 Q21 TRACK SYSTEM FOR NISSAN NP300 NAVARA DUAL CAB 2015+ TOOLS AND COMPONENTS REQUIRED • Masking Tape • Drill • Ø4.9mm Drill Bit (provided) • Tape Measure • Marking Pen • Ø4-5mm Centre Punch • 8-10mm Drill Stop • Vacuum Cleaner • Cleaning cloth FIRST TIME INSTALLATION • Please read instructions carefully before installation. • Check the contents of the kit. Contact your Prorack dealer if any parts appear missing or damaged. • Clean your roof thoroughly prior to fitting the Q21 Track System. IMPORTANT WARNING! IT IS CRITICAL THAT ALL PRORACK TRACKS BE PROPERLY AND SECURELY ATTACHED TO YOUR VEHICLE. IMPROPER ATTACHMENT COULD RESULT IN AN AUTOMOBILE ACCIDENT, AND COULD CAUSE SERIOUS BODILY INJURY OR DEATH TO YOU OR TO OTHERS.YOU ARE RESPONSIBLE FOR SECURING THE TRACKS AND ACCESSORIES TO YOUR CAR, CHECKING THE ATTACHMENTS PRIOR TO USE, AND PERIODICALLY INSPECTING THE PRODUCTS FOR WEAR AND DAMAGE.THEREFORE, YOU MUST READ AND UNDERSTAND ALL OF THE INSTRUCTIONS AND CAUTIONS SUPPLIED WITH YOUR PRORACK PRODUCT PRIOR TO INSTALLATION OR USE. IF YOU DO NOT UNDERSTAND ALL OF THE INSTRUCTIONS AND CAUTIONS, OR IF YOU HAVE NO MECHANICAL EXPERIENCE AND ARE NOT THOROUGHLY FAMILIAR WITH THE INSTALLATION PROCEDURES, YOU SHOULD HAVE THE PRODUCT INSTALLED BY A PROFESSIONAL INSTALLER SUCH AS A ROOF RACK SPECIALIST. Item Component Qty 1 End Plug - Left Front 1 2 End Plug - Right Front 1 3 End Plug - Left Rear 1 4 End Plug - Right Rear 1 5 10mm Screw Driver / Spanner 1 6 Track - Left 1 7 Track - Right 1 8 Rivet 16 9 Ø2.7 Rivet Nozzel 1 10 Ø4.9mm Drill Bit 1 11 Instructions 1 22-13-021 Rev 1 KIT CONTENTS ABBREVIATIONS • Zinc Rich Cold Galvanizing Compound • Mastic Silicone Sealant • Rivet Gun • Rivet Nozzel (provided) • Rivets (provided) • Cardboard Strips 5 Abbreviation Corresponding Text LHS Left Hand Side RHS Right Hand Side 3 4 1 2 7 6 8 10 9 Page 1 of 6 Q21 TRACK SYSTEM FOR NISSAN NP300 NAVARA DUAL CAB 2015+ TOOLS AND COMPONENTS REQUIRED • Masking Tape • Drill • Ø4.9mm Drill Bit (provided) • Tape Measure • Marking Pen • Ø4-5mm Centre Punch • 8-10mm Drill Stop • Vacuum Cleaner • Cleaning cloth FIRST TIME INSTALLATION • Please read instructions carefully before installation. • Check the contents of the kit. Contact your Prorack dealer if any parts appear missing or damaged. • IMPORTANT WARNING! IT IS CRITICAL THAT ALL PRORACK TRACKS BE PROPERLY AND SECURELY ATTACHED TO YOUR VEHICLE. IMPROPER ATTACHMENT COULD RESULT IN AN AUTOMOBILE ACCIDENT, AND COULD CAUSE SERIOUS BODILY INJURY OR DEATH TO YOU OR TO OTHERS.YOU ARE RESPONSIBLE FOR SECURING THE TRACKS AND ACCESSORIES TO YOUR CAR, CHECKING THE ATTACHMENTS PRIOR TO USE, AND PERIODICALLY INSPECTING THE PRODUCTS FOR WEAR AND DAMAGE.THEREFORE, YOU MUST READ AND UNDERSTAND ALL OF THE INSTRUCTIONS AND CAUTIONS SUPPLIED WITH YOUR PRORACK PRODUCT PRIOR TO INSTALLATION OR USE. IF YOU DO NOT UNDERSTAND ALL OF THE INSTRUCTIONS AND CAUTIONS, OR IF YOU HAVE NO MECHANICAL EXPERIENCE AND ARE NOT THOROUGHLY FAMILIAR WITH THE INSTALLATION PROCEDURES, YOU SHOULD HAVE THE PRODUCT INSTALLED BY A PROFESSIONAL INSTALLER SUCH AS A ROOF RACK SPECIALIST. Item Component Qty 1 End Plug - Left Front 1 2 End Plug - Right Front 1 3 End Plug - Left Rear 1 4 End Plug - Right Rear 1 5 10mm Screw Driver / Spanner 1 6 Track Assembly - Left 1 7 Track Assembly - Right 1 8 Rivet 16 9 Ø2.7 Rivet Nozzel 1 10 Ø4.9mm Drill Bit 1 11 Q21 Instructions 1 22-00-021 Rev 2 KIT CONTENTS ABBREVIATIONS • Zinc Rich Cold Galvanizing Compound • Mastic Silicone Sealant • Rivet Gun • Rivet Nozzel (provided) • Rivets (provided) • Cardboard Strips 5 Abbreviation Corresponding Text LHS Left Hand Side RHS Right Hand Side 3 4 1 2 7 6 8 10 9 11 11
  • 2. Page 2 of 6 TRACK INSTALLATION GUIDE FOR NISSAN NP300 DUAL CAB 2 1 TRACK POSITIONING 43 VEHICLE MASKING TRACK PREPARATION Apply lengths of masking tape along window and door seals. NOTE: This prevents drill swarf from getting caught. Using the Ø4.9mm drill bit provided, run through the foam covering the centre holes. Q21 Track System BEFORE BEGINNING INSTALLATION Remove parts from package and check kit contents. If any parts are missing, please contact your nearest store. Clean roof thoroughly and allow drying before beginning installation. Identify left hand (LH) and right hand (RH) tracks as shown. The front of each track is identified by a red circle sticker. Please note the front of the track is to be positioned with the front of the vehicle. REAR OF TRACK FRONT OF TRACK Red Circle Sticker LH RH
  • 3. Page 3 of 6 6 REAR OF TRACK MEASUREMENT 87 POSITION AND SECURE TRACKS AS SHOWN MARK DRILL HOLES Place tracks onto vehicle. Take note of all marked measurements and the red front of track sticker. Once positioned, secure well in place with masking tape. 5 FRONT OF TRACK MEASUREMENT Apply masking tape along the outer edge of the roof channel. NOTE: This will provide a surface for which measurements can be recorded. Measure and mark a line 246mm from the front corner radius of the roof channel to the start of the track. Place track on outer section of roof. Use masking tape to assist if required. Ensure front of track aligns with reference mark and sits parallel to roof channel. Record rear of track position as shown then remove. At the front and rear reference lines, measure and record 5mm from the outside edge of the roof channel onto the masking tape. NOTE: Track corners will be positioned where the lines intersect. Q21 Track System 246mm 5mm REAR OF TRACK FRONT OF TRACK ROOF CENTRE REAR OF TRACKFRONT OF TRACK Using a tape measure, re- check the measurements and orientation of the track. Using a marking pen, record the location of each track hole through the track onto the masking tape. Remove track. FRONT OF VEHICLE
  • 4. Page 4 of 6 10 DRILL ROOF 1211 REMOVE SWARF APPLY PROTECTIVE SEALANTS Using a vacuum cleaner carefully remove swarf from roof, taking care not to scratch the vehicle. Remove all masking tape and gently wipe clean with a damp cloth. Protect roof channel by applying liberal amounts of protective sealants, as described. Stage 1 Apply a zinc rich cold galvanising compound to the inside surface and surrounds of each drilled hole. Ensure the solution has adequate time to become touch dry before proceeding with Stage 2, (approx. 10 minutes depending product used). Stage 2 Apply a mastic silicone sealant to the inside surface and surrounds of each hole. 9 CENTRE PUNCH HOLES BEFORE DRILLING Lightly centre punch all marked hole positions with a Ø4-5mm pin punch tool. Place tracks back onto vehicle and check to see if all centre punch marks line up with track holes. If necessary, re-measure to confirm. Using the Ø4.9mm drill bit provided and a 8-10mm drill stop, carefully drill through the roof at each centre punched location. Ensure a drilling angle perpendicular to the roof surface is maintained throughout. NOTE: A drill stop is used to avoid drilling into the second roof skin of the vehicle. Q21 Track System Stage 1 Stage 2
  • 5. Page 5 of 6 14 POSITION TRACK BACK ONTO VEHICLE 1615 RIVETING TACK TO VEHICLE TRACK INSTALLATION COMPLETE Place cardboard strips either side of the track prior to riveting to prevent accidental scratching of the roof body should the rivet gun slip. Good pressure must be applied to the track when riveting. For ease of installation, we recommend an assistant hold the track firmly in place. Attach the rivet nozzle to a rivet gun with the provided 10mm screw driver/spanner. Rivet the centre of the track. Continue to rivert in an alternating pattern out towards the end of the track. Check both tracks are secured to the vehicle as per these installation instructions. For assistance, contact your local dealer. 13 FIT END PLUGS TO TRACKS Identify the front and rear end plugs. Align end plug and slide into position. Place track back onto vehicle, taking note of correct orientation. Insert rivets through track holes and end plugs to align. Once located, secure well with masking tape. Q21 Track System Insert rivet through end plug. 6 8 7 6 64 62 61 63 65 REAR OF TRACK FRONT OF TRACK Red Circle Sticker End plug locates above track base REAR OF TRACK FRONT OF TRACK
  • 6. Page 6 of 6 WARRANTY & DISCLAIMER Yakima Australia Pty Ltd 17 Hinkler Court, Brendale QLD 4500, Australia Freephone AU: 1800 143 548 NZ: 0800 4776 722 RECOMMENDATIONS • Check accessory is securely attached whenever you refit accessories to the vehicle. If the tracks feels loose, refer to the fitting instructions or contact your local roof rack specialist. • Regularly check all fasteners. This includes all attached accessories and roof racks. CAUTION • A loaded roof rack system can alter the performance of your vehicle. Be especially aware of the effects of side winds, changing of direction, and braking performance. Avoid rapid acceleration and deceleration. Drive Carefully. • Make sure all loads are securely fastened with non-elastic straps. Check regularly during longer journeys. • Always remove roof racks from tracks before entering a car wash. • Do not exceed the vehicle manufacturer’s roof load rating. Total load equals weight of tracks + roof racks + accessories + cargo/equipment. Yakima Australia Pty Ltd ABN 58 154 440 221 17 Hinkler Court, Brendale QLD 4500 Tel: 0800 4776 722 (NZ) or 1800 143 548 (AU) Email: warranty@yakima.co.nz or warranty@yakima.com.au 1. Where the product is supplied to the customer for other than business purposes within the meaning of section 43 of the New Zealand Consumer Guarantees Act 1993, the provisions of that Act shall apply. It is important that anyone who fits or uses this product does so in accordance with the manufacturer’s instructions. 2. Where the product is supplied to the customer for business purposes within the meaning of section 43 of the New Zealand Consumer Guarantees Act 1993, the provisions of that Act and all other representations or terms (including any conditions or warranty expressed or implied by law, statute or otherwise) not expressly included in this leaflet are hereby expressly excluded shall have no effect and the clauses (a) and (b) shall apply. 3. Subject to the Additional Information (Australia), where the product is supplied and purchased in Australia, the following shall apply: (a). THE SUPPLIER WARRANTS the product to be free from defects in materials and/or workmanship for a period of three (3) years from the date of original purchase (the warranty period). Proof of purchase is required. Subject to the limitations and exclusions set out below, the Supplier hereby agrees to remedy any defects in materials or workmanship becoming apparent during the warranty period, by replacing or repairing any defective product or component (at its option) free of charge to the purchaser in respect of replacement parts or labour. Any defective product or component must be notified and where practicable, returned at the purchaser’s expense to the Supplier immediately upon discovery of the alleged defect and no attempt made on the part of the purchaser to repair it. (b). EXCEPTIONS, EXCLUSIONS AND LIMITATIONS TO WARRANTY. The product and/or its components must be fitted/assembled and loaded in accordance with the Supplier’s written instructions and any requirements set out in the car’s owner manual. This warranty does not cover defects, loss or damage resulting from circumstances beyond the Supplier’s control including, but not limited to misuse, overloading, or failure to assemble and/or fit the product or component in accordance with the Supplier’s written instructions. Nor does the warranty cover defects, loss or damage resulting from accidents, unlawful use of the vehicle or defects/inconsistencies in the vehicle on which the product or component is fitted. Liability for direct, indirect, special, punitive, incidental, exemplary, contractual or consequential damage or loss arising from defects, faulty materials or design omissions or negligence or workmanship in the product or its components is hereby expressly excluded subject to the following. Certain Commonwealth legislation, including the Competition and Consumer Act 2010 (Cth), and other State and Territorial legislation confers upon purchasers rights which cannot be excluded from or be restricted or modified by contract. Any conditions, guarantees and/or warranties implied by law and incapable of exclusion are deemed to be expressly incorporated herein. Nothing herein contained is intended nor shall be permitted to be inconsistent with any such conditions, guarantees and/or warranties. To the extent permitted by legislation all conditions, guarantees and/or warranties such as implied warranties which are capable of exclusion are hereby expressly excluded and negatived.   ADDITIONAL INFORMATION ( AUSTRALIA ) This information should be read in conjunction with clauses (a) and (b). IMPORTANT LEGAL NOTICE Our goods come with guarantees that cannot be excluded under the Australian Consumer Law. You are entitled to a replacement or refund for a major failure and for compensation for any other reasonably foreseeable loss or damage. You are also entitled to have the goods repaired or replaced if the goods fail to be of acceptable quality and the failure does not amount to a major failure. This warranty does not change or take away your rights under the Australian Consumer Law. Your right to claim under this policy for the benefits covered is in addition to other rights and remedies you have under the law in relation to the product. Where you become aware of defects in materials or of workmanship, and wish to make a claim under this warranty you must do the following for the warranty to be honoured by your Prorack dealer or Yakima Australia Pty Ltd ABN 58 154 440 221 (Yakima): 1. Make a claim as soon as practicable by contacting the Prorack dealer from whom you purchased the product, who will give you instructions on how to proceed. 2. If you are unable to contact the Prorack dealer, or the dealer is not able to remedy the defect, you should contact Yakima as soon as practicable at: Call: 0800 4776 722 (NZ) or 1800 143 548 (AU) Email: warranty@yakima.co.nz or warranty@yakima.com.au Alternately, you can write to Yakima at 17 Hinkler Court, Brendale QLD Australia 4500 in order to make a claim under your warranty. 3. Upon contacting Yakima directly, you should explain as fully as possible the defect. A Yakima representative will provide you with appropriate instructions for returning the product together with a copy of the original purchase invoice or receipt to Yakima. 4. The costs and expenses associated with making a claim under your warranty including the costs of complying with those instructions and of returning the product to Yakima or the Prorack dealer will be borne by you. Following receipt of the product and purchase invoice or receipt, Yakima or the Prorack dealer must inspect the product to determine whether the claim falls within the warranty. If: 4.1 the claim falls within the warranty, Yakima will remedy any defects in materials or workmanship becoming apparent during the warranty period, by replacing or repairing any defective product or component (at its option) free of charge to the purchaser in respect of replacement parts or labour. 4.2 the claim does not fall within the warranty, Yakima will return the product to you at your expense. Document Developed By: Jessica Smith Revision: 1 | Issue Date: 28/10/2015 Q21 Track System