
Recommandé
Contenu connexe
Tendances
Tendances (20)
Similaire à Database as information system
Similaire à Database as information system (20)
Plus de KAZEMBETVOnline
Plus de KAZEMBETVOnline (20)
Dernier
Dernier (20)
Database as information system
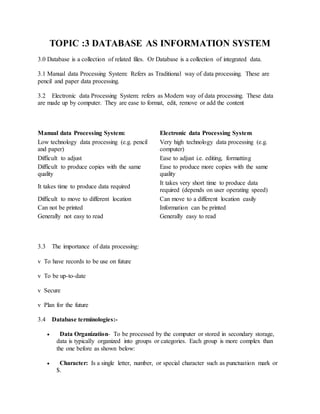
- 1. TOPIC :3 DATABASE AS INFORMATION SYSTEM 3.0 Database is a collection of related files. Or Database is a collection of integrated data. 3.1 Manual data Processing System: Refers as Traditional way of data processing. These are pencil and paper data processing. 3.2 Electronic data Processing System: refers as Modern way of data processing. These data are made up by computer. They are ease to format, edit, remove or add the content Manual data Processing System: Electronic data Processing System Low technology data processing (e.g. pencil and paper) Very high technology data processing (e.g. computer) Difficult to adjust Ease to adjust i.e. editing, formatting Difficult to produce copies with the same quality Ease to produce more copies with the same quality It takes time to produce data required It takes very short time to produce data required (depends on user operating speed) Difficult to move to different location Can move to a different location easily Can not be printed Information can be printed Generally not easy to read Generally easy to read 3.3 The importance of data processing: v To have records to be use on future v To be up-to-date v Secure v Plan for the future 3.4 Database terminologies:- Data Organization- To be processed by the computer or stored in secondary storage, data is typically organized into groups or categories. Each group is more complex than the one before as shown below: Character: Is a single letter, number, or special character such as punctuation mark or $.
- 2. Field: Contain a set of related characters. E.g. a word such as “Caesar” Record: Collection of related field. File: Collection of related records Database: Collection of related files. 3.5 Database Management System In order to create, modify, and gain access to database the special software is required. This software is called Database Management System (DBMS) ABMS is made up of a data dictionary and query language. 3.6 Importance of database system o Sharing: In Organizations, information from one department can be ready shared with others o Security: Users are given passwords or access only to the kind of information they need to know e.g. payroll department may have access to employee’s pay rates, but other department would not. o Fewer files: With several departments having access to one file, there are fewer files. o Data integrity: Order filing systems many times did not have” integrity” that is a change made in a file in one department might non be made in the file in another department 3.7 Types of Database: There are (4) kinds Databases (i) Individual: is also called microcomputer database. It is a collection of integrated file primarily used by just one person (ii) Company: May be stored on a mainframe computer and managed by a computer professional (database administrator) users throughout the company have access to the database through their microcomputers linked to local area networks or wide area networks. There are two types of company database (1) common operational database (2) common user database. (iii) Distributed: That is, it is located in a place(s) other than where users are located. Typically, database savers on a client/sever network provide a link between users and the distant data. E.g. information can be at regional offices. Some can be at headquarters, some down the hall from you and some even overseas
- 3. (iv) Propriety: Is generally an enormous database that an organization develops to cover certain particular subject. It offers access to this database to the public or selected outside individuals for fee. 3.8 Creating database: What is Microsoft Access? Microsoft Access is a Database Management Program Database is a collection of related files Main objects in a database are:- o Tables – Used to store data in a database o Queries- Used to search for specific information in database tables o Forms – Used to display data from database tables, Queries & also are used to enter, edit data in tables o Reports- Used to present data for printing. Tables Tables are containers used to store data in a database Data in tables is stored in fields(columns) and records (rows) Starting MS - Access Click on Start button Click on Programs Click on Microsoft Access OR Click on Start button Click on RUN Type MSACCESS Click OK Creating a Table Using DesignView On database window, click on Tables Objects Double-click on ‘Create a table using design view’ OR ‘Click on New, click on Design View, Click OK’
- 4. On Design view, enter the field names and select their respective data types and if needed enter the description for the fields. Specify the properties for the fields (field size, format e.t.c) if necessary, specify the primary key field. Save the table Close the table Creating a table using Wizard On database window, on Tables objects Double click on ‘Create a table using Wizard’ Select category, select sample table, select fields you want, Click on Next Enter table name, specify how you want the primary key to be created, click Next On the last step, specify how you want the table opened, Click on Finish Creating a Primary key field On Table’s design view Right-click on a field you want to be a Primary key field On the menu appearing, click on Primary Key. FILTERS Filters are used to narrow the list of records displayed A filter looks for specific information in each record and then lists only those records that contain that specific information. Filter by Selection Open the table on which you want to filter Click on the field with the value you want to filter Click on the Filter by Selection button on the toolbar OR Right-click on the field with the value to filter Click on Filter by Selection on menu appearing Filter Excluding Selection On the table on which you want to filter Right-click on the field with the value to exclude Click on Filter Excluding Selection on menu appearing Filter by Form
- 5. Open the table on which you want to filter Click on Filter by Form button on the toolbar The filter window may contain previous filters, click on Clear Grid button on the toolbar to remove Enter the filters you want Click on Apply Filter button on the toolbar to view the results Removing Filter On Filtered view Click on Remove Filter button on the toolbar to see all the records QUERIES Access refers to the process of questioning, selecting and manipulating data as Querying. Queries are used to search for a specific data contained in a table. Creating a Query using DesignView On database Window, click on queries objects Double-click on ‘Create Query using Design View’ OR Click on New, Click on Design View, Click OK On Show table window, click on a table you want for the query to get its values from Click OK. If it’s more than one table, then continue to add the tables in the same way Click close to close the show table window. In query’s design view, the user has to add the fields for the query on field row by: o Double-click on a field OR o Drag the field to the field row Add criteria, calculated fields etc if needed. View the query in datasheet view to see how the resulting query looks like Save the query. Creating Query Using Wizard On database Window, make sure you are Queries Objects Double-click on ‘Create Query using Wizard’ OR Click on New, Click on Simple Query Wizard, Select OK Select the table/query where you want the query to get its values from on tables/queries box Select the fields, click Next Follow the wizard steps and select options you want On the last step, enter the query name, select where you want the query to be opened Click Finish Creating a calculated field on Queries
- 6. On Query’s design view On field row, click on the empty cell on field row Type the field name, and the formula (how the field is going to get its values), the field name and the formula are being separated by a double colon (:) FORMS Forms in Access are like any forms we usually fill in our everyday life. Forms in Access are used to enter data in tables, to view existing data in queries tables and also to edit data in our databases tables. The easiest way to create a form is by using Form Wizard and after creating you can switch to design view and customize the form. Creating a Form Using Form Wizard On Database window, click on Forms Objects. Double-click on ‘Create a Form using Wizard’ OR ‘Click on New, click on Form Wizard, Click OK’ Select the table / query where you want the form to get its values from Select the fields you want for the form, click Next Select the Form Layout, click Next Select the style, click Next Enter the Form Name Select on which view you want the form to be opened Click on Finish Creating A Form Using Autoform On Database window, on Forms objects Click on New Select the type of Autoform you want o Autoform: Columnar o Autoform: Tabular o Autoform: Datasheet o Select the table/query you want the form to get its values from o Click OK Formatting Form’s Controls On Form’s Design View Click on form’s controls to select Use Formatting toolbar to format the control(s) Showing / Hiding Toolbox on Form’s DesignView On Form’s Design view
- 7. Click on View Menu Click on Toolbox Creating a Label on a Form On Form’s Design view On Toolbox, click on Label control Click on a Form where you want the label to appear Type the label name Press Enter to select the label Use formatting toolbar to format the label REPORT Report is the flexible means of presenting and displaying your data in a database. In a report, data can not be modified or deleted, you can only view data. The easiest way to create a report is by using wizard Creating a report using a wizard On database window, click on Report Objects Double-click on ‘Create Report using a wizard’ OR Click on New, Click on Report Wizard, Click OK Select the table/query where you want the report to get its values from Select the fields, click Next Add grouping level(s), Click Next If necessary add sort order for the detail records AND if any of the fields selected for the report has Currency or Number data type, then you will have Summary Options button allowing you (the user) to add calculated value e.g. sum, average etc Click Next Select the layout you want, Click Next Select the style, Click Next Enter the report name and where do you want the report to be viewed. Click Finish. Renaming database objects e.g. tables, forms, queries etc On database window, Right click on the object you want to rename On the menu appearing, click on Rename Type the new name Press ENTER Deleting database objects On database window
- 8. Click on the object you want to delete Press DELETE on keyboard OR On database window Right-click on the object to delete Select Delete on menu appearing Sending a database to floppy diskette (A) Close the database Go to where Database file is saved e.g. to My Document, on desktop etc. Find the database you want to send to the diskette Right-click on it On the menu appearing, click on send to Click on 3½ floppy(A)