1. About Gauge
For the best introduction to this topic, let’s start out by defining what gauge is in relation to
knitting. Gauge is a measure of the number of stitches in one inch of fabric. Gauge is essential in
knitting and you will see it referenced in a number of places.
Once you have selected a pattern to knit, look for the designer’s given gauge. This can usually
be found at the start of the pattern, near the yarn and needle requirements. The designer gives
you the gauge of the pattern as shown so that you can achieve the fit and drape that they
intended the knitted fabric to have. However, the gauge is also included so that you can
experiment with other yarns and styles while still creating the same basic finished item.
Now that you’ve chosen a pattern, it’s time to select your yarn. Look at the label on any yarn for
a starting point. Usually the label will indicate a gauge (i.e. – 5 sts/inch) and a recommended
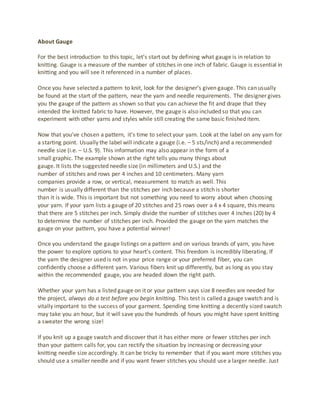
needle size (i.e. – U.S. 9). This information may also appear in the form of a
small graphic. The example shown at the right tells you many things about
gauge. It lists the suggested needle size (in millimeters and U.S.) and the
number of stitches and rows per 4 inches and 10 centimeters. Many yarn
companies provide a row, or vertical, measurement to match as well. This
number is usually different than the stitches per inch because a stitch is shorter
than it is wide. This is important but not something you need to worry about when choosing
your yarn. If your yarn lists a gauge of 20 stitches and 25 rows over a 4 x 4 square, this means
that there are 5 stitches per inch. Simply divide the number of stitches over 4 inches (20) by 4
to determine the number of stitches per inch. Provided the gauge on the yarn matches the
gauge on your pattern, you have a potential winner!
Once you understand the gauge listings on a pattern and on various brands of yarn, you have
the power to explore options to your heart’s content. This freedom is incredibly liberating. If
the yarn the designer used is not in your price range or your preferred fiber, you can
confidently choose a different yarn. Various fibers knit up differently, but as long as you stay
within the recommended gauge, you are headed down the right path.
Whether your yarn has a listed gauge on it or your pattern says size 8 needles are needed for
the project, always do a test before you begin knitting. This test is called a gauge swatch and is
vitally important to the success of your garment. Spending time knitting a decently sized swatch
may take you an hour, but it will save you the hundreds of hours you might have spent knitting
a sweater the wrong size!
If you knit up a gauge swatch and discover that it has either more or fewer stitches per inch
than your pattern calls for, you can rectify the situation by increasing or decreasing your
knitting needle size accordingly. It can be tricky to remember that if you want more stitches you
should use a smaller needle and if you want fewer stitches you should use a larger needle. Just
2. remember that the larger your needles get, the larger your stitches will be and therefore fewer
of them will fit into an inch.
In the pattern you have chosen, it will most likely have a note next to the required needles that
says something like “Or size needed to obtain correct gauge”. This is an important tip as various
knitters will use different sizes of needles to achieve a specific gauge. If you knit tightly, you
may need a size 8 needle to achieve 5 sts/inch. If you knit loosely, you may need a size 5
needle. If you happen to be lucky enough to knit at exactly the same tension as the person who
wrote the pattern, you’re ahead of the game – but you wouldn’t have known that for sure
without knitting a gauge swatch! Your swatch will help you figure out what needle size you
need.
Gauge is your friend, but you’ve got to negotiate until you, your yarn, your needles and your
pattern have reached an agreement. Then you’re ready to get down to business!
T-shirt
A T-shirt (or tee-shirt, or tee) is a style of fabric shirt, named after the T shape of the body and
sleeves. It is normally associated with short sleeves, a round neck line known as a "crew neck",
and no collar.
Typically made of cotton fibers knitted in a jersey stitch, they have a distinctive soft texture
compared to woven shirts. The majority of modern versions have a body made from a
continuously woven tube, on a circular loom, so that the torso has no side seams. The
manufacture of T-shirts has become highly automated, and may include fabric cutting
by laser or water jet.
The T-shirt evolved from undergarments used in the 19th century, through cutting the one-
piece "union suit" underwear into separate top and bottom garments, with the top long
enough to tuck under the waistband of the bottoms. With and without buttons, they were
adopted by miners and stevedores during the late 19th century as a convenient covering for
hot environments.
3. As slip-on garments without buttons, they originally became popular in the United States when
they were issued by the U.S. Navy during or following the Spanish–American War of 1898.
These were a crew-necked, short-sleeved, white cotton undershirt to be worn under a uniform.
It became common for sailors and Marines in work parties, the early submarines, and tropical
climates to remove their uniform "jacket", wearing (and soiling) only the undershirt.[1]
They soon became popular as a bottom layer of clothing for workers in various industries,
including agriculture. The T-shirt was easily fitted, easily cleaned, and inexpensive, and for
those reasons it became the shirt of choice for young boys. Boys' shirts were made in various
colors and patterns. By the Great Depression, the T-shirt was often the default garment to be
worn when doing farm or ranch chores, as well as other times when modesty called for a torso
covering but conditions called for lightweight fabrics.[1]
A V-neck T-shirt has a V-shaped neckline, as opposed to the round neckline of the more
common crew neck shirt. V-necks were introduced so that the neckline of the shirt does not
stand out when an outer shirt is worn over it, thus reducing or eliminating the visible cloth
above the outer shirt of a crew neck shirt.