1. Katie Ruben
July 20, 2016
Logistics Data Analyst Internship RRD
During the summer of 2016, I worked as a data analyst intern for RR Donnelley. Throughout this
internship I was introduced to several software programs including Microsoft Azure ML, Visual Studio,
and SQL Server. In addition to these programs, I continued to build upon my knowledge of the program
R using R Studio. As an intern, I assisted in building predictive analytic and machine learning solutions to
help formulate the truck rating pricing engine that the current data analysts have been working on for
the company. I used Azure and R to create conceptual and logical data models in order to improve the
descriptive statistics of the price rating engine. In addition, I worked together with our team to assist in
determining the most appropriate method to represent data from our price rating engine for business
consumption. Key skills that I needed to be successful in this internship were understanding and
adhering to organizational structures, gathering and integrating information into tasks, problem solving,
thinking critically, possess computer/technical skills, and have good written communication as well as
oral presentation skills.
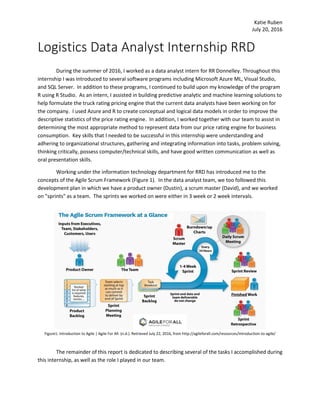
Working under the information technology department for RRD has introduced me to the
concepts of the Agile Scrum Framework (Figure 1). In the data analyst team, we too followed this
development plan in which we have a product owner (Dustin), a scrum master (David), and we worked
on "sprints" as a team. The sprints we worked on were either in 3 week or 2 week intervals.
Figure1: Introduction to Agile | Agile For All. (n.d.). Retrieved July 22, 2016, from http://agileforall.com/resources/introduction-to-agile/
The remainder of this report is dedicated to describing several of the tasks I accomplished during
this internship, as well as the role I played in our team.
2. Katie Ruben
July 20, 2016
1 SPRINT 7: 2D HISTOGRAM PLOTS IN R
Task Description:
All plots constructed in this task were used to determine whether a correlation existed between cost
and distance. A 2D histogram plot, created in R Studio, was used to depict the density of shipments
occurring for RRD’s Logistics. I relied on the expertise of our product owner, who has a high
understanding of the business, in addition to our scrum master to determine the ideal filters we wished
to proceed with after this task.
The goal was to determine a sensible filter for three categories of information in the data set. Those
categories were USA vs. Non, carrier mode, and location id. We have two data sets that come from two
different sources that have been used in our analysis. I performed analysis on one of the data sets while
another team member did the other.
1.1 USA VS. NON-USA
In order to filter by USA state, I used the following logic for origin and destination state
respectively.
K<-
subset(data,!(Dest.State=="AL"|Dest.State=="AK"|Dest.State=="AZ"|Dest.State=="A
R"|Dest.State=="CA"|Dest.State=="CO"|Dest.State=="CT"|Dest.State=="DE"|Dest.S
tate=="FL"|Dest.State=="GA"|Dest.State=="HI"|Dest.State=="ID"|Dest.State=="IL
"|Dest.State=="IN"|Dest.State=="IA"|Dest.State=="KS"|Dest.State=="KY"|Dest.St
ate=="LA"|Dest.State=="ME"|Dest.State=="MD"|Dest.State=="MA"|Dest.State=="MI"
|Dest.State=="MN"|Dest.State=="MS"|Dest.State=="MO"|Dest.State=="MT"|Dest.Sta
te=="NE"|Dest.State=="NV"|Dest.State=="NH"|Dest.State=="NJ"|Dest.State=="NM"|
Dest.State=="NY"|Dest.State=="NC"|Dest.State=="ND"|Dest.State=="OH"|Dest.Stat
e=="OK"|Dest.State=="OR"|Dest.State=="PA"|Dest.State=="RI"|Dest.State=="SC"|D
est.State=="SD"|Dest.State=="TN"|Dest.State=="TX"|Dest.State=="UT"|Dest.State
=="VT"|Dest.State=="VA"|Dest.State=="WA"|Dest.State=="WV"|Dest.State=="WI"|De
st.State=="WY"))
I split the data into USA and Non-USA using the following.
Non.USA<- data[ (data$Origin.State %in% K)|(data$Dest.State %in% K), ]
USA<- data[ !(data$Origin.State %in% K)&!(data$Dest.State %in% K), ]
Thereafter, I used the “Hexbin” and “RcolorBrewer” libraries in R to construct my 2D plots for
cost vs. distance (Figure 2). A single example of code is below.
#Non-USA Cost vs. Mile 2D Histogram Plot
Total.Cost.Non.USA<-Non.USA[,36]
Miles.Traveled.Non.USA<-Non.USA[,45]
###Color Library for Hexbin Plot
3. Katie Ruben
July 20, 2016
library(RColorBrewer)
rf <- colorRampPalette(rev(brewer.pal(11,'Spectral')))
r <- rf(32)
#Library for Hexbin Plot
library(hexbin)
df1<-data.frame(Miles.Traveled.Non.USA,Total.Cost.Non.USA)
hexbinplot(Total.Cost.Non.USA~Miles.Traveled.Non.USA,xbins=35,xlim = c(0,
10000), ylim = c(0, 60000),mincnt=1, maxcnt=145380,
data=df1,aspect=1,colramp=rf,inv=exp,main="Miles Vs. Total Cost:
Non-USA",type=c("r"), col.line = "red", lwd="1")
Figure 2: Hexbin plots for USA and Non-USA
When comparing the plots, I made sure to keep the scaling the same as well as the density count. From
this investigation we concluded that for trucking we are concerned with only USA states. In addition, we
decided to exclude Alaska and Hawaii.
4. Katie Ruben
July 20, 2016
1.2 CARRIER MODE
A similar investigation occurred for carrier mode where I determined the most frequently used
mode of transportation for shipments with respect to the advice given by the product owner. I also
investigated if there was a strong correlation between cost and distance in relation to the filter on
carrier mode (Figure 3). TL stands for truck load.
Figure 3: Hexbin plots for truck load carrier mode.
The logic behind my code is displayed below. I began improving my skills with R from the first week at
the internship.
#Filters all 2014 out.
DF1 <- data[grep("2014", data$Actual.Ship), ]
data<-data[!(data$Actual.Ship%in% DF1$Actual.Ship),]
summary(data$Actual.Ship)
summary(data$Carrier.Mode)
c2<- data[ which(data$Carrier.Mode=="TL"), ]
tc.tl<-c2[,4]
mile.tl<-c2[,5]
df2<-data.frame(mile.tl,tc.tl)
hexbinplot(tc.tl~mile.tl, data=df2,aspect=1,xbins=40,xlim = c(-5, 90000), yli
m = c(0, 20000),mincnt=1, maxcnt=18880,colramp=rf,inv=exp,main="Miles Vs. Tot
al Cost: TL")
I compared six different carrier modes for the Mercury Gate data set. Upon talking with our product
owner, he determined which carrier modes were of interest to our rating engine. He decided that
“TL” was of interest only for the MG data set. In addition, the “TL” Carrier mode showed a steep
slope from the linear regression line in R, suggesting a higher rate for mile vs total cost. Therefore,
we filter the MG data set for “TL” only.
5. Katie Ruben
July 20, 2016
1.3 ORIGIN AND DESTINATION LOCATION ID’S
Finally, I looked at filtering the data set by origin and destination ID’s in three cases. Conclusions
I was able to draw upon based on the plots I constructed were as follows:
When Origin and Destination numbers are not equal:
o But, Miles = 1
This seems reasonable as shipments could be going to locations
within the same area. The maximum cost seems good when
looking at the 2015-2016 filtered data. The max cost for 1 mile is
approximately $200. The fees associated with this mileage could
be base fee charges by a carrier. This fee is higher when we
consider 2014.
o But, Miles = 0
The information displayed for the plots when considering 2014-201
6 or 2015-2016 doesn’t seem reasonable. Traveling 0 miles should
not result in a fee as high as $50,000. Base fees could be higher
for traveling outside the USA, but it seems to be an unrealistic
amount.
*Round trips could be the cause of this in addition to data not
logged correctly in the system showing a stop.
Origin and Destination are equal:
o Comparing the intercept of the linear regression line for both sets of
years, the base fee for 2015-2016 is half the fee when including 2014
(the 2014 data is known to be inaccurate with the data entry).
o It also seems unrealistic that when the destination number is the same,
we could be traveling thousands of miles.
Possibly due to leaving a location, reaching first drop off point, and
returning to origin location to finish drop off.
(data entry error is possible)
#USE stringsAsFactors = FALSE when importing data file in order to pull out
entires that are same within rows.
data<-read.csv("C:Usersrr244862DocumentsProject DatasetSprint 7KR
Sprint 5 - FMS Data Pulling Task Add Jan-March16.csv",header=TRUE,sep=",",s
tringsAsFactors = FALSE)
new.df<-data[,c("Origin..","Dest..","Miles","L.H.Cost")]
library(dplyr)
6. Katie Ruben
July 20, 2016
same.origin.destination<-new.df%>%
filter((new.df$Origin.. == new.df$Dest..))
different.origin.destination.0<-new.df%>%
filter((new.df$Origin.. != new.df$Dest..)&(new.df$Miles==0))
different.origin.destination.1<-new.df%>%
filter((new.df$Origin.. != new.df$Dest..)&(new.df$Miles==1))
Again, 2D plots were created to get a visual image of the correlation between cost and distance when
referring back to origin and destination id. The filtering that was chosen for this investigation was to
exclude the occurrences when miles equaled zero.
7. Katie Ruben
July 20, 2016
2 SPRINT 7: SMOTE MODULE IN AZURE
Throughout the internship, we used Microsoft’s Azure Machine Learning platform (Figure 4). This
platform is web based and can be used in any browser.
Figure 4: Azure Machin Learning Experiments Homepage
Task Description:
In this task, I used the SMOTE module which stands for “Synthetic Minority Oversampling
Technique.” With our data sets, we have a larger quantity of rows in the FMS data set than we do
in MG. The purpose of SMOTE is to increase the number of cases in a less represented data set in a
balanced way. This module is only used when a class of data is under represented, because it will
increase the number of rare cases in a more sufficient manner rather than simply duplicating
existing cases. [1]
To determine if including the SMOTE module benefited our model, I systematically changed several
parameters. Each time I attained a result, I would compare the mean absolute error and overall
accuracy to our baseline model for that sprint. The baseline model would have the best descriptive
statistics at the start of the sprint until we try to improve upon those values.
8. Katie Ruben
July 20, 2016
Figure 5: SMOTE module and SMOTE Percentage
The documentation located on Azure MLs site for the SMOTE module was not accurate. I had to
communicate with their help desk to figure out what the 100% SMOTE percentage was doing to the
data when we selected our target column as “source” for our data. Through this discussion with
Azure help desk, the documentation on the module was altered on their website the next day to
display the correct meaning of the SMOTE percentage (Figure 6). We figured out that when set to
0%, we would get the same datasets out as we put in. The effect of the percentage is displayed on
mock data in the image below.
Figure 6: Example of SMOTE Percentage.
By the end of this investigation, I determined that synthetically oversampling the minority source
did not prove beneficial to continue to move forward. Therefore, we moved on with leaving the
number of data in each source as it was.
9. Katie Ruben
July 20, 2016
3 SPRINT 8: EFFECTS OF THE CLIPPING MODULE IN AZURE
Task Description:
In a previous sprint, I had investigated the effects of clipping missing data by different methods based on
those outliers beyond the 1 and 99 percent threshold. Those methods included mean, median, mode,
replace by missing, and remove the entire row. In reviewing this module in further detail, I discovered
that we were replacing our clippings for all numerical features in our model. We do not want to do this
primarily because after we clipped on all columns we cleaned the missing data by predicting these
values using probabilistic PCA in a clean missing data module. Probabilistic PCA “replaces the missing
values by using a linear model that analyzes the correlations between the columns and estimates a low-
dimensional approximation of the data, from which the full data is reconstructed.” [2] It did not make
sense to predict such features as latitude and longitude. In the end, we as a team discussed that
clipping on total cost, weight, and distance followed by using PCA was ideal. Below are several slides I
used to present my findings (Figure 7,8,9).
Figure 7: Introduction Slide to Presentation
Figure 8: Clipping on total cost, distance, and weight provided us with the best mean absolute error of $59.93 and accuracy of 78%.
10. Katie Ruben
July 20, 2016
Figure 9: Comparison of baseline model with corrected clip value module.
11. Katie Ruben
July 20, 2016
4 SPRINT 8: R SCRIPT TO FILTER ZIP CODE
Task Description:
We as a team realized that the SQL transformation used to filter ZIP codes was not filtering zip correctly
due to the SQL Lite in Azure not working properly. However, the SQL transformation works fine in the
SQL Server.
In an attempt to begin to resolve this issue, I used the following R script displayed in the image below
(Figure 10).
Figure 10: Updated R script filtering ZIP codes.
A large amount of my time at the end of sprint 7 and beginning of sprint 8 consisted of cross referencing
ZIP codes that were being found in our ZIP code database and those that were not. Those that didn’t
match I manually investigated the issue. As seen in the code above, I hard coded several destination ZIP
codes that were data entry errors. I was able to retrieve 95% of the missing ZIP codes that were absent
after the new ZIP code filtering logic was implemented.
12. Katie Ruben
July 20, 2016
5 SPRINT 8 & 9: WEB SERVICE DEPLOYMENT/TROUBLESHOOTING
Task Description:
Creating the truck price rating engine incorporates two main tasks, predictive modeling and
calling a web service to retrieve the scored label mean based upon the end users input. I spent a lot of
my time in two sprints working on producing a web service that could be used for this purpose. In
addition, I persevered in sticking to the task until we were able to figure it out. Through much trial and
error, along with team communication, we were able to finally create a predictive experiment based off
our training experiment that was able to be used in Excel. The web development team uses the Excel
file in order to update the rating website with the most current predictive model. Below, is an example
layout of a predictive experiment and what Azure add in within Excel (Figure 11).
Figure 11: Example of Training Experiment on left and Predictive Experiment in Azure on right.
13. Katie Ruben
July 20, 2016
6 SPRINT 9: DECISION FOREST REGRESSION PARAMETER SWEEP
Task Description:
An aspect of the web service (Figure 12) that we are continually refining is the speed at which
we can call upon it. One approach that I was involved with in order to increase this speed was to
perform a parameter sweep of the decision forest regression module. In this module we can change 4
different parameters. These parameters are the number of decision trees, the max depth of the
decision tree, the number of random splits per node, and the minimum number of samples per leaf
nodes. I worked on this task with two other team members. The goal was to find the optimal settings
that would reduce the scoring module duration, produce a low mean absolute error, and a high accuracy.
We were concerned with the timing of the scoring module because a web service in Excel will time out
after 90 seconds when predicting in non-batch mode. For the purpose of the website, we need to be
able to call upon the web service in a reasonable time under 90 seconds.
Figure 12: Example of Web Service in Excel.
14. Katie Ruben
July 20, 2016
Figure 13: Troubleshooting in Excel Part 2 is the parameter sweep.
Once we ran approximately 700 experiments, we compiled the results in our google drive. From there, a
team member produced scatter plots in Tableau (Figure 14) that described "accuracy vs duration" and
"mean absolute error vs duration". These plots can be seen below.
15. Katie Ruben
July 20, 2016
Figure 14: Tableau Plots done by team member of parameter sweep of Decision Forest Regression.
By observing these plots, to minimize mean absolute error we want to focus down and to the left and to
maximize accuracy we want to focus up and the right. We want to find the optimal settings right where
data begins to level off. In our investigation, we were able to find many settings that would keep our
scoring module under 15 seconds in the predictive expeirment. This is much better in comparison to the
55 seconds it previously took.
Key: Colors and shapes:
# of Random Splits per Node
blue: 256
orange: 512
green: 768
red: 1024
# of Decision Trees
circle: 4
square: 8,
plus: 16
16. Katie Ruben
July 20, 2016
In addition to seeking the optimal parameter settings, we also focused on reducing our score module
duration by limiting the number of features in our model. In order to do this effectively, we held all
other variables constant and fluctuated the number of features from 5 to 45. Our results can be seen in
the plot below (Figure 15). Again, we wanted to minimize time and mean absolute error while
maximizing accuracy. There will always be a trade off of accuracy and mean absolute error for time.
Figure 15: Effect of features selected on duration of score module.
17. Katie Ruben
July 20, 2016
7 SPRINT 10: FINALIZE SPRINT 9 BASELINE MODEL,
FINALIZE SLOW SPRINT 9 WEB SERVICE, &
FINALIZE FAST SPRINT 9 WEB SERVICE
Task Description:
Every time we begin a new sprint, we put together a baseline predictive model that demonstrates our
best mean absolute error and accuracy. For sprint 10, I finalized this model. Once I finalized the model I
created a slow and fast version of the predictive experiment. The reason we have a fast and slow model
is that the slow model is our most accurate predictive model with the best parameter settings and the
fast model is used for our web service in the website. In this task I worked with another team member
in using our results from the parameter sweep previously discussed to find the parameter settings for
decision forest regression that minimized the score module time, but retained reasonable descriptive
statistics of our model. As seen below, the fast model we choose to work with was Fast V4 (Figure 16).
Figure 16: Variety of predictive models depending on the need for web service or to have the best model statistics.
18. Katie Ruben
July 20, 2016
In addition, to changing the parameter settings we also partitioned our historical data set in the
predictive model. We set up 12 experiments in which we randomly sampled this data set with different
sampling rates while keeping all other variables constant (Figure 17).
Figure 17: Varied sampling rate experiments to reduce scoring duration in Fast V4.
Upon deciding what sampling rates reduced time but retained decent descriptive statistics we then
looked at the number of features selected for our model. The number of features varied from 56 to 5
(Figure 18). We moved forward to this stage of our experimentation with a sampling rate of 10% and
35%.
Figure 18: Varied number of features in experiments to reduce scoring duration in Fast V4.
19. Katie Ruben
July 20, 2016
By the end of these experiments we concluded that using 30 features for a sampling rate of 10%
produced our optimal fast model for the web service.
Figure 20: Description of who received our slow and fast model.
Dustin is the product owner and Ganga is a part of the web development team.
I sent the slow and fast model to the members of our team who needed these predictive experiments as
well as the excel files for the web service (Figure 20). This task involved strategic and organized planning
in which the experiments were set up in a systematic manner.
20. Katie Ruben
July 20, 2016
8 SPRINT 10 USE ZIP CODE TO COMPARE LATITUDE AND LONGITUDE
(SQL DATABASE VS. OLD DATA SET)
Task Description:
The goal of this task was to do a comparison between the saved data set the team has been using to
perform all experiments in Azure for Sprint 7-10 and the SQL database that our developer has
constructed to be cleaning the data before reaching the Azure platform. In order to compare these data
sets, I aggregated origin ZIP code by taking the average of origin latitude and longitude. Similarly, I did
the same for destination ZIP code. I then created a data frame in R that matched origin and destination
ZIP codes respectively for the saved data set and SQL. To compare further, I took the difference of the
SQL latitude/longitude and the saved data set’s latitude/longitude. From here, I found the range of how
much each origin or destination latitude/longitude varied in degrees from the saved data set to the SQL
data set. If the difference between them was 0 degrees, then our two data sets agreed on latitude and
longitude for that ZIP code. I used the following R code seen below to accomplish this.
SQL2<-read.csv("C:Usersrr244862DocumentsProject DatasetSprint 10FMS Data
AnalysisSprint10 SQL FMS.csv", header=TRUE,sep=",")
SQL2<-data.frame(SQL2$Destination.ZIP.Code.PCMiler,SQL2$Destination.Latitude,SQL2$Des
tination.Longitude)
sum(is.na(SQL2))
df2<-read.csv("C:Usersrr244862DocumentsProject DatasetSprint 10FMS Data A
nalysisSprint10 Original FMS.csv", header=TRUE,sep=",")
df2<-data.frame(df2$Destination.ZIP.Code,df2$Latitude,df2$Longitude)
sum(is.na(SQL2))
# Aggregate by Destination Zipcode to compare lat and long. aggregate by mean.
df3<-aggregate(df2[, c(1,2,3)], by = list(df2$df2.Destination.ZIP.Code),mean, na.rm =
TRUE)
SQL3<-aggregate(SQL2[, c(1,2,3)], by = list(SQL2$SQL2.Destination.ZIP.Code.PCMiler),m
ean, na.rm = TRUE)
#Find matching ZIP codes from SQL2 and Original data set
same.DestinationZIP<- SQL3[ (SQL3$SQL2.Destination.ZIP.Code.PCMiler %in% df3$df2.Dest
ination.ZIP.Code), ]
#Rename Column name for Zip code to merge against
df3$SQL2.Destination.ZIP.Code.PCMiler<-df3$df2.Destination.ZIP.Code
#Left join
same.DestinationZIP.LeftJoin <- merge(same.DestinationZIP,df3, by = "SQL2.Destination.
ZIP.Code.PCMiler",all.x = TRUE,all.y = FALSE)
21. Katie Ruben
July 20, 2016
#Renaming Columns
colnames(same.DestinationZIP.LeftJoin)[which(colnames(same.DestinationZIP.LeftJoin) =
= 'Group.1.x')] <- 'SQL2 Destination ZIP'
colnames(same.DestinationZIP.LeftJoin)[which(colnames(same.DestinationZIP.LeftJoin) =
= 'SQL2.Destination.Latitude')] <- 'SQL2 Destination Latitude'
colnames(same.DestinationZIP.LeftJoin)[which(colnames(same.DestinationZIP.LeftJoin) =
= 'SQL2.Destination.Longitude')] <- 'SQL2 Destination Longitude'
colnames(same.DestinationZIP.LeftJoin)[which(colnames(same.DestinationZIP.LeftJoin) =
= 'Group.1.y')] <- 'Old Dataset Destination ZIP'
colnames(same.DestinationZIP.LeftJoin)[which(colnames(same.DestinationZIP.LeftJoin) =
= 'df2.Latitude')] <- 'Old Dataset Destination Latitude'
colnames(same.DestinationZIP.LeftJoin)[which(colnames(same.DestinationZIP.LeftJoin) =
= 'df2.Longitude')] <- 'Old Dataset Destination Longitude'
colnames(same.DestinationZIP.LeftJoin)[which(colnames(same.DestinationZIP.LeftJoin) =
= 'df2.Destination.ZIP.Code')] <- 'Old Dataset ZIP Code'
#Find the difference between the SQL2 and Original Data set
options(scipen=999)
Lattitude.difference.destination<-data.frame(same.DestinationZIP.LeftJoin$`SQL2 Desti
nation Latitude`-same.DestinationZIP.LeftJoin$`Old Dataset Destination Latitude`)
Lattitude.difference.destination[]<-lapply(Lattitude.difference.destination,abs)
Destination.Lat.not0<- data.frame(Lattitude.difference.destination[ which(Lattitude.d
ifference.destination$`same.DestinationZIP.LeftJoin..SQL2.Destination.Latitude....sam
e.DestinationZIP.LeftJoin..Old.Dataset.Destination.Latitude.` != 0), ])
Destination.Lat.greater.3degree<- data.frame(Lattitude.difference.destination[ which
(Lattitude.difference.destination$`same.DestinationZIP.LeftJoin..SQL2.Destination.Lat
itude....same.DestinationZIP.LeftJoin..Old.Dataset.Destination.Latitude.` > 3), ])
Longitude.difference.destination<-data.frame(same.DestinationZIP.LeftJoin$`SQL2 Desti
nation Longitude`-same.DestinationZIP.LeftJoin$`Old Dataset Destination Longitude`)
Longitude.difference.destination[]<-lapply(Longitude.difference.destination,abs)
Destination.Long.not0<-
data.frame(Longitude.difference.destination[ which(Longitude.difference.destination$s
ame.DestinationZIP.LeftJoin..SQL2.Destination.Longitude....same.DestinationZIP.LeftJo
in..Old.Dataset.Destination.Longitude. != 0), ])
In conclusion, I found that the SQL data set was more accurate in relation to the saved dataset for
latitude and longitude. I had to cross reference the SQL data set’s latitudes and longitudes with the ZIP
code library in R, as some of the differences for destination latitudes and longitudes for both FMS and
MG were off by a significant amount of degrees. An example of the differences can be seen in figure 21
below.
22. Katie Ruben
July 20, 2016
Figure 21: Comparing destination latitude and longitude for SQL and the saved data set.
A note demonstrating the use of the R library ZIP code.
After cross referencing the ZIP code data set with the SQL, I found that the range of degree differences
for destination latitude and longitude are as follows below in figure 22 for ZIP codes.
Destination Latitude: (Range [0.000097°,.784°])
Destination Longitude: (Range [0.0004°,1.1886°])
Figure 22:FMS range of destination latitude and longitude.
23. Katie Ruben
July 20, 2016
9 FINAL REMARKS
My internship experience for RR Donnelley has broadened my understanding of predictive
modeling. In addition, I have been introduced to the growing field of big data and machine learning.
While working this summer I had the opportunity to experience my first business meeting at “The
Capital Grille” in Chicago with the DAT team who flew in from Portland, Oregon. DAT is a logistics data
trucking company that works with brokers.
In addition, during this internship I helped our team to organize our PowerPoint presentations. I
also set up the structure of our presentation for each sprint by entering in the stories (main tasks) and
leaving slides for the team to enter their results and findings. The organization of these presentations
made presenting each sprint to our product owner go very well. The team relied on me to help prepare
the presentations and keep it organized.
Finally, I am beyond excited to continue working as a data analyst for this team at RRD
throughout the remainder of my master’s program. I thoroughly enjoyed working with this team and
have learned so much from everyone. It has been an extremely beneficial experience and I am so
thankful for the opportunities graduate school has brought me so far.
BIBLIOGRAPHY
[1] SMOTE. (2016, May 31). Retrieved July 21, 2016, from
https://msdn.microsoft.com/library/azure/9f3fe1c4-520e-49ac-a152-2e104169912a
[2] Clean Missing Data. (2016, July 1). Retrieved July 21, 2016, from https://msdn.microsoft.com/en-
us/library/azure/dn906028
![Katie Ruben
July 20, 2016
1 SPRINT 7: 2D HISTOGRAM PLOTS IN R
Task Description:
All plots constructed in this task were used to determine whether a correlation existed between cost
and distance. A 2D histogram plot, created in R Studio, was used to depict the density of shipments
occurring for RRD’s Logistics. I relied on the expertise of our product owner, who has a high
understanding of the business, in addition to our scrum master to determine the ideal filters we wished
to proceed with after this task.
The goal was to determine a sensible filter for three categories of information in the data set. Those
categories were USA vs. Non, carrier mode, and location id. We have two data sets that come from two
different sources that have been used in our analysis. I performed analysis on one of the data sets while
another team member did the other.
1.1 USA VS. NON-USA
In order to filter by USA state, I used the following logic for origin and destination state
respectively.
K<-
subset(data,!(Dest.State=="AL"|Dest.State=="AK"|Dest.State=="AZ"|Dest.State=="A
R"|Dest.State=="CA"|Dest.State=="CO"|Dest.State=="CT"|Dest.State=="DE"|Dest.S
tate=="FL"|Dest.State=="GA"|Dest.State=="HI"|Dest.State=="ID"|Dest.State=="IL
"|Dest.State=="IN"|Dest.State=="IA"|Dest.State=="KS"|Dest.State=="KY"|Dest.St
ate=="LA"|Dest.State=="ME"|Dest.State=="MD"|Dest.State=="MA"|Dest.State=="MI"
|Dest.State=="MN"|Dest.State=="MS"|Dest.State=="MO"|Dest.State=="MT"|Dest.Sta
te=="NE"|Dest.State=="NV"|Dest.State=="NH"|Dest.State=="NJ"|Dest.State=="NM"|
Dest.State=="NY"|Dest.State=="NC"|Dest.State=="ND"|Dest.State=="OH"|Dest.Stat
e=="OK"|Dest.State=="OR"|Dest.State=="PA"|Dest.State=="RI"|Dest.State=="SC"|D
est.State=="SD"|Dest.State=="TN"|Dest.State=="TX"|Dest.State=="UT"|Dest.State
=="VT"|Dest.State=="VA"|Dest.State=="WA"|Dest.State=="WV"|Dest.State=="WI"|De
st.State=="WY"))
I split the data into USA and Non-USA using the following.
Non.USA<- data[ (data$Origin.State %in% K)|(data$Dest.State %in% K), ]
USA<- data[ !(data$Origin.State %in% K)&!(data$Dest.State %in% K), ]
Thereafter, I used the “Hexbin” and “RcolorBrewer” libraries in R to construct my 2D plots for
cost vs. distance (Figure 2). A single example of code is below.
#Non-USA Cost vs. Mile 2D Histogram Plot
Total.Cost.Non.USA<-Non.USA[,36]
Miles.Traveled.Non.USA<-Non.USA[,45]
###Color Library for Hexbin Plot](data:image/gif;base64,R0lGODlhAQABAIAAAAAAAP///yH5BAEAAAAALAAAAAABAAEAAAIBRAA7)