SlideShare une entreprise Scribd logo
1  sur  8
Télécharger pour lire hors ligne
–1–
WOODWORKS: INTERMEDIATE PROJECT
ADIRONDACK CHAIR
The Adirondack chair originated at the camps and resorts of New York’s Adirondack mountains during the late 1800s. It was the solution to
adding a little comfort while in the wilderness, and has become an outdoor classic. This version, like its forebears, is designed for maximum
comfort with a deep seat, spacious arms and a slanted back. When you want to take a nap, just pull up the matching footrest. When summer’s
gone, you can fold up both the chair and footrest for easy moving and storage. Part of the beauty of this chair is its simple construction. You’ll
gain experience with cutting curves using a jigsaw or band saw and with precision assembly by making sure that the seat and back slats are
identically spaced apart.
CONTINUED - WOODWORKS: INTERMEDIATE PROJECT 2006-2007 ADIRONDACK CHAIR
–2–
TOOLS REQUIRED
SHOPPING LIST
WOOD FINISHING PRODUCTS
CUTTING LIST
Hand Tools
– Clamps
– Hacksaw
– Vise flat file
Power Tools
– Tablesaw or circular saw with rip and
crosscut blades
– Electric drill with countersink bit
– Jigsaw or band saw
– Belt or drum sander
– Router with 1/8"or 3/5" roundover bit
Miscellaneous
– Pencil
– Tape measure
– Safety glasses
– Carpenter’s glue
– 120, 150 and 220-grit sandpaper
– Clean, lint-free cloths
– Respirator
– Gloves for finishing
– Mineral spirits
– Water-filled metal container with
tight-fitting lid (for oil-based stains
and finishes waste products)
– Paint pad or good quality, natural-
bristle brush
Recommended Finish
Thompson’s®
WaterSeal®
Advanced Tinted Wood
Protector in Natural Cedar. (Also available in Honey
Gold, Rustic Red, Nutmeg Brown and Coastal Gray)
Alternate Finish
Thompson’s®
WaterSeal®
Waterproofer Plus Tinted
Wood Protector, available in five colors: Honey Gold,
Natural Cedar, Rustic Red, Nutmeg Brown and Coastal
Gray.
Item Quantity
1x8 clear pine 6'
1x6 clear pine 37'
1/4" x 1-3/4" carriage bolts 6
1/4" flat washers 22
1/4" cap nuts 10
1/4"x 3" hanger bolts 4
#8 x 1-1/2" flat head wood screws
(brass, bronze or stainless steel) 90
1/8"x 3/4"stainless steel
or brass bar stock 12"
5/8"diameter decorative pegs 2
Overall Dimensions: 41-1/2"H x 22"W x 5-1/2"D
Key Part Pcs. Dimensions
A Seat supports 2 3/4" x 5" x 36"
B Arms 2 3/4" x 6-3/4" x 31"
C Legs 2 3/4" x 4" x 20"
D Arm braces 2 3/4" x 4" x 5"
E Seat slats 8 3/4" x 2-1/2" x 20"
F Back slats 2 3/4" x 2-1/2" x 27"
G Back slats 2 3/4" x 2-1/2" x 29-1/2"
H Back slats 2 3/4" x 2-1/2" x 32"
J Front brace 1 3/4" x 2-1/2" x 21-5/8"
K Middle brace 1 3/4" x 2-1/2" x 21-1/2"
L Bottom brace 1 3/4" x 2-1/2" x 20"
M Arm supports 2 3/4" x 2-1/2" x 23"
N Hinge bars 2 3/4" x 1-1/2" x 6"
P Slats 6 3/4" x 2-1/2" x 16"
Q Sides 2 3/4" x 2-1/2" x 16"
R Legs 2 3/4" x 2-1/2" x 9-1/2"
S Stops 2 3/4" X 3/4" X 2"
Recommended Wood – Pine (stain grade)
Alternate Wood – Fir or any type of construction-grade lumber
NOTE: The hardware used for your furniture can be ordinary
plated steel if it will be kept indoors. But if you want a really
weatherproof and handsome piece, use stainless steel,
bronze or brass. These materials will enhance the look of
stained furniture.
BEFORE YOU BEGIN
Good craftsmanship begins and ends with good work habits, so make
the following steps part of your routine workshop practice. If you have
any doubts or questions about how to proceed with a project, always
discuss them with your instructor.
• Carefully and fully review plans and instructions before putting
a tool to the project lumber.
• Work sensibly and safely. Wear safety goggles and the appropriate
respirator whenever making sawdust or working with thinners
or other solvents.
• At the end of every work session, clean up your shop area and
put away all portable tools.
CUTTING AND ASSEMBLY
PROCEDURE
Building the Chair
1. Rip the boards and then crosscut all the parts to length according to
the plan and CUTTING LIST. With a jigsaw or band saw, cut all the curved
pieces. Use a 1" grid of pencil lines to transfer the patterns to the wood.
W
Wo
oo
od
dw
wo
or
rk
ke
er
r’
’s
s T
Ti
ip
p:
: Use a router with a roundover bit to soften
selected edges for comfort and better appearance, such as the top
edges of the seat and back slats and the arms.
2. Sand the curved edges with a belt sander or drum sander chucked
into an electric drill. Sand all the parts.
3. Drill holes in all the parts that need them, except for the holes in the
seat supports (A) where they attach to the legs (C). In each seat slat
(E), drill two holes 3/8" from each end.
W
Wo
oo
od
dw
wo
or
rk
ke
er
r’
’s
s T
Ti
ip
p:
: A combination drill and countersink, used in
a drill press or drill guide, will enable you to make quick and
consistent holes on the slats.
4. Screw the hanger bolts into the ends of the braces (K, L). Clamp the
edges of the boards to prevent the wood from splitting (Fig. 2).
5. Screw the slats (E) to the seat supports (A). Start with the slat
farthest back, then do the one at the front. Space out the remaining
slats and screw them in place. You may need to file flat surfaces on
the curved edges of the sides so the slats rest firmly.
6. Assemble the back. Screw the slats to the bottom brace (L), then
attach the middle brace (K) 10-1/4" above the bottom brace.
7. Screw the arms (B) to the arm supports (M), and the arm braces (D)
to the legs (C), being sure to leave the braces protruding above the
tops of the legs (see detail in Fig. 1).
8. Bolt the hinge bars (N) to the back assembly. Use washers between
the wooden pieces.
9. Bolt the arm supports (M) to the legs (C) and back, and clamp the
legs to the seat assembly. Then screw the hinge bars to the seat supports.
10. Adjust the legs (C) so they are square, then drill through the holes
in the leg and into the seat supports (A, Fig. 1). The peg must have a
firm fit in its hole, so be sure to make a test hole first on scrap. Bolt the
legs to the seat, insert the pegs, and screw on the front brace (J).
11. Attach the front brace (J) to the legs.
Building the Footrest
12. Cut all pieces to size, then cut and sand the curves as you did those
of the chair.
13. Cut the angled ends of the legs (R). Drill screw holes in the slats,
bolt holes in the sides, and chop a shallow mortise for the metal hooks
(see the plan detail in Fig. 1).
14. Bend the hooks in a metal vise, cut them off with a hacksaw, and
file or grind smooth. Use a slat (P) as a guide for drilling clearance
holes for the screws.
15. Screw the slats and hooks to the sides (Q) and bolt on the legs (R).
As with the seat, you may need to file flat surfaces on the curved edges
of the sides so the slats rest firmly. Do not insert screws too close to the
narrow ends of the sides.
16. Hook the footrest to the chair and adjust the legs so they are flat on
the ground. Clamp them there. Screw the stops (S) to the inside so that
when the legs are unfolded the stops will keep them in the correct
position (see the plan detail in Fig. 1).
PROTECTING YOUR PROJECT
Any type of wood that’s used outdoors needs protection from water
damage. There are a variety of protective coatings available, including
clear and tinted wood protectors and semi-transparent and solid stains.
Each of these finishes has a different look and maintenance requirement.
We’ve chosen Thompson’s®
WaterSeal®
Advanced Tinted Wood
Protector in Natural Cedar to give your project complete protection.
This product provides maximum strength waterproofing in a coating
that also resists mildew and U.V. (ultraviolet radiation in sunlight)
damage. This product can be applied to damp, freshly cleaned wood
so you can clean and treat your project in one day. Plus, the transparent
tint will give plain pine just the right amount of rich wood tone. This
product is also available in Honey Gold, Rustic Red, Nutmeg Brown
and Coastal Gray sheer wood tones.
W
Wo
oo
od
dw
wo
or
rk
ke
er
r’
’s
s T
Ti
ip
p:
: Always be sure to choose a waterproofer that
exceeds industry standards for waterproofing on wood.
STAINING AND FINISHING
FINISHING TIPS
• Coverage: The approximate coverage of Thompson’s®
WaterSeal®
Advanced Tinted Wood Protector on pine is 200 square feet per
gallon. A gallon of Thomson’s®
WaterSeal®
Waterproofer Plus
Tinted Wood Protector will cover about 200 to 300 square feet.
• When you apply Thompson’s®
WaterSeal®
Advanced Tinted Wood
Protector or Thompson’s®
WaterSeal®
Waterproofer Plus Tinted
Wood Protector, do not mix it with other waterproofing products,
because variations in the final appearance of the surface being
treated may result. Also, do not thin these products.
–3–
CONTINUED - WOODWORKS: INTERMEDIATE PROJECT 2006-2007 ADIRONDACK CHAIR
Recommended Finish
For maximum strength protection against water damage, use
Thompson’s®
WaterSeal®
Advanced Tinted Wood Protector.
17. Read and follow the directions found on the back of the can.
Be sure that both surface and air temperature are above 50°F and
remain above freezing 24 hours after application. If you’re working
outside do not apply product if rain is forecasted within 48 hours
of application.
18. Before applying Thompson’s®
WaterSeal®
Advanced Tinted Wood
Protector, the wood surface must be free of all dirt, mildew, mold,
waterproofers, wood stains and other contaminants. Then do a trial test
before full application. The surface may darken slightly with applica-
tion and color appearance is different when the wood is fully dry.
19. Shake or stir contents for a minimum of 2 minutes before use.
Intermix all containers (of the same color) to be used to assure
color uniformity.
20. Apply using a paint pad or brush. For small projects, a brush is the
preferred applicator.
21. Apply only one thin, even coat. DO NOT APPLY A SECOND COAT.
A heavier or additional coat will not improve performance or appearance.
Avoid puddling. Tackiness will result if over-applied. May also occur
after application if overnight temperature falls below 50°F within
48 hours of application. Drying time will vary depending on wood surface
and humidity. Allow a minimum of 12 hours before using the chair.
22. Clean brushes and equipment with soap and water. Dry product
can be removed with mineral spirits.
Alternate Finish
23. Before applying Thompson’s®
WaterSeal®
Waterproofer Plus Tinted
Wood Protector, read and follow the directions found on the back of
the can. Be sure that both surface and air temperature are above 50°F
during application and for 48 hours after application, and if you’re
working outside, do not apply product if rain is forecasted within
24 hours of application.
24. The surface must be free of all dirt, mildew, mold, waterproofers,
wood stains and other contaminants. If the surface is damp or wet from
cleaning or weather, allow the surface to dry thoroughly (a minimum of
48 hours) before application.
25. Before applying this product over the entire surface, a small trial
patch is recommended to verify color.
26. In most applications, only one light coat is necessary. Apply with a
brush, roller, paint pad, or by dipping the piece into the product.
Regardless of which application method is used, remove excess within
15 minutes by redistributing it to drier areas or wiping it off.
27. Oiliness and tackiness will result if over-applied or applied to wet
or damp surface or if overnight temperature falls below 50° F within
48 hours of application.
28. Allow at least 48 hours to dry before you sit in the chair. Drying
time will vary depending on the substrate, temperature and humidity.
29. Clean brushes and equipment with mineral spirits, then rinse with
clean water.
IMPORTANT: If using oil-based Waterproofer Plus Wood Protector,
place rags, steel wool and waste immediately after use in a sealed,
water-filled metal container.
NOTE: For all waterproofing products, the length of protection will
vary depending on environment. Perform the following splash test
once a year to see whether reapplication is necessary. Sprinkle water
on various sections of surface to be sealed. If water absorbs and
darkens color of substrate within 5 seconds, the surface is porous
and considered ready to be treated. If water beads up or otherwise
sits on top of surface, then surface doesn’t need protection at this
time. For maximum protection from color change and other damage
caused by the sun, reapplication is recommended every year. Vertical
and horizontal surfaces will experience color changes at different rates.
PRODUCT SAFETY
For your safety and the safety of those you work with, always read the
safety warnings, which manufacturers print on their labels, and follow
them to the letter. Typical safety advice and instructions will contain
information such as the following:
DANGER: Rags, steel wool and other waste soaked in these products
may spontaneously catch fire if improperly discarded. Immediately
place rags, steel wool and waste after use in a sealed, watertight, water-
filled metal container. Dispose in accordance with local fire regulations.
When using Thompson’s®
WaterSeal®
Waterproofer Plus Tinted
Wood Protector:
CAUTIONS: CONTAINS ALIPHATIC HYDROCARBONS. Keep
away from heat and open flame. Use only with adequate ventilation.
For Exterior Use Only. To avoid overexposure, if treating enclosed
exterior rooms or porches, open windows and doors or use other
means to ensure fresh air entry during application and drying. If
you experience eye watering, headaches, or dizziness, increase fresh
air, or wear respiratory protection (NIOSH approved), or leave the
area. Avoid contact with eyes and skin. Causes skin and respiratory
tract irritation. Wash hands after using. Keep container closed when
not in use. Do not transfer contents to other containers for storage.
FIRST AID: In case of eye contact, flush thoroughly with large amounts
of water for 15 minutes and get medical attention. For skin contact,
wash thoroughly with soap and water. In case of respiratory difficulty,
provide fresh air and call physician. If swallowed, call Poison Control
Center, hospital emergency room, or physician immediately.
DELAYED EFFECTS FROM LONG-TERM OVEREXPOSURE.
Contains solvents which can cause permanent brain and nervous
system damage. Intentional misuse by deliberately concentrating
and inhaling contents may be harmful or fatal.
WARNING: This product contains chemicals known to the State of
California to cause cancer and birth defects or other reproductive harm.
DO NOT TAKE INTERNALLY. KEEP OUT OF REACH OF CHILDREN.
–4–
CONTINUED - WOODWORKS: INTERMEDIATE PROJECT 2006-2007 ADIRONDACK CHAIR
When using Thompson’s®
WaterSeal®
Advanced
Tinted Wood Protector:
CAUTIONS: Use Only With Adequate Ventilation. To avoid overexposure,
open windows and doors or use other means to ensure fresh air entry
during application and drying. If you experience eye watering, head-
aches, or dizziness, increase fresh air, or wear respiratory protection
(NIOSH approved), or leave the area. Avoid contact with eyes and
skin. Wash hands after using. Keep container closed when not in use.
Do not transfer contents to other containers for storage.
FIRST AID: In case of eye contact, flush thoroughly with large
amounts of water. Get medical attention if irritation persists. If
swallowed, call Poison Control Center, hospital emergency room,
or physician immediately.
WARNING: This product contains chemicals known to the State of
California to cause cancer and birth defects or other reproductive harm.
DO NOT TAKE INTERNALLY. KEEP OUT OF REACH OF CHILDREN.
–5–
CONTINUED - WOODWORKS: INTERMEDIATE PROJECT 2006-2007 ADIRONDACK CHAIR
FIG 1. ADIRONDACK CHAIR DETAIL
–6–
CONTINUED - WOODWORKS: INTERMEDIATE PROJECT 2006-2007 ADIRONDACK CHAIR
Arm B
Arm B
Arm Support M
Arm Support M
Arm Brace D
Leg C
Leg C
Seat Slats E
Front Brace J
See Metal Hook Detail
F
F
G
G
H
H
Middle Brace K
K
N
L E
Seat Support A
See Detail
See Detail
See Detail
Hinge Bar N
Bottom Brace L
HARDWARE KEY
1 =
1
/4" Dia. x 13
/4" Carriage Bolt,
1
/4" x 3” Hanger Bolt
1
/4" Flat Washer
1
/4" Cap Nut
2 = 1
1
/2" No. 8 FH Screw
1
/4" Cap Nut
1
/4" Flat Washer,
5
/8" Dia. Decorative Peg
1
1
1
2
2
2
Slats P
Stop S
Side Q
Legs R
Back Slats
D
20"
Each Sq. = 1"
0
L K
B
B
M
M
5" 10" 15" 20" 25" 30" 40"
35"
1
/4" x 3” Hanger Bolt
(Both Sides L and K)
1
/4" Dia. Hole
21
/2" Rad.
(Both Ends)
3
/16" x 2" Pilot Hole
(Both Sides)
3
/4"
3
/4"
–7–
CONTINUED - WOODWORKS: INTERMEDIATE PROJECT 2006-2007 ADIRONDACK CHAIR
Each Sq. = 1”
0 5" 10" 15" 20" 25" 30" 40"
35"
5"
1
1
/16"
A
D
F,G,H
LEG C
1
/4" Dia. Hole
1
/4" Dia. Hole
Arm Brace D
Seat Support A
Leg C
5
/8" Dia. Hole
1
/8"
3
/4" Rad.
1"
2"
111
/2"
9
1
/2" 8
1
/2"
31
/2"
3
/4"
5
/8"
Front Brace J
HINGE BAR N
Hinge Bar N
Seat Support A
1
/4" Dia. Hole
3
/4"
3
/4"
F
L
5
/32" Dia. Hole and
Countersink in Hinge Bar N
1
/8" Dia. Pilot Hole in
Seat Support A
1
/4"
1
/8"
3
/4"
Slat P
Side Q
Metal Hook
METAL HOOK DETAIL
2
1
/2"
60°
120°
3
/4"
1
1
/4" Rad.
13
/4"
1
5
/8"
21
/2"
1
/4" Dia. Hole
LEG R
75°
Stop S
Side Q
Leg R
1"
7"
4"
FIG 2. SCREW IN THE HANGER BOLTS
–8–
CONTINUED - WOODWORKS: INTERMEDIATE PROJECT 2006-2007 ADIRONDACK CHAIR
FIG 3. DRILL THE BOLT HOLES

Contenu connexe

Similaire à Adirondack_Chair.pdf

Installation JB2011
Installation JB2011Installation JB2011
Installation JB2011jbusse
 
Building a mobile chipper
Building a mobile chipperBuilding a mobile chipper
Building a mobile chipperSegun Bello
 
Shop notes issue 131
Shop notes issue 131Shop notes issue 131
Shop notes issue 131Omar Orozco
 
F-F-Fiddle Assembly Instructions
F-F-Fiddle Assembly InstructionsF-F-Fiddle Assembly Instructions
F-F-Fiddle Assembly Instructionsdsp39
 
Chuck Brown Memorial Park Community Meeting Presentation (January 30, 2014)
Chuck Brown Memorial Park Community Meeting Presentation (January 30, 2014)Chuck Brown Memorial Park Community Meeting Presentation (January 30, 2014)
Chuck Brown Memorial Park Community Meeting Presentation (January 30, 2014)DC Department of General Services
 
WOOD - AS A MATERIAL.
WOOD - AS A MATERIAL.WOOD - AS A MATERIAL.
WOOD - AS A MATERIAL.jagrutib22
 
The making of a DIY CNC milling machine
The making of a DIY CNC milling machineThe making of a DIY CNC milling machine
The making of a DIY CNC milling machinejgeisler0303
 
Catalogue Restorative Nordent
Catalogue Restorative NordentCatalogue Restorative Nordent
Catalogue Restorative Nordentvlnkhn
 
F-F-Fiddle Assembly Instructions
F-F-Fiddle Assembly InstructionsF-F-Fiddle Assembly Instructions
F-F-Fiddle Assembly Instructionsdsp39
 

Similaire à Adirondack_Chair.pdf (20)

Installation JB2011
Installation JB2011Installation JB2011
Installation JB2011
 
Building a mobile chipper
Building a mobile chipperBuilding a mobile chipper
Building a mobile chipper
 
17.Seating
17.Seating17.Seating
17.Seating
 
Shop notes issue 131
Shop notes issue 131Shop notes issue 131
Shop notes issue 131
 
Coffee table @1
Coffee table @1Coffee table @1
Coffee table @1
 
Construção de Violões
Construção de ViolõesConstrução de Violões
Construção de Violões
 
F-F-Fiddle Assembly Instructions
F-F-Fiddle Assembly InstructionsF-F-Fiddle Assembly Instructions
F-F-Fiddle Assembly Instructions
 
Shoring
ShoringShoring
Shoring
 
Outdoor Living Catalog
Outdoor Living CatalogOutdoor Living Catalog
Outdoor Living Catalog
 
Chuck Brown Memorial Park Community Meeting Presentation (January 30, 2014)
Chuck Brown Memorial Park Community Meeting Presentation (January 30, 2014)Chuck Brown Memorial Park Community Meeting Presentation (January 30, 2014)
Chuck Brown Memorial Park Community Meeting Presentation (January 30, 2014)
 
קטלוג טרונקס 2018 TRONEX
קטלוג טרונקס 2018  TRONEXקטלוג טרונקס 2018  TRONEX
קטלוג טרונקס 2018 TRONEX
 
Break down bow
Break down bowBreak down bow
Break down bow
 
WOOD - AS A MATERIAL.
WOOD - AS A MATERIAL.WOOD - AS A MATERIAL.
WOOD - AS A MATERIAL.
 
Portfolio 2017.compressed
Portfolio 2017.compressedPortfolio 2017.compressed
Portfolio 2017.compressed
 
The making of a DIY CNC milling machine
The making of a DIY CNC milling machineThe making of a DIY CNC milling machine
The making of a DIY CNC milling machine
 
Adega modular
Adega modularAdega modular
Adega modular
 
Catalogue Restorative Nordent
Catalogue Restorative NordentCatalogue Restorative Nordent
Catalogue Restorative Nordent
 
Tow dolly plans
Tow dolly plansTow dolly plans
Tow dolly plans
 
Certainteed Drywall Installation Guide
Certainteed Drywall Installation GuideCertainteed Drywall Installation Guide
Certainteed Drywall Installation Guide
 
F-F-Fiddle Assembly Instructions
F-F-Fiddle Assembly InstructionsF-F-Fiddle Assembly Instructions
F-F-Fiddle Assembly Instructions
 

Dernier

VIP Call Girl Amravati Aashi 8250192130 Independent Escort Service Amravati
VIP Call Girl Amravati Aashi 8250192130 Independent Escort Service AmravatiVIP Call Girl Amravati Aashi 8250192130 Independent Escort Service Amravati
VIP Call Girl Amravati Aashi 8250192130 Independent Escort Service AmravatiSuhani Kapoor
 
Kurla Call Girls Pooja Nehwal📞 9892124323 ✅ Vashi Call Service Available Nea...
Kurla Call Girls Pooja Nehwal📞 9892124323 ✅  Vashi Call Service Available Nea...Kurla Call Girls Pooja Nehwal📞 9892124323 ✅  Vashi Call Service Available Nea...
Kurla Call Girls Pooja Nehwal📞 9892124323 ✅ Vashi Call Service Available Nea...Pooja Nehwal
 
VIP Call Girls Service Mehdipatnam Hyderabad Call +91-8250192130
VIP Call Girls Service Mehdipatnam Hyderabad Call +91-8250192130VIP Call Girls Service Mehdipatnam Hyderabad Call +91-8250192130
VIP Call Girls Service Mehdipatnam Hyderabad Call +91-8250192130Suhani Kapoor
 
VIP Call Girls Service Bhagyanagar Hyderabad Call +91-8250192130
VIP Call Girls Service Bhagyanagar Hyderabad Call +91-8250192130VIP Call Girls Service Bhagyanagar Hyderabad Call +91-8250192130
VIP Call Girls Service Bhagyanagar Hyderabad Call +91-8250192130Suhani Kapoor
 
Booking open Available Pune Call Girls Nanded City 6297143586 Call Hot India...
Booking open Available Pune Call Girls Nanded City  6297143586 Call Hot India...Booking open Available Pune Call Girls Nanded City  6297143586 Call Hot India...
Booking open Available Pune Call Girls Nanded City 6297143586 Call Hot India...Call Girls in Nagpur High Profile
 
Recommendable # 971589162217 # philippine Young Call Girls in Dubai By Marina...
Recommendable # 971589162217 # philippine Young Call Girls in Dubai By Marina...Recommendable # 971589162217 # philippine Young Call Girls in Dubai By Marina...
Recommendable # 971589162217 # philippine Young Call Girls in Dubai By Marina...home
 
Peaches App development presentation deck
Peaches App development presentation deckPeaches App development presentation deck
Peaches App development presentation decktbatkhuu1
 
Cheap Rate ➥8448380779 ▻Call Girls In Iffco Chowk Gurgaon
Cheap Rate ➥8448380779 ▻Call Girls In Iffco Chowk GurgaonCheap Rate ➥8448380779 ▻Call Girls In Iffco Chowk Gurgaon
Cheap Rate ➥8448380779 ▻Call Girls In Iffco Chowk GurgaonDelhi Call girls
 
Cheap Rate Call girls Malviya Nagar 9205541914 shot 1500 night
Cheap Rate Call girls Malviya Nagar 9205541914 shot 1500 nightCheap Rate Call girls Malviya Nagar 9205541914 shot 1500 night
Cheap Rate Call girls Malviya Nagar 9205541914 shot 1500 nightDelhi Call girls
 
The_Canvas_of_Creative_Mastery_Newsletter_April_2024_Version.pdf
The_Canvas_of_Creative_Mastery_Newsletter_April_2024_Version.pdfThe_Canvas_of_Creative_Mastery_Newsletter_April_2024_Version.pdf
The_Canvas_of_Creative_Mastery_Newsletter_April_2024_Version.pdfAmirYakdi
 
VIP College Call Girls Gorakhpur Bhavna 8250192130 Independent Escort Service...
VIP College Call Girls Gorakhpur Bhavna 8250192130 Independent Escort Service...VIP College Call Girls Gorakhpur Bhavna 8250192130 Independent Escort Service...
VIP College Call Girls Gorakhpur Bhavna 8250192130 Independent Escort Service...Suhani Kapoor
 
(AISHA) Ambegaon Khurd Call Girls Just Call 7001035870 [ Cash on Delivery ] P...
(AISHA) Ambegaon Khurd Call Girls Just Call 7001035870 [ Cash on Delivery ] P...(AISHA) Ambegaon Khurd Call Girls Just Call 7001035870 [ Cash on Delivery ] P...
(AISHA) Ambegaon Khurd Call Girls Just Call 7001035870 [ Cash on Delivery ] P...ranjana rawat
 
The history of music videos a level presentation
The history of music videos a level presentationThe history of music videos a level presentation
The history of music videos a level presentationamedia6
 
Cosumer Willingness to Pay for Sustainable Bricks
Cosumer Willingness to Pay for Sustainable BricksCosumer Willingness to Pay for Sustainable Bricks
Cosumer Willingness to Pay for Sustainable Bricksabhishekparmar618
 
Best VIP Call Girls Noida Sector 47 Call Me: 8448380779
Best VIP Call Girls Noida Sector 47 Call Me: 8448380779Best VIP Call Girls Noida Sector 47 Call Me: 8448380779
Best VIP Call Girls Noida Sector 47 Call Me: 8448380779Delhi Call girls
 
Top Rated Pune Call Girls Koregaon Park ⟟ 6297143586 ⟟ Call Me For Genuine S...
Top Rated  Pune Call Girls Koregaon Park ⟟ 6297143586 ⟟ Call Me For Genuine S...Top Rated  Pune Call Girls Koregaon Park ⟟ 6297143586 ⟟ Call Me For Genuine S...
Top Rated Pune Call Girls Koregaon Park ⟟ 6297143586 ⟟ Call Me For Genuine S...Call Girls in Nagpur High Profile
 
WAEC Carpentry and Joinery Past Questions
WAEC Carpentry and Joinery Past QuestionsWAEC Carpentry and Joinery Past Questions
WAEC Carpentry and Joinery Past QuestionsCharles Obaleagbon
 
NO1 Trending kala jadu Love Marriage Black Magic Punjab Powerful Black Magic ...
NO1 Trending kala jadu Love Marriage Black Magic Punjab Powerful Black Magic ...NO1 Trending kala jadu Love Marriage Black Magic Punjab Powerful Black Magic ...
NO1 Trending kala jadu Love Marriage Black Magic Punjab Powerful Black Magic ...Amil baba
 

Dernier (20)

VIP Call Girl Amravati Aashi 8250192130 Independent Escort Service Amravati
VIP Call Girl Amravati Aashi 8250192130 Independent Escort Service AmravatiVIP Call Girl Amravati Aashi 8250192130 Independent Escort Service Amravati
VIP Call Girl Amravati Aashi 8250192130 Independent Escort Service Amravati
 
Kurla Call Girls Pooja Nehwal📞 9892124323 ✅ Vashi Call Service Available Nea...
Kurla Call Girls Pooja Nehwal📞 9892124323 ✅  Vashi Call Service Available Nea...Kurla Call Girls Pooja Nehwal📞 9892124323 ✅  Vashi Call Service Available Nea...
Kurla Call Girls Pooja Nehwal📞 9892124323 ✅ Vashi Call Service Available Nea...
 
VIP Call Girls Service Mehdipatnam Hyderabad Call +91-8250192130
VIP Call Girls Service Mehdipatnam Hyderabad Call +91-8250192130VIP Call Girls Service Mehdipatnam Hyderabad Call +91-8250192130
VIP Call Girls Service Mehdipatnam Hyderabad Call +91-8250192130
 
B. Smith. (Architectural Portfolio.).pdf
B. Smith. (Architectural Portfolio.).pdfB. Smith. (Architectural Portfolio.).pdf
B. Smith. (Architectural Portfolio.).pdf
 
VIP Call Girls Service Bhagyanagar Hyderabad Call +91-8250192130
VIP Call Girls Service Bhagyanagar Hyderabad Call +91-8250192130VIP Call Girls Service Bhagyanagar Hyderabad Call +91-8250192130
VIP Call Girls Service Bhagyanagar Hyderabad Call +91-8250192130
 
Booking open Available Pune Call Girls Nanded City 6297143586 Call Hot India...
Booking open Available Pune Call Girls Nanded City  6297143586 Call Hot India...Booking open Available Pune Call Girls Nanded City  6297143586 Call Hot India...
Booking open Available Pune Call Girls Nanded City 6297143586 Call Hot India...
 
Recommendable # 971589162217 # philippine Young Call Girls in Dubai By Marina...
Recommendable # 971589162217 # philippine Young Call Girls in Dubai By Marina...Recommendable # 971589162217 # philippine Young Call Girls in Dubai By Marina...
Recommendable # 971589162217 # philippine Young Call Girls in Dubai By Marina...
 
Peaches App development presentation deck
Peaches App development presentation deckPeaches App development presentation deck
Peaches App development presentation deck
 
Cheap Rate ➥8448380779 ▻Call Girls In Iffco Chowk Gurgaon
Cheap Rate ➥8448380779 ▻Call Girls In Iffco Chowk GurgaonCheap Rate ➥8448380779 ▻Call Girls In Iffco Chowk Gurgaon
Cheap Rate ➥8448380779 ▻Call Girls In Iffco Chowk Gurgaon
 
Cheap Rate Call girls Malviya Nagar 9205541914 shot 1500 night
Cheap Rate Call girls Malviya Nagar 9205541914 shot 1500 nightCheap Rate Call girls Malviya Nagar 9205541914 shot 1500 night
Cheap Rate Call girls Malviya Nagar 9205541914 shot 1500 night
 
The_Canvas_of_Creative_Mastery_Newsletter_April_2024_Version.pdf
The_Canvas_of_Creative_Mastery_Newsletter_April_2024_Version.pdfThe_Canvas_of_Creative_Mastery_Newsletter_April_2024_Version.pdf
The_Canvas_of_Creative_Mastery_Newsletter_April_2024_Version.pdf
 
young call girls in Vivek Vihar🔝 9953056974 🔝 Delhi escort Service
young call girls in Vivek Vihar🔝 9953056974 🔝 Delhi escort Serviceyoung call girls in Vivek Vihar🔝 9953056974 🔝 Delhi escort Service
young call girls in Vivek Vihar🔝 9953056974 🔝 Delhi escort Service
 
VIP College Call Girls Gorakhpur Bhavna 8250192130 Independent Escort Service...
VIP College Call Girls Gorakhpur Bhavna 8250192130 Independent Escort Service...VIP College Call Girls Gorakhpur Bhavna 8250192130 Independent Escort Service...
VIP College Call Girls Gorakhpur Bhavna 8250192130 Independent Escort Service...
 
(AISHA) Ambegaon Khurd Call Girls Just Call 7001035870 [ Cash on Delivery ] P...
(AISHA) Ambegaon Khurd Call Girls Just Call 7001035870 [ Cash on Delivery ] P...(AISHA) Ambegaon Khurd Call Girls Just Call 7001035870 [ Cash on Delivery ] P...
(AISHA) Ambegaon Khurd Call Girls Just Call 7001035870 [ Cash on Delivery ] P...
 
The history of music videos a level presentation
The history of music videos a level presentationThe history of music videos a level presentation
The history of music videos a level presentation
 
Cosumer Willingness to Pay for Sustainable Bricks
Cosumer Willingness to Pay for Sustainable BricksCosumer Willingness to Pay for Sustainable Bricks
Cosumer Willingness to Pay for Sustainable Bricks
 
Best VIP Call Girls Noida Sector 47 Call Me: 8448380779
Best VIP Call Girls Noida Sector 47 Call Me: 8448380779Best VIP Call Girls Noida Sector 47 Call Me: 8448380779
Best VIP Call Girls Noida Sector 47 Call Me: 8448380779
 
Top Rated Pune Call Girls Koregaon Park ⟟ 6297143586 ⟟ Call Me For Genuine S...
Top Rated  Pune Call Girls Koregaon Park ⟟ 6297143586 ⟟ Call Me For Genuine S...Top Rated  Pune Call Girls Koregaon Park ⟟ 6297143586 ⟟ Call Me For Genuine S...
Top Rated Pune Call Girls Koregaon Park ⟟ 6297143586 ⟟ Call Me For Genuine S...
 
WAEC Carpentry and Joinery Past Questions
WAEC Carpentry and Joinery Past QuestionsWAEC Carpentry and Joinery Past Questions
WAEC Carpentry and Joinery Past Questions
 
NO1 Trending kala jadu Love Marriage Black Magic Punjab Powerful Black Magic ...
NO1 Trending kala jadu Love Marriage Black Magic Punjab Powerful Black Magic ...NO1 Trending kala jadu Love Marriage Black Magic Punjab Powerful Black Magic ...
NO1 Trending kala jadu Love Marriage Black Magic Punjab Powerful Black Magic ...
 

Adirondack_Chair.pdf

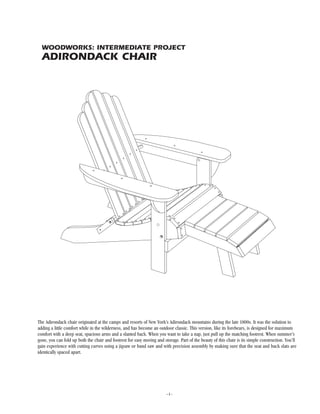
  • 1. –1– WOODWORKS: INTERMEDIATE PROJECT ADIRONDACK CHAIR The Adirondack chair originated at the camps and resorts of New York’s Adirondack mountains during the late 1800s. It was the solution to adding a little comfort while in the wilderness, and has become an outdoor classic. This version, like its forebears, is designed for maximum comfort with a deep seat, spacious arms and a slanted back. When you want to take a nap, just pull up the matching footrest. When summer’s gone, you can fold up both the chair and footrest for easy moving and storage. Part of the beauty of this chair is its simple construction. You’ll gain experience with cutting curves using a jigsaw or band saw and with precision assembly by making sure that the seat and back slats are identically spaced apart.
  • 2. CONTINUED - WOODWORKS: INTERMEDIATE PROJECT 2006-2007 ADIRONDACK CHAIR –2– TOOLS REQUIRED SHOPPING LIST WOOD FINISHING PRODUCTS CUTTING LIST Hand Tools – Clamps – Hacksaw – Vise flat file Power Tools – Tablesaw or circular saw with rip and crosscut blades – Electric drill with countersink bit – Jigsaw or band saw – Belt or drum sander – Router with 1/8"or 3/5" roundover bit Miscellaneous – Pencil – Tape measure – Safety glasses – Carpenter’s glue – 120, 150 and 220-grit sandpaper – Clean, lint-free cloths – Respirator – Gloves for finishing – Mineral spirits – Water-filled metal container with tight-fitting lid (for oil-based stains and finishes waste products) – Paint pad or good quality, natural- bristle brush Recommended Finish Thompson’s® WaterSeal® Advanced Tinted Wood Protector in Natural Cedar. (Also available in Honey Gold, Rustic Red, Nutmeg Brown and Coastal Gray) Alternate Finish Thompson’s® WaterSeal® Waterproofer Plus Tinted Wood Protector, available in five colors: Honey Gold, Natural Cedar, Rustic Red, Nutmeg Brown and Coastal Gray. Item Quantity 1x8 clear pine 6' 1x6 clear pine 37' 1/4" x 1-3/4" carriage bolts 6 1/4" flat washers 22 1/4" cap nuts 10 1/4"x 3" hanger bolts 4 #8 x 1-1/2" flat head wood screws (brass, bronze or stainless steel) 90 1/8"x 3/4"stainless steel or brass bar stock 12" 5/8"diameter decorative pegs 2 Overall Dimensions: 41-1/2"H x 22"W x 5-1/2"D Key Part Pcs. Dimensions A Seat supports 2 3/4" x 5" x 36" B Arms 2 3/4" x 6-3/4" x 31" C Legs 2 3/4" x 4" x 20" D Arm braces 2 3/4" x 4" x 5" E Seat slats 8 3/4" x 2-1/2" x 20" F Back slats 2 3/4" x 2-1/2" x 27" G Back slats 2 3/4" x 2-1/2" x 29-1/2" H Back slats 2 3/4" x 2-1/2" x 32" J Front brace 1 3/4" x 2-1/2" x 21-5/8" K Middle brace 1 3/4" x 2-1/2" x 21-1/2" L Bottom brace 1 3/4" x 2-1/2" x 20" M Arm supports 2 3/4" x 2-1/2" x 23" N Hinge bars 2 3/4" x 1-1/2" x 6" P Slats 6 3/4" x 2-1/2" x 16" Q Sides 2 3/4" x 2-1/2" x 16" R Legs 2 3/4" x 2-1/2" x 9-1/2" S Stops 2 3/4" X 3/4" X 2" Recommended Wood – Pine (stain grade) Alternate Wood – Fir or any type of construction-grade lumber NOTE: The hardware used for your furniture can be ordinary plated steel if it will be kept indoors. But if you want a really weatherproof and handsome piece, use stainless steel, bronze or brass. These materials will enhance the look of stained furniture.
  • 3. BEFORE YOU BEGIN Good craftsmanship begins and ends with good work habits, so make the following steps part of your routine workshop practice. If you have any doubts or questions about how to proceed with a project, always discuss them with your instructor. • Carefully and fully review plans and instructions before putting a tool to the project lumber. • Work sensibly and safely. Wear safety goggles and the appropriate respirator whenever making sawdust or working with thinners or other solvents. • At the end of every work session, clean up your shop area and put away all portable tools. CUTTING AND ASSEMBLY PROCEDURE Building the Chair 1. Rip the boards and then crosscut all the parts to length according to the plan and CUTTING LIST. With a jigsaw or band saw, cut all the curved pieces. Use a 1" grid of pencil lines to transfer the patterns to the wood. W Wo oo od dw wo or rk ke er r’ ’s s T Ti ip p: : Use a router with a roundover bit to soften selected edges for comfort and better appearance, such as the top edges of the seat and back slats and the arms. 2. Sand the curved edges with a belt sander or drum sander chucked into an electric drill. Sand all the parts. 3. Drill holes in all the parts that need them, except for the holes in the seat supports (A) where they attach to the legs (C). In each seat slat (E), drill two holes 3/8" from each end. W Wo oo od dw wo or rk ke er r’ ’s s T Ti ip p: : A combination drill and countersink, used in a drill press or drill guide, will enable you to make quick and consistent holes on the slats. 4. Screw the hanger bolts into the ends of the braces (K, L). Clamp the edges of the boards to prevent the wood from splitting (Fig. 2). 5. Screw the slats (E) to the seat supports (A). Start with the slat farthest back, then do the one at the front. Space out the remaining slats and screw them in place. You may need to file flat surfaces on the curved edges of the sides so the slats rest firmly. 6. Assemble the back. Screw the slats to the bottom brace (L), then attach the middle brace (K) 10-1/4" above the bottom brace. 7. Screw the arms (B) to the arm supports (M), and the arm braces (D) to the legs (C), being sure to leave the braces protruding above the tops of the legs (see detail in Fig. 1). 8. Bolt the hinge bars (N) to the back assembly. Use washers between the wooden pieces. 9. Bolt the arm supports (M) to the legs (C) and back, and clamp the legs to the seat assembly. Then screw the hinge bars to the seat supports. 10. Adjust the legs (C) so they are square, then drill through the holes in the leg and into the seat supports (A, Fig. 1). The peg must have a firm fit in its hole, so be sure to make a test hole first on scrap. Bolt the legs to the seat, insert the pegs, and screw on the front brace (J). 11. Attach the front brace (J) to the legs. Building the Footrest 12. Cut all pieces to size, then cut and sand the curves as you did those of the chair. 13. Cut the angled ends of the legs (R). Drill screw holes in the slats, bolt holes in the sides, and chop a shallow mortise for the metal hooks (see the plan detail in Fig. 1). 14. Bend the hooks in a metal vise, cut them off with a hacksaw, and file or grind smooth. Use a slat (P) as a guide for drilling clearance holes for the screws. 15. Screw the slats and hooks to the sides (Q) and bolt on the legs (R). As with the seat, you may need to file flat surfaces on the curved edges of the sides so the slats rest firmly. Do not insert screws too close to the narrow ends of the sides. 16. Hook the footrest to the chair and adjust the legs so they are flat on the ground. Clamp them there. Screw the stops (S) to the inside so that when the legs are unfolded the stops will keep them in the correct position (see the plan detail in Fig. 1). PROTECTING YOUR PROJECT Any type of wood that’s used outdoors needs protection from water damage. There are a variety of protective coatings available, including clear and tinted wood protectors and semi-transparent and solid stains. Each of these finishes has a different look and maintenance requirement. We’ve chosen Thompson’s® WaterSeal® Advanced Tinted Wood Protector in Natural Cedar to give your project complete protection. This product provides maximum strength waterproofing in a coating that also resists mildew and U.V. (ultraviolet radiation in sunlight) damage. This product can be applied to damp, freshly cleaned wood so you can clean and treat your project in one day. Plus, the transparent tint will give plain pine just the right amount of rich wood tone. This product is also available in Honey Gold, Rustic Red, Nutmeg Brown and Coastal Gray sheer wood tones. W Wo oo od dw wo or rk ke er r’ ’s s T Ti ip p: : Always be sure to choose a waterproofer that exceeds industry standards for waterproofing on wood. STAINING AND FINISHING FINISHING TIPS • Coverage: The approximate coverage of Thompson’s® WaterSeal® Advanced Tinted Wood Protector on pine is 200 square feet per gallon. A gallon of Thomson’s® WaterSeal® Waterproofer Plus Tinted Wood Protector will cover about 200 to 300 square feet. • When you apply Thompson’s® WaterSeal® Advanced Tinted Wood Protector or Thompson’s® WaterSeal® Waterproofer Plus Tinted Wood Protector, do not mix it with other waterproofing products, because variations in the final appearance of the surface being treated may result. Also, do not thin these products. –3– CONTINUED - WOODWORKS: INTERMEDIATE PROJECT 2006-2007 ADIRONDACK CHAIR
  • 4. Recommended Finish For maximum strength protection against water damage, use Thompson’s® WaterSeal® Advanced Tinted Wood Protector. 17. Read and follow the directions found on the back of the can. Be sure that both surface and air temperature are above 50°F and remain above freezing 24 hours after application. If you’re working outside do not apply product if rain is forecasted within 48 hours of application. 18. Before applying Thompson’s® WaterSeal® Advanced Tinted Wood Protector, the wood surface must be free of all dirt, mildew, mold, waterproofers, wood stains and other contaminants. Then do a trial test before full application. The surface may darken slightly with applica- tion and color appearance is different when the wood is fully dry. 19. Shake or stir contents for a minimum of 2 minutes before use. Intermix all containers (of the same color) to be used to assure color uniformity. 20. Apply using a paint pad or brush. For small projects, a brush is the preferred applicator. 21. Apply only one thin, even coat. DO NOT APPLY A SECOND COAT. A heavier or additional coat will not improve performance or appearance. Avoid puddling. Tackiness will result if over-applied. May also occur after application if overnight temperature falls below 50°F within 48 hours of application. Drying time will vary depending on wood surface and humidity. Allow a minimum of 12 hours before using the chair. 22. Clean brushes and equipment with soap and water. Dry product can be removed with mineral spirits. Alternate Finish 23. Before applying Thompson’s® WaterSeal® Waterproofer Plus Tinted Wood Protector, read and follow the directions found on the back of the can. Be sure that both surface and air temperature are above 50°F during application and for 48 hours after application, and if you’re working outside, do not apply product if rain is forecasted within 24 hours of application. 24. The surface must be free of all dirt, mildew, mold, waterproofers, wood stains and other contaminants. If the surface is damp or wet from cleaning or weather, allow the surface to dry thoroughly (a minimum of 48 hours) before application. 25. Before applying this product over the entire surface, a small trial patch is recommended to verify color. 26. In most applications, only one light coat is necessary. Apply with a brush, roller, paint pad, or by dipping the piece into the product. Regardless of which application method is used, remove excess within 15 minutes by redistributing it to drier areas or wiping it off. 27. Oiliness and tackiness will result if over-applied or applied to wet or damp surface or if overnight temperature falls below 50° F within 48 hours of application. 28. Allow at least 48 hours to dry before you sit in the chair. Drying time will vary depending on the substrate, temperature and humidity. 29. Clean brushes and equipment with mineral spirits, then rinse with clean water. IMPORTANT: If using oil-based Waterproofer Plus Wood Protector, place rags, steel wool and waste immediately after use in a sealed, water-filled metal container. NOTE: For all waterproofing products, the length of protection will vary depending on environment. Perform the following splash test once a year to see whether reapplication is necessary. Sprinkle water on various sections of surface to be sealed. If water absorbs and darkens color of substrate within 5 seconds, the surface is porous and considered ready to be treated. If water beads up or otherwise sits on top of surface, then surface doesn’t need protection at this time. For maximum protection from color change and other damage caused by the sun, reapplication is recommended every year. Vertical and horizontal surfaces will experience color changes at different rates. PRODUCT SAFETY For your safety and the safety of those you work with, always read the safety warnings, which manufacturers print on their labels, and follow them to the letter. Typical safety advice and instructions will contain information such as the following: DANGER: Rags, steel wool and other waste soaked in these products may spontaneously catch fire if improperly discarded. Immediately place rags, steel wool and waste after use in a sealed, watertight, water- filled metal container. Dispose in accordance with local fire regulations. When using Thompson’s® WaterSeal® Waterproofer Plus Tinted Wood Protector: CAUTIONS: CONTAINS ALIPHATIC HYDROCARBONS. Keep away from heat and open flame. Use only with adequate ventilation. For Exterior Use Only. To avoid overexposure, if treating enclosed exterior rooms or porches, open windows and doors or use other means to ensure fresh air entry during application and drying. If you experience eye watering, headaches, or dizziness, increase fresh air, or wear respiratory protection (NIOSH approved), or leave the area. Avoid contact with eyes and skin. Causes skin and respiratory tract irritation. Wash hands after using. Keep container closed when not in use. Do not transfer contents to other containers for storage. FIRST AID: In case of eye contact, flush thoroughly with large amounts of water for 15 minutes and get medical attention. For skin contact, wash thoroughly with soap and water. In case of respiratory difficulty, provide fresh air and call physician. If swallowed, call Poison Control Center, hospital emergency room, or physician immediately. DELAYED EFFECTS FROM LONG-TERM OVEREXPOSURE. Contains solvents which can cause permanent brain and nervous system damage. Intentional misuse by deliberately concentrating and inhaling contents may be harmful or fatal. WARNING: This product contains chemicals known to the State of California to cause cancer and birth defects or other reproductive harm. DO NOT TAKE INTERNALLY. KEEP OUT OF REACH OF CHILDREN. –4– CONTINUED - WOODWORKS: INTERMEDIATE PROJECT 2006-2007 ADIRONDACK CHAIR
  • 5. When using Thompson’s® WaterSeal® Advanced Tinted Wood Protector: CAUTIONS: Use Only With Adequate Ventilation. To avoid overexposure, open windows and doors or use other means to ensure fresh air entry during application and drying. If you experience eye watering, head- aches, or dizziness, increase fresh air, or wear respiratory protection (NIOSH approved), or leave the area. Avoid contact with eyes and skin. Wash hands after using. Keep container closed when not in use. Do not transfer contents to other containers for storage. FIRST AID: In case of eye contact, flush thoroughly with large amounts of water. Get medical attention if irritation persists. If swallowed, call Poison Control Center, hospital emergency room, or physician immediately. WARNING: This product contains chemicals known to the State of California to cause cancer and birth defects or other reproductive harm. DO NOT TAKE INTERNALLY. KEEP OUT OF REACH OF CHILDREN. –5– CONTINUED - WOODWORKS: INTERMEDIATE PROJECT 2006-2007 ADIRONDACK CHAIR
  • 6. FIG 1. ADIRONDACK CHAIR DETAIL –6– CONTINUED - WOODWORKS: INTERMEDIATE PROJECT 2006-2007 ADIRONDACK CHAIR Arm B Arm B Arm Support M Arm Support M Arm Brace D Leg C Leg C Seat Slats E Front Brace J See Metal Hook Detail F F G G H H Middle Brace K K N L E Seat Support A See Detail See Detail See Detail Hinge Bar N Bottom Brace L HARDWARE KEY 1 = 1 /4" Dia. x 13 /4" Carriage Bolt, 1 /4" x 3” Hanger Bolt 1 /4" Flat Washer 1 /4" Cap Nut 2 = 1 1 /2" No. 8 FH Screw 1 /4" Cap Nut 1 /4" Flat Washer, 5 /8" Dia. Decorative Peg 1 1 1 2 2 2 Slats P Stop S Side Q Legs R Back Slats D 20" Each Sq. = 1" 0 L K B B M M 5" 10" 15" 20" 25" 30" 40" 35" 1 /4" x 3” Hanger Bolt (Both Sides L and K) 1 /4" Dia. Hole 21 /2" Rad. (Both Ends) 3 /16" x 2" Pilot Hole (Both Sides) 3 /4" 3 /4"
  • 7. –7– CONTINUED - WOODWORKS: INTERMEDIATE PROJECT 2006-2007 ADIRONDACK CHAIR Each Sq. = 1” 0 5" 10" 15" 20" 25" 30" 40" 35" 5" 1 1 /16" A D F,G,H LEG C 1 /4" Dia. Hole 1 /4" Dia. Hole Arm Brace D Seat Support A Leg C 5 /8" Dia. Hole 1 /8" 3 /4" Rad. 1" 2" 111 /2" 9 1 /2" 8 1 /2" 31 /2" 3 /4" 5 /8" Front Brace J HINGE BAR N Hinge Bar N Seat Support A 1 /4" Dia. Hole 3 /4" 3 /4" F L 5 /32" Dia. Hole and Countersink in Hinge Bar N 1 /8" Dia. Pilot Hole in Seat Support A 1 /4" 1 /8" 3 /4" Slat P Side Q Metal Hook METAL HOOK DETAIL 2 1 /2" 60° 120° 3 /4" 1 1 /4" Rad. 13 /4" 1 5 /8" 21 /2" 1 /4" Dia. Hole LEG R 75° Stop S Side Q Leg R 1" 7" 4"
  • 8. FIG 2. SCREW IN THE HANGER BOLTS –8– CONTINUED - WOODWORKS: INTERMEDIATE PROJECT 2006-2007 ADIRONDACK CHAIR FIG 3. DRILL THE BOLT HOLES