Car Modelling In 3D Animation Techniques
•
0 j'aime•33 vues

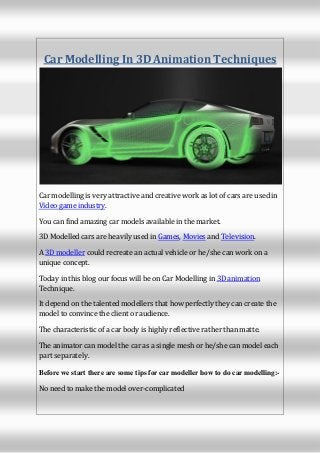
Car modelling is very attractive and creative work as lot of cars are used in Video game industry. You can find amazing car models available in the market. 3D Modelled cars are heavily used in Games, Movies and Television.

Recommandé
Contenu connexe
Plus de Animation Kolkata
Plus de Animation Kolkata (20)
Dernier
Dernier (20)
Car Modelling In 3D Animation Techniques
- 1. Car Modelling In 3D Animation Techniques Car modelling is very attractive and creative work as lot of cars are used in Video game industry. You can find amazing car models available in the market. 3D Modelled cars are heavily used in Games, Movies and Television. A 3D modeller could recreate an actual vehicle or he/she can work on a unique concept. Today in this blog our focus will be on Car Modelling in 3D animation Technique. It depend on the talented modellers that how perfectly they can create the model to convince the client or audience. The characteristic of a car body is highly reflective rather than matte. The animator can model the car as a single mesh or he/she can model each part separately. Before we start there are some tips for car modeller how to do car modelling:- No need to make the model over-complicated
- 2. Before going into details start with the simple shapes on the vehicle for example start with the shape of wheel as it is less complicated. Use the reference picture of a good car to start with car modelling in 3D software. Keep the reference picture of the car from all the sides; front, side, back and top. Edge Modelling Technique To begin with firstly use the edge modelling technique to block out the shapes. Edge modelling technique is extremely useful as cars are made up of a lot of curves shapes which can be traced by this technique. Blocking out will allow you to work on the details. Draw the simple shapes such as wheels then move to the other parts. The tyre can be created from a Torus shape and section radius can be used to block out the initial shape. Add extra edge loops to the tyre to reduce the element’s softness. In case of automotive modelling edge modelling technique is a great help. This technique will allow you to block out oddly shaped pieces or tough pieces and will make it easy to eject pieces of car piece by piece.
- 3. One can work on the parts of the car one by one; wheels, door and roof then lights and grills, bonnets and bumpers etc. Once outside model is created inside parts of the car such as seats, steering wheel, belts etc need to be drawn. Use NURBS and Polygon As NURBS (non-uniform splines) helps to achieve much smoother shape than polygons; use NURBS to create the model. NURBS are used to generate curves and surfaces; it is highly flexible and good for modelling shapes. The car windows has smooth surface, use NURBS to create the windows. One can even take advantage of polygons tools to create the car model. Using both NURBS and polygon will help to speed up the workflow. Use polygon tool where it is needed; see the above picture.
- 4. A car body with the mesh work will look like this. Apply Polygons or NURBS tools to complete the figure of the car. To get high quality model add more loops and smooth out the flow of the hard surfaces. Move around the model and check the car from all angles, keep the model clean. Use different camera angles to view the car from all angles. Bridge the pieces together. The bridge tool is use to connect pieces together and helps to create large chunks of geometry between the pieces.
- 5. This tool can be used to bridge the gap between two wheels. By bridging the gap between wheels one can easily create the side panel. To make the bonnet of the car, select a range of faces –go to edit mesh>Duplicate Faces to get the copy of those faces. It will enable you to get the workflow between the main base and bonnet. Give some edges around the border so that the bonnet gets the depth. For bumper start with the default cube and add edge loops to match it to the reference image. You can duplicate the bumper and use it at the rear of the car. For headlight place semi-sphere into the cavity. Basic polygon cubes to form the Rapier’s eyelids shape and tight rims around the headlight to make it more realistic. The indicator or grill lights can also be created from simple shapes such as cylinders, cubes and spheres; by adding edge loops you can make the lights more prominent. Use Lattice Deformer from the Animation Panel to make the work smooth. Lattice points can help you to quickly and effectively reshape the mesh.
- 6. Bevel the edges The metal rims around the window frames need bevel. Without the bevel the metal rim will look too flat in unsmoothed mode or rubbery in smoothed mode. For roof of the car select all the faces and make a large extrude inwards. The depth of the roof will enable you to rest the side windows against it. Now bevel the door and the bonnet of the car. The metal work around the car can have their edges bevelled. Bevelling will give overall believability to the model. Select a nice, bright colour for the body of the car. In car modelling creasing the right line can make or break the realism of your car model.
- 7. In car modelling adding holes on the hard surfaces without affecting the geometrical surrounding is a challenge. To do this new polygon can be added and by extruding it inward you can get a hole. Automobile models do not normally need to be as flexible as character model. 3D platform will allow you to have smooth preview, take the advantage and check the progress of car modelling by previewing in smooth how your car looks. In this way you could focus your time more on the parts of the model that need more work and leave those areas which need less work. The car modeller should add finer details to make the model rich such as strips running along the model or logo on the door. You can use simple geometry for side mirrors and model the window wipers and the door handle. Readers, we at MAAC Kolkata deal with different types of Car Modelling, join us and explore.