
Recommandé
Contenu connexe
Similaire à Lino printing
Similaire à Lino printing (20)
Dernier
Dernier (20)
Lino printing
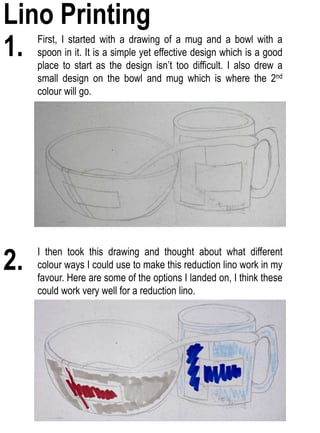
- 1. 1. First, I started with a drawing of a mug and a bowl with a spoon in it. It is a simple yet effective design which is a good place to start as the design isn’t too difficult. I also drew a small design on the bowl and mug which is where the 2nd colour will go. 2. I then took this drawing and thought about what different colour ways I could use to make this reduction lino work in my favour. Here are some of the options I landed on, I think these could work very well for a reduction lino. Lino Printing
- 2. 3.I then traced over the design I had made, and then I flipped the design over and re-traced the lines on to the lino plate. 4.After tracing the design onto the lino, I shaded in the parts that I needed to cut out for the first print. 5. I then cut out the shaded areas to make the first plate. Cutting out the lino, was a challenge at first, but I managed to get the hang of it and the gouges after a while. I did a good job with cutting the first layer and the first print came out quite nice.
- 3. 6. To print the first plate, I used a placeholder. I used this so when I came to do the second layer, I could put the paper and the plate in the exact same place so the final piece come out correctly. This is the place holder I used, the lino plate rests in the cardboard corner and the paper in the masking tape corner. I also made a little sketch on the side of the placeholder with the mug and the bowl so I knew which way the plate sits in the holder. This isn’t the colours that I used for my prints but when I was printing the colours that I first used, I didn’t get any pictures of the fist print, so I recreated the plate and printed this with a black block ink that I had at home. But this is what the first print looked like. To print the lino, I used a Albion Press. To print using this, you place the placeholder down first, put the lino plate in the holder and also the paper, then you place some felt blankets over the top of the paper and plate, to add some extra pressure to the press. After that you use the lever on the side to move the board under the press, and then you use the other lever on the top and pull it to yourself. Pull the lever completely towards yourself so all the pressure is put onto the plate. Then you use the side lever again to move it out an you’ve got your print.
- 4. 7. After printing the first layer I took the plate out and I shaded in the parts of the plate that I wanted to cut out. I cut out all the parts I would like to stay the first colour that I printed. I then cut the shaded area out with the gouges. 8. I then printed the second layer just as it is so I could see if there was anything that I needed to change. I printed this so I could see if any of those lines around the piece, where the linos catching, would print over the first colour and take away from the print.
- 5. 9. Then using the place holder and the Albion Press I printed the second layer on top of the first layer. These are the final lino prints that I came out with. I feel like the colours in the first print, with the light brown and the red, work better together than the second. I like how the design has come out, even though I did make a mistake when cutting the second plate. On the mug, I had originally wanted the shape to be a cross like the bowl, but I accidentally cut the wrong part of the lino, and didn’t realise until I had done that much that I couldn’t work round it, so we ended up with the design of 3 boxes instead of the cross. Even with this I do think that the design worked well I do just wish that I had cut the second layer as I meant to. The red on the blue print didn’t really work very well. I though that the red would be strong enough to show up on top of the blue but unfortunately that didn’t happen.