Ayv shot compositionhandout
•
0 j'aime•545 vues

The document discusses various techniques for composing shots and framing photographs effectively. It recommends paying attention to elements in the frame and background, following the rule of thirds for subject placement, adjusting the foreground and background with aperture settings, changing the line of sight and camera angles, including elements that guide the eye, finding patterns, getting close for texture and details, and cropping to emphasize the intended subject. It also defines different types of camera shots and angles that can be used.

Recommandé
Contenu connexe
Tendances
Tendances (20)
Similaire à Ayv shot compositionhandout
Similaire à Ayv shot compositionhandout (20)
Plus de Neith Moore
Plus de Neith Moore (11)
Dernier
Dernier (20)
Ayv shot compositionhandout
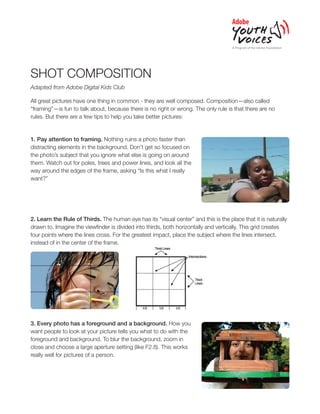
- 1. Shot Composition Adapted from Adobe Digital Kids Club All great pictures have one thing in common - they are well composed. Composition—also called “framing”—is fun to talk about, because there is no right or wrong. The only rule is that there are no rules. But there are a few tips to help you take better pictures: 1. Pay attention to framing. Nothing ruins a photo faster than distracting elements in the background. Don’t get so focused on the photo’s subject that you ignore what else is going on around them. Watch out for poles, trees and power lines, and look all the way around the edges of the frame, asking “Is this what I really want?” 2. Learn the Rule of Thirds. The human eye has its “visual center” and this is the place that it is naturally drawn to. Imagine the viewfinder is divided into thirds, both horizontally and vertically. This grid creates four points where the lines cross. For the greatest impact, place the subject where the lines intersect, instead of in the center of the frame. 3. Every photo has a foreground and a background. How you want people to look at your picture tells you what to do with the foreground and background. To blur the background, zoom in close and choose a large aperture setting (like F2.8). This works really well for pictures of a person.
- 2. 2 4. Change your line of sight. Try kneeling, or even putting the camera on the ground. Or climb a flight of stairs so you’re higher than the subject you’re photographing. Digital cameras with twist and tilt LCD screens make it even easier. Changing angles provides a new way of seeing things, and makes for a more dramatic picture. 5. Look for elements that lead the eyes through the photo. A winding path, a row of telephone poles or even a line of chairs at the beach can serve as elements in a good photo. 6. Keep your eyes open for patterns. Interesting photos can be made of the waves and patterns created by drifting snow, a flock of birds flying in formation or pipes stacked at a construction site. 7. Try getting in close. Look for texture, in the wrinkles of a face or the bark of a tree. Pay attention to details. 8. Cropping brings a photo to life. If you edit photos on the computer, you are no longer limited to the standard 4 x 6, 5 x 7 or 8 x 10 print sizes. Look at each photo and think about what you really want people to see. Then crop everything else away. Try some unusual shapes, like panoramas or narrow verticals. Original Photo Cropped Photo
- 3. 3 Camera Shots Establishing Shot or Extreme Long Shot (ES) Used to establish a setting or sense of place. Shot is captured very far away from the subject. Long Shot (LS) Captures all of the subject, this shot generally establishes the size of the subject relative to place (for example a person from head to toe). Medium Shot (MS) This shot captures half of the subject, generally seen from waist to head for a person. Close-up Shot (CU) This shot focuses in closely on the subject. Used most frequently with people during interviews. Extreme Close-Up Shot (ECU) Goes in even closer to the subject than the Close-Up Shot and is used to focus on details or to make a more interesting shot.
- 4. 4 Camera Angles Bird’s Eye View Shooting the subject from way above. High Angle A shot that is just above the subject looking down, but not nearly as high as Bird’s Eye View. This shot can make the subject look or seem smaller and inferior. Low Angle A shot that is just below the subject, looking up at them. This shot is used to make subjects look larger and more powerful, for example the President is usually shot from a low angle. Canted Angle A shot that it is tilted. Generally used to create the feeling of imbalance. © 2011 Adobe Youth Voices