
Recommandé
Contenu connexe
Similaire à Janu Sirsasana.pdf
Similaire à Janu Sirsasana.pdf (20)
Plus de Knowing Overt
Plus de Knowing Overt (20)
Dernier
Dernier (20)
Janu Sirsasana.pdf
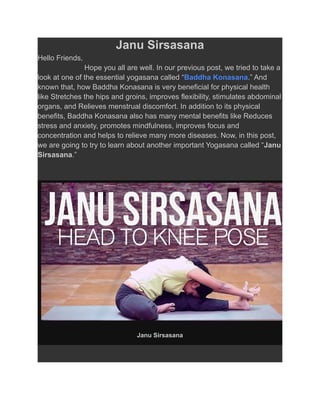
- 1. Janu Sirsasana Hello Friends, Hope you all are well. In our previous post, we tried to take a look at one of the essential yogasana called “Baddha Konasana.” And known that, how Baddha Konasana is very beneficial for physical health like Stretches the hips and groins, improves flexibility, stimulates abdominal organs, and Relieves menstrual discomfort. In addition to its physical benefits, Baddha Konasana also has many mental benefits like Reduces stress and anxiety, promotes mindfulness, improves focus and concentration and helps to relieve many more diseases. Now, in this post, we are going to try to learn about another important Yogasana called “Janu Sirsasana.” Janu Sirsasana
- 2. Janu headstand is a Sanskrit language word. This word is made up of three words. The first word 'Janu' means knee. The second word 'Sirsa' means head. On the other hand, the meaning of the third word 'Asana' is the posture, position, or posture of sitting, lying, or standing. While doing this asana, your head touches the knee, hence it is also called the nose-to-knee pose, head-on-nose pose, and head-on-knee forward bend pose. This asana is usually compared to the Sirsasana pose, but it is completely different from it. Janu Sirsasana was first noticed in the 20th century (1). Yoga Guru Krishnamacharya It is first mentioned in Yoga Guru Krishnamacharya's book “Yoga Makaranda” (2) written in the year 1934. Later in the 1966 book Light on Yoga by his disciples BKS Iyengar (3) and the book Ashtanga Vinyasa Yoga by yoga guru Sri Krishna Pattabhi Jois. This asana has also been mentioned. Janu Shirshasana is considered beginner-level or easy asana. It is done in the Ashtanga yoga style. It is recommended to do this for 30 to 60 seconds with one leg. This is repeated only once.
- 3. B. K. S. Iyengar Sri Krishna Pattabhi Jois
- 4. Health Benefits Of Janu Sirsasana Aka Head To Knee Pose Regular practice of Janu Shirshasana not only gives health but also many general benefits to the body. As... ● Strengthening And Stretching This asana is done by bending forward at the hips. During this, the head is touched to the knee or beyond. This gives a great stretch to the shoulders, spine, hamstrings, neck, abdominal muscles, and groin. Stretching these muscles helps to make them stronger. It also improves the flexibility of the body. ● Stimulates The Various Organs Of The Body By applying pressure on the soles of the feet with hands, there is pressure on many points present on the soles and hands. These points are considered very important in acupressure therapy. These points can stimulate different parts of the body. This type of pressure leads to increased stimulation in the liver, pancreas, kidney, stomach, and spleen. ● Improves Digestion In this asana, the lower part of the abdomen is pressed towards the thighs to reach above the knees or above the forehead. This puts tremendous pressure on the stomach. This pressure stimulates the internal organs of the stomach, it also helps a lot in the digestion process.
- 5. ● Relaxes The Mind And Brings Down The Anxiety Levels In this asana, bringing the head down and touching the knees, the rest is done. Due to this, there is a feeling of deep peace in the body in no time. However, breathing rhythmically takes some time and practice. But once mastered, the calmness of body and mind will gradually reduce the anxiety of body and mind. Head-to-Knee Pose ● Reduces Sciatica Janu Shirshasana helps with the symptoms associated with sciatica nerves. Frequent exercise and slow breathing increase the supply of fresh blood to the sciatic nerves. In this way, pain in the lower back and outer part of the leg can be reduced.
- 6. ● Flexibility Of The Lower Back And The Spine Is Improved In this asana, by bending forward on the hip, the jammed lower part of the back also starts to open. By bending in this way, there is a stretch on the muscles around the waist. The flexibility of the entire spine improves. The importance of this flexibility is also because most Asana requires a strong back and a flexible spine to perform. ● Fresh Blood To The Chest And The Lungs It is very important to take long breaths while practicing Janu Shirshasana. This increases the supply of newly made blood to the diaphragm. The new blood increases the capacity of the lungs and chest to function. The chest remains clean and strong. ● Works Great For Runners By doing this asana, the hamstrings are stretched, and the hips get a deep stretch. If you are into running, the practice of this asana after running gives relief to tired hamstrings. Apart from this, even before running, this asana helps in opening the hamstrings. Apart from this, runners can practice this asana before and after running. ● Balance And Harmony In The Body While doing this asana, there is an equal stretch on both sides of the hips. While balance has to be made in the lower back. In most of these cases, it turns out that one part of the lower back or one part of the hip is more flexible than the other. By doing this asana, the rigid part of the lower back and the balance in the hip begin to form, and their combination becomes better.
- 7. Method of doing Janu Shirshasan 1. Sit on the yoga mat with your back straight. 2. Extend the left leg outward from the hip joint. 3. During this, bend your right knee inwards. 4. Now place the sole of the right foot on the inner side of the left thigh. 5. Then press the right leg and knee comfortably on the floor. 6. At this time, the chest, and navel should be with the left leg. 7. With this, the upper torso will come in the right position. 8. Now give support by keeping both hands near the hip. 9. Breathe in and raise the abdomen and torso towards the head. 10. Then, while exhaling, hold the heel of the foot with both hands. 11. During this, do not try to force at all. 12. Stay in this position and keep taking deep breaths and exhaling. 13. After this, while inhaling, leave the feet with the hands. 14. Now lift the torso up and straighten the right leg. 15. After this, you rest for a few seconds. 16. After this, now do the same asana with the right leg. Precautions for Janu Sirsasana Or Head To Knee Pose Avoid practicing Janu Shirshasana if you have the following problems. ● Do not do this asana if you have pain in the spine. ● This posture should not be done even in case of serious illness. ● Do not do this asana if you have diarrhea and asthma. ● Janu Shirshasana should not be done when there is a pain in the neck. ● Do not raise your hand when you have shoulder pain.
- 8. ● If you have knee pain or arthritis, practice only with the support of the wall. ● Heart and high blood pressure patients should not do this asana. ● In the beginning, do Janu Shirshasana only under the supervision of a yoga trainer. ● You can also do this asana on your own after becoming balanced. ● Always take the advice of a doctor before starting the practice of Janu Shirshasana. Nose-to-Knee Pose
- 9. Important Notes ● Janu Shirshasana should be practiced only in the morning. But if you are doing this asana in the evening, then it is necessary that you have taken your meal at least 4 to 6 hours before. ● It is also necessary to make sure that you have defecated before doing the asana and that the stomach is completely empty. ● Gradually increase the practice to do Janu Shirshasana. Never practice this asana when there is discomfort. Never put pressure on the shoulders or knees. ● Always make sure that you have warmed up and that your core muscles are active. ● If, at any point in time, you feel any kind of discomfort or pain, do not exert any pressure on yourself. Gradually stop the practice of the asana and rest. ● If you are doing this asana for the first time, then practice this asana under the supervision of a qualified yoga teacher. Final words about Janu sirsasana Janu sirsasana is one of the most basic and essential poses in yoga. It is a seated forward bend that stretches the spine and opens up the hips. This pose is often included in beginners' yoga classes, as it is a good way to warm up the body and get familiar with the practice of yoga. Once you have learned how to do janu sirsasana, you can begin to experiment with different variations of the pose. You can try adding a twist to the pose, or extending one leg out to the side in order to deepen the stretch. There are many different ways to modify janu sirsasana, so be creative and have fun with it!
- 10. If you are new to yoga, janu sirsasana is a great pose to start with. It is relatively simple and low-key, but it still provides a good stretch for the spine and hips. As you become more comfortable with the pose, you can begin to explore different variations. Remember to listen to your body and never force yourself into a position that feels uncomfortable. With time and practice, you will be able to master janu sirsasana and all of the many variations of the pose. It's important to note that the benefits of Janu Sirsasana may vary depending on the individual and their practice. As with any yoga pose, it's important to practice safely and listen to your body to avoid injury. If you have any health concerns or injuries, it's always best to consult with a healthcare professional before attempting any new physical activity Hope you have liked this article. If you like the article, please subscribe to our blog and share the article. If you want to ask any questions related to the article or have any suggestions, please comment.