NASA Travel LogBook
•
0 j'aime•7 vues

NASA National Aeronautics and Space Administration NASA Travel LogBook By Dr. Pankaj Dhussa

Recommandé
Contenu connexe
Similaire à NASA Travel LogBook
Similaire à NASA Travel LogBook (20)
Plus de Dr. Pankaj Dhussa
Plus de Dr. Pankaj Dhussa (20)
Dernier
Dernier (20)
NASA Travel LogBook
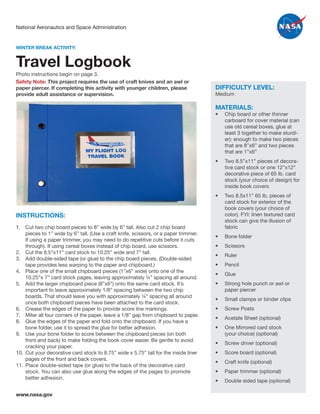
- 1. National Aeronautics and Space Administration www.nasa.gov Travel Logbook INSTRUCTIONS: 1. Cut two chip board pieces to 8” wide by 6” tall. Also cut 2 chip board pieces to 1” wide by 6” tall. (Use a craft knife, scissors, or a paper trimmer. If using a paper trimmer, you may need to do repetitive cuts before it cuts through). If using cereal boxes instead of chip board, use scissors. 2. Cut the 8.5”x11” card stock to 10.25” wide and 7” tall. 3. Add double-sided tape (or glue) to the chip board pieces. (Double-sided tape provides less warping to the paper and chipboard.) 4. Place one of the small chipboard pieces (1”x6” wide) onto one of the 10.25”x 7” card stock pages, leaving approximately ¼” spacing all around. 5. Add the larger chipboard piece (8”x6”) onto the same card stock. It’s important to leave approximately 1/8” spacing between the two chip boards. That should leave you with approximately ¼” spacing all around once both chipboard pieces have been attached to the card stock. 6. Crease the edges of the paper to provide score line markings. 7. Miter all four corners of the paper, leave a 1/8” gap from chipboard to paper. 8. Glue the edges of the paper and fold onto the chipboard. If you have a bone folder, use it to spread the glue for better adhesion. 9. Use your bone folder to score between the chipboard pieces (on both front and back) to make folding the book cover easier. Be gentle to avoid cracking your paper. 10. Cut your decorative card stock to 8.75” wide x 5.75” tall for the inside liner pages of the front and back covers. 11. Place double-sided tape (or glue) to the back of the decorative card stock. You can also use glue along the edges of the pages to promote better adhesion. WINTER BREAK ACTIVITY: DIFFICULTY LEVEL: Medium MATERIALS: • Chip board or other thinner carboard for cover material (can use old cereal boxes, glue at least 3 together to make sturdi- er): enough to make two pieces that are 8”x6” and two pieces that are 1”x6” • Two 8.5”x11” pieces of decora- tive card stock or one 12”x12” decorative piece of 65 lb. card stock (your choice of design) for inside book covers • Two 8.5x11” 65 lb. pieces of card stock for exterior of the book covers (your choice of color). FYI: linen textured card stock can give the illusion of fabric • Bone folder • Scissors • Ruler • Pencil • Glue • Strong hole punch or awl or paper piercer • Small clamps or binder clips • Screw Posts • Acetate Sheet (optional) • One Mirrored card stock (your choice) (optional) • Screw driver (optional) • Score board (optional) • Craft knife (optional) • Paper trimmer (optional) • Double sided tape (optional) Photo instructions begin on page 3. Safety Note: This project requires the use of craft knives and an awl or paper piercer. If completing this activity with younger children, please provide adult assistance or supervision.
- 2. National Aeronautics and Space Administration www.nasa.gov Travel Logbook 12. Place the decorative card stock onto the chipboard pieces on the inside of both the front and back cover pieces. If available, use your bone folder to ensure even spreading of the glue from edge to edge. 13. For the pages you will place inside your travel book, like your flight log or scrapbook pages, use a score board to make a score to the pages by coming in 1” on the left of the page. This will help it bend when flipping through your book. Once all the pages have been scored on the left side, come in another ½” and also 1 ¼” from the top and make a mark. Do this on both the top and bottom. These marks are where you will make holes for the screw posts. 14. Use your strong hole punch (or awl) to punch a hole through your pages. If you don’t have a strong hole punch you can use an awl or paper piercer to make the holes. 15. Mark the inside of both chipboard covers where you will place the holes. The easiest way to do it is to take the internal pages you’ve already pierced and line them up where you want them within the travel log. Use binder clips or small clamps to keep everything lined up. Take a pencil and make a mark on the inside cover where you will place the hole. 16. Use the strong hole punch to punch a hole through the chip board. If using an awl, this may take a little time and you may need to wiggle the awl to make the hole larger. 17. Add your screw posts into the holes. You can use a screwdriver to screw it in or just twist with your hands. 18. Assemble LogBook pages and tighten screwposts. OPTIONAL STEPS (for front cover design): 1. Cut the mirrored card stock to 3 ½” wide by 2 ¾” inches tall. 2. Turn the mirrored card stock onto the back so you can add measurements to know where to cut. Measure in ¼” on all four sides and draw a mark with your pencil. Cut along the line using a craft knife. Safety note: Be careful and if need- ed, provide adult supervision when using a craft knife. 3. Cut the acetate sheet down to 3 ¼” wide and 2 ½” tall and glue it to the back of the mirrored card stock. 4. Place double-sided tape (or glue, but it can be messy on acetate) on only 3 sides, the left, right and bottom sides. Leave the top open. 5. Place onto the cover of the travel book, 1 ¾” from the top and 2 ¾” from either side to place in the center of the cover. 6. Slip in the “My Travel Logbook” printout into the opening of the mirrored card stock. PRINTABLES 1. There are inserts you can print for the inside pages of your travel log. (pages 6-10). There are two designs per page. There is a gray line in the middle showing where to cut the page. 2. Label art is available on page 11. You can make your own label if you prefer. The slot opening will fit a 3” x 2” design. WINTER BREAK ACTIVITY: Photo instructions begin on page 3.
- 3. National Aeronautics and Space Administration www.nasa.gov Travel Logbook WINTER BREAK ACTIVITY: Step 1. Step 4. Step 7. Step 2. Step 5. Step 8. Step 3. Step 6. Step 9.
- 4. National Aeronautics and Space Administration www.nasa.gov Travel Logbook WINTER BREAK ACTIVITY: Step 10. Step 13. Step 16. Step 17. Step 18. Step 11. Step 14. Step 12. Step 15.
- 5. National Aeronautics and Space Administration www.nasa.gov Travel Logbook WINTER BREAK ACTIVITY: Optional Step 1. Optional Step 4. Optional Step 2. Optional Step 5. Optional Step 3. Optional Step 6. FINAL.
- 6. Flight Date Departure Location Destination Aircraft Type Purpose Comments My Flight Log My Flight Log Flight Date Departure Location Destination Aircraft Type Purpose Comments