Faster and more efficient system management with Lenovo XClarity Administrator
•
0 j'aime•444 vues

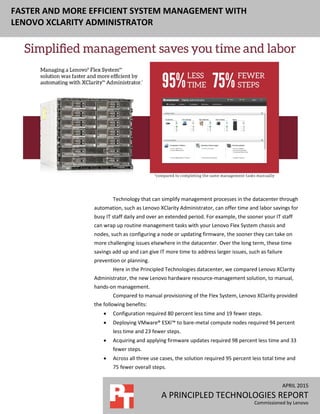
Lenovo XClarity Administrator provides significant time savings over manual administration of Lenovo Flex System chassis and nodes. It automates tasks like discovery and inventory, server configuration, deployment of VMware ESXi to bare metal nodes, and applying firmware updates. Testing across three use cases found XClarity Administrator reduced time by 95% and steps by 75% compared to manual administration. Faster, more efficient management allows IT staff to focus on other priorities.

Recommandé
Recommandé
Contenu connexe
Tendances
Tendances (20)
Similaire à Faster and more efficient system management with Lenovo XClarity Administrator
Similaire à Faster and more efficient system management with Lenovo XClarity Administrator (20)
Plus de Principled Technologies
Plus de Principled Technologies (20)
Dernier
Dernier (20)
Faster and more efficient system management with Lenovo XClarity Administrator
- 1. APRIL 2015 A PRINCIPLED TECHNOLOGIES REPORT Commissioned by Lenovo FASTER AND MORE EFFICIENT SYSTEM MANAGEMENT WITH LENOVO XCLARITY ADMINISTRATOR sa Technology that can simplify management processes in the datacenter through automation, such as Lenovo XClarity Administrator, can offer time and labor savings for busy IT staff daily and over an extended period. For example, the sooner your IT staff can wrap up routine management tasks with your Lenovo Flex System chassis and nodes, such as configuring a node or updating firmware, the sooner they can take on more challenging issues elsewhere in the datacenter. Over the long term, these time savings add up and can give IT more time to address larger issues, such as failure prevention or planning. Here in the Principled Technologies datacenter, we compared Lenovo XClarity Administrator, the new Lenovo hardware resource-management solution, to manual, hands-on management. Compared to manual provisioning of the Flex System, Lenovo XClarity provided the following benefits: Configuration required 80 percent less time and 19 fewer steps. Deploying VMware® ESXi™ to bare-metal compute nodes required 94 percent less time and 23 fewer steps. Acquiring and applying firmware updates required 98 percent less time and 33 fewer steps. Across all three use cases, the solution required 95 percent less total time and 75 fewer overall steps.
- 2. A Principled Technologies test report 2Faster and more efficient system management with Lenovo XClarity Administrator THE POWER OF AUTOMATION WITH LENOVO XCLARITY ADMINISTRATOR In addition to saving time, a valuable management solution should reduce complexity and provide a standard of consistency, reliability, and accuracy. Automation can lead to a reduction in potential human error, which in turn reduces the downtime necessary to correct it. Most importantly, these kinds of benefits are scalable, and can grow with your datacenter and company. Lenovo XClarity Administrator is a virtual appliance providing centralized resource management. It was designed to reduce complexity in the datacenter through automation, to facilitate prompt responses from IT staff on issues, and to promote availability of Lenovo server solutions. XClarity Administrator provides agent-free hardware management for Lenovo servers and the Flex System, including the Flex System Chassis Management Module, x86 compute nodes, and I/O modules. The virtual appliance offers out-of-band, agentless management, which can mean managed endpoints do not need special software agents, driver installation, or maintenance. One of the key benefits to being agentless means XClarity Administrator can remove operating system (OS) dependency, potentially simplifying the workload stack. For more information on XClarity Administrator and Flex System, see Appendix A. In our datacenter, we tested three resource-management use cases: Compute node configuration Deployment of VMware ESXi to bare-metal compute nodes Updating firmware of system components We recorded the time and steps to complete each use case for the manual approach and the automated approach with XClarity Administrator. We configured our Flex System solution using the methods and best practices described in relevant documentation. For detailed configuration information of the test systems, see Appendix B. For detailed steps on how we tested, see Appendix C.
- 3. A Principled Technologies test report 3Faster and more efficient system management with Lenovo XClarity Administrator WHAT WE FOUND Administrator time is valuable, and saving time through automation can create opportunities for administrators to focus on other important initiatives. Lenovo XClarity Administrator provided significant time savings by automating routine administrative tasks. We found administrators could save up to 58 minutes using XClarity Administrator in our three use cases compared to executing the same tasks using the Flex System built-in management portal. Overall, using XClarity Administrator took 95 percent less time and 75 percent fewer steps than the manual approach. Figure 1 shows the time and steps for each use case. Automated with XClarity Administrator Manual Time (h:mm:ss) Steps Time (h:mm:ss) Steps Creating and applying configuration patterns/profiles 0:00:51 12 0:04:17 31 Deploying VMware ESXi to bare-metal nodes 0:01:39 7 0:28:59 30 Acquiring and applying firmware updates 0:00:30 6 0:27:45 39 Total for all use cases 0:03:00 25 1:01:01 100 Figure 1: Time and steps for the two hardware management approaches in each use case. Lower numbers are better. Simple discovery and inventory of Flex System chassis & nodes Using Lenovo XClarity Administrator, we found that the automated discovery and inventory process of Flex System components to be simple and effective. We first plugged in and logged in to the XClarity Administrator console. XClarity Administrator automatically discovered the chassis, making it available for us to manage. Automating the initial discovery and inventory of a new Flex System infrastructure can help IT staff promptly identify components requiring deployment or installation, thereby decreasing the time to value (TtV) of each component. Figure 2 shows the Lenovo XClarity Administrator dashboard. After Lenovo XClarity Administrator gathers your discovered endpoints into an inventory, IT staff can view the inventory and the status of any component at a glance.
- 4. A Principled Technologies test report 4Faster and more efficient system management with Lenovo XClarity Administrator Figure 2: The Lenovo XClarity Administrator dashboard displaying components of our Flex System solution. Faster server configuration The Lenovo XClarity Administrator interface allowed us to create configuration templates called patterns, and to use the patterns to configure multiple nodes simultaneously. Configuration patterns let your administrators see which nodes have configurations, apply patterns to the ones that need them, and then attend to other matters in the datacenter. Applying configurations en masse, as opposed to individually, can additionally help reduce the possibility of human error. Compared to the manual approach, we found that automated configuration using XClarity Administrator reduced the time to configure the compute node by 80 percent. Saving time on configuration means your administrators can move on to installing the operating system or hypervisor, updating firmware, or performing other critical tasks sooner. In addition to requiring less time, XClarity Administrator required 19 fewer steps compared to manually configuring compute nodes. Figure 3 shows the amount of time both approaches needed to configure one node; Figure 4 shows the number of steps.
- 5. A Principled Technologies test report 5Faster and more efficient system management with Lenovo XClarity Administrator Figure 3: The time each approach took to configure a Flex System node. Lower numbers are better. Figure 4: The number of steps each approach needed to configure a Flex System node. Lower numbers are better. Faster deployment of VMware ESXi to bare-metal nodes Lenovo XClarity Administrator automates deployment of VMware ESXi, Microsoft® Windows Server® including Hyper-V®, or Red Hat® Enterprise Linux® including KVM to bare-metal compute nodes or servers. Administrators can deploy the operating system or hypervisor onto a single node or onto multiple nodes simultaneously using XClarity Administrator. We tested deployment of VMware ESXi to a bare-metal compute node. XClarity Administrator did not require an external file server or the use of software-based consoles to manage the installation. This means administrators using XClarity Administrator can import the ISO image, select the endpoints for deployment, and then execute the deployment job.
- 6. A Principled Technologies test report 6Faster and more efficient system management with Lenovo XClarity Administrator Deploying VMware ESXi to the compute node took 27 minutes and 20 seconds less with XClarity Administrator than by manually doing so—a time savings of 94 percent. With faster VMware ESXi deployment, your administrators could move on to other critical tasks sooner, such as deploying virtual machines. In addition to taking less time, using XClarity Administrator also took 23 fewer steps—7 steps compared to 30 steps with the manual approach. Figure 5 shows the amount of time it took with both approaches and Figure 6 shows the number of steps. Figure 5: The time each approach took to deploy VMware ESXi on the Flex System. Lower numbers are better. Figure 6: The number of steps each approach needed to deploy VMware ESXi on the Flex System. Lower numbers are better.
- 7. A Principled Technologies test report 7Faster and more efficient system management with Lenovo XClarity Administrator Figure 7 shows the Lenovo XClarity Administrator interface displaying endpoints available to accept OS or hypervisor deployment. Your administrators can quickly select the desired endpoints and then execute the deployment job. Figure 7: The Lenovo XClarity Administrator dashboard when deploying an OS image. Faster updates and firmware management The firmware update process with Lenovo XClarity Administrator saved 98 percent of the time compared to manually updating firmware, and required 33 fewer steps. Figure 8 shows the amount of time it took with both approaches, and Figure 9 shows the number of steps.
- 8. A Principled Technologies test report 8Faster and more efficient system management with Lenovo XClarity Administrator Figure 8: The time each approach needed to complete the update process for the Flex System. Lower numbers are better. Figure 9: The number of steps each approach needed to complete the update process on the Flex System. Lower numbers are better. Figure 10 shows the Lenovo XClarity Administrator interface displaying the available endpoints that can receive firmware updates. Similar to deploying an OS or hypervisor, your administrators can quickly select the desired endpoints to update and then execute the update job.
- 9. A Principled Technologies test report 9Faster and more efficient system management with Lenovo XClarity Administrator Figure 10: The Lenovo XClarity Administrator dashboard when applying firmware updates. CONCLUSION We found that automating provisioning tasks with Lenovo XClarity Administrator saved over 58 minutes total across three use cases—a total time savings of 95 percent—and required 75 percent fewer total steps. Specifically, configuring a compute node required 80 percent less time and 19 fewer steps; deploying VMware ESXi to a bare-metal node required 94 percent less time and 23 fewer steps; and updating firmware required 98 percent less time and 33 fewer steps using XClarity Administrator compared to manually executing these tasks. Automating processes for your Lenovo Flex System chassis and nodes can mean less required time and labor from your administrators. This can translate to simplifying their day and allowing them to devote more time to other projects and sooner than anticipated.
- 10. A Principled Technologies test report 10Faster and more efficient system management with Lenovo XClarity Administrator APPENDIX A – ABOUT THE COMPONENTS About Lenovo XClarity Administrator Designed to integrate into Lenovo servers and the Flex System converged infrastructure platform, Lenovo XClarity Administrator is a hardware resource-management solution that can simplify and automate infrastructure tasks. Lenovo XClarity Administrator features an intuitive graphical user interface (GUI); automated firmware, and configuration management, and deployment of operating systems and hypervisors to bare-metal servers and compute nodes; support for integration into various external, higher level management, automation, and orchestration tools through REST APIs; and control over hardware resources through scripting and commands by using Microsoft Windows PowerShell®. Learn more at shop.lenovo.com/us/en/servers/thinkserver/system-management/xclarity/. About the Lenovo Flex System The Flex System is the next generation of blade technology that offers potentially greater performance, bandwidth, and ability to consolidate and virtualize than previous systems. At the center of the Flex System is the Flex System Enterprise Chassis, which enables high-speed performance with integrated servers and networking. According to Lenovo, the flexible design of this system lets it meet the needs of varying workloads with independently scalable IT resource pools for higher utilization and lower cost per workload. Learn more at www.redbooks.ibm.com/abstracts/tips0863.html.
- 11. A Principled Technologies test report 11Faster and more efficient system management with Lenovo XClarity Administrator APPENDIX B – SYSTEM CONFIGURATION INFORMATION Figure 11 provides detailed configuration information for the test systems. System Lenovo Flex System x440 Compute Node-7917 Lenovo Flex System x240 Compute Node-8737 General Number of processor packages 4 2 Number of cores per processor 4 4 Number of hardware threads per core 2 2 System power management policy Default Default CPU Vendor Intel® Intel Name Intel Xeon® Processor Intel Xeon Processor Model number E5-4603 E5-2680 Stepping M1 C1 Socket type FCLGA2011 FCLGA2011 Core frequency (GHz) 2.0 2.7 Bus frequency 6.4 GT/s 8 GT/s L1 cache 128 KB 128 KB L2 cache 256 KB 256 KB L3 cache 10 MB 20 MB Platform Vendor and model number Lenovo Flex System® x440 Compute Node-7917 Lenovo Flex System x240 Compute Node-8737 Motherboard model number 88Y6237 95Y4788 BIOS name and version CNE136SUS / 1.30 (Nov 8, 2013) B2E136TUS / 1.40 (Nov 12, 2013) BIOS settings Default Default Memory modules Total RAM in system (GB) 192 32 192 Vendor and model number HMT31GR7CFR4C-PB HMT351R7CFR8C- PB HMT31GR7CFR4C- PB Type PC3-12800R PC3-12800R PC3-12800R Speed (MHz) 1600 1600 1600 Speed running in the system (MHz) 1600 1600 1600 Size (GB) 8 4 8 Number of RAM module(s) 24 8 24 Rank 2Rx4 2Rx8 2Rx4 Hypervisor Name VMware ESXi 5.5 VMware ESXi 5.5 Language English English
- 12. A Principled Technologies test report 12Faster and more efficient system management with Lenovo XClarity Administrator System Lenovo Flex System x440 Compute Node-7917 Lenovo Flex System x240 Compute Node-8737 Hard drives Vendor and model number 90Y8876 42C0529 Number of drives 2 2 Size (GB) 600 200 RPM 10,000 N/A Type SAS SSD Expansion card Name Lenovo Flex System FC3052 2-port 8Gb FC Lenovo Flex System FC3052 2-port 8Gb FC Firmware version 2.01A11 (Nov 15, 2012) 2.01A11 (Nov 15, 2012) Figure 11: System configuration information for the test systems.
- 13. A Principled Technologies test report 13Faster and more efficient system management with Lenovo XClarity Administrator APPENDIX C – HOW WE TESTED Discovery and inventory of Flex System chassis and compute nodes Discovery and inventory using Lenovo XClarity Administrator 1. Log on to the Lenovo XClarity Administrator console. 2. In the Lenovo XClarity Administrator console, click Hardware. 3. Click Discover and Manage New Devices. 4. In the Discover and Manage New Devices screen, select the chassis that appears and click Manage Selected. 5. In the Manage window, input the username, password, and recovery password, and click Manage. 6. In the Manage Chassis window, click OK after the XClarity Administrator finishes connecting to the chassis. 7. When given the option, select Continue to Chassis Configuration. 8. In the Initial Chassis Configuration screen, select Validate Chassis and Component IP Settings. Creating and applying configuration patterns to Flex System compute nodes Creating and applying configuration patterns using Lenovo XClarity Administrator 1. Log on to the Lenovo XClarity Administrator console. 2. In the Lenovo XClarity Administrator console, click Provisioning. 3. Click Patterns. 4. In the Configuration Patterns: Patterns window click the Create a new pattern button. 5. In the New Server Pattern Wizard window, click Create a new pattern from scratch. 6. Make sure the Form Factor is Flex Computer Node, write a name, and click Next. 7. In the Local Storage tab, choose the following options: Disk Type: Any type (try HDD first) Raid Level: RAID 1 (Mirroring) Number of drives: 2 Then click Next. 8. In the I/O Adapters tab, click Add I/O Adapter. 9. In the Add I/O Adapter window, select the following options: PCI Slot 2 Flex System FC3052 2-port 8Gb FC Adapter Then click Add. 10. Click Next. 11. Leave the option on Keep existing boot mode and click Next. 12. Choose Extended UEFI: x240 Virtualization and click Save and Deploy. 13. In the Deploy Server Pattern window, select your server and click Deploy. Creating and applying configuration patterns manually 1. Log on to the Chassis Management Module console. 2. In the Chassis screen, click the server you want to use for your first install. 3. In the Actions for your server window on the right, click Launch Compute Node Console. 4. In the Launch Node Console popup, click Launch. 5. In the new tab created, click Start remote control in single-user mode. 6. When asked if you want to run the console, click Yes. 7. Click continue at the Security Warning prompt. 8. In the Do you want to run this application window, click Run. 9. In the Warning - Security window, click Continue. 10. In the Video Viewer window, select Tools → Power → On. 11. When prompted during the boot, hit F1 to enter setup. 12. Select System Settings and press Enter.
- 14. A Principled Technologies test report 14Faster and more efficient system management with Lenovo XClarity Administrator 13. In System Settings, select Storage and press Enter. 14. In Storage, select LSI SAS2 MPT Controller and press Enter. 15. In LSI SAS2 MPT Controller Configuration, press Enter. 16. In Configuration Options, select Controller Management and press Enter. 17. In Controller Management, select Create Configuration and press Enter. 18. In Controller Management → Create Configuration, choose the following settings: Select RAID level: RAID 1 Select Physical Disks: Check All Apply Changes And press Enter. 19. In Message, check Confirm, select Yes, and press Enter. 20. In Configuration Options, press Escape. 21. In LSI SAS2 MPT Controller Configuration, press Escape. 22. In Storage, select LSI SAS2 MPT Controller and press Escape. 23. In System Settings, select Operating Modes and press Enter. 24. In Operating Modes, choose the following settings: Choose Operating Mode: Custom Mode Memory Speed: Max Performance Memory Power Management: Disable Proc Performance States: Enable C1 Enhance Mode: Disable QPI Link Frequency: Max Performance Turbo Mode: Enable CPU C-States: Disable Power/Performance Bias: Platform Controlled Platform Controlled Type: Maximum Performance And press Escape. 25. In System Settings, select Memory and press Enter. 26. In Memory, change Patrol Scrub to Disable and press Escape. 27. In System Settings, select Devices and I/O Ports and press Enter. 28. In Devices and I/O Ports, change MM Config Base to 3GB and press Escape. 29. In System Settings, press Escape. 30. In System Configuration and Boot Management, press Escape. 31. When prompted, press Y to save your changes. Deploying bare-metal version of VMware ESXi to Flex System chassis and compute nodes Deploying bare-metal ESXi using Lenovo XClarity Administrator 1. Log on to the Lenovo XClarity Administrator console. 2. In the Lenovo XClarity Administrator console, click Provisioning. 3. Click Deploy OS Images. 4. On your first server, click on the Edit button under Network Settings. 5. In the Edit Network Settings button, enter the host name and IP information and click OK. 6. Repeat steps 4 and 5 for the next two servers. 7. Check all servers’ checkboxes, make sure that the image to deploy is the provided ESXi image, and then click Deploy Images. 8. At the deployment confirmation screen, double-check everything is set up the way you want and click Deploy. Deploying bare-metal ESXi using Lenovo Chassis Management Module 1. Log onto the Chassis Management Module console. We used the following settings:
- 15. A Principled Technologies test report 15Faster and more efficient system management with Lenovo XClarity Administrator IP address: 10.128.115.50 Username: admin (or USERID; try admin first) Password: Password1 2. In the Chassis screen, click the server you want to use for your first install. 3. In the Actions for your server window on the right, click Launch Compute Node Console. 4. In the Launch Node Console popup, click Launch. 5. In the new tab created, click Start remote control in single-user mode. 6. When asked if you want to run the console, click Yes. 7. Click continue at the Security Warning prompt. 8. In the Do you want to run this application window, click Run. 9. In the Warning - Security window, click Continue. 10. In the Video viewer, select Virtual Media → Activate. 11. Select Virtual Media → Select Devices to Mount. 12. In the Select Devices to Mount window, click Add Image. 13. In the Open window, select your ESX ISO, and click Open. 14. Check the ESX ISO you added, and click Mount Selected. 15. Reboot the server. 16. During the POST, press F12 to select boot device. 17. Select your mounted ISO and press Return. 18. In the introduction screen, press Return. 19. In the EULA screen, press F11. 20. In the Select a Disk to Install or Upgrade screen, select your disk and press Return. 21. In the Please select a keyboard layout screen, select your keyboard layout and press Enter. 22. Enter your root password and press Enter. 23. In the Confirm Install screen, press F11. 24. At the Installation Complete screen, press Enter. 25. Hit F2 to login. 26. Navigate to Configure Management Network and press Enter. 27. Navigate to IP Configuration and press Enter. 28. Choose your IP address in the IP Configuration window and press Enter. 29. Hit Escape to exit the Configure Management Network window. 30. In the Configure Management Network: Confirm window, press Y to confirm. Acquiring and applying firmware updates to Flex System nodes Applying firmware updates using Lenovo XClarity Administrator 1. Log on to the Lenovo XClarity Administrator console. 2. In the Lenovo XClarity Administrator console, click Provisioning. 3. Click Apply / Activate. 4. In the Firmware Updates: Apply / Activate screen, check all units, change their assigned policy to the policy you created, and click Perform Updates. 5. In the Update summary, select the following options: Update Rule: Stop all updates on error Activation Rule: Immediate activation 6. Click Perform Update. 7. If you get a confirmation window warning you that the endpoint might be restarted, click OK. Applying firmware updates using Lenovo Chassis Management Module 1. Download the Bootable Media Creator. 2. Run the Bootable Media Creator.
- 16. A Principled Technologies test report 16Faster and more efficient system management with Lenovo XClarity Administrator 3. In the Welcome screen, click Next. 4. In Media Purpose, choose Updates and click Next. 5. In Acquire Location, choose Check the website, and make sure that UpdateXpress System Packs is selected, then click Next. 6. In HTTP Proxy, enter your proxy settings and click Next. 7. In Targeted Systems, choose your system and click Next. 8. In Target Directory, choose your directory and click Next. 9. In Media Format, leave the device type as CD/DVD, name your image file and click Next. 10. In Unattended Mode Configuration, choose Do not use unattended mode and click Next. 11. In Confirm Choices, click Next. 12. In Creation Progress, click Next once the bootable media has been created. 13. In Finish, click Finish. 14. Log on to the Chassis Management Module console. 15. In the Chassis screen, click the server you want to use for your first install. 16. In the Actions for your server window on the right, click Launch Compute Node Console. 17. In the Launch Node Console popup, click Launch. 18. In the new tab created, click Start remote control in single-user mode. 19. When asked if you want to run the console, click Yes. 20. Click continue at the Security Warning prompt. 21. In the Do you want to run this application window, click Run. 22. In the Warning - Security window, click Continue. 23. In the Video viewer, select Virtual Media → Activate. 24. Select Virtual Media → Select Devices to Mount. 25. In the Select Devices to Mount window, click Add Image. 26. In the Open window, select your update ISO and click Open. 27. Check the update ISO you added and click Mount Selected. 28. Reboot the server. 29. During the POST, press F12 to select boot device. 30. Select your mounted ISO and press Return. 31. In Welcome to ToolsCenter, click Updates. 32. In Updates, click Click here to start update. 33. In Software License Agreement, click I accept the terms in the license agreement. 34. In Update Recommendation, click the checkbox to update everything, and click Next. 35. In Update Options, accept defaults and click Next. 36. In Running updates, click Next. 37. In Complete, click Finish. 38. In Updates, click Exit. 39. Click OK.
- 17. A Principled Technologies test report 17Faster and more efficient system management with Lenovo XClarity Administrator ABOUT PRINCIPLED TECHNOLOGIES Principled Technologies, Inc. 1007 Slater Road, Suite 300 Durham, NC, 27703 www.principledtechnologies.com We provide industry-leading technology assessment and fact-based marketing services. We bring to every assignment extensive experience with and expertise in all aspects of technology testing and analysis, from researching new technologies, to developing new methodologies, to testing with existing and new tools. When the assessment is complete, we know how to present the results to a broad range of target audiences. We provide our clients with the materials they need, from market-focused data to use in their own collateral to custom sales aids, such as test reports, performance assessments, and white papers. Every document reflects the results of our trusted independent analysis. We provide customized services that focus on our clients’ individual requirements. Whether the technology involves hardware, software, websites, or services, we offer the experience, expertise, and tools to help our clients assess how it will fare against its competition, its performance, its market readiness, and its quality and reliability. Our founders, Mark L. Van Name and Bill Catchings, have worked together in technology assessment for over 20 years. As journalists, they published over a thousand articles on a wide array of technology subjects. They created and led the Ziff-Davis Benchmark Operation, which developed such industry-standard benchmarks as Ziff Davis Media’s Winstone and WebBench. They founded and led eTesting Labs, and after the acquisition of that company by Lionbridge Technologies were the head and CTO of VeriTest. Principled Technologies is a registered trademark of Principled Technologies, Inc. All other product names are the trademarks of their respective owners. Disclaimer of Warranties; Limitation of Liability: PRINCIPLED TECHNOLOGIES, INC. HAS MADE REASONABLE EFFORTS TO ENSURE THE ACCURACY AND VALIDITY OF ITS TESTING, HOWEVER, PRINCIPLED TECHNOLOGIES, INC. SPECIFICALLY DISCLAIMS ANY WARRANTY, EXPRESSED OR IMPLIED, RELATING TO THE TEST RESULTS AND ANALYSIS, THEIR ACCURACY, COMPLETENESS OR QUALITY, INCLUDING ANY IMPLIED WARRANTY OF FITNESS FOR ANY PARTICULAR PURPOSE. ALL PERSONS OR ENTITIES RELYING ON THE RESULTS OF ANY TESTING DO SO AT THEIR OWN RISK, AND AGREE THAT PRINCIPLED TECHNOLOGIES, INC., ITS EMPLOYEES AND ITS SUBCONTRACTORS SHALL HAVE NO LIABILITY WHATSOEVER FROM ANY CLAIM OF LOSS OR DAMAGE ON ACCOUNT OF ANY ALLEGED ERROR OR DEFECT IN ANY TESTING PROCEDURE OR RESULT. IN NO EVENT SHALL PRINCIPLED TECHNOLOGIES, INC. BE LIABLE FOR INDIRECT, SPECIAL, INCIDENTAL, OR CONSEQUENTIAL DAMAGES IN CONNECTION WITH ITS TESTING, EVEN IF ADVISED OF THE POSSIBILITY OF SUCH DAMAGES. IN NO EVENT SHALL PRINCIPLED TECHNOLOGIES, INC.’S LIABILITY, INCLUDING FOR DIRECT DAMAGES, EXCEED THE AMOUNTS PAID IN CONNECTION WITH PRINCIPLED TECHNOLOGIES, INC.’S TESTING. CUSTOMER’S SOLE AND EXCLUSIVE REMEDIES ARE AS SET FORTH HEREIN.