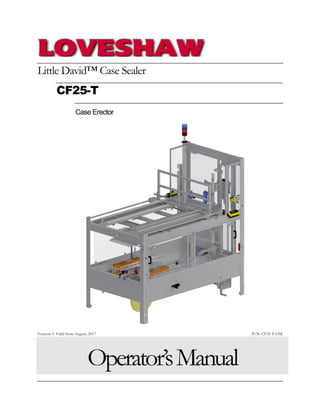
Little DavidTM CF25-T Case Sealer Operator's Manual
•
1 j'aime•687 vues

The document provides operating instructions for the Little David CF25-T case erector. It describes how to set up the machine for different box sizes and load blanks into the hopper. The main sections of the machine are also outlined, including the hopper, vertical feed assembly, box opening assembly, flap folder assembly, and cartridge. Safety instructions and a maintenance schedule are also provided.

Recommandé
Contenu connexe
Tendances
Tendances (20)
Similaire à Little DavidTM CF25-T Case Sealer Operator's Manual
Similaire à Little DavidTM CF25-T Case Sealer Operator's Manual (20)
Plus de Pyramid Packaging Inc.
Plus de Pyramid Packaging Inc. (20)
Dernier
Dernier (20)
Little DavidTM CF25-T Case Sealer Operator's Manual
- 1. Little David™ Case Sealer CF25-T Case Erector Version: I Valid from August, 2017 P/N: CF25-T-OM Operator’sManual
- 2. i Little David™ CASE ERECTOR CF25-T Operation Copyright Loveshaw Loveshaw, Inc. 2206 Easton Turnpike, PO. Box 83 South Canaan, PA 18459 Tel: 1-800-962-2633 • 570-937-4921 Fax: 570-937-4016 o es a co Loveshaw Europe Unit 1 Newton Park West Portway Industrial Estate Andover, Hampshire SP10 3SH ENGLAND Tel: 264-357511 Fax: 264-355964
- 3. ii The information contained in this manual is correct and accurate at the time of its publication. LOVESHAW reserves the right to change or alter any information or technical specifications at any time and without notice. ©2016 LOVESHAW. All rights reserved Printed in the United States of America
- 4. iii CONTENTS Introduction...........................................................................................................1 Operating Safety....................................................................................................2 Instructions.................................................................................................................. 2 Warnings ...................................................................................................................... 3 Cautions ....................................................................................................................... 3 Safety Devices Functional Testing............................................................................ 4 Overview................................................................................................................6 Case Sealer Sections.................................................................................................... 6 Machine Specifications............................................................................................... 7 Installation.............................................................................................................9 Section 1: Placing the Machine.................................................................................. 9 Section 2: Important Considerations...................................................................... 10 Theory of Operation............................................................................................ 11 Operating Procedures .........................................................................................13 Set Up Procedure...................................................................................................... 13 Loading the Hopper ................................................................................................. 18 Start-Up Procedure................................................................................................... 18 Sequence of Operation............................................................................................. 19 Shut-Down Procedure.............................................................................................. 20 Maintenance........................................................................................................21 Servicing Chain on Main Drive Assembly............................................................. 21 CF25-T Preventative Maintenance Schedule ........................................................ 23 Spare Parts ................................................................................................................. 25 Troubleshooting..................................................................................................27 Preliminary Checks ................................................................................................... 27 Using Test Mode to Troubleshoot Machine ......................................................... 27 Checking Solenoid Valves........................................................................................ 27 Checking PLC Inputs and Outputs........................................................................ 28 Tape Cartridge and Taping Issues .......................................................................... 28
- 5. iv Warranty............................................................................................................ 32 Assembly Drawings and Schematics ................................................................ 33 Electrical Drawings and Schematics ................................................................ 56 Global Drawings..........................................................................................................56 120 Volt Specific Drawings........................................................................................57 240 Volt, CE Compliant Specific Drawings............................................................65 240 Volt, Non CE Compliant Specific Drawings ..................................................74 Available Special Options ................................................................................. 82 Optional Sensor Part Numbers.................................................................................82
- 6. 1 INTRODUCTION hank you for purchasing the Little David™ case erector, the CF25-T. The CF25-T is an automatic case erector and bottom sealer. The CF25-T is a robust built 24/7 case erector constructed of quality materials, bearings, pneumatic and electrical components. All employees who will be required to operate and maintain the case erector must read this manual to ensure safe operation as well as proper set-up and maintenance throughout the life of the machine. After reading this manual, you will know how to perform the following functions: How to install the machine. How to operate the machine safely. Troubleshooting and replacing of worn or defective parts. Throughout this manual there are several illustrations designed to help you perform the variety of tasks described. Chapter 1 T
- 7. 2 OPERATING SAFETY his manual contains operator information for Little David Application Equipment. It is directed toward the person who operates and maintains the machine. Read through the manual completely before operating the machine. Thereafter, refer to it as necessary. Take special note of all warnings, cautions, and maintenance instructions. Like any other piece of equipment, the Little David Case Erector functions best when maintained and used correctly. Observe the warnings and cautions below when using the Little David CF25-T case sealer. Within this manual, on page 5, all safety labels are depicted with location and part numbers. If a safety, label is missing or not legible it must be replaced immediately. Failure to follow safety labels can lead to injury or damage to the machine. Instructions Instructions are requirements to system operations. Instruction: An electrical receptacle must be located near the machine. The line cord connection to the receptacle is the disconnect means for the machine. The receptacle must be located in an area that is easily accessible to all personnel. Chapter 2 T
- 8. 3 Warnings Warnings help prevent potential bodily injury. Warning: This machine is equipped with moving parts. Do not place hands in the machine when parts are moving. Always use a roller-type exit conveyor, and always remove boxes after they clear the exit end of the machine. Warning: Always disconnect all sources of energy to the machine before performing maintenance. Sources of energy include but are not limited to electrical and pneumatic. Refer to your company’s lock out tag out procedures. Warning: Never bypass or remove safety guards from the machine or tape cartridge. Warning: Never override safety devices such as Emergency Stop switches. Warning: Never adjust the machine or tape cartridges when the machine is operating. Warning: Never place hands or body inside confines of the machine unless all power sources are locked out. Warning: Never wear jewelry, loose clothing, such as ties, scarves etc. and long hair must be pulled back when operating this machine. Warning: Never pull a jammed box out of the machine while it is in operation. Warning: Use caution when near cartridge knife or when threading tape. The knife is very sharp, automatically operated and linked to the wipe-down rollers. Warning: Do not attempt to open or work on the electrical box, junction boxes, or other electrical components without first disconnecting power to the machine. Shock hazard exists if the power is not disconnected. Cautions Cautions help prevent potential machine damage. Caution: Provide and use proper electrical power. Caution: Do not operate, maintain, or otherwise use this machine, except as described in this manual.
- 9. 4 Safety Devices Functional Testing It is necessary to test the functionality of the safety devices at regular time intervals. The safety emergency stop function must be tested daily before each and every shift of operation. The procedure for testing the emergency stop function is as follows: 1. Connect the machine to the main electrical power source. 2. De-press the emergency stop pushbutton on the main electrical enclosure. 3. Press the start pushbutton on the main enclosure. If the machine does not start proceed to the next step. If the machine does start unplug it from the main electrical power source and report it to your supervisor. This machine cannot be used until a qualified technician corrects the issue. 4. Reset the estop pushbutton to its extended state. Push the start pushbutton the machine should start. With the machine running de-press the emergency stop pushbutton, the machine should now stop. This confirms that the emergency stop function is working correctly. 5. Test all E-Stops on the machine separately. The overload motor relay must be tested every three months to confirm its operation. This test can only be performed by a qualify technician since it requires the enclosure door to be opened. 1. Connect the machine to the main electrical power source. 2. Insure that the emergency stop pushbutton is fully extended. 3. De-press the machine start pushbutton. The machine drive motor should start at this time. 4. Open the main electrical enclosure. Use extreme caution not to contact any live conductors. 5. Locate the overload relay and de-press the red test button on the front of the unit. The machine should stop. If the machine does not stop the overloads relay is defective and needs to be changed out. If the machine stops the overload relay passes the functionality test. 6. Install the main enclosure cover and secure all (4) screws. Never operate a machine that does not pass the safety functional testing! Report it to management and have the machine taken out of service until the deficiency is corrected.
- 11. 6 OVERVIEW Case Sealer Sections This manual covers several parts of the machine. The following diagram identifies the some key sections of the machine. Chapter 3 Vertical Feed Assembly Box Opening Assembly Hopper Assembly Flap Folder Assembly Sled Assembly Main Drive Assembly Machine Guard Assembly Assembly Cartridge
- 12. 7 Machine Specifications Machine dimensions: Height: 75.75” Length : 75.13” Width: 43.25” Standard Discharge Height: 23” Weight: 1100 lb. uncrated Electrical Requirements: Standard Voltage: 120/1/60 with 15 amp dedicated service. Operating speed: Cases per Minute: 10 for standard machines (up to 15 cpm options available) Air Requirement: 14 SCFM @ 85 psi – Maximum throughput based on maximum box range. Machine box capacity: Length: 6” to 16” Width: 6” to 14” Height: 4” to 12”
- 13. 8 Machine Options: Spare Parts Kit Special Electronics Custom Color Casters Low Tape Alarm Low Hopper Alarm Box Jam Alarm Leg Extensions High Speed (12, 14, & 15)
- 14. 9 INSTALLATION lways check for any signs that the machine may have been damaged before fully removing it from the shipping skid. If machine arrives damaged contact Loveshaw immediately to help in filing a claim with the shipping company. Exercise care when handling this machine, a sudden jolt or jar may cause serious damage. Do not remove the shipping skid until machine has been moved to a point of installation. The skid is designed for easy and safe handling of your machine. Section 1: Placing the Machine The case former is fully assembled and ready for operation. Step One: Carefully remove the machine from the shipping skid. Remove all fasteners and brackets holding the machine to the skid. Step Two: Transfer the machine from the shipping skid to the factory floor by lifting it with a fork lift. Approach the machine from the side and carefully position the forks under the frame. Locate the forks in the center on the machine, so that they lift on the main frame flanges. Take care that the forks do not lift on any sub- assemblies as they may be damaged by the force. Take care removing the machine from the skid as it weighs 1,100 pounds! Step Three: Use jack screws (1/2-13unc x 3” lg) in each leg to level the machine. Step Four: Connect compressed air and electricity to the machine. Connect air supply to an air source with a minimum line pressure of 85 psi. Chapter 4 A
- 15. 10 Step Five: Before starting the machine, load a new roll of tape on the cartridge and thread the tape according to the arrows on the unit. Step Six: For proper start-up procedure, see the start-up procedure section of this manual. Section 2: Important Considerations • A great deal of trouble may be caused if the current is supplied by lines which are not heavy enough. If this occurs, the controls cannot operate at their full capacity and overheating may result. A similar condition will exist if poor electrical connections are made. It is, therefore, worthwhile to make sure that everything is electrically correct. • Electrical polarity must be supplied to the machine exactly as shown on the electrical diagram. Power must be supplied to the L1 side of the circuit, and the L2 side will be neutral. • The compressed air supplied to the machine should be clean and dry, as the filter is only meant to remove minor particles or slight amounts of moisture in the air line. Dirt or moisture can cause erratic operation or failure of control valves.
- 16. 11 THEORY OF OPERATION he Machine E-Stop circuit is reset and the machine is started. All the cylinders go to their home position and the machine is ready to operate. Selector switch SS1 is set to Automatic mode which will allow the machine to operate continuously. With boxes loaded in the hopper and limit switches LS1 (Vertical blank trolley home) and LS4 (Blanks in hopper ready) the vacuum cups cylinder will extend into the hopper to contact a blank. Solenoid valve, SV5 will be energized. The vacuum generator connected to the vertical trolley vacuum cups will be enabled. This allows the vacuum cups to attach to the side wall of the box to be erected. Solenoid valve SV9 is energized. SV5 will be de-energized pulling the blank out of the hopper. Solenoid SV6 is energized and the vertical trolley will travel downwards towards the box opening area of the machine until finally reaching cylinder proximity switch Prox1. As the trolley is moving downward it will first trigger cylinder proximity switch Prox4. This will signal the vacuum cylinder to extend again to get the blank into positon to be opened. Solenoid valve SV5 will be energized. Chapter 5 T
- 17. 12 With the vertical trolley in position at Prox1, the box opening arm is rotated into positon, contacting the opposite side of the blank with a vacuum cup. Solenoid valve SV2 is energized and cylinder proximity switch Prox6 is triggered. When Prox6 is triggered vacuum is applied to the cup on the box opening arm. Solenoid SV8 is energized. With the blank being held on both sides with vacuum cups, the opening arm is rotated back to its home position making cylinder proximity switch Prox5. Solenoid valve SV2 is de-energized. With the box open the minor flap folders rotate upwards closing he flaps. Solenoid SV4 is energized. With the minor flaps folded, both of the vacuum generators are turned off. The open box is only being supported by the minor flap folders. Solenoid valves SV8 and SV9 are de-energized. The vacuum trolley moves up back to the hopper to get the next blank to be opened. At the same time the box pusher is waiting for a signal from photoelectric sensor PE2. When PE2 is triggered it verifies the lugs are in position to receive the erected box. Solenoid valve SV7 is energized. Then the box pusher cylinder extended proximity switch is made SV7 is de-energized and the pusher goes back to its home position. The open box is transferred by lugs that push the box by its rear panel. The major flaps are plowed upwards and tape is applied to the bottom of the box as it exits the machine. The cycle repeats.
- 18. 13 OPERATING PROCEDURES Set Up Procedure Determine the length, width and height (with flaps up) of box in inches (see diagram). Important: Use scales and yellow pointers. Due to changes in design for continual improvement, the set-ups depicted in the steps below might not be exact, but similarities should exist. Chapter 6
- 19. 14 1) Hopper, Near Side – Set equal to width. 2.A) Hopper, Far Side – Use the blank (flat box) to set position. Leave 1/4” of extra room. Pointer and Scale Lock- handle ¼” Gap Lock-handle
- 20. 15 2.B) 3rd Vacuum Cup – Adjust to widest position possible without cup hitting vertical box guide. Tighten lock knobs securely. 3) Vertical Trolley Stop – Set equal to width. Tighten securely. Lock-knob 3rd Cup Pointer and Scale Lock-handle
- 21. 16 4) Box Opening Arm – set equal to width (arm in open position). Adjust vacuum cup to land in center of major panel. 5) Flap Folder – Set to length. Pointer and Scale Lock Handle Crank Handle Pointer and Scale Vacuum Cup Vacuum Knob
- 22. 17 6) Lug Drive – Set to width. 7) Sled Height – set to erected box with top flaps up. 8) Run one box in step (manual) mode to verify settings Pointer and Scale Crank Handle Pointer and Scale Lock-knob
- 23. 18 Loading the Hopper 1) Make sure the hopper is correctly set up based on the outside dimensions of the erected box. a. The blanks must be loaded with the major panel toward the operator side when facing the vacuum cups. If the blanks are not loaded this way the box will jam in the forming section. 2) Lift the hopper gate handle and push it all the way back. 3) The easiest way to load the machine is to place full bundles in the hopper without removing the straps. The hopper will hold approximately 7 bundles of 25 blanks. 4) When the hopper is fully loaded, cut all the straps off the bundles and remove them. 5) Lift the gate handle and push the gate forward to provide light pressure on the blanks. 6) Blanks should be vertical and not leaning in any direction. a. The hopper can be reloaded without stopping the machine. 7) Support the blanks with one hand and slide the gate back with the other. 8) Take the last 5 or so blanks in the hopper and lean them toward the vacuum cups to support the remaining blanks. 9) Load full bundles in the hopper Start-Up Procedure 1) Close all guard doors and make sure all personnel are clear from machinery. 2) Turn on main air disconnect and electrical power. 3) Check that hopper is filled with blanks, and that tape cartridge is filled with tape. 4) Check that machine has been properly set-up to run the blanks that are loaded in hopper. 5) Re-set the emergency stop push button and turn selector switch to run position. 6) Depress machine start push button. Machine will begin to process boxes. 7) While in run mode the machine will continue to make boxes unless the downstream photo-eye is blocked or the hopper empties.
- 24. 19 Sequence of Operation 1) Initial condition of machine: hopper filled with blanks (boxes that are flat, as received). Emergency stop push button re-set, electrical and compressed air power turned on, machine mode selector switch turned on to run position, safety guards closed. 2) Depress the start push button. 3) The pneumatic soft-start valve will open allowing air to fill the system. The valve meters the flow of air so that components will move slowly to their home position without slamming. When the pressure in the machine equals the supply pressure the valve "latches in". This process should take between 3 to 4 seconds. If it does not latch in adjust the valve according to the instructions found in the trouble shooting section. After a count a 5 seconds, the plc will automatically start a cycle. 4) If not already in position, the hopper drive system will ratchet the gate forward, pushing the blanks until the limit switch is made. The (3) vacuum cups of the vertical case feeder will extend to contact the first blank in the hopper. 5) The vacuum system turns on causing the cups to securely grip the blank. The vacuum trolley pulls the blank downward into the forming area. 6) When the trolley reaches the bottom, vacuum is switched from the 3 rd (outer) cup to the cup on the box-opening arm. Simultaneously, the arm swings in to grip the major panel of the box. Immediately, the arm reverses direction and returns to the home position, causing the box to open. 7) As the box is held open by vacuum, the minor flap folders swing up and push the flaps up. After a short time, vacuum is automatically turned off and the box rests on the flap folders. The vacuum trolley rises to the home position, ready to extract the next blank. 8) When the lug-drive photo-eye is tripped by the passing chain-lug, the box transfer arm pushes the box forward into the lug drive system. As it does the major flaps come in contact with the folding bars causing the flaps to fold upward. Once the box is fully pushed into the lug drive, the transfer arm returns to its home position and the minor flap folders retract. 9) The lugs pick up the box just in front of the idler sprockets and move the box through the remainder of the folding bars and over the tape cartridge. The finished box is ejected onto either the standard dead plate or a customer supplied conveyor.
- 25. 20 Shut-Down Procedure Control Stop: 1) Turn selector switch to test position. Wait until machine finishes processing box. 2) Depress emergency stop push button. Emergency Stop: 1) Depress emergency stop push button. 2) Remove any unmade or jammed boxes before restarting machine.
- 26. 21 MAINTENANCE Safety: NEVER perform any maintenance on the CF25-T without first following your company’s LOCK OUT / TAG OUT procedures. Servicing Chain on Main Drive Assembly The CF25-T has a dual spring chain tensioner on either side of the main drive assembly. For the convenience of servicing the chain, the tensioned sprocket mounts were designed with a clearance hole, which aligns with a threaded hole on the main drive. NOTE: A 5/16-18 x 3” bolt will be required. This is not provided with the CF25-T. 1. Locate the clearance hole on the side of the main drive that you wish to service. Insert 5/16-18 x 3” bolt and begin to thread it into the hole. (See Figures 1 and 2 below.) 2. Tighten the bolt to release the desired amount of tension from the chain. 3. Leave bolt tightened in place while the chain is serviced. 4. Once the chain has been serviced and returned to its proper position, unthread the bolt to apply full tension to the chain. 5. Be certain to fully remove the main drive before running the machine. Chapter 7
- 27. 22 Figure 1. Inserting bolt into clearance hole. Figure 2. Tightening bolt to compress tensioner springs. Clearance Hole 5/16-18 x 3” Bolt Threaded Hole
- 28. 23 CF25-T Preventative Maintenance Schedule Follow the PM chart below according to the specified time intervals to maintain and enhance machine functionality and longevity. Frequency: Weekly Monthly Pneumatic Components 1. Inspect air filter and drain. 2. Inspect and clear the vacuum generator and the (3) in-line vacuum filters. 3. Make sure flow controls are set properly and locked. 4. Inspect the vacuum cups for damage. (If a cup is damaged, vacuum will be reduced in the remaining cups.) 5. Make sure vacuum lines are free from debris. 6. Make sure the regulator is set to 80 psi. 1. Inspect components and air lines for leaks. 2. Inspect cylinders for wear, damage, or excessive noise. Mechanical Components 1. Make sure all nuts and bolts are on tight. 2. Check chain tension on motor chain and lug drive. ( Lug chains are automatically tensioned by spring loaded idlers. If excessive slack is present, chains should be replaced along with the sprockets and tensioning springs.) 3. Check all bearings and bushings for wear. 4. Check chain lugs for alignment. The face of the lug plates should be parallel. If necessary, adjsust by loosening the B-LOC bushing found under the left side chain guard. See the following page for detailed instructions on the B- LOC. 1. Check all sprockets and chains for wear. 2. Make sure the set screws in the sprockets are tight. 3. Check sprocket and chain alignment of the chain-lug system. Note: Both the gear reducer and the right angle gear boxes are filled by the manufacturer with permanent lubrication and no maintenance is required. Photo Eyes 1. Clean Face
- 29. INSTALLATION AND REMOVAL INSTRUCTIONS FOR B-LOC® KEYLESS BUSHING SERIES B109 B-LOC® Keyless Bushings provide a high capacity, zero-backlash shaft/hub or coupling connection by means of a mechanical interference ¿t. Please follow these INSTALLATION AND REMOVAL INSTRUCTIONS carefully to ensure proper performance of this B-LOC® unit. L WARNING L When installing or removing B-LOC® products, always adhere to the following safety standards: 1. Be sure that all power switches are locked out before installing or removing B-LOC® products. 2. Eye protection is required when installing or removing B-LOC® products - please wear safety glasses and protective clothing. LOCKING SCREW SIZES AND SPECIFIED TIGHTENING TORQUE Ma Figure 1 1/4" or 6 mm 38 M 4 3 5/16" or 8 mm to 3/4" or 19 mm 42.5 M 4 3 7/8" or 20 mm to 1-3/8" or 35 mm 87 M 5 4 Figure 2 Tightening Torque Ma (in-lbs) Hex Key Size (mm) Screw Size Size INSTALLATION (Refer to Figure 1) B-LOC® Mini Series B109 Keyless Bushings are supplied lightly oiled and ready for installation. They are self-centering and ¿t straight-thru hub bores. Note that the extended Àange on Series B109 units results in an axially ¿xed hub position during assembly. When reinstalling a used unit, make sure that all slits are aligned. The frictional torque capacity of these devices is based on a coef¿cient of friction of 0.12 for lightly oiled screw, taper, shaft and bore contact areas. Therefore, it is important not to use Molybdenum Disul¿de (e.g., Molykote, Never-Seeze or similar lubricants) in any Keyless Bushing installation. 1. Make sure that locking screw, taper, shaft and bore contact areas are clean and lightly oiled and that all collar slits are aligned. 2. Loosen all locking screws by a minimum of four (4) turns and transfer at least three (3) screws into push-off threads in order to keep Parts 1 and 2 separated during assembly (see Figure 2). 3. After inserting Keyless Bushing into hub bore, relocate locking screw(s) used for separating Parts 1 and 2. 4. Hand tighten locking screws and con¿rm that collar Item 1 is parallel and in full contact with face of part to be attached to shaft. 5. Use torque wrench and set it approximately 5% higher than speci¿ed tightening torque Ma. Tighten locking screws in either a clockwise or counterclockwise sequence (it is not necessary to tighten in a diametrically opposite pattern), using only 1/4 (i.e., 90°) turns for several passes until 1/4 turns can no longer be achieved. 6. Continue to apply overtorque for 1 to 2 more passes. This is required to compensate for a system-related relaxation of locking screws since tightening of a given screw will always relax adjacent screws. Without overtorquing, an in¿nite number of passes would be needed to reach speci¿ed tightening torque. 7. Reset torque wrench to speci¿ed torque (Ma) and check all locking screws. No screw should turn at this point, otherwise repeat Step 6 for 1 or 2 more passes. It is not necessary to re-check tightening torque after equipment has been in operation. NOTE: The torque capacity of these units can be increased by approximately 25% by thoroughly cleaning the shaft and Keyless Bushing bore of any lubricant. In applications subject to extreme corrosion, the slits in all collars should be sealed with a suitable caulking compound or equivalent. Likewise, push-off threads should be protected from corrosion. INSTALLATION OF B-LOC® KEYLESS BUSHING OVER SHAFT KEYWAYS The Keyless Bushing should be positioned so that slits in Keyless Bushing collars that contact the shaft are located approximately opposite the keyway. In addition, a locking screw should be centered directly over the keyway. When tightening locking screws, it is important to follow the installation procedure outlined above, which speci¿es equal 1/4 turns of each locking screw. Failure to follow these instructions could result in excessive tightening of the screw over the keyway, possibly causing permanent deformation of the Keyless Bushing collars. Even after 1/4 turns can no longer be achieved, it is important to continue to use equal turning angles for every screw until the speci¿ed tightening torque is reached. REMOVAL (Refer to Figure 2) Prior to initiating the following removal procedure, check to ensure that no torque or thrust loads are acting on the Keyless Bushing, shaft or any mounted components. IMPORTANT! Make sure ends of locking screws used for removal are ground Àat and are slightly chamfered to prevent damage to screw and collar threads during push-off. 1. Check to ensure that axial movement of collars - necessary for release of connection - is not restricted. Likewise, ensure that push-off threads are in good condition. 2. Relax all locking screws by approx. four (4) complete turns and transfer screws to all push- off threads located in Àange of collar Item 1. 3. Release connection by evenly tightening all push-off screws (not exceeding 1/4 turns) in a diametrically opposite sequence. ©2010 Fenner Drives B-PR-018 6/23/2010 For technical assistance, please call 1-717-665-2421 www.fennerdrives.com
- 30. 25 Spare Parts See the following page for a complete list of recommended spare parts.
- 31. www.loveshaw.com RECOMMENDED SPARE PARTS KIT FOR MODEL CF25 PART # QTY DESCRIPTION NOTES .REPKIT-CAC60 1 .CAC60 REPAIR KIT 2" TAPE .REPKIT-CAC61 1 .CAC61 REPAIR KIT 3" TAPE N401-329 1 CYLINDER, BOX TRANSFER N400-220 1 FLOW CONTROL, 1/4 NPT X 3/8 TUBE SHK-007 1 SHOCK ABSORBER SHK-007-N 1 JAM NUT N401-298 1 CYLINDER, FLAP FOLDER SPH-1460 1 ROD END BEARING N400-183 1 FLOW CONTROL, 1/8 NPT X 1/4 TUBE SPR-1065L 1 TORSION SPRING, HOPPER SPR-1065R 1 TORSION SPRING, HOPPER N591 1 FLOW CONTROL, 1/4 NPT X 1/4 TUBE .VC-1001 4 VACUUM CUP WITH NIPPLE HC-1046 1 KNURLED KNOB SPR-1059 2 EXTENSION SPRING HC-1045 1 RATCHET HANDLE N401-362 1 CYLINDER, VERTICAL FEEDER STANDARD (10 CPM) N401-363 1 CYLINDER, VERTICAL FEEDER HIGH SPEED (>10 CPM N402-133 2 SOL VAVLE N402-142 1 AIR PILOTED VALVE N669 1 AIR FILTER AIR A125SB-10-R 1 FUSE A125SB-3-R 1 FUSE A125SB-2/10- 312 1 FUSE
- 32. 27 TROUBLESHOOTING Preliminary Checks Check that electrical or air power has not been disconnected. Check for leaking or disconnected airlines. Check electrical fuses for continuity. Using Test Mode to Troubleshoot Machine Close all guard doors and make sure the emergency stop push button is not depressed. Turn the selector switch to the step position and depress the machine’s start push button. The machine’s emergency stop circuit will energize, the lug drive will start to run and the machine is ready to start a cycle. The case erector can be stepped through each machine function by pushing the step push button. For example, when the machine is originally started in the test mode by pushing the step push button, the vertical trolley vacuum cup assembly will extend toward the hopper. By continually pushing the step button the machine will completely step through an entire machine cycle (refer to machine sequence of operation chart). By using the step mode to troubleshoot, it can be determined at which step the machine does not operate. By using this method you will eliminate excessive down time. Checking Solenoid Valves The solenoid valves are equipped with manual pushbutton overrides. Chapter 8
- 33. 28 With the machine in the test mode, depress and hold an override button to determine if the valve is able to actuate the pneumatic device that it’s connected to. Also check that the valve is receiving electrical power. There are indicator lights built into the coils of the valves to aide in trouble shooting. Checking PLC Inputs and Outputs Properly checking inputs will require two people, one to trigger the device, and one to monitor the plc. The plc has indicator lights on its front panel for each input and output. Refer to the electrical schematics for plc/device information. To check the plc inputs, the machine must be “e” stopped. By manually moving the machine components, the various switches can be triggered one at a time, and the corresponding plc input can be verified. To properly check the outputs, the machine must be in the test mode of operation. By stepping the machine through its sequence of operation, the plc’s outputs can be verified. Tape Cartridge and Taping Issues Refer to the tape cartridge section of this manual for all information referring to taping of the erected box. PROBLEM POSSIBLE CAUSE CORRECTIVE ACTION Vertical trolley vacuum cups will not extend toward hopper. 1) Box backup sensor PE1 is blocked, or malfunctioning. 2) LS1 is not functioning properly. 3) Trolley stop is loose. 4) Low tape roll detected (option). 5) Low hopper detected (option). 6) Check PLC outputs 8 & 9. They should NOT be lit. 7) Check PLC inputs 1, 2, 6, 8, 10, & 11 and output 3. They should be lit. 8) Solenoid 5 is malfunctioning. 1) Remove obstruction from sensor, or replace PE1 sensor. 2) Troubleshoot or replace LS1. 3) Secure the trolley stop. 4) Refill tape cartridge. 5) Refill hopper. 6) Check suggested PLC inputs and outputs. 7) Check air lines supplying solenoid 5; replace solenoid 5. Vertical trolley vacuum cups will not pick blank from hopper. 1) Check PLC output 7. It should be lit. 2) Solenoid 9 is malfunctioning. 3) Vacuum cups are damaged. 4) Vacuum generator is not functioning properly. 5) Vacuum hoses are clogged or damaged. 1) Check suggested PLC inputs and outputs. 2) Check air lines to solenoid 9; replace solenoid 9. 3) Inspect, clean, or replace vacuum cups. 4) Inspect, repair, or replace vacuum generator.
- 34. 29 5) Replace inline filter cartridges in vacuum system with clean, new cartridges; check vacuum hoses for clogs; replace hoses/fittings. Vertical trolley will not lower toward forming section of machine. 1) Check PLC output 4. It should be lit. 2) Solenoid 6 is malfunctioning. 3) Air flow controls are not functioning properly. 4) There is a mechanical bind or jam. 1) Check suggested PLC inputs and outputs. 2) Check air lines to solenoid 6; replace solenoid 6. 3) Troubleshoot air flow controls. 4) Remove or repair cause of bind or jam. Box opening arm does not swing inward towards blank. 1) Check PROX 3 on bottom of vertical cylinder. It should be lit. 2) Check PLC input 4. It should be lit. 3) Solenoid 2 is malfunctioning. 4) Check PLC output 0. It should be lit. 5) Air flow controls are malfunctioning. 6) There is a mechanical bind or jam. 1) Check suggested PROX/PLC inputs and outputs. 2) Check air lines to solenoid 2; replace solenoid 2. 3) Troubleshoot air flow controls. 4) Remove or repair cause of bind or jam. Box opening arm vacuum cup will not grip the blank. 1) Check PLC output 6 & 7 ( it should be lit. 2) Solenoid 8 and 9 are malfunctioning. 3) Vacuum cup is damaged. 4) Vacuum generator is not functioning properly. 5) Vacuum hoses are clogged or damaged. 6) Check PROX 6 on rotary actuator. It should be lit. 1) Check suggested PROX/PLC inputs and outputs. 2) Check air lines to solenoids 6 & 7; replace solenoids 6 & 7. 3) Inspect, repair, or replace vacuum generator. 4) Replace inline filter cartridges in vacuum system with clean, new cartridges; check vacuum hoses for clogs; replace hoses/fittings. Box opening arm does not return to open position (home position). 1) Check PLC output 0. It should NOT be lit. 2) Solenoid 2 is malfunctioning. 3) Air flow controls are malfunctioning. 4) There is a mechanical bind or jam. 1) Check suggested PLC inputs and outputs. 2) Check air lines to solenoid 2; replace solenoid 2. 3) Troubleshoot air flow controls. 4) Remove or repair cause of bind or jam. Minor flap folders do not operate. 1) Check PLC output 2. It should be lit. 2) Solenoid 4 is malfunctioning. 3) Check PROX 5. It should be lit. 4) Check PLC input 6. It should be lit. 5) There is a mechanical bind or jam. 6) The air flow controls are 1) Check suggested PROX/PLC inputs and outputs. 2) Check air lines to solenoid 4; replace solenoid 4. 3) Troubleshoot air flow controls. 4) Remove or repair cause of bind or jam.
- 35. 30 malfunctioning. Vertical trolley will not rise toward the hopper (home position). 1) Check PROX 1 at rear of transfer cylinder. It should be lit. 2) Check PLC input 2. It should be lit. 3) Solenoid 6 is malfunctioning. 4) Check PLC output 8. It should NOT be lit. 5) The air flow controls are malfunctioning. 6) There is a mechanical bind or jam. 1) Check suggested PROX/PLC inputs and outputs. 2) Check air lines to solenoid 6; replace solenoid 6. 3) Troubleshoot air flow controls. 4) Remove or repair cause of bind or jam. Box transfer arm will not push box into lug drive system. 1) Check PROX 4 near base of vertical cylinder. It should blink once as the trolley rises. 2) Check PLC input 5 & 14. They should blink once as the trolley rises. 3) Check PLC output 5. It should be lit. 4) Solenoid 7 is malfunctioning. 5) Lug detector PE2 is blocked or malfunctioning. 1) Check suggested PROX/PLC inputs and outputs. 2) Check air lines to solenoid 7; replace solenoid 7. 3) Remove obstruction from sensor, or replace PE2 sensor. Machine shuts off on its own. 1) Safety gates are not securely closed. 2) Check PLC input 10. It should be lit. 3) Motor over-current relay is triggering. 4) There is a mechanical malfunction in the lug drive system. 1) Ensure safety gates are properly closed with safety switches engaged. 2) Check PLC inputs and outputs. 3) Check if motor is drawing too much current or malfunctioning. 4) Inspect lug drive system for damages, failures, etc. Blanks jam while being stripped from hopper. 1) Pressure on front of blank is too tight or too loose. 2) The gap between the stripper plates are not spaced properly. 3) The hopper guide clearance is not correct. 1) If pressure on the front of the blank is too tight, adjust LS1 towards blanks, and slow the ratcheting action of the hopper cylinder by throttling the flow controls. 2) If pressure on the front of the blank is too loose, adjust LS1 away from the blanks. 3) Set the gap between the stripper plates to 1.5 times the width of the blank. 4) Set the hopper guide clearance to ¼”. Box not square after taping. 1) Chain lugs are not square to each other. 2) See mechanical section to adjust lugs to be square.
- 36. 31 Major flaps (bottom) not straight or are overlapped. 1) Main drives are not properly set. 1) Adjust main drives by 1/8” increments. Box deformed by lugs (back panel 1 pushed in) or squeezers (sides of box have score lines). 1) Sled height is set too low. 2) Main drive is adjusted too narrow. 1) Adjust sled by 1/8” increments. 2) Adjust main drive by 1/8” increments. Box does not open or transition into lug drive smoothly. 1) Trolley stop setting is not accurately adjusted. 2) Top sled is not properly adjusted. 3) Box opening arm is not properly inspected. 1) Adjust trolley stop, or sled, or box opening arm according to instructions in this manual. Cylinders move slowly or erratically at start-up. 1) Damaged lines or loose fittings are leaking air. 2) Slow start valve is not properly adjusted. 1) Check for air leaks. 2) Adjust start valve. a. Set regulator to 80 psi. b. Open slow start metering valve by turning adjuster out with a 3mm hex key. (Screw is found underneath the valve body.) c. Test setting by starting machine and timing how fast valve latches in. correct setting is about 3 seconds. d. Readjust accordingly.
- 37. 32 WARRANTY For a detailed, up-to-date warranty, contact our customer service or view it on our website. Chapter 9
- 44. 86(3$57)
- 62. 56 ELECTRICAL DRAWINGS AND SCHEMATICS Global Drawings The drawings and schematics in this section represent the electrical layouts common among all machines. Chapter 11
- 63. 57 PROGRAMMABLE LOGIC CONTROLLER STANDARD PLC – AB MICRO830 OPTIONAL PLC – AB MICRO 850 NOTE: CHECK TITLE BLOCK ON PANEL ASSEMBLY BEFORE ORDERING REPLACEMENT PLC.
- 64. 57 120 Volt Specific Drawings The drawings and schematics in this section represent the electrical layouts related specifically to 120V rated machines.
- 73. 65 240 Volt, CE Compliant Specific Drawings The drawings and schematics in this section represent the electrical layouts related specifically to 240V rated machines that are CE compliant. Note: not all machines are CE compliant – determine the specifications of the machine in order to reference the proper drawings and schematics within this manual.
- 82. 74 240 Volt, Non CE Compliant Specific Drawings The drawings and schematics in this section represent the electrical layouts related specifically to 240V rated machines that are not CE compliant. Note: not all machines are CE compliant – determine the specifications of the machine in order to reference the proper drawings and schematics within this manual.
- 99. 82 AVAILABLE SPECIAL OPTIONS Optional Sensor Part Numbers BOX JAM DETECTION SENSOR: P/N: A219‐PF‐13 LOW TAPE DETECTION SENSOR: P/N: 303527 LOW HOPPER DETECTION SENSOR: P/N: 302575 Chapter 12