How to stream live in 3D 360 with Vuze Camera
•
0 j'aime•911 vues

How to stream live 3D 360 video with Vuze virtual reality camera

Recommandé
Contenu connexe
Tendances
Similaire à How to stream live in 3D 360 with Vuze Camera
Similaire à How to stream live in 3D 360 with Vuze Camera (20)
Dernier
Dernier (20)
How to stream live in 3D 360 with Vuze Camera
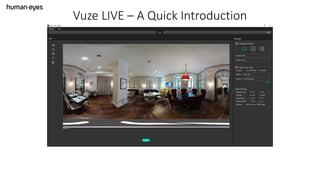
- 1. Vuze LIVE – A Quick Introduction
- 2. Before you start make sure your Vuze or Vuze+ camera is set to ‘LIVE’ mode through the mobile app and connect your camera to the computer. If you are using a Vuze camera you will need to activate your LIVE license before the first use. This isn’t necessary for a Vuze+ camera. Ready?
- 3. Turn on Broadcasting Media if you wish to broadcast live. Select your platform and fill in the required details. If your broadcasting platform requires it, remember to set up a streaming event locally before starting. Broadcasting won’t begin until you press start. Selecting a preset platform here will set the recommended values in the ‘Video Settings’ section below.
- 4. Turn on ‘Save Local Copy’ if you wish to save the media you are previewing. If you choose to save stitched media the media will be stitched with the settings in the ‘Video Settings’ section below. If you save unstitched media the full quality unstitched file will be saved to your PC and can be stitched and edited in Vuze VR Studio later. Recording won’t begin until you press start.
- 5. Choose the settings with which to stich your video here. These depend on your hardware, internet connection and the platform you are broadcasting to. For example to stream on a weaker internet connection choose a lower resolution or bitrate. If you have selected to broadcast to a preset platform these settings have already been set to the recommended values.
- 6. Once you have selected your desired set up, begin recording and broadcasting using the ‘Start’ button.
- 7. While recording you can ensure stitching is keeping up to 30FPS. If not your hardware may be overloaded, try closing other processes or rendering at a lower resolution.
- 8. Stop recording when finished.
- 9. To save battery while not recording you can select ‘Turn LIVE preview off’ under the File menu.
- 10. Turn the preview on again when ready to continue.
- 11. See you LIVE