Yoga poses for back pain
•Télécharger en tant que DOC, PDF•
0 j'aime•125 vues

Yoga is wonderful for lower back pain, here are some very easy basic yoga poses that will help you with your lower back pain. Lower back pain can be caused by overuse of the ligaments or muscles and they tear, or there is pressure on the nerves and this is where Yoga is ideal for lower back pain,

Recommandé
Contenu connexe
Tendances
Tendances (20)
En vedette
En vedette (13)
Similaire à Yoga poses for back pain
Similaire à Yoga poses for back pain (20)
Dernier
Dernier (20)
Yoga poses for back pain
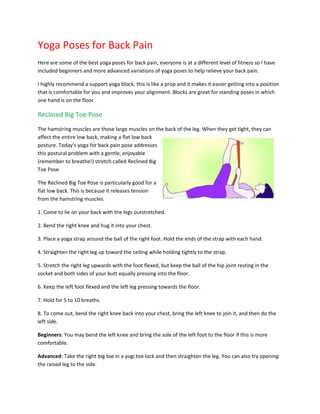
- 1. Yoga Poses for Back Pain Here are some of the best yoga poses for back pain, everyone is at a different level of fitness so I have included beginners and more advanced variations of yoga poses to help relieve your back pain. I highly recommend a support yoga block, this is like a prop and it makes it easier getting into a position that is comfortable for you and improves your alignment. Blocks are great for standing poses in which one hand is on the floor Reclined Big Toe Pose The hamstring muscles are those large muscles on the back of the leg. When they get tight, they can affect the entire low back, making a flat low back posture. Today's yoga for back pain pose addresses this postural problem with a gentle, enjoyable (remember to breathe!) stretch called Reclined Big Toe Pose. The Reclined Big Toe Pose is particularly good for a flat low back. This is because it releases tension from the hamstring muscles. 1. Come to lie on your back with the legs outstretched. 2. Bend the right knee and hug it into your chest. 3. Place a yoga strap around the ball of the right foot. Hold the ends of the strap with each hand. 4. Straighten the right leg up toward the ceiling while holding tightly to the strap. 5. Stretch the right leg upwards with the foot flexed, but keep the ball of the hip joint resting in the socket and both sides of your butt equally pressing into the floor. 6. Keep the left foot flexed and the left leg pressing towards the floor. 7. Hold for 5 to 10 breaths. 8. To come out, bend the right knee back into your chest, bring the left knee to join it, and then do the left side. Beginners: You may bend the left knee and bring the sole of the left foot to the floor if this is more comfortable. Advanced: Take the right big toe in a yogi toe lock and then straighten the leg. You can also try opening the raised leg to the side.
- 2. Cat Cow Pose On an inhale : 1. Curl your toes under. 2. Drop your belly, but keep your abdominal muscles hugging your spine. 3. Take your gaze up toward the ceiling. 4. Let the movement in the spine start from your tailbone, so that your neck is the last part to move. DOWNWARD FACING DOG Downward facing dog stretches and strengthens the whole body and can help relieve back pain. Downward facing dog is done many times during most yoga classes. It is a transitional pose, a resting pose and a great strengthener in its own right. It may be the first yoga pose you encounter as you begin a yoga practice. Come to your hands and knees with the wrists underneath the shoulders and the knees underneath the hips. 2. Curl the toes under and push back raising the hips and straightening the legs. 3. Spread the fingers and ground down from the forearms into the fingertips. 4. Outwardly rotate the upper arms broadening the collarbones. 5. Let the head hang, move the shoulder blades away from the ears towards the hips. 6. Engage the quadriceps strongly to take the weight off the arms, making this a resting pose. 7. Rotate the thighs inward, keep the tail high and sink your heels towards the floor. 8. Check that the distance between your hands and feet is correct by coming forward to a plank position. The distance between the hands and feet should be the same in these two poses. Do not step the feet toward the hands in Down Dog in order the get the heels to the floor. This will happen eventually as the muscles lengthen. SUPINE SPINAL TWIST
- 3. The supine spinal twist is essentially lying on your back and gently rotating the spine by twisting at the waist. The shoulders lay flat on the floor, while one knee is bent and brought up and crossed over the body. The other leg stays on the floor. This movement can be very therapeutic; however, it does come with a warning for people with back pain. Type of Pose : Supine Benefits: Stretches the glutes. Stretches and relaxes the spine. Can help relieve back pain, though should be approached with caution by those with degenerative disk disease. Instructions: 1. Come to lie on your back. 2. Bend your knees and put the soles of your feet on the floor. 3. Lift your hips slightly off the floor and shift them about an inch to your right. 4. Draw your right knee into your chest and extend the left leg on the floor. 5. Drop your right knee over to the left side of your body. 6. Open your right arm to the right side in line with your shoulder. Rest your left hand on your right knee. 7. Turn your head to the right, bringing your gaze over the right shoulder. 7. Work on releasing your left knee and your right shoulder to the floor. 8. Hold 5 to 10 breaths before drawing your right knee back into your chest and doing the other side. Variations: Before twisting, take your legs into the air and wrap your right leg around your left, coming into Eagle legs. Then twist, bringing the right knee over to the left side of the body. BRIDGE POSE For back pain sufferers, the supported bridge pose offers a set of challenges to the body and mind that together provide an entryway into the benefits of having a yoga practice. Like most yoga poses, the supported bridge pose involves the entire body it begins to change the balance between the strength and flexibility of the musculature of the body. • Promotes postural re-education.
- 4. • Encourages a balanced position of the pelvis, which readies the posture muscles for productive therapeutic work. • Ignites and strengthens the core abdominals for controlling pelvic tilt. 1 The supported bridge pose takes the challenge of the pelvic tilt into space, introducing new variables for the core muscles to resolve via strength and stretch. • Strengthens low back muscles. • Helps to release unnecessary muscle tension, for example, in certain muscles of the the shoulders and through the front of the body. • Uses both front and back body muscles to stabilize the trunk. • Develops an awareness of the body in space COBRA Be very careful doing Cobra when you have back problems, Cobra is an intense move for the spine and back muscles and extending the spine back has been shown to alleviate the symptoms associated with disk problems. 1. Inhale, come forward to a Plank position. 2. Exhale, lower down onto your belly. 3. Place your forehead on the floor and your palms flat directly under your shoulders. 4. Inhale, engage the muscles of your lower back, press the tops of the feet into the floor, and lift the upper chest off the floor while keeping your gaze on the floor. 5. Exhale, lower your forehead back to the floor. 6. Repeat this motion three to five times. Follow up with a gentle back stretch is a good idea, to keep muscles in balance. Child's pose is an ideal follow up to the Cobra.
- 5. CHILD’S POSE This is a resting pose which can be used at any time you need rest from any Yoga exercise The benefits of this pose are it is a gentle stretch for the hips, thighs and ankles. It can help relieve back pain. Instructions: 1. From Downward Facing Dog, drop the knees to the floor. 2. Spread the knees as wide as the mat, keeping the big toes touching. 3. Bring the belly to rest between the thighs and the forehead to the floor. 4. There are two possible arm variations: Either stretch the arms in front of you with the palms toward the floor or bring the arms back alongside the thighs with the palms facing upwards. Do whichever feel more comfortable to you.
- 6. CHILD’S POSE This is a resting pose which can be used at any time you need rest from any Yoga exercise The benefits of this pose are it is a gentle stretch for the hips, thighs and ankles. It can help relieve back pain. Instructions: 1. From Downward Facing Dog, drop the knees to the floor. 2. Spread the knees as wide as the mat, keeping the big toes touching. 3. Bring the belly to rest between the thighs and the forehead to the floor. 4. There are two possible arm variations: Either stretch the arms in front of you with the palms toward the floor or bring the arms back alongside the thighs with the palms facing upwards. Do whichever feel more comfortable to you.