IAC 2024 - IA Fast Track to Search Focused AI Solutions
Vb%20 tutorial
1. Phidgets Inc.
Servo Tutorial 1
A Single Servo Controller in Visual Basic
Overview
In this, tutorial we will cover:
InstallingVisual Basic Express
Create a Graphical User interface
Writing code to operate the Graphical User Interface and control a Phidget servo.
This tutorial provides an excellent starting point for learning how to use the PhidgetServo controller and helps develop a feel for
the way all Phidgets work. It is specifically geared towards those users new toVisual Basic and creating Graphical User Interfaces.
To attempt this tutorial, you should understand basic programming concepts. Knowledge of object oriented programming would
also be an asset. There are extensive resources available online that deal with this subject.
The source code for this application is provided with the tutorial. It is suggested though that you follow the steps outlined here to
gain a firm grasp of howVisual Basic works and the steps used to create the application.
Visual Basic Express and Initial Setup
Visual Basic (VB) Express is a free Windows development package from Microsoft that uses the .NET framework. It provides all
the functionality that the vast majority of people will require. Additionally, it contains documentation and help files specifically
targeted at assisting beginner and intermediate programmers. VB Express can be downloaded from the Microsoft web site.
Important: OnceVB Express has been installed, or if you are using a pre-installed .NET programming package, it is necessary to
download and install the API from the Phidgets website, Phidget21.msi. Without this file, it is not possible to use Phidgets.
Creating the Graphical User Interface (GUI)
The GUI is what you actually see when running your program. It allows you to interact with the code and make changes that can
affect your Phidget.
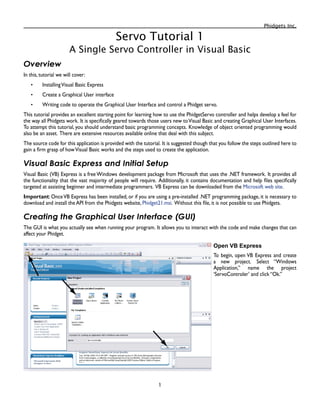
Open VB Express
To begin, open VB Express and create
a new project. Select “Windows
Application,” name the project
‘ServoControler’ and click “Ok.”
•
•
•
2. Phidgets Inc.
Load Phidget API
Under the “Project” menu (1), select “Add
Reference.” In the new window, click on the
Browse tab (2) and navigate to the directory in
which you installed Phidgets21.msi. The default
directory is: C:Program FilesPhidgets. For VB
Express, select the Phidget21.NET.dll (3) and
click “Ok” (4). This is a compulsory process as
it loads the Phidget API or “Application
Programming Interface.” The API contains the
Phidget library which is a collection of the
controls we will need to interact with Phidgets.
You must load the library regardless of which
Phidgets you are using.
GUI Layout
A program with a GUI is composed of one or more “forms.”
The forms contain all of the elements necessary to interact
with the computer in a graphical environment. The form for
this program is the grey box on the screen. Most programs
that you will be writing for Phidgets, at least to begin with, will
only use one form. Applications that make use of more than
one are often substantially more complicated to program. The
screen you see now is called the “Form Designer”
It is useful to first set up your workspace. If the “Toolbox”
panel is not already visible, open the “View” menu (1) and
select “Toolbox.” To ensure the Toolbox panel does not cover
the form you are going to be working on, toggle the “pin”
button (2).
The various elements of the GUI, known as controls, can be
placed in whatever order you wish and in any location you wish. For this example, let us first start by placing the “TrackBar” (3).
This control will be used to change the position of the servo. Under the “All Windows Forms” rollout, select TrackBar. Click
and drag somewhere in the upper portion of the form. The exact positioning is irrelevant, however, for aesthetic purposes, the
trackbar may be repositioned, and re-sized. Edge “snaps” are often useful to create a uniform look (you should discover these
when dragging the track bar around the edges of the form).
The next step is to place the “Labels” (5) which will be used to display information.‘Label1’ will present an absolute numerical
value for servo rotation,‘Label2’, the connection status and finally,‘Label3’, the serial number of a connected Phidget. Under the
“Common Controls” rollout in the toolbox, select the label and click and drag in the form. Repeat this action to create 3 labels.
Note the names of your labels and the order they appear on the form, they should follow the order shown here.
When working with the labels and controls in general, it is often useful to open the layout toolbar by selecting View (1)
Toolbars Layout. The layout toolbar provides many helpful tools for aligning elements on the form. Select the three labels you
created and perform a“LeftAlign” (6). If your labels are spread out vertically you can also try clicking“MakeVertical Spacing Equal”
(7). You can move the labels as a group into whatever position you wish.
3. Phidgets Inc.
Finally, select the button tool (4) and as in the same manner as the trackbar and labels, create a button at the bottom of the form.
It should be sized in such a way so its title,“Button1” can be seen clearly. While the button is selected,click“Center Horizontally”
(8) on the layout toolbar.
In this stage, experimentation is encouraged to create a satisfactory look.
Modify Properties
To ensure the proper operation of the program,a few properties of the controls you just placed
must be modified. By first clicking on the trackbar to select it, look to the bottom right hand
side of the screen. The properties panel should be visible with the name of the selected control
at the top of the panel. Here the name is “TrackBar1.” Change the following properties
Maximum – Set this to 180. In combination with the minimum value two lines below,these
numbers determines the range of values that can be selected on the trackbar. Within
the application code (which will be discussed latter), the API for the servo accepts values
corresponding roughly to degrees of rotation. Consequently, the range of 0 to 180 on the
track bar is used to set the position of the servo within half of one complete rotation. It
should be noted that the PhidgetServo accept position ranges from -23 to 231.
TickFrequency – Once you change the maximum property and view the trackbar, it is
quite obvious that it does not look right. Where there should be ticks beneath the slider,
it probably looks like some sort of solid bar. Changing the TickFrequency property from
1 to 10 should fix this.
Value – The value should be set to 90 to ensure that the slider is resting in the middle of
the slide range.
After modifying the track bar, click to select the button that you placed near the bottom of the
form. In the properties panel,findText and set its value to“Close.”You should now observe that
the button is now labeled “Close.”
As is obvious, there are many different properties that can be set. A fairly good explanation can
be found by clicking on each and looking to the very bottom of the screen or by searching the
help file which comes withVB Express.
1.
2.
3.
4. Phidgets Inc.
Writing the Code
Visual Basic and all visual programming languages are“event driven,” as such,any action you want the program to respond to calls a
subroutine. As a general rule,every event requires its own block of code. There are three categories of action that this application
must be designed to handle.
Program Activities –These are events such as opening or closing the program.
User Activities –Including sliding the trackbar and clicking the Close button.
Phidget Events – Phidget events include attaching or detaching the Phidget and handling any errors that might occur.
Objects and Events
While still in the Form Designer, under the
“View” menu, select “Code” (1). A more or
less blank page should appear. At the top of
this section, two drop down menus can be
found. The left menu (2) is used for selecting
the control or object while the right menu
(3) is used to select an event related to that
object. The first subroutine that should be
written is the Load event that is triggered
when the application is opened. First, select
“(Form1 Events)” (2) from the left menu,
then “Load” (3) from the right menu. A new
block of text should appear.
If at any time you would like to test code you
have written, simply click the green arrow
button (4) on the “Standard” toolbar.
Loading the form
Both subroutines seen here should be created by using the drop down menus or other automatic means withinVB (such as double
clicking on the control in the form designer). You should never have to type out the basic frame work for subroutines that deal
with events. Private Sub, End Sub, and any text on the same line as Private Sub should be created byVB. Making your
own subroutines will be covered in the next tutorial.
1.
2.
3.
Public Class Form1
Dim WithEvents Servo1 As New Phidgets.Servo
Private Sub Form1_Load(ByVal sender As System.Object, ByVal e As System.EventArgs)
Handles MyBase.Load
1
Label1.Text = Position: -
Label2.Text = Status: Not Connected
Label3.Text = Serial Number: -
End Sub
Private Sub TrackBar1_Scroll(ByVal sender As Object, ByVal e As System.EventArgs)
Handles TrackBar1.Scroll
Label1.Text = Position: TrackBar1.Value
End Sub
End Class
4
2
34
5
6
7
5. Phidgets Inc.
In attempting this tutorial,you should already have a concept of
how object oriented programming works. As a quick refresher
though; object oriented programming is centered around
creating virtual “objects” that can both store information and
take action using subroutines. Objects are defined by writing
a “class” that defines their behavior. Each of the controls that
you placed in the form designer (the trackbar, button and
labels) are objects. If you will notice the very first lines of this
code are “Class Form1.” In writing this program we are
actually creating an object. It can perform actions through its
subroutines and store data. Generally, in this program, we are
using other object,like the labels (6),to store information,such
as text (called “strings”).
After writing the segment of code shown here it would be
prudent to test it by clicking the green arrow button as described
previously. All the application allows you to do with this code is
drag the slider and have a numerical value displayed.
Here, the “Servo1” object is created. Note that
the position of this line is outside of any subroutine
(as explained in (7)) and therefore it remains globally
accessible (every subroutine can access it) within the
scope of this application, or more specifically, this form.
It may be obvious that this line is not strictly necessary
as Servo1 is not used. Later, it will allow us to interact
with the Phidget.
Notice the structure of this declaration. The keyword
Dim is responsible for declaring the object, creating
a reference for the object and reserving appropriate
memory. It does not create the object. Objects or
variables created in memory always have a reference,also
known as a pointer. If you are unfamiliar with references,
you can simply think of them as the objects name. When
using an object in code, such as Servo1, you are actually
not using the object but the reference to that object. For
example, it is possible to have two objects (A and B) and
to swap their references. In such a case, calling object A
would actually access object B.
WithEvents allows the object to use its own handles. If
this term is neglected, you would have to manually define
subroutine names for the events the object can trigger. In
tutorial 3, this will be discussed in deeper detail. For now,
it is important for simplicity.
As New Phidgets.Servo creates this object
as a Servo object. The term New is important as it
is responsible for actually creating the object in the
memory defined by Dim. Finally, If you were to create
a program using Phidget encoders, you would use
As New Phidgets.Encoder to create an encoder
specific object.
The entire line shown here was automatically created
and is used to define the subroutine. This portion is the
name of the subroutine and can be changed to whatever
1.
2.
is wished. It can not start with a number or contain any
spaces or special characters such as *, !, , etc. It must
also be unique. These naming rules are applicable for
any variable or object withinVisual Basic and most other
programming languages.
As with (3), this portion of the line was automatically
created and for most new users is unimportant. In the
simplest sense,it generates two objects,the first of which,
sender, can be used to identify the object or event
responsible for triggering the subroutine. The second
object, e, contains other information that the subroutine
is given. This structure containing sender,and e objects
is very common in .NET programming.
Handles are very important and are by default,responsible
for determining when a subroutine is called. In the
first instance, the handle is Me.Load. “Me” is used to
reference the active form and .Load is the condition for
action. Hence the statement is equivalent to “Call this
subroutine when loading.” Similarly with the second block,
the handle TrackBar.Scroll calls that subroutine
when the trackbar is scrolled or moved. Without these
handles, neither event of loading the form or moving the
trackbar would call a subroutine. While creating an event
to respond to trackbar changes it is important to use the
.Scroll event and not the .ValueChanged event
though both seem similar.
This three line block of code is responsible for changing the
labels. The text shown on the Close button was modified
in the properties panel when laying out the GUI. Here
however, the contents of the labels are modified directly
within the code. Most properties found in the properties
panel can be modified by the code in this same manner. The
structure,object.propertyorobject.variable
is a universal way of accessing or modifying information
within objects. If the call contains brackets, it is a
subroutine, such as object.subroutine().
It is also possible to have layered structures, as in
object.property.property.subroutine().
In this case,the property actually refers to another object
contained within the main object.
It should be obvious that the precursor to this statement
is very similar to the statements contained within (6).
The highlighted section however demonstrates a way to
display variables. The“” symbol is necessary to separate
distinct elements.
These two statements were created automatically when
selecting the two drop down menus. Together,they define
the start and end of the subroutine.
3.
4.
5.
6.
7.
6. Phidgets Inc.
Handling the Phidget
It is now time to interface with the Phidget.
As you can see in the code to the left, there
are three important events common to
all Phidgets, these are, attach and detach,
occurring when a Phidgets USB cord is
connected or removed from the computer.
Additionally,there is the error event which is
called when the Phidget malfunctions.
As with the previous section of code,
these are the handles to the subroutines.
If you modify the name of the subroutine
and later can not remember what it
does, simply look to the handle. All three
handles, and therefore subroutines, are
called when something happens regarding
the Phidget, and since we are using
the Servo1 object to interact with it,
the Servo1 object is responsible for
triggering these events.
This is the first instance where we are
actually telling the Phidget to take action.
Here,we are giving it a command to center
its position (90 degrees out of 180). Notice
the structure of this command. Servo1 is
the object responsible for controlling this
Phidget. Next, servos(0), is accessing
the subroutine for servo motor with
index 0. On the 4-Motor PhidgetServo,
the 0 shown here could be 0, 1, 2 or 3 corresponding to each individual motor channel. Finally, .Position= 90 is
responsible for setting the position of the servo.
This line ensures that when the servo becomes active, the trackbar is enabled so that the user can modify its position.
These two blocks of code are very similar to those shown in (6) from the previous explanation and are responsible for
changing the labels information.
TheValue property of the trackbar can be changed by both the program and the user. You have already seen how this value
can be read by the application and while being modified by the user to simply display a value. Here, the value is set by the
application and then the control is disabled to prevent its value from being changed when there is no Phidget attached to the
computer. Since this is necessary only when there is no Phidget, it is located within the Servo.Detach subroutine.
This expression creates the object, e, of type Phidgets.Events.ErrorEventArgs. The type of object should be of
no concern as it is already defined by the nature of the event. The call to this subroutine occurs when there is an error and
the e object gets passed the details of that error.
Following from (6), here, a message box is created and the desc variable of the e object is displayed. The e object only
contains two variables, the error code and its corresponding description (or desc). It is always a good practice to show
what error has occurred when writing code.
Me refers to the active form and the .Close() subroutine initiates the processes of closing the form
If you like, you can once again test the code you have written. At this stage, the trackbar still will not have any effect on the servo
motor however you should see changes to the lables on the form when you plug in and unplug the Phidget.
1.
2.
3.
4.
5.
6.
7.
8.
Private Sub Servo1_Attach(ByVal sender As Object, ByVal
e As Phidgets.Events.AttachEventArgs) Handles Servo1.Attach
Servo1.servos(0).Position = 90
TrackBar1.Enabled = True
Label1.Text = Position: 90
Label2.Text = Status: Connected
Label3.Text = Serial Number: Servo1.SerialNumber
End Sub
Private Sub Servo1_Detach(ByVal sender As Object, ByVal e
As Phidgets.Events.DetachEventArgs) Handles Servo1.Detach
Label1.Text = Position: -
Label2.Text = Status: Not Connected
Label3.Text = Serial Number: -
TrackBar1.Value = 90
TrackBar1.Enabled = False
End Sub
Private Sub Servo1_Error(ByVal sender As Object, ByVal e
As Phidgets.Events.ErrorEventArgs) Handles Servo1.Error
MessageBox.Show(e.desc)
Me.Close()
End Sub
2
3
5
8
1
1
1
6
4
4
7
6
7. Phidgets Inc.
Linking the Phidget to TrackBar
Return once more to the first two blocks of
code you wrote.
Adding this line will disable the trackbar
immediately when the program starts.
At this point, it is unknown whether
or not a Phidget is connected to the
computer. If no servo Phidget is available
to the Servo1 object and you try and
change its position value through the
code at (3), an error will occur. Since
there is an enable command for the
trackbar in the Attach subroutine,this
line provides a measure of protection.
Calling the .open() subroutine
specifically tells Servo1 to search
the computers USB ports and try and
detect any Phidgets already connected.
If it finds any, it then proceeds to call
the Attach subroutine that you
have already written. The .open()
subroutine called here is in fact an
element common to any Phidget object that you create. Just as Phidgets.Servo was used to create the Servo1 object
used here to interact with the servo motor,a Phidgets.Accelerometer object would interact with an accelerometer.
Both objects would contain a number of common properties and subroutines, including .open(). A complete list can be
found in the .NET API manual.
This is the line that links the rotation of the servo to the position of the track bar. It updates the Position property for the
servo to reflect the position of the trackbar when it is moved.
At this point the application is nearly complete. If you choose to test it at this stage, dragging the slider bar when a PhidgetServo
is connected should result in it rotating.
Closing Subroutines
The final thing that must be accounted for is exiting the
program and clicking the close button.
As has been mentioned, these handles tell you what the
subroutines are responding to. They should be starting to
look familiar by now. The lower subroutine is called only
when the program is closing.
This is exactly the same as the line shown above and tells
the application to shut down. It causes the program to
call the subroutine below it.
Though not essential, it is recommended to use the
.close() subroutine when a given Phidget object is no
longer required. It does not delete the object,rather it disconnects the current Phidget from the program. If you wanted to
use the Phidget after this command (which is not applicable in this case as the program is closing), you would need to once
again call the .open() subroutine.
1.
2.
3.
1.
2.
3.
Public Class Form1
Dim WithEvents Servo1 As Phidgets.Servo
Private Sub Form1_Load(ByVal sender As System.Object,
ByVal e As System.EventArgs) Handles MyBase.Load
Servo1 = New Phidgets.Servo
Label1.Text = Position: -
Label2.Text = Status: Not Connected
Label3.Text = Serial Number: -
TrackBar1.Enabled = False
Servo1.open()
End Sub
Private Sub TrackBar1_Scroll(ByVal sender As Object,
ByVal e As System.EventArgs) Handles TrackBar1.Scroll
Label1.Text = Position: TrackBar1.Value
Servo1.servos(0).Position = TrackBar1.Value
End Sub
1
2
3
Private Sub CloseButton_Click(ByVal sender
As Object, ByVal e As System.EventArgs)
Handles Button1.Click
Me.Close()
End Sub
Private Sub Form1_FormClosing(ByVal sender
As Object, ByVal e As System.Windows.Forms
FormClosingEventArgs) Handles Me.FormClosing
Servo1.close()
End Sub
End Class
2
3
1
1
Private Sub CloseButton_Click(ByVal sender
As Object, ByVal e As System.EventArgs)
Handles Button1.Click
Me.Close()
End Sub
Private Sub Form1_FormClosing(ByVal sender
As Object, ByVal e As System.Windows.Forms
FormClosingEventArgs) Handles Me.FormClosing
Servo1.close()
End Sub
End Class
2
3
1
1
8. Phidgets Inc.
Conclusion
You are now done creating this application. You should now be
able to run it (the green arrow). Connect a Phidget and drag
the trackbar around. The servo motor should move in relation
to the position of the bar.
Hopefully you now have a better understanding of Phidgets and
how to begin programming with them. Every Phidget works in
the same fundamental way so if you understand the creation
of the Servo1 object, how it is used and how to modify its
properties,you are well on your way to being able to use almost
any Phidget.
It is very important to note what you have learned in this
tutorial is suitable for dealing with only one Phidget connected
to the computer. If you have two or more of the same type,you
will get unreliable results and not know which one the program
will control. A simple method for dealing with this issue is
discussed in the next tutorial.
If you do have two Phidgets of different types and wish to try
creating your own program now,you must remember that each
Phidget requires its own object to control it. That object must
also be of the same type as the Phidget.
9. Phidgets Inc.
'This application demonstrates the use of the Phidget
'servo controller. Please note that if you are using the
'4-Motor version, this application is suitable for
'controlling only motor 0. For reliable results, esure
'that only one PhidgetServo is attached to the computer
Public Class Form1
Dim WithEvents Servo1 As New Phidgets.Servo
'Creates the Servo1 Object used to control the Phidget
Private Sub Form1_Load(ByVal sender As System.Object, ByVal e As System.EventArgs)
Handles MyBase.Load
'Subroutine called when the form is created. Sets the initial conditions.
Label1.Text = Position: -
Label2.Text = Status: Not Connected
Label3.Text = Serial Number: -
'Sets the inital text to display
TrackBar1.Enabled = False
'Disables the TrackBar to prevent errors with the Servo1 object
Servo1.open()
'Will attempt to detect Phidgets already attached to the computer.
'If detected will call the attach subroutine (below).
End Sub
Private Sub TrackBar1_Scroll(ByVal sender As Object, ByVal e As System.EventArgs) Handles
TrackBar1.Scroll
'A subroutine to deal with changes made to the scroll bar
Label1.Text = Position: TrackBar1.Value
'Updates the position display
Servo1.servos(0).Position = TrackBar1.Value
'Updates the servo motor to reflect the position of the track bar
End Sub
Private Sub Servo1_Attach(ByVal sender As Object, ByVal e As Phidgets.Events.
AttachEventArgs) Handles Servo1.Attach
'A subroutine activated when a Phidget is detected attached to the computer
Servo1.servos(0).Position = 90
'Sets the initial position of the Phidget servo to 90 degrees
TrackBar1.Enabled = True
'Enables the TrackBar to allow for changing the servo position
Label1.Text = Position: 90
Label2.Text = Status: Connected
Label3.Text = Serial Number: Servo1.SerialNumber
'Updates the text and shows the serial number of the connected Phidget
End Sub
Private Sub Servo1_Detach(ByVal sender As Object, ByVal e As Phidgets.Events.
DetachEventArgs) Handles Servo1.Detach
'Subroutine called when the Phidget is detached from the computer
Code
10. Phidgets Inc.
10
Label1.Text = Position: -
Label2.Text = Status: Not Connected
Label3.Text = Serial Number: -
'Text Changes
TrackBar1.Value = 90
TrackBar1.Enabled = False
'Resets the track bar
End Sub
Private Sub Servo1_Error(ByVal sender As Object, ByVal e As Phidgets.Events.
ErrorEventArgs) Handles Servo1.Error
'A subroutine that deals with error conditions
MessageBox.Show(e.desc)
'Show the error that has occurred
Me.Close()
'Close the program
End Sub
Private Sub CloseButton_Click(ByVal sender As Object, ByVal e As System.EventArgs)
Handles Button1.Click
'A subroutine to close the program
Me.Close()
End Sub
Private Sub Form1_FormClosing(ByVal sender As Object, ByVal e As System.Windows.Forms.
FormClosingEventArgs) Handles Me.FormClosing
'The subroutine that is run as the program closes
Servo1.close()
'This block of code ensures that the Phidget is disabled. It is
'not strictly necessary but recommended
End Sub
End Class 'Signals the end of this program