Call Girls in Kalyan Vihar Delhi 💯 Call Us 🔝8264348440🔝
Crochet Duck pattern
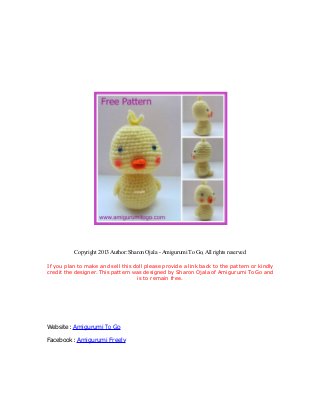
1. Copyright 2013 Author: Sharon Ojala - Amigurumi To Go, All rights reserved
If you plan to make and sell this doll please provide a link back to the pattern or kindly
credit the designer. This pattern was designed by Sharon Ojala of Amigurumi To Go and
is to remain free.
Website: Amigurumi To Go
Facebook: Amigurumi Freely
2. 2
What I used to make the Duck:
worsted weight yarn medium #4
7.5mm safety eyes (8mm will work fine too)
4.00 mm hook
yarn needle
red felt marker for cheeks
st = stitch
sc = single crochet
2tog = 2 stitches together
ch1 = chain one
sl st = slip stitch
f/o = finish off
Special notes: I worked in continuous rounds with a 4.00 mm hook and
worsted weight yarn. It helps to pin all pieces in place before sewing!
There is a stitch by stitch video tutorial available for this Amigurumi
Duck on my youtube channel
For Video Tutorial Click Here!
Head:
1) magic circle with 6st (6)
2) 2sc in each st (12)
3) 1sc in next st then 2sc in next st (18)
4) 1sc in next 2st then 2sc in next st (24)
5) 1sc in next 3st then 2sc in next st (30)
6) 1sc in each st
7) 1sc in next 4st then 2sc in next st (36)
8-10) 1sc in each st for 3 rows
11) 1sc in next 10st, 2sc in next 5st, 1sc in next 6st, 2sc in next 5st, 1sc
in next 10st (46)
12-14) 1sc in each st for 3 rows
15) 1sc in next 3st then 2tog (1sc in last st of the row) (37)
16) 1sc in next 3st then 2tog (1sc in last 2st of the row) (30)
17) 1sc in next 3st then 2tog (24)
3. 3
*put safety eyes in between the 10th and 11th row and have about 7st
between them. Also make sure you are putting the eyes in the right side
of the head. Refer to the video if you are having difficulty. I find it also
helps to stuff the head and then decide where the eyes will go, push them
in to make a little hole or dot the spot with a pen then take out the
stuffing and put in the eyes.
*stuff and shape as you stuff and making sure to stuff those cheeks! Put
your thumb in between the cheeks, this will help you shape the face as
you stuff. Don't worry about completely stuffing the face now because
you can stuff more in as you continue to close up the hole. Refer to video
for help with stuffing.
4. 4
18) 1sc in next 2st then 2tog (18)
19) 1sc in next st then 2tog (12)
20) 2tog 6 times (6)
f/o and hide the yarn tail inside the head. Check over the face and make
sure you are happy with the way it looks. Using a stuffing stick, put more
stuffing into the cheeks if need be.
Body:
1) magic circle with 6st (6)
2) 2sc in each st (12)
3) 1sc in next st then 2sc in next st (18)
4) 1sc in next 2st then 2sc in next st (24)
5) 1sc in next 3st then 2sc in next st (30)
6) 1sc in next 4st then 2sc in next st (36)
7-11) 1sc in each st for 5 rows
12) 1sc in next 4st then 2tog (30)
13) 1sc in each st
14) 1sc in next 3st then 2tog (24)
15) 1sc in each st
16) 1sc in next 2st then 2tog (18) * stuff body
17) 1sc in next st then 2tog (12)
f/o and leave a long tail for sewing
You can now sew the head and body together.
5. 5
Wings make 2:
1) magic circle with 6st (6)
2) ch1 and turn, 2sc in each st (12)
3) ch1 and turn, 1sc in each st
f/o and leave a long tail for sewing
Sew the flat edge of the wing to the top of the 12th row. Count the rounds
counting up from the magic circle you started the body with.
Tail:
1) magic circle with 6st (6)
2) 1sc in next st then 2sc in next st (9)
3) 1sc in next 2st then 2sc in next st (12)
4-5) 1sc in each st for 2 rows
sl st next st and f/o leaving a long tail for sewing
*stuff the tail and lightly stuff the tip of the tail. You can bend the tip of
the tail upwards after you sew the tail onto the body. Sew the tail so the
under side of the tail is level with the bottom of the body. This will help
the Duck stand up right.
Tuft of Hair:
1) ch 6
2) starting with the 2nd ch from the hook, 1sc in each ch (5)
3) ch 5
4) starting with the 2nd ch from the hook, 1sc in each ch (4)
5) ch 4
6. 6
6) starting with the 2nd ch from the hook, 1sc in each ch (3)
f/o and sew the 2 ends together then sew to the top of the head
Beak:
1) magic circle with 6st (6)
2) 3sc in next st then 1sc in next 2st, repeat (10)
sl st next st and f/o leaving a long tail for sewing. Fold beak in half and
sew in between the cheeks. You can shape the beak more once it's in
place. Refer to the video if you have difficulty.
7. 7
Cheeks:
I used red felt marker to paint the cheeks on but you can use whatever
will stain the yarn, something that won't rub off.
And that's it! If you made a Duck please post pictures on my facebook
page Amigurumi Freely, I would love to see!