Top profile Call Girls In Udgir [ 7014168258 ] Call Me For Genuine Models We ...
Dwl1000xy
1. Digi-Pas™
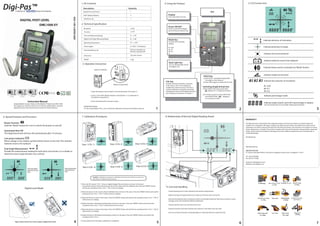
1. Kit Contents 4. Using the Product 5. LCD Screen Icon
Description Quantity
A division of Group of Companies Digital Post Level Device 1 Vial
“AAA” Alkaline Batteries 2 Display
LCD screen with Cross hair
JIM1000XY-001-F09
Aluminium Jig 1
DIGITAL POST LEVEL
DWL1000 XY 2. Technical Speci cation
Power ON/OFF
Resolution ± 0.05° Power on and o the digital
post level by pressing this key
Accuracy ± 0.10°
Post Level Measuring Range 0° ~ ± 45°
Digital Level Angle Measuring Range 0° ~ ± 90° Mode Key Indicate direction of inclination
0°c ~ ± 50°c To Switch the resolution
Operating Temperature
reading
Power Supply 2x “AAA” 1.5V batteries Indicate proximity to target
R1: 0.05
Estimated Battery Life 150 hours (backlite on) R2: .01
350 hours (backlite o ) R3: 0.5
% Indicate zero level achieved
Dimension 120 x 60 x 50 mm
Weight 210g
Indicate batteries need to be replaced
Back Light Key
3. Operation Instruction Turn on the back light of LCD
for brighter LCD
Indicate beep sound is activated via “Mode” button
Battery Installation
Fig 1
Indicate single axis function
HOLD Key
a) Press HOLD , the digital reading blink.
The angle is in the memory. Indicate the selection of resolution:
CAL Key b) Press HOLD again to release the function.
Periodic checking should be conducted
Battery Compartment
to this device. If it is out of alignment, R1: 0.05
recalibration will be necessary. This key is Switching Single & Dual Axis
used for calibration to absolute horizontal a) Press HOLD, then press mode when R2: 0.1
and absolute vertical of the digital post level. display, it is i n single axis function. R3: 0.5
Tested to Comply
1. Open the battery cover, located as vertcial side plastic (See Figure 1).
with FCC Standards See “Calibration Procedures” in section 7.
b) To switch to dual axis, Press HOLD then
ISO 9001:2000 ISO 14001:2000 OHSAS 18001:2007
2. Insert 2 new “AAA” alkaline batteries with polarity (+/-) as indicated on
press MODE. When disappear, Indicate percentage mode
the battery compartment.
Cet No.: TWO4/00450EM Cet No.: SG08/50066
Cet No.: QSP00050
it is in dual axis mode.
Instruction Manual 3. Close the battery door securely in place.
Congratulations on your choice on this Digi-Pas™ Digital Level DWL-1000
Indicate angle of pitch and roll in percentage or degree.
(See the relationship of vial and digit reading pairing details)
We suggest you read this instruction manual thoroughly before using the IMPORTANT NOTICE:
digital post level. Save thisinstruction manual for future reference. It is the responsibility of the user to verify the calibration of the post level before each use. 1 2 3
6. Special Features and Functions 7. Calibration Procedures 8. Relationship of Vial and Digital Reading Paired
WARRANTY
Buzzer Function The Digi-Pas level is warranted to the original purchaser to be free from defects in workmanship and
Hold the “Mode” button for 4 sec to switch the buzzer on and o . material. Our corporation will repair or replace any detective part which may malfunction under normal
and proper use within a period of 30 days from the date of purchase. This warranty is not subject to misuse,
abuse, assignment, or transfer. The exclusive remedy under any and all warrants and guarantees, expressed
Automated Shut-O herein, and we shall not be liable for damages from loss or delay of equipments uses, consequential, or
This digital post level will shut-o automatically after 10 minutes. incidental damage.
Distributed by:
Low-power indication
When voltage is low, battery symbol will be shown on the LCD. This indicate
batteries need to be replaced. Step 1 (CAL 1) Step 2 (CAL 2) Step 3 (CAL 3)
Manufactured by:
Dual Angle Measurement
JSB TECH PTE LTD
Provide the measurement reading for both pitch and roll axis. It is suitable to 41 Science Park Road #04-02, The Gemini, Singapore Science Park 2 Singapore 117610
determine exact angle between two surfaces.
Tel: (65) 6778 0640
Fax: (65) 6777 0460
Email: jsb-sales@jsbtech.com
Website: www.digipas.com
Step 4 (CAL 4) Step 5 (CAL 5) Step 6 (CAL 6)
Show that digital Show the proximity
post level is at zero towards the zero
level level
Caution: Digital Post Level device is calibrated in the factory for maximum accuracy. User
only need to re-calibrates when necessary.
1) Press the CAL button. “CAL 1” show on digital display. Place the device as shown in the step 1.
Ensure both surfaces of the aluminum bar are in full contact with the calibration bar. Press the “MODE” button,
9. Care and Handling
Digital Level Mode wait for the countdown from 10 to 1. ”CAL 2” show on display.
2) Place the device on the reverse side of calibration bar as shown in the step 2. Press the “MODE” button and wait for • Avoid exposing unit to shock vibrations and extreme temperatures.
countdown from 10 to 1. ”CAL 3” will be shown on display.
• Before moving or transporting the unit, make sure that the unit is turned off.
3) Place the device as shown in the step 3. Press the “MODE” button and wait for the countdown from 10 to 1. ”CAL 4” Roof/drainage
will be shown on display. • Remove the batteries when storing the unit for an extended time(more than three months) to avoid Leveling
damage to the unit should the batteries deteriorate.
4) Rotate the device 180 degree horizontally as shown on the step 4. Press the "MODE" button and wait for the
countdown from 10 to 1. ”CAL 5” will be shown on the screen. • Always store the unit in its case when not in use.
5) Place the device as shown in the step 5. Press the “MODE” button and wait for the countdown from 10 to 1. ”CAL 6” • Keep the level dry and clean. Remove any moisture or dirt with a soft, dry cloth.
will be shown on display.
• Do not use harsh chemicals, strong detergents or cleaning solvents to clean the level.
6) Rotate the device 180 degree horizontally as shown on the step 6. Press the “MODE” button and wait for the
countdown from 10 to 1.
Figure above shown the correct usage in digital level mode 4 7) A long beep sound will signal, calibration is completed.
5 6 7