Azure Quantum with IBM Qiskit and IonQ QPU
•
0 j'aime•57 vues

This is a simple demo of the setup and running of Azure Quantum with IBM Qiskit for quantum circuit and IonQ QPU using Jupyter Notebook

Recommandé
Recommandé
Contenu connexe
Tendances
Tendances (19)
Similaire à Azure Quantum with IBM Qiskit and IonQ QPU
Similaire à Azure Quantum with IBM Qiskit and IonQ QPU (20)
Plus de Vijayananda Mohire
Plus de Vijayananda Mohire (20)
Dernier
Dernier (20)
Azure Quantum with IBM Qiskit and IonQ QPU
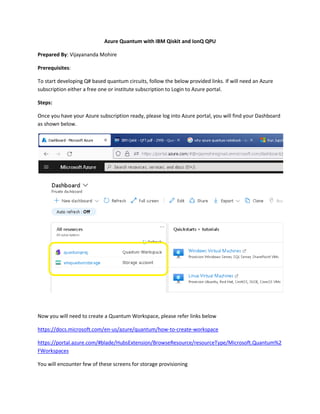
- 1. Azure Quantum with IBM Qiskit and IonQ QPU Prepared By: Vijayananda Mohire Prerequisites: To start developing Q# based quantum circuits, follow the below provided links. If will need an Azure subscription either a free one or institute subscription to Login to Azure portal. Steps: Once you have your Azure subscription ready, please log into Azure portal, you will find your Dashboard as shown below. Now you will need to create a Quantum Workspace, please refer links below https://docs.microsoft.com/en-us/azure/quantum/how-to-create-workspace https://portal.azure.com/#blade/HubsExtension/BrowseResource/resourceType/Microsoft.Quantum%2 FWorkspaces You will encounter few of these screens for storage provisioning
- 2. Select your subscription and created storage account After storage is selected you will now need a target platform to execute your Q# code. You may select any provider from below. This step is optional and can be added later on. I have selected IonQ
- 3. Finally preview your project details and Click on Create button as shown below Confirm the deployment has been succeeded
- 4. You will now see your project listed in your Dashboard. Click on the project link that will take you to the project IDE. Here we will use the Notebooks menu as shown below
- 5. We will now start working with the Jupyter Notebooks with Q# as Kernel. You can instead select Python. Use this link for more details. https://docs.microsoft.com/en-us/azure/quantum/get-started-jupyter- notebook Below is the sample of notebook imported into the Quantum workspace and the resulting results after executing the code. Please follow the instruction and obtain the results Quantum Computing on Azure Quantum with Q# and Jupyter Notebook: Parallel QRNG This notebook demonstrates how to execute a Q# program on Azure Quantum. Define Q# operations The quickest way to define a Q# operation in a Q# Jupyter Notebook is to simply write the Q# code directly into a notebook cell and execute it. Note that for convenience, the Microsoft.Quantum.Canon and Microsoft.Quantum.Intrinsic namespaces are automatically opened in every cell. [2] open Microsoft.Quantum.Arrays; open Microsoft.Quantum.Measurement;
- 6. operation SampleRandomNumber(nQubits : Int) : Result[] { // We prepare a register of qubits in a uniform // superposition state, such that when we measure, // all bitstrings occur with equal probability. use register = Qubit[nQubits] { // Set qubits in superposition. ApplyToEachA(H, register); // Measure all qubits and return. return ForEach(MResetZ, register); } } SampleRandomNumber You can also write your Q# code in .qs files which are in the same folder as the .ipynb notebook. Running %workspace reload will recompile all such .qs files and report the list of available Q# operations and functions. In this case, it finds an operation called SampleRandomNumber in a namespace called Microsoft.Quantum.AzureSamples. [3] %workspace reload Reloading workspace: done! Using %simulate, you can invoke the built-in Q# functionality to simulate a quantum operation locally and return the result. You can specify any operation that has been defined in the notebook or that has been imported from a .qs file. [4] %simulate SampleRandomNumber nQubits=3 Zero One Zero Executing Q# operations in Azure Quantum First, find the resource ID of your Azure Quantum workspace. You can copy/paste this from the top-right corner of your Quantum Workspace page in Azure Portal. Next, you can run %azure.connect to connect to the workspace and display the list of provisioned targets that support execution of Q# programs. If you are prompted to login, be sure to use the same account you used to create your Azure Quantum workspace. [7]
- 7. %azure.connect "/subscriptions/c684880b-e981-4b8f-9baf- 742935e59228/resourceGroups/cloud-shell-storage- centralindia/providers/Microsoft.Quantum/Workspaces/quantumproj" location="eastus" 2 sec Authenticated using Microsoft.Azure.Quantum.Authentication.TokenFileCredential Connected to Azure Quantum workspace quantumproj in location eastus Target ID Current Availability Average Queue Time (Seconds) ionq.qpu Available 158 ionq.simulator Available 3 Now, use %azure.target to specify the target you'd like to use for job submission. [8] %azure.target ionq.simulator 38 sec Loading package Microsoft.Quantum.Providers.IonQ and dependencies... Active target is now ionq.simulator Target ID Current Availability Average Queue Time (Seconds) ionq.simulator Available 3 To submit a job, use %azure.submit along with the Q# operation name and any parameters required by that operation. The %azure.submit command will return immediately after the job is created. Alternatively, you can use %azure.execute, which will submit the job and wait for it to complete. [9] %azure.submit SampleRandomNumber nQubits=3 9 sec Submitting SampleRandomNumber to target ionq.simulator... Job successfully submitted for 500 shots. Job name: SampleRandomNumber Job ID: 5f1afaa2-25ea-437d-b305-fe1fa94e479e
- 8. Job Name Job ID Job Status Target Creation Time Begin Execution Time End Execution Time SampleRandomNumber 5f1afaa2-25ea- 437d-b305- fe1fa94e479e Waiting ionq.simulator 01/14/2022 07:27:34 +00:00 Running %azure.status will display the status of the most recently submitted job in this session. If you want to check the status of a different job, provide the job ID to %azure.status. [10] %azure.status 4 sec Job Name Job ID Job Status Target Creation Time Begin Execution Time End Execution Time SampleRandomNumber 5f1afaa2- 25ea-437d- b305- fe1fa94e479e Succeeded ionq.simulator 01/14/2022 07:27:34 +00:00 01/14/2022 07:27:40 +00:00 01/14/2022 07:27:40 +00:00 Once the job has completed, use %azure.output to display the result. Again, you can provide a job ID to %azure.output if you want to display the status of a specific job. [11] %azure.output 2 sec
- 9. You can also view the status of all jobs by using %azure.jobs. Providing a parameter to this command will filter to just the jobs containing that string. For example, you can query for the status of all jobs named Microsoft.Quantum.AzureSamples.SampleRandomNumber. [12] %azure.jobs SampleRandomNumber 1 sec Job Name Job ID Job Status Target Creation Time Begin Execution Time End Execution Time SampleRandomNumber 5f1afaa2- 25ea-437d- b305- fe1fa94e479e Succeeded ionq.simulator 01/14/2022 07:27:34 +00:00 01/14/2022 07:27:40 +00:00 01/14/2022 07:27:40 +00:00 // Getting started with Qiskit and IonQ on Azure Quantum This notebook shows how to send a basic quantum circuit expressed using the Qiskit library to an IonQ target via the Azure Quantum service. First, import the required packages for this sample: from qiskit import QuantumCircuit from qiskit.visualization import plot_histogram from qiskit.tools.monitor import job_monitor from azure.quantum.qiskit import AzureQuantumProvider Connecting to the Azure Quantum service To connect to the Azure Quantum service, use the AzureQuantumProvider constructor to create a provider object that connects to your Azure Quantum workspace. This will use your workspace's resource ID and location. from azure.quantum.qiskit import AzureQuantumProvider provider = AzureQuantumProvider ( resource_id = "/subscriptions/c684880b-e981-4b8f-9baf- 742935e59228/resourceGroups/cloud-shell-storage- centralindia/providers/Microsoft.Quantum/Workspaces/quantumproj",
- 10. location = "eastus" ) Use provider.backends to see what targets are currently available. Running this method will trigger authentication to your Microsoft account, if you're not already logged in. print([backend.name() for backend in provider.backends()]) ['ionq.qpu', 'ionq.simulator'] Run a simple circuit Let's create a simple Qiskit circuit to run. This notebook assumes some familiarity with Qiskit. To read more about Qiskit, review the Qiskit documentation. # Create a Quantum Circuit acting on the q register circuit = QuantumCircuit(3, 3) circuit.name = "Qiskit Sample - 3-qubit GHZ circuit" circuit.h(0) circuit.cx(0, 1) circuit.cx(1, 2) circuit.measure([0,1,2], [0, 1, 2]) # Print out the circuit circuit.draw() ┌───┐ ┌─┐ q_0: ┤ H ├──■───────┤M├────── └───┘┌─┴─┐ └╥┘┌─┐ q_1: ─────┤ X ├──■───╫─┤M├─── └───┘┌─┴─┐ ║ └╥┘┌─┐ q_2: ──────────┤ X ├─╫──╫─┤M├ └───┘ ║ ║ └╥┘ c: 3/════════════════╩══╩══╩═ 0 1 2 To get a result back quickly, use provider.get_backend to create a Backend object to connect to the IonQ Simulator back-end: simulator_backend = provider.get_backend("ionq.simulator") You can now run the program via the Azure Quantum service and get the result. The following cell will submit a job that runs the circuit with 100 shots: job = simulator_backend.run(circuit, shots=100) job_id = job.id() print("Job id", job_id) Job id 4a40a692-7835-11ec-91ff-00155d14b93c
- 11. To monitor job progress, we can use the Qiskit job_monitor we imported earlier to keep track of the Job's status. Note that this call will block until the job completes: job_monitor(job) Job Status: job has successfully run To wait until the job is completed and return the results, run: result = job.result() This returns a qiskit.Result object. type(result) qiskit.result.result.Result print(result) Result(backend_name='ionq.simulator', backend_version='1', qobj_id='Qiskit Sample - 3-qubit GHZ circuit', job_id='4a40a692-7835-11ec-91ff-00155d14b93c', success=True, results=[ExperimentResult(shots=100, success=True, meas_level=2, data=ExperimentResultData(counts={'000': 50, '111': 50}, probabilities={'000': 0.5, '111': 0.5}), header=QobjExperimentHeader(meas_map='[0, 1, 2]', name='Qiskit Sample - 3- qubit GHZ circuit', num_qubits='3', qiskit='True'))]) Because this is an object native to the Qiskit package, we can use Qiskit's result.get_counts and plot_histogram to visualize the results. The results can return a sparse dictionary so to make sure all possible bitstring lables are represented we add them to counts # The histogram returned by the results can be sparse, so here we add any of the miss ing bitstring labels. counts = {format(n, "03b"): 0 for n in range(8)} counts.update(result.get_counts(circuit)) print(counts) plot_histogram(counts) {'000': 50, '001': 0, '010': 0, '011': 0, '100': 0, '101': 0, '110': 0, '111': 50}
- 12. Run on IonQ QPU To connect to real hardware (Quantum Processing Unit or QPU), simply provide the name of the target "ionq.qpu" to the provider.get_backend method: qpu_backend = provider.get_backend("ionq.qpu") Submit the circuit to run on Azure Quantum. Note that depending on queue times this may take a while to run! Here we will again use the job_monitor to keep track of the job status, and plot_histogram to plot the results. # Submit the circuit to run on Azure Quantum qpu_job = qpu_backend.run(circuit, shots=1024) job_id = qpu_job.id() print("Job id", job_id) # Monitor job progress and wait until complete: job_monitor(qpu_job) # Get the job results (this method also waits for the Job to complete): result = qpu_job.result() print(result) counts = {format(n, "03b"): 0 for n in range(8)} counts.update(result.get_counts(circuit)) print(counts) plot_histogram(counts) Job id 94fac0be-7835-11ec-91ff-00155d14b93c Job Status: job has successfully run Result(backend_name='ionq.qpu', backend_version='1', qobj_id='Qiskit Sample - 3-qubit GHZ circuit', job_id='94fac0be-7835-11ec-91ff-00155d14b93c', success=True, results=[ExperimentResult(shots=1024, success=True, meas_level=2, data=ExperimentResultData(counts={'000': 446, '001': 16, '010': 16, '011': 21, '100': 11, '101': 13, '110': 30, '111': 471}, probabilities={'000': 0.435546875, '001': 0.015625, '010': 0.015625, '011': 0.0205078125, '100': 0.0107421875, '101': 0.0126953125, '110': 0.029296875, '111': 0.4599609375}), header=QobjExperimentHeader(meas_map='[0, 1, 2]', name='Qiskit Sample - 3-qubit GHZ circuit', num_qubits='3', qiskit='True'))]) {'000': 446, '001': 16, '010': 16, '011': 21, '100': 11, '101': 13, '110': 30, '111': 471}
- 13. # Print package versions used in this notebook import qiskit print('n'.join(f'{m.__name__}=={m.__version__}' for m in globals().values() if getat tr(m, '__version__', None))) qiskit==0.18.3 ------------------------------------------------------------------------------------------------------------------------------ Disclaimer: Copyrights and all training material are owned by Microsoft Azure Quantum. We at Bhadale IT have executed the Q# code and used IonQ hardware. No intention for any copyright infringements. For educational purpose only