Kasuti of karnataka
•Télécharger en tant que PPTX, PDF•
1 j'aime•650 vues

Kasuti of karnataka

Recommandé
Contenu connexe
Tendances
Tendances (20)
Similaire à Kasuti of karnataka
Similaire à Kasuti of karnataka (13)
Plus de Visual Design Solution
Plus de Visual Design Solution (20)
Dernier
Dernier (20)
Kasuti of karnataka
- 2. Basic stitches of Kasuti • Ganti or Gavanti • Muragi
- 3. • Neygi or Negi • Menthi
- 4. Fig 1: Trace out the pattern from the graph paper onto the fabric using a carbon tracing paper or any other tracing medium.
- 5. • Fig 2: In Kasuti, you always return to where you begin from. So, keep the centre of the pattern as the common point and always begin from there. • Fig 3: Every time you reach a point with a choice to go either left or right, the trick is to keep finishing all the lines/patterns on the left first and then move to right. This is a simple logic to keep any confusion at rest.
- 6. Fig 4: Once you finish with the right side and return to the point B, continue the journey upward unitl you reach the last point, D.You will see that the patterns hanging on the left side is finished. Fig 5: Fig 5: Start the return journey.Just a simple note: diamonds are seen as a split in the main line, and not as a pattern in itself. This is the reason why the diamonds are finished during the return journey.
- 7. Fig 6: Now, we start with the right side of the pattern. Finish up with the diamond, return back downwards. From B, turn to the right. Finish the left part of the hanging pattern first before moving to finishing the right part. Fig 7: Once you reach back to the point B, continue the return journey downwards till you reach the first diamond.
- 8. Fig 8: Finish up with the diamond. Fig 9: Return back to the centre, A. Now we begin the next part of the pattern. Work upward, through the point B till the very end. Keep to the left all the way.
- 9. Fig 11: Take the return journey and follow the little arrow to the right and continue to finish up with the remaining pattern. Now, instead, you can also finish the little diamond on return journey from the right side. Fig 10: Begin your return journey and come back to B. Move to the right side of the pattern, but before going all the way up, you have to finish the little diamond shape lying in between. So, take a diversion to where the little arrow points to.
- 10. Fig 12: Continue the return journey downwards. Fig 13: Finish up with the diamond and return to the centre. Now, continue with the next line of pattern till the entire design is done in the similar way.
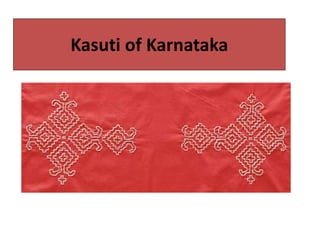
- 11. Fig 14: The completed kasuti pattern would look like this
- 12. This is a traditional pattern of a lamp. Each colored cell in the graph represents a cross stitch or the menthi stitch of kasuti.