A Critique of the Proposed National Education Policy Reform
WCF tutorial
1. Getting Started
Welcome to the world of windows communication foundation. This section you will
learn what is WCF and how it is differ from web service. Tools require setting up the
environment for WCF development and great books on WCF also mention here.
• Introduction to WCF
• Development Tools
• Difference between WCF and Web service
Introduction to WCF
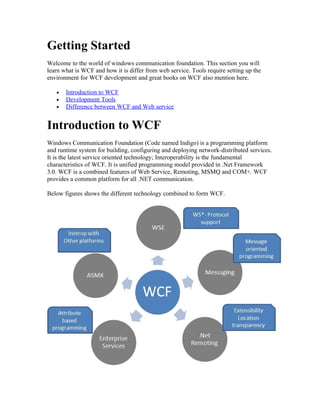
Windows Communication Foundation (Code named Indigo) is a programming platform
and runtime system for building, configuring and deploying network-distributed services.
It is the latest service oriented technology; Interoperability is the fundamental
characteristics of WCF. It is unified programming model provided in .Net Framework
3.0. WCF is a combined features of Web Service, Remoting, MSMQ and COM+. WCF
provides a common platform for all .NET communication.
Below figures shows the different technology combined to form WCF.
2. Advantage
1. WCF is interoperable with other services when compared to .Net Remoting,where
the client and service have to be .Net.
2. WCF services provide better reliability and security in compared to ASMX web
services.
3. In WCF, there is no need to make much change in code for implementing the
security model and changing the binding. Small changes in the configuration will
make your requirements.
4. WCF has integrated logging mechanism, changing the configuration file settings
will provide this functionality. In other technology developer has to write the
code.
Disadvantage
Making right design for your requirement is little bit difficult. I will try to help you on
solving these difficulties in the following article.
Development Tools
WCF application can be developed by the Microsoft Visual Studio. Visual studio is
available at different edition. You can use Visual Studio 2008 Expression edition for the
development.
http://www.microsoft.com/express/product/default.aspx
Visual Studio 2008 SDK 1.1
http://www.microsoft.com/downloads/details.aspx?FamilyID=59ec6ec3-4273-48a3-
ba25-dc925a45584d...
Microsoft Visual Studio 2008
Microsoft Visual studio 2008 provides new features for WCF compared to Visual Studio
2005. These are the new features added to VS 2008.
1. Multi-targeting
You can create application in different framework like Framework 2.0, 3.0 and
3.5
3. 2. Default template is available for WCF
3. WCF - Test Client tools for testing the WCF service.
Microsoft provides inbuilt application to test the WCF application. This can be
done by opening the Visual Studio command prompt and type the wcfClient
Serviceurl shows below. This will help the developer to test the service before
creating the client application.
4. 4. WCF services can be debugged now in Visual Studio 2008. Wcfsvchost.exe
will do it for you because service will be self hosted when you start
debugging.
Difference between WCF and Web service
Web service is a part of WCF. WCF offers much more flexibility and portability to
develop a service when comparing to web service. Still we are having more advantages
over Web service, following table provides detailed difference between them.
Features Web Service WCF
It can be hosted in IIS, windows
Hosting It can be hosted in IIS activation service, Self-hosting,
Windows service
[WebService] attribute has to be [ServiceContraact] attribute has to be
Programming
added to the class added to the class
[WebMethod] attribute represents [OperationContract] attribute represents
Model
the method exposed to client the method exposed to client
One-way, Request- Response are One-Way, Request-Response, Duplex
Operation the different operations supported are different type of operations
in web service supported in WCF
5. System.Xml.serialization name System.Runtime.Serialization
XML
space is used for serialization namespace is used for serialization
XML 1.0, MTOM(Message
Encoding Transmission Optimization XML 1.0, MTOM, Binary, Custom
Mechanism), DIME, Custom
Can be accessed through HTTP, Can be accessed through HTTP, TCP,
Transports
TCP, Custom Named pipes, MSMQ,P2P, Custom
Security, Reliable messaging,
Protocols Security
Transactions
WCF Fundamental
In this part of tutorial you are going to learn about some fundamental concepts in WCF.
These concepts and terms will be used throughout this tutorial.
• End Point
• Bindings and Behavior
• Contracts and Service host
• Message and Channel
• WCF client and Metadata
EndPoint
WCF Service is a program that exposes a collection of Endpoints. Each Endpoint is a
portal for communicating with the world.
All the WCF communications are take place through end point. End point consists of
three components.
Address
Basically URL, specifies where this WCF service is hosted .Client will use this url to
connect to the service. e.g
http://localhost:8090/MyService/SimpleCalculator.svc
Binding
Binding will describes how client will communicate with service. There are different
protocols available for the WCF to communicate to the Client. You can mention the
protocol type based on your requirements.
6. A binding has several characteristics, including the following:
• Transport -Defines the base protocol to be used like HTTP, Named Pipes, TCP,
and MSMQ are some type of protocols.
• Encoding (Optional) - Three types of encoding are available-Text, Binary, or
Message Transmission Optimization Mechanism (MTOM). MTOM is an
interoperable message format that allows the effective transmission of
attachments or large messages (greater than 64K).
• Protocol(Optional) - Defines information to be used in the binding such as
Security, transaction or reliable messaging capability
The following table gives some list of protocols supported by WCF binding.
Binding Description
BasicHttpBinding Basic Web service communication. No security by default
WSHttpBinding Web services with WS-* support. Supports transactions
WSDualHttpBinding Web services with duplex contract and transaction support
WSFederationHttpBinding Web services with federated security. Supports transactions
Communication directly with MSMQ applications. Supports
MsmqIntegrationBinding
transactions
Communication between WCF applications by using queuing.
NetMsmqBinding
Supports transactions
Communication between WCF applications on same computer.
NetNamedPipeBinding
Supports duplex contracts and transactions
Communication between computers across peer-to-peer
NetPeerTcpBinding
services. Supports duplex contracts
Communication between WCF applications across computers.
NetTcpBinding
Supports duplex contracts and transactions
Contract
Collection of operation that specifies what the endpoint will communicate with outside
world. Usually name of the Interface will be mentioned in the Contract, so the client
application will be aware of the operations which are exposed to the client. Each
operation is a simple exchange pattern such as one-way, duplex and request/reply.
Below figure illustrate the functions of Endpoint
7. Example:
Endpoints will be mentioned in the web.config file on the created service.
<system.serviceModel>
<services>
<service name="MathService"
behaviorConfiguration="MathServiceBehavior">
<endpoint
address="http://localhost:8090/MyService/MathService.svc"
contract="IMathService"
binding="wsHttpBinding"/>
</service>
</services>
<behaviors>
<serviceBehaviors>
<behavior name="MathServiceBehavior">
<serviceMetadata httpGetEnabled="True"/>
<serviceDebug includeExceptionDetailInFaults="true" />
</behavior>
</serviceBehaviors>
</behaviors>
</system.serviceModel>
8. Binding and Behavior
Binding
Simple definition for Binding describes how the client will communicate with service.
We can understand with an example.
Consider a scenario say, I am creating a service that has to be used by two type of client.
One of the client will access SOAP using http and other client will access Binary using
TCP. How it can be done? With Web service it is very difficult to achieve, but in WCF its
just we need to add extra endpoint in the configuration file.
<system.serviceModel>
<services>
<service name="MathService"
behaviorConfiguration="MathServiceBehavior">
<endpoint
address="http://localhost:8090/MyService/MathService.svc"
contract="IMathService"
binding="wsHttpBinding"/>
<endpoint address="net.tcp://localhost:8080/MyService/MathService.svc"
contract="IMathService"
binding="netTcpBinding"/>
</service>
</services>
<behaviors>
<serviceBehaviors>
<behavior name="MathServiceBehavior">
<serviceMetadata httpGetEnabled="True"/>
<serviceDebug includeExceptionDetailInFaults="true" />
</behavior>
</serviceBehaviors>
</behaviors>
</system.serviceModel>
See how simple it is in WCF. Microsoft is making everything simple.cording to its scope:
common behaviors affect all endpoints globally, service behaviors affect only service-
related aspects, endpoint behaviors affect only endpoint-related properties, and operation-
level behaviors affect particular operations.
Example:
In the below configuration information, I have mentioned the Behavior at Service level.
In the service behavior I have mention the servieMetadata node with attribute
httGetEnabled='true'. This attribute will specifies the publication of the service metadata.
Similarly we can add more behavior to the service.
<system.serviceModel>
9. <services>
<service name="MathService"
behaviorConfiguration="MathServiceBehavior">
<endpoint address="" contract="IMathService"
binding="wsHttpBinding"/>
</service>
</services>
<behaviors>
<serviceBehaviors>
<behavior name="MathServiceBehavior">
<serviceMetadata httpGetEnabled="True"/>
<serviceDebug includeExceptionDetailInFaults="true" />
</behavior>
</serviceBehaviors>
</behaviors>
</system.serviceModel>
Note:
Application can be controlled either through coding, configuring or through combination
of both. Specification mention in the configuration can also be overwritten in code.
Contracts and Service Host
Contracts
In WCF, all services are exposed as contracts. Contract is a platform-neutral and standard
way of describing what the service does. Mainly there are four types of contracts
available in WCF
Service Contract
Service contracts describe the operation that service can provide. For Eg, a Service
provide to know the temperature of the city based on the zip code, this service is called as
Service contract. It will be created using Service and Operational Contract attribute.
To know more on Service contract see Service contract tutorial.
Data Contract
10. Data contract describes the custom data type which is exposed to the client. This defines
the data types, that are passed to and from service. Data types like int, string are
identified by the client because it is already mention in XML schema definition language
document, but custom created class or data types cannot be identified by the client e.g.
Employee data type. By using DataContract we can make client to be aware of Employee
data type that are returning or passing parameter to the method.
To know more on DataContract see DataContract tutorial.
Message Contract
Default SOAP message format is provided by the WCF runtime for communication
between Client and service. If it is not meeting your requirements then we can create our
own message format. This can be achieved by using Message Contract attribute.
To know more on Message Contract see Message contract tutorial.
Fault Contract
Suppose the service I consumed is not working in the client application. I want to know
the real cause of the problem. How I can know the error? For this we are having Fault
Contract. Fault Contract provides documented view for error occurred in the service to
client. This helps us to easy identity, what error has occurred.
To know more on Fault Contract see Fault Contract tutorial.
Service Host
Service Host object is in the process of hosting the WCF service and registering
endpoints. It loads the service configuration endpoints, apply the settings and start the
listeners to handle the incoming request. System.ServiceModel.ServiceHost namespace
hold this object. This object is created while self hosting the WCF service.
In the below example you can find that WCF service is self hosted using console
application.
//Creating uri for the hosting the service
Uri uri = new Uri("http://localhost/CategoryService");
//Creating the host object for MathService
ServiceHost host = new ServiceHost(typeof(CategoryService), uri);
//Adding endpoint to the Host object
host.AddServiceEndpoint(typeof(ICategoryService),new WSHttpBinding(),
uri);
host.Open(); //Hosting the Service
Console.WriteLine("Waiting for client invocations");
Console.ReadLine();
host.Close();
11. Message and Channel
Message
WCF Message is the unit of data exchange between client and service. It consists of
several parts, including a body and headers.
WCF Runtime
WCF runtime is the set of object responsible for sending and receiving message. For
example formatting the message, applying security and transmitting and receiving
message using various protocol.
Channels:
Channels are the core abstraction for sending message to and receiving message from an
Endpoint. Broadly we can categories channels as
Transport Channels
- Handles sending and receiving message from network. Protocols like HTTP, TCP
name pipes and MSMQ.
Protocol Channels
- Implements SOAP based protocol by processing and possibly modifying message. e.g.
WS-Security and WS-Reliability.
WCF Client and Metadata
WCF Client
WCF client is a client application creates to expose the service operations as method.
Any application can host a WCF client, including an application that host a service.
Therefore it is possible to create a service that includes WCF clients of other services.
A client application is a managed application that uses a WCF client to communicate
with another application. To create a client application for a WCF service requires the
following steps:
1. Get the Proxy class and service end point information
Using SvcUtil.exe we can create proxy class for the service and configuration
information for endpoints. Example type the following sentence in the Visual
12. studio command prompt, this will generate the class file and configuration file
which contain information about the endpoints.
svcutil /language:vb /out:ClientCode.vb /config:app.config http://localhost:8090/
MyService/SimpleCalculator.svc?wsdl
2. Call operations.
Add this class files in the client application. Then create the object for this class
and invoke the service operation. Configuration information we got from the
above step has to be added to the client application configuration file. When the
client application calls the first operation, WCF automatically opens the
underlying channel. This underlying channel is closed, when the object is
recycled.
//Creating the proxy on client side
MyCalculatorServiceProxy.MyServiceProxy proxy
= new MyCalculatorServiceProxy.MyServiceProxy();
Console.WriteLine("Counter: " + proxy.MyMethod());
3. Close the WCF client object.
After using the object created in the above steps, we have to dispose the object.
Channel will be closed with the service, when the object is cleared.
Metadata
Characteristics of the service are described by the metadata. This metadata can be
exposed to the client to understand the communication with service. Metadata can be set
in the service by enabling the ServiceMetadata node inside the servcieBehaviour node of
the service configuration file.
<system.serviceModel>
<services>
<service name="MathService"
behaviorConfiguration="MathServiceBehavior">
<endpoint address="" contract="IMathService"
binding="wsHttpBinding"/>
</service>
</services>
<behaviors>
<serviceBehaviors>
<behavior name="MathServiceBehavior">
<serviceMetadata httpGetEnabled="True"/>
<serviceDebug includeExceptionDetailInFaults="true" />
</behavior>
</serviceBehaviors>
</behaviors>
</system.serviceModel>
13. This metadata can be viewed while creating WCF client application using SvcUtil.exe
WCF Architecture
The following figure illustrates the major components of WCF.
Figure 1: WCF Architecture
Contracts
Contracts layer are next to that of Application layer. Developer will directly use this
contract to develop the service. We are also going to do the same now. Let us see briefly
what these contracts will do for us and we will also know that WCF is working on
message system.
Service contracts
14. - Describe about the operation that service can provide. Example, Service provided to
know the temperature of the city based on the zip code, this service we call as Service
contract. It will be created using Service and Operational Contract attribute.
Data contract
- It describes the custom data type which is exposed to the client. This defines the data
types, are passed to and from service. Data types like int, string are identified by the
client because it is already mention in XML schema definition language document, but
custom created class or datatype cannot be identified by the client e.g. Employee data
type. By using DataContract we can make client aware that we are using Employee data
type for returning or passing parameter to the method.
Message Contract
- Default SOAP message format is provided by the WCF runtime for communication
between Client and service. If it is not meeting your requirements then we can create our
own message format. This can be achieved by using Message Contract attribute.
Policies and Binding
- Specify conditions required to communicate with a service e.g security requirement to
communicate with service, protocol and encoding used for binding.
Service Runtime
- It contains the behaviors that occur during runtime of service.
• Throttling Behavior- Controls how many messages are processed.
• Error Behavior - Specifies what occurs, when internal error occurs on the service.
• Metadata Behavior - Tells how and whether metadata is available to outside
world.
• Instance Behavior - Specifies how many instance of the service has to be created
while running.
• Transaction Behavior - Enables the rollback of transacted operations if a failure
occurs.
• Dispatch Behavior - Controls how a message is processed by the WCF
Infrastructure.
Messaging
- Messaging layer is composed of channels. A channel is a component that processes a
message in some way, for example, by authenticating a message. A set of channels is also
known as a channel stack. Channels are the core abstraction for sending message to and
receiving message from an Endpoint. Broadly we can categories channels as
15. • Transport Channels
Handles sending and receiving message from network. Protocols like HTTP,
TCP, name pipes and MSMQ.
• Protocol Channels
Implements SOAP based protocol by processing and possibly modifying message.
E.g. WS-Security and WS-Reliability.
Activation and Hosting
- Services can be hosted or executed, so that it will be available to everyone accessing
from the client. WCF service can be hosted by following mechanism
• IIS
Internet information Service provides number of advantages if a Service uses Http
as protocol. It does not require Host code to activate the service, it automatically
activates service code.
• Windows Activation Service
(WAS) is the new process activation mechanism that ships with IIS 7.0. In
addition to HTTP based communication, WCF can also use WAS to provide
message-based activation over other protocols, such as TCP and named pipes.
• Self-Hosting
WCF service can be self hosted as console application, Win Forms or WPF
application with graphical UI.
• Windows Service
WCF can also be hosted as a Windows Service, so that it is under control of the
Service Control Manager (SCM).
WCF Hosting
In this part of the tutorial we are going to see the four different way of hosting the WCF
service. WCF service cannot exist on its own; it has to be hosted in windows process
called as host process. Single host process can host multiple servers and same service
type can be hosted in multiple host process. As we discussed there are mainly four
different way of hosting the WCF service.
16. 1. IIS hosting
2. Self hosting
3. Windows Activation Service
4. Windows Service
Multiple hosting and protocols supported by WCF.Microsoft has introduced the WCF
concept in order to make distributed application development and deployment simple.
Hosting Environment Supported protocol
Windows console and form application HTTP,net.tcp,net.pipe,net.msmq
Windows service application (formerly known as NT
HTTP,net.tcp,net.pipe,net.msmq
services)
Web server IIS6 http, wshttp
Web server IIS7 - Windows Process Activation Service
HTTP,net.tcp,net.pipe,net.msmq
(WAS)
A summary of hosting options and supported features.
Feature Self-Hosting IIS Hosting WAS Hosting
Executable Process/ App Domain Yes Yes Yes
Configuration App.config Web.config Web.config
Activation Manual at startup Message-based Message-based
Idle-Time Management No Yes Yes
Health Monitoring No Yes Yes
Process Recycling No Yes Yes
Management Tools No Yes Yes
IIS 5/6 Hosting
The main advantage of hosting service in IIS is that, it will automatically launch the host
process when it gets the first client request. It uses the features of IIS such as process
recycling, idle shutdown, process health monitoring and message based activation. The
main disadvantage of using IIS is that, it will support only HTTP protocol.
Let as do some hands on, to create service and host in IIS
Step 1:Start the Visual Studio 2008 and click File->New->Web Site. Select the 'WCF
Service' and Location as http. This will directly host the service in IIS and click OK.
17. Step 2: I have created sample HelloWorld service, which will accept name as input and
return with 'Hello' and name. Interface and implementation of the Service is shown
below.
IMyService.cs
[ServiceContract]
public interface IMyService
{
[OperationContract]
string HelloWorld(string name);
}
MyService.cs
public class MyService : IMyService
{
#region IMyService Members
public string HelloWorld(string name)
{
return "Hello " + name;
}
#endregion
18. }
Step 3: Service file (.svc) contains name of the service and code behind file name. This
file is used to know about the service.
MyService.svc
<%@ ServiceHost Language="C#" Debug="true"
Service="MyService" CodeBehind="~/App_Code/MyService.cs" %>
Step 4: Server side configurations are mentioned in the config file. Here I have mention
only one end point which is configured to 'wsHttpBinding', we can also have multiple end
point with differnet binding. Since we are going to hosted in IIS. We have to use only
http binding. We will come to know more on endpoints and its configuration in later
tutorial. Web.Config
<system.serviceModel>
<services>
<service behaviorConfiguration="ServiceBehavior" name="MyService">
<endpoint
address="http://localhost/IISHostedService/MyService.svc"
binding="wsHttpBinding" contract="IMyService">
<identity>
<dns value="localhost"/>
</identity>
</endpoint>
<endpoint address="mex" binding="mexHttpBinding"
contract="IMetadataExchange"/>
</service>
</services>
<behaviors>
<serviceBehaviors>
<behavior name="ServiceBehavior">
<!-- To avoid disclosing metadata information,
set the value below to false and remove the
metadata endpoint above before deployment -->
<serviceMetadata httpGetEnabled="true"/>
<!-- To receive exception details in faults for
debugging purposes, set the value below to true.
Set to false before deployment to avoid disclosing exception
information -->
<serviceDebug includeExceptionDetailInFaults="false"/>
</behavior>
</serviceBehaviors>
</behaviors>
</system.serviceModel>
Note:
You need to mention the service file name, along with the Address mention in the config
file. IIS Screen shot
20. Step 5:Now we successfully hosted the service in IIS. Next we have to consume this
service in client application. Before creating the client application, we need to create the
proxy for the service. This proxy is used by the client application, to interact with service.
To create the proxy, run the Visual Studio 2008 command prompt. Using service utility
we can create the proxy class and its configuration information.
svcutil http://localhost/IISHostedService/MyService.svc
After executing this command we will find two file generated in the default location.
• MyService.cs - Proxy class for the WCF service
• output.config - Configuration information about the service.
Step 6: Now we will start creating the Console application using Visual Studio
2008(Client application).
21. Step 7: Add the reference 'System.ServiceModel'; this is the core dll for WCF.
22. Step 8: Create the object for the proxy class and call the HelloWorld method.
static void Main(string[] args)
{
//Creating Proxy for the MyService
MyServiceClient client = new MyServiceClient();
Console.WriteLine("Client calling the service...");
Console.WriteLine(client.HelloWorld("Ram"));
Console.Read();
}
Step 9: If we run the application we will find the output as shown below.
23. I hope you have enjoyed the Service hosted in IIS. Now let start the look on the self
hosted service.
Self Hosting
In web service, we can host the service only in IIS, but WCF provides the user to host the
service in any application (e.g. console application, Windows form etc.). Very
interestingly developer is responsible for providing and managing the life cycle of the
host process. Service can also be in-pro i.e. client and service in the same process. Now
let's us create the WCF service which is hosted in Console application. We will also look
in to creating proxy using 'ClientBase' abstract class.
Note: Host process must be running before the client calls the service, which
typically means you have to prelaunch it.
Step 1: First let's start create the Service contract and it implementation. Create a
console application and name it as MyCalculatorService. This is simple service
which return addition of two numbers.
24. Step 2: Add the System.ServiceModel reference to the project.
25. Step 3: Create an ISimpleCalculator interface, Add ServiceContract and
OperationContract attribute to the class and function as shown below. You will
know more information about these contracts in later session. These contracts will
expose method to outside world for using this service.
IMyCalculatorService.cs
using System;
using System.Collections.Generic;
using System.Linq;
using System.Text;
using System.ServiceModel;
namespace MyCalculatorService
{
[ServiceContract()]
public interface ISimpleCalculator
{
[OperationContract()]
int Add(int num1, int num2);
}
}
Step 4: MyCalculatorService is the implementation class for IMyCalculatorService
interface as shown below.
26. MyCalculatorService.cs
using System;
using System.Collections.Generic;
using System.Linq;
using System.Text;
namespace MyCalculatorService
{
class SimpleCalculator : ISimpleCalculator
{
public int Add(int num1, int num2)
{
return num1 + num2;
}
}
}
Step 5: Now we are ready with service. Let's go for implementing the hosting
process. Create a new console application and name it as
'MyCalculatorServiceHost'
Step 6: ServiceHost is the core class use to host the WCF service. It will accept
implemented contract class and base address as contractor parameter. You can
27. register multiple base addresses separated by commas, but address should not use
same transport schema.
Uri httpUrl
= new Uri("http://localhost:8090/MyService/SimpleCalculator");
Uri tcpUrl
= new Uri("net.tcp://localhost:8090/MyService/SimpleCalculator");
ServiceHost host
= new ServiceHost(typeof(MyCalculatorService.SimpleCalculator),
httpUrl, tcpUrl);
Multiple end points can be added to the Service using AddServiceEndpoint() method.
Host.Open() will run the service, so that it can be used by any client.
Step 7: Below code show the implementation of the host process.
using System;
using System.Collections.Generic;
using System.Linq;
using System.Text;
using System.ServiceModel;
using System.ServiceModel.Description;
namespace MyCalculatorServiceHost
{
class Program
{
static void Main(string[] args)
{
//Create a URI to serve as the base address
Uri httpUrl = new
Uri("http://localhost:8090/MyService/SimpleCalculator");
//Create ServiceHost
ServiceHost host
= new
ServiceHost(typeof(MyCalculatorService.SimpleCalculator), httpUrl);
//Add a service endpoint
host.AddServiceEndpoint(typeof(MyCalculatorService.ISimpleC
alculator)
, new WSHttpBinding(), "");
//Enable metadata exchange
ServiceMetadataBehavior smb = new ServiceMetadataBehavior();
smb.HttpGetEnabled = true;
host.Description.Behaviors.Add(smb);
//Start the Service
host.Open();
Console.WriteLine("Service is host at " +
DateTime.Now.ToString());
Console.WriteLine("Host is running... Press <Enter> key to
stop");
Console.ReadLine();
28. }
}
}
Step 8: Service is hosted, now we need to implement the proxy class for the client.
There are different ways of creating the proxy
• Using SvcUtil.exe, we can create the proxy class and configuration file with
end points.
• Adding Service reference to the client application.
• Implementing ClientBase<T> class
Of these three methods, Implementing ClientBase<T> is the best practice. If you are
using rest two method, we need to create proxy class every time when we make
changes in Service implementation. But this is not the case for ClientBase<T>. It
will create the proxy only at runtime and so it will take care of everything.
MyCalculatorServiceProxy.cs
using System;
using System.Collections.Generic;
using System.Linq;
using System.Text;
using System.ServiceModel;
using MyCalculatorService;
namespace MyCalculatorServiceProxy
{
public class MyCalculatorServiceProxy :
//WCF create proxy for ISimpleCalculator using ClientBase
ClientBase<ISimpleCalculator>,
ISimpleCalculator
{
public int Add(int num1, int num2)
{
//Call base to do funtion
return base.Channel.Add(num1, num2);
}
}
}
Step 9: In the client side, we can create the instance for the proxy class and call the
method as shown below. Add proxy assembly as reference to the project.
using System;
using System.Collections.Generic;
using System.Linq;
using System.Text;
using System.ServiceModel;
namespace MyCalculatorServiceClient
{
class Program
29. {
static void Main(string[] args)
{
MyCalculatorServiceProxy.MyCalculatorServiceProxy proxy ;
proxy= new
MyCalculatorServiceProxy.MyCalculatorServiceProxy();
Console.WriteLine("Client is running at " +
DateTime.Now.ToString());
Console.WriteLine("Sum of two numbers... 5+5
="+proxy.Add(5,5));
Console.ReadLine();
}
}
}
Step 10 : End point (same as service) information should be added to the
configuration file of the client application.
<?xml version="1.0" encoding="utf-8" ?>
<configuration>
<system.serviceModel>
<client>
<endpoint address
="http://localhost:8090/MyService/SimpleCalculator"
binding ="wsHttpBinding"
contract ="MyCalculatorService.ISimpleCalculator">
</endpoint>
</client>
</system.serviceModel>
</configuration>
Step 11: Before running the client application, you need to run the service. Output
of the client application is shown below.
30. This self host shows advantage such as in-Pro hosting, programmatic access and it
can be used when there need singleton service. I hope you have enjoyed the Self
hosting session, now let go for hosting using Windows Activation service.
Windows Activation Service
Windows Activation service is a system service available with Windows vista and
windows server 2008. It is available with IIS 7.0 and it is more powerful compared to IIS
6.0 because it supports Http, TCP and named pipes were IIS 6.0 supports only Http. It
can be installed and configured separately.
Hosting WCF in Activation service takes many advantages such as process recycling,
isolation, idle time management and common configuration system. WAS hosted service
can be created using following steps
1. Enable WCF for non-http protocols
2. Create WAS hosted service
3. Enable different binding to the hosted service
Enable WCF for non-http protocols
Before Start creating the service we need to configure the system to support WAS.
Following are the step to configure WAS.
1. Click Start -> Control Panel -> programs and Features and click 'Turn Windows
Components On or Off' in left pane.
2. Expand 'Microsoft .Net Framework 3.0' and enable "Windows Communication
Foundation HTTP Activation" and "Windows Communication Foundation Non-
HTTP Activation".
3. Next we need to add Binding to the Default Web site. As an example, we will
bind the default web site to the TCP protocol. Go to the Start menu -> Programs -
>Accessories. Right click on the "Command Prompt" item, and select "Run as
administrator" from the context menu.
4. Execute the following command
5. C:Windowssystem32inetsrv> appcmd.exe set site "Default Web Site" -
+bindings.[protocol='net.tcp',
bindingInformation='808:*']
b That command adds the net.tcp site binding to the default web site by modifying the
applicationHost.config file located in the "C:Windowssystem32inetsrvconfig"
directory. Similarly we can add different protocols to the Default Web site.
Create WAS hosted service
31. Step 1: Next we are going to create the service, Open the Visual Studio 2008 and click
New->WebSite and select WCF Service from the template and Location as HTTP as
shown below.
Step 2: Create the Contract by creating interface IMathService and add ServiceContract
attribute to the interface and add OperationContract attribute to the method declaration.
IMathService.cs
using System;
using System.Collections.Generic;
using System.Linq;
using System.Runtime.Serialization;
using System.ServiceModel;
using System.Text;
[ServiceContract]
public interface IMathService
{
[OperationContract]
int Add(int num1, int num2);
[OperationContract]
int Subtract(int num1, int num2);
32. }
Step 3: Implementation of the IMathService interface is shown below.
MathService.cs
using System;
using System.Collections.Generic;
using System.Linq;
using System.Runtime.Serialization;
using System.ServiceModel;
using System.Text;
public class MathService : IMathService
{
public int Add(int num1, int num2)
{
return num1 + num2;
}
public int Subtract(int num1, int num2)
{
return num1 - num2;
}
}
Step 4: Service file is shown below.
MathService.svc
<%@ ServiceHost Language="C#" Debug="true" Service="MathService"
CodeBehind="~/App_Code/MathService.cs" %>
Step 5: In web.Config file, create end point with 'netTcpBinding' binding and service
metadata will be published using Metadata Exchange point. So create the Metada
Exchange end point with address as 'mex' and binding as 'mexTcpBinding'. Without
publishing the service Metadata we cannot create the proxy using net.tcp address (e.g
svcutil.exe net.tcp://localhost/WASHostedService/MathService.svc )
Web.Config
<system.serviceModel>
<services>
<service name="MathService"
behaviorConfiguration="ServiceBehavior">
<!-- Service Endpoints -->
<endpoint binding="netTcpBinding"
contract="IMathService" >
</endpoint>
<endpoint address="mex"
binding="mexTcpBinding" contract="IMetadataExchange"/>
</service>
</services>
<behaviors>
<serviceBehaviors>
33. <behavior name="ServiceBehavior">
<!-- To avoid disclosing metadata information, set the value below
to false and remove the metadata endpoint above before deployment -->
<serviceMetadata httpGetEnabled="true"/>
<!-- To receive exception details in
faults for debugging purposes, set the value below to true.
Set to false before deployment to avoid disclosing
exception information -->
<serviceDebug includeExceptionDetailInFaults="false"/>
</behavior>
</serviceBehaviors></behaviors>
</system.serviceModel>
Enable different binding to the hosted service
1. Go to the Start menu -> Programs ->Accessories. Right click on the "Command
Prompt" item, and select "Run as administrator" from the context menu.
2. Execute the following command C:Windowssystem32inetsrv>appcmd set app
"Default Web Site/WASHostedServcie" /enabledProtocols:http,net.tcp
Output will be shown below.
Step 6: Now the service is ready to use. Next we can create the proxy class using service
uttility and add the proxy class to the client application. Creat the proxy class using
Visual Studio Command prompt and execute the command
svcutil.exe net.tcp://localhost/WASHostedService/MathService.svc
Proxy and configuration file are generated in the corresponding location.
34. Step 6: Create the client application as shown below and add the reference
'System.ServiceModel', this is the core dll for WCF.
35. Step 8: Add the proxy class and configuration file to the client application. Create the
object for the MathServiceClient and call the method.
Program.cs
class Program
{
static void Main(string[] args)
{
MathServiceClient client = new MathServiceClient();
Console.WriteLine("Sum of two number 5,6");
Console.WriteLine(client.Add(5,6));
Console.ReadLine();
}
}
The output will be shown as below.
36. So this tutorial clearly explains about the hosting the WCF in Windows Activation
Service. So next we can see how to host the service using Windows Service
Windows Service Hosting
In this tutorial we are going to see the hosting WCF service in Windows service. We will
use same set of code used for hosting the WCF service in Console application to this.
This is same as hosting the service in IIS without message activated. There is some
advantage of hosting service in Windows service.
• The service will be hosted, when system starts
• Process life time of the service can be controlled by Service Control Manager for
windows service
• All versions of Windows will support hosting WCF service.
Step 1: Now let start create the WCF service, Open the Visual Studio 2008 and click
New->Project and select Class Library from the template.
37. Step 2: Add reference System.ServiceModel to the project. This is the core assembly used
for creating the WCF service.
Step 3: Next we can create the ISimpleCalulator interface as shown below. Add the
Service and Operation Contract attribute as shown below.
ISimpleCalculator.cs
using System;
using System.Collections.Generic;
using System.Linq;
using System.Text;
using System.ServiceModel;
namespace WindowsServiceHostedContract
{
[ServiceContract]
public interface ISimpleCalculator
{
[OperationContract]
int Add(int num1, int num2);
[OperationContract]
38. int Subtract(int num1, int num2);
[OperationContract]
int Multiply(int num1,int num2);
[OperationContract]
double Divide(int num1, int num2);
}
}
Step 4: Implement the ISimpleCalculator interface as shown below.
SimpleCalulator.cs
using System;
using System.Collections.Generic;
using System.Linq;
using System.Text;
namespace WindowsServiceHostedService
{
class SimpleCalculator
: ISimpleCalculator
{
public int Add(int num1, int num2)
{
return num1+num2;
}
public int Subtract(int num1, int num2)
{
return num1-num2;
}
public int Multiply(int num1, int num2)
{
return num1*num2;
}
public double Divide(int num1, int num2)
{
if (num2 != 0)
return num1 / num2;
else
return 0;
}
}
}
Step 5: Build the Project and get the dll. Now we are ready with WCF service, now we
are going to see how to host the WCF Service in Windows service. Note:In this project, I
39. have mention that we are creating both Contract and Service(implementation) are in same
project. It is always good practice if you have both in different project.
Step 6: Open Visual Studio 2008 and Click New->Project and select Windows Service.
Step 7: Add the 'WindowsServiceHostedService.dll' as reference to the project. This
assembly will going to act as service.
40. Step 8: OnStart method of the service, we can write the hosting code for WCF. We have
to make sure that we are using only one service host object. On stop method you need to
close the Service Host. Following code show how to host WCF service in Windows
service.
WCFHostedWindowsService.cs
using System;
using System.Collections.Generic;
using System.ComponentModel;
using System.Data;
using System.Diagnostics;
using System.Linq;
using System.ServiceProcess;
using System.Text;
using System.ServiceModel;
using System.ServiceModel.Description;
namespace WCFHostedWindowsService
{
partial class WCFHostedWindowsService : ServiceBase
{
ServiceHost m_Host;
public WCFHostedWindowsService()
{
InitializeComponent();
}
protected override void OnStart(string[] args)
{
if (m_Host != null)
{
m_Host.Close();
41. }
//Create a URI to serve as the base address
Uri httpUrl = new
Uri("http://localhost:8090/MyService/SimpleCalculator");
//Create ServiceHost
m_Host = new ServiceHost
(typeof(WindowsServiceHostedService.SimpleCalculator),
httpUrl);
//Add a service endpoint
m_Host.AddServiceEndpoint
(typeof(WindowsServiceHostedService.ISimpleCalculator), new
WSHttpBinding(), "");
//Enable metadata exchange
ServiceMetadataBehavior smb = new ServiceMetadataBehavior();
smb.HttpGetEnabled = true;
m_Host.Description.Behaviors.Add(smb);
//Start the Service
m_Host.Open();
}
protected override void OnStop()
{
if (m_Host != null)
{
m_Host.Close();
m_Host = null;
}
}
static void Main()
{
ServiceBase[] ServicesToRun;
ServicesToRun = new ServiceBase[]
{
new WCFHostedWindowsService()
};
ServiceBase.Run(ServicesToRun);
}
}
}
Step 9: In order to install the service we need to have the Installer class for the Windows
service. So add new Installer class to the project, which is inherited from the Installer
class. Please find the below code for mentioning the Service name, StartUp type etc of
the service.
ServiceInstaller.cs
using System;
using System.Collections.Generic;
using System.Text;
using System.ServiceProcess;
using System.Configuration.Install;
using System.ComponentModel;
42. using System.Configuration;
namespace WCFHostedWindowsService
{
[RunInstaller(true)]
public class WinServiceInstaller : Installer
{
private ServiceProcessInstaller process;
private ServiceInstaller service;
public WinServiceInstaller()
{
process = new ServiceProcessInstaller();
process.Account = ServiceAccount.NetworkService;
service = new ServiceInstaller();
service.ServiceName = "WCFHostedWindowsService";
service.DisplayName = "WCFHostedWindowsService";
service.Description = "WCF Service Hosted";
service.StartType = ServiceStartMode.Automatic;
Installers.Add(process);
Installers.Add(service);
}
}
}
Step 10: Build the project, we will get the WCFHostedWindowsService.exe. Next we
need to install the service using Visual Studio Command Prompt. So open the command
prompt by clicking Start->All Programs-> Microsoft Visual Studio 2008-> Visual Studio
Tools-> Visual Studio Command Prompt Using installutil utility application, you can
install the service as shown below.
43. Step 11: Now service is Hosted sucessfully and we can create the proxy class for the
service and start using in the client applcaiton.
Binding
Binding will describes how client will communicate with service. There are different
protocols available for the WCF to communicate to the Client. You can mention the
protocol type based on your requirements.
Binding has several characteristics, including the following:
• Transport
44. Defines the base protocol to be used like HTTP, Named Pipes, TCP, and MSMQ
are some type of protocols.
• Encoding (Optional)
Three types of encoding are available-Text, Binary, or Message Transmission
Optimization Mechanism (MTOM). MTOM is an interoperable message format
that allows the effective transmission of attachments or large messages (greater
than 64K).
• Protocol(Optional)
Defines information to be used in the binding such as Security, transaction or
reliable messaging capability
Bindings and Channel Stacks
In WCF all the communication details are handled by channel, it is a stack of channel
components that all messages pass through during runtime processing. The bottom-most
component is the transport channel. This implements the given transport protocol and
reads incoming messages off the wire. The transport channel uses a message encoder to
read the incoming bytes into a logical Message object for further processing.
45. Figure 1: Bindings and Channel Stacks (draw new diagram)
After that, the message bubbles up through the rest of the channel stack, giving each
protocol channel an opportunity to do its processing, until it eventually reaches the top
and WCF dispatches the final message to your service implementation. Messages
undergo significant transformation along the way.
It is very difficult for the developer to work directly with channel stack architecture.
Because you have to be very careful while ordering the channel stack components, and
whether or not they are compatible with one other.
So WCF provides easy way of achieving this using end point. In end point we will
specify address, binding and contract. To know more about end point. Windows
Communication Foundation follows the instructions outlined by the binding description
to create each channel stack. The binding binds your service implementation to the wire
through the channel stack in the middle.
Types of Binding
Let us see more detailed on predefined binding
BasicHttpBinding
• It is suitable for communicating with ASP.NET Web services (ASMX)-based
services that comfort with WS-Basic Profile conformant Web services.
• This binding uses HTTP as the transport and text/XML as the default message
encoding.
• Security is disabled by default
• This binding does not support WS-* functionalities like WS- Addressing, WS-
Security, WS-ReliableMessaging
• It is fairly weak on interoperability.
WSHttpBinding
• Defines a secure, reliable, interoperable binding suitable for non-duplex service
contracts.
• It offers lot more functionality in the area of interoperability.
• It supports WS-* functionality and distributed transactions with reliable and
secure sessions using SOAP security.
• It uses HTTP and HTTPS transport for communication.
• Reliable sessions are disabled by default.
WSDualHttpBinding
46. This binding is same as that of WSHttpBinding, except it supports duplex service.
Duplex service is a service which uses duplex message pattern, which allows service to
communicate with client via callback.
In WSDualHttpBinding reliable sessions are enabled by default. It also supports
communication via SOAP intermediaries.
WSFederationHttpBinding
This binding support federated security. It helps implementing federation which is the
ability to flow and share identities across multiple enterprises or trust domains for
authentication and authorization. It supports WS-Federation protocol.
NetTcpBinding
This binding provides secure and reliable binding environment for .Net to .Net cross
machine communication. By default it creates communication stack using WS-
ReliableMessaging protocol for reliability, TCP for message delivery and windows
security for message and authentication at run time. It uses TCP protocol and provides
support for security, transaction and reliability.
NetNamedPipeBinding
This binding provides secure and reliable binding environment for on-machine cross
process communication. It uses NamedPipe protocol and provides full support for SOAP
security, transaction and reliability. By default it creates communication stack with WS-
ReliableMessaging for reliability, transport security for transfer security, named pipes for
message delivery and binary encoding.
NetMsmqBinding
• This binding provides secure and reliable queued communication for cross-
machine environment.
• Queuing is provided by using MSMQ as transport.
• It enables for disconnected operations, failure isolation and load leveling
NetPeerTcpBinding
• This binding provides secure binding for peer-to-peer environment and network
applications.
• It uses TCP protocol for communication
• It provides full support for SOAP security, transaction and reliability.
47. Binding configuration
Binding can be configured either through configuration file or Programming. Let us see
the binding representation in each method.
Administrative (Configuration file):
In the configuration file of the hosting application, you can add the <bindings> element
inside the <system.serviceModel> element and add the properties to particular binding
type. Properties corresponding to the particular binding type can be mentioned below.
Name of the binding properties that you are going to use has to be mention in the end
point.
<system.serviceModel>
<services>
<service name="MyService">
<endpoint
address="http://localhost/IISHostedService/MyService.svc"
binding="wsHttpBinding" bindingName="wshttpbind"
contract="IMyService">
<identity>
<dns value="localhost"/>
</identity>
</endpoint>
<endpoint address="mex" binding="mexHttpBinding"
contract="IMetadataExchange"/>
</service>
</services>
<bindings>
<wsHttpBinding>
<binding name="wshttpbind" allowCookies="true"
closeTimeout="00:01:00"
receiveTimeout="00:01:00" />
</wsHttpBinding>
</bindings>
</system.serviceModel>
Programming Model:
In the following code, I have created the WSHttpBinding object and assign the properties
which to be configured. This binding object is added to the Service endpoint for client
communication. Similarly you can also create any type of binding and add to endpoint.
//Create a URI to serve as the base address
Uri httpUrl = new
Uri("http://localhost:8090/MyService/SimpleCalculator");
//Create ServiceHost
ServiceHost host =
new
ServiceHost(typeof(MyCalculatorService.SimpleCalculator), httpUrl);
48. //Create Binding to add to end point
WSHttpBinding wshttpbind = new WSHttpBinding();
wshttpbind.AllowCookies = true;
wshttpbind.CloseTimeout = new TimeSpan(0, 1, 0);
wshttpbind.ReceiveTimeout = new TimeSpan(0, 1, 0);
//Add a service endpoint
host.AddServiceEndpoint
(typeof(MyCalculatorService.ISimpleCalculator), wshttpbind,
"");
//Enable metadata exchange
ServiceMetadataBehavior smb = new ServiceMetadataBehavior();
smb.HttpGetEnabled = true;
host.Description.Behaviors.Add(smb);
//Start the Service
host.Open();
Console.WriteLine("Service is host at " +
DateTime.Now.ToString());
Console.WriteLine("Host is running... Press key to stop");
Console.ReadLine();
Note: It is always good if you configure the binding properties using configuration file,
because while moving to the production you no need to change in the code and recompile
it. It is always good practice to represent in the configuration file.
Metadata Exchange
WCF provides rich infrastructure for Exporting, Publishing, retrieving and Importing the
metadata. WCF uses the Metadata to describe how to interact with the service endpoint.
Using the metadata, client will create the proxy class for the service using SvcUtil.exe
Exporting Service Metadata
It is the process of describing the service endpoint so that client can understand how to
use the service.
Publishing Service Metadata
It is the process publishing metadata. It involves converting CLR type and binding
information into WSDL or some other low level representation.
Retrieving Service Metadata
It is the process of retrieving the metadata. It uses WS-MetadataExcahge or HTTP
protocol for retrieving the metadata. Importing Service Metadata - It is the process of
generating the abstract representation of the service using metadata.
49. Now we are going to focus mainly on publishing metadata. There are two way to publish
metadata, either we can use HTTP-GET or through message exchange endpoint. By
default service metadata is turn-off due to security reason. WCF metadata infrastructure
resides in System.ServiceModel.Description namespace. Service metadata can be used for
following purpose
• Automatically generating the client for consuming service
• Implementing the service description
• Updating the binding for a client
Now let us understand the publishing the metadata using HTTP-GET method.
HTTP_GET Enabled Metadata
We will use ServiceBehaviour to publish the metadata using HTTP-GET. This can be
configures either administratively or Programmatically. Http and Https can expose by
appending "?wsdl" to the end of the service address. For example service address is
http://localhost:9090/MyCalulatorService , HTTP-Get metadata address is given by
http://localhost:9090/MyCalulatorService?wsdl.
Administrative (Configuration file):
In the below mention configuration information, you can find the behavior section in the
ServiceBehavior. You can expose the metadata using ServiceMetadata node with
httpGetEnable='True'.
<system.serviceModel>
<services>
<service behaviorConfiguration="ServiceBehavior"
name="MyService">
<endpoint
address="http://localhost/IISHostedService/MyService.svc"
binding="wsHttpBinding" contract="IMyService">
<identity>
<dns value="localhost"/>
</identity>
</endpoint>
</service>
</services>
<behaviors>
<serviceBehaviors>
<behavior name="ServiceBehavior">
<!-Setting httpGetEnabled you can publish the metadata
-->
<serviceMetadata httpGetEnabled="true"/>
</behavior>
</serviceBehaviors>
</behaviors>
</system.serviceModel>
50. Progarmming Model:
Using ServiceMetadataBehavior you can enable the metadata exchange. In the following
code, I have created the ServiceMetadataBehavior object and assigned HttpGetEnabled
property to true. Then you have to add the behavior to host description as shown. This set
of code will publish the metadata using HTTP-GET.
//Create a URI to serve as the base address
Uri httpUrl = new
Uri("http://localhost:8090/MyService/SimpleCalculator");
//Create ServiceHost
ServiceHost host = new
ServiceHost(typeof(MyCalculatorService.SimpleCalculator),
httpUrl);
//Add a service endpoint
host.AddServiceEndpoint
(typeof(MyCalculatorService.ISimpleCalculator), new
WSHttpBinding(), "");
//Enable metadata exchange
ServiceMetadataBehavior smb = new ServiceMetadataBehavior();
//Enable metadata exchange using HTTP-GET
smb.HttpGetEnabled = true;
host.Description.Behaviors.Add(smb);
//Start the Service
host.Open();
Console.WriteLine("Service is host at " +
DateTime.Now.ToString());
Console.WriteLine("Host is running... Press key to stop");
Console.ReadLine();
Metadata Exchange Endpoint
Exposing the metadata using HTTP-GET has a disadvantage, such that there is no
guarantee that other platforms you interact will support it. There is other way of exposing
the using special endpoint is called as Metadata Exchange Endpoint. You can have as
many metadata exchange endpoints as you want.
Address
It is basically Uri to identify the metadata. You can specify as address in the endpoint but
append with "mex" keyword. For example
"http://localhost:9090/MyCalulatorService/mex"
Binding
51. There are four types of bindings supported for metadata exchange. They are
mexHttpBinding, mexHttpsBinding, mexNamedPipesBinding, mexTcpBinding.
Contract
IMetadataExchange is the contract used for MEX endpoint. WCF service host
automatically provides the implementation for this IMetadataExcahnge while hosting the
service.
You can create the Metadata Exchange Endpoint either Administrative (configuration
file) or programmatically.
Administrative (Configuration file):
In the configuration file of the hosting application, you can add metadata exchange
endpoint as shown below.
<system.serviceModel>
<services>
<service name="MyService">
<endpoint
address="http://localhost/IISHostedService/MyService.svc"
binding="wsHttpBinding" contract="IMyService">
<identity>
<dns value="localhost"/>
</identity>
</endpoint>
<endpoint address="mex" binding="mexHttpBinding"
contract="IMetadataExchange"/>
</service>
</services>
</system.serviceModel>
Programming Model:
In the following code I have mention about creating the Metadata Exchange Endpoint
through coding. Steps to create the metadata endpoint are
• Create the ServiceMetadataBehavior object and add to Service host description.
ServiceMetadataBehavior smb = new ServiceMetadataBehavior();
host.Description.Behaviors.Add(smb);
• Create the metadata binding object using MetadataExchangeBinding
Binding mexBinding =
MetadataExchangeBindings.CreateMexHttpBinding ();
• 3. Add the endpoint to the service host with address, binding and contract.
52. host.AddServiceEndpoint(typeof(IMetadataExchange), mexBinding,
"mex");
Complete code for hosting the service with metadata exchange endpoint is shown below.
//Create a URI to serve as the base address
Uri httpUrl = new
Uri("http://localhost:8090/MyService/SimpleCalculator");
//Create ServiceHost
ServiceHost host = new
ServiceHost(typeof(MyCalculatorService.SimpleCalculator),
httpUrl);
//Add a service endpoint
host.AddServiceEndpoint
(typeof(MyCalculatorService.ISimpleCalculator), new
WSHttpBinding(), "");
//Enable metadata exchange
ServiceMetadataBehavior smb = new ServiceMetadataBehavior();
host.Description.Behaviors.Add(smb);
Binding mexBinding =
MetadataExchangeBindings.CreateMexHttpBinding ();
//Adding metadata exchange endpoint
host.AddServiceEndpoint(typeof(IMetadataExchange),
mexBinding, "mex");
//Start the Service
host.Open();
Console.WriteLine("Service is host at " +
DateTime.Now.ToString());
Console.WriteLine("Host is running... Press key to stop");
Console.ReadLine();
Contracts
Windows Communication Foundation (WCF, formerly known as Indigo) is built upon
the foundation of web services messaging and related standards, while at the same time
makes it possible to serialize messages in a more compact binary format, or in a more
proprietary way. Still, the core message can always be represented in XML, therefore be
considered compatible with any platform that understands XML, and agrees on the
contract that defines said messaging between systems.
The contract is a platform-neutral and standard way of describing what the service does.
WCF defines four types of contracts:
• Service Contract
• Data Contract
• Message Contract
• Fault Contract
53. Service Contract
Service contract describes the operation that service provide. A Service can have more
than one service contract but it should have at least one Service contract.
Service Contract can be define using [ServiceContract] and [OperationContract] attribute.
[ServiceContract] attribute is similar to the [WebServcie] attribute in the WebService and
[OpeartionContract] is similar to the [WebMethod] in WebService.
• It describes the client-callable operations (functions) exposed by the service
• It maps the interface and methods of your service to a platform-independent
description
• It describes message exchange patterns that the service can have with another
party. Some service operations might be one-way; others might require a request-
reply pattern
• It is analogous to the element in WSDL
To create a service contract you define an interface with related methods representative
of a collection of service operations, and then decorate the interface with the
ServiceContract Attribute to indicate it is a service contract. Methods in the interface that
should be included in the service contract are decorated with the OperationContract
Attribute.
[ServiceContract()]
public interface ISimpleCalculator
{
[OperationContract()]
int Add(int num1, int num2);
}
Once we define Service contract in the interface, we can create implement class for this
interface.
public class SimpleCalculator : ISimpleCalculator
{
public int Add(int num1, int num2)
{
return num1 + num2;
}
}
With out creating the interface, we can also directly created the service by placing
Contract in the implemented class. But it is not good practice of creating the service
[ServiceContract()]
public class SimpleCalculator
{
54. [OperationContract()]
public int Add(int num1, int num2)
{
return num1 + num2;
}
}
Now you have some fundamental idea on Service contract. Next we will look into Data
Contract.
Data Contract
A data contract is a formal agreement between a service and a client that abstractly
describes the data to be exchanged.
Data contract can be explicit or implicit. Simple type such as int, string etc has an implicit
data contract. User defined object are explicit or Complex type, for which you have to
define a Data contract using [DataContract] and [DataMember] attribute.
A data contract can be defined as follows:
• It describes the external format of data passed to and from service operations
• It defines the structure and types of data exchanged in service messages
• It maps a CLR type to an XML Schema
• t defines how data types are serialized and deserialized. Through serialization,
you convert an object into a sequence of bytes that can be transmitted over a
network. Through deserialization, you reassemble an object from a sequence of
bytes that you receive from a calling application.
• It is a versioning system that allows you to manage changes to structured data
We need to include System.Runtime.Serialization reference to the project. This assembly
holds the DataContract and DataMember attribute.
Create user defined data type called Employee. This data type should be identified for
serialization and deserialization by mentioning with [DataContract] and [DataMember]
attribute.
[ServiceContract]
public interface IEmployeeService
{
[OperationContract]
Employee GetEmployeeDetails(int EmpId);
}
[DataContract]
public class Employee
{
private string m_Name;
55. private int m_Age;
private int m_Salary;
private string m_Designation;
private string m_Manager;
[DataMember]
public string Name
{
get { return m_Name; }
set { m_Name = value; }
}
[DataMember]
public int Age
{
get { return m_Age; }
set { m_Age = value; }
}
[DataMember]
public int Salary
{
get { return m_Salary; }
set { m_Salary = value; }
}
[DataMember]
public string Designation
{
get { return m_Designation; }
set { m_Designation = value; }
}
[DataMember]
public string Manager
{
get { return m_Manager; }
set { m_Manager = value; }
}
}
Implementation of the service class is shown below. In GetEmployee method we have
created the Employee instance and return to the client. Since we have created the data
contract for the Employee class, client will aware of this instance whenever he creates
proxy for the service.
public class EmployeeService : IEmployeeService
{
public Employee GetEmployeeDetails(int empId)
{
Employee empDetail = new Employee();
56. //Do something to get employee details and assign to
'empDetail' properties
return empDetail;
}
}
Client side
On client side we can create the proxy for the service and make use of it. The client side
code is shown below.
protected void btnGetDetails_Click(object sender, EventArgs e)
{
EmployeeServiceClient objEmployeeClient = new
EmployeeServiceClient();
Employee empDetails;
empDetails = objEmployeeClient.GetEmployeeDetails(empId);
//Do something on employee details
}
Message Contract
Message
Message is the packet of data which contains important information. WCF uses these
messages to transfer information from Source to destination.
WCF uses SOAP(Simple Object Access Protocol) Message format for communication.
SOAP message contain Envelope, Header and Body.SOAP envelope contails name,
namespace,header and body element. SOAP Hear contain important information which
are not directly related to message. SOAP body contains information which is used by the
target.
Diagram Soap envelope
Message Pattern
It describes how the programs will exchange message each other. There are three way of
communication between source and destination
1. Simplex - It is one way communication. Source will send message to target, but
target will not respond to the message.
2. Request/Replay - It is two way communications, when source send message to
the target, it will resend response message to the source. But at a time only one
can send a message
57. 3. Duplex - It is two way communication, both source and target can send and
receive message simultaniouly.
What is Message contract?
As I said earlier, WCF uses SOAP message for communication. Most of the time
developer will concentrate more on developing the DataContract, Serializing the data,
etc. WCF will automatically take care of message. On Some critical issue, developer will
also require control over the SOAP message format. In that case WCF provides Message
Contract to customize the message as per requirement.
WCF supports either RPC(Remote Procedure Call) or Message style operation model. In
the RPC model, you can develop operation with Ref and out parameter. WCF will
automatically create the message for operation at run time. In Message style operation
WCF allows to customize the message header and define the security for header and body
of the message.
Defining Message Contract
Message contract can be applied to type using MessageContract attribute. Custom Header
and Body can be included to message using 'MessageHeader' and
'MessageBodyMember'atttribute. Let us see the sample message contract definition.
[MessageContract]
public class EmployeeDetails
{
[MessageHeader]
public string EmpID;
[MessageBodyMember]
public string Name;
[MessageBodyMember]
public string Designation;
[MessageBodyMember]
public int Salary;
[MessageBodyMember]
public string Location;
}
When I use this EmployeeDeatils type in the service operation as parameter. WCF will
add extra header call 'EmpID' to the SOAP envelope. It also add Name, Designation,
Salary, Location as extra member to the SOAP Body.
Rules :
You have to follow certain rules while working with Message contract
1. When using Message contract type as parameter, Only one parameter can be used
in servicie Operation
2. [OperationContract]
58. 3. void SaveEmployeeDetails(EmployeeDetails emp);
4. Service operation either should return Messagecontract type or it should not
return any value
5. [OperationContract]
6. EmployeeDetails GetEmployeeDetails();
7. Service operation will accept and return only message contract type. Other data
types are not allowed.
8. [OperationContract]
9. EmployeeDetails ModifyEmployeeDetails(EmployeeDetails emp);
Note: If a type has both Message and Data contract, service operation will accept only
message contract.
MessageHeaderArray Attribute
Consider the Message contract type definition as shown below.
[MessageContract]
public class Department
{
[MessageHeader]
public string DepartmentID;
[MessageHeader]
public string DepartmentName;
[MessageHeader]
public Employees Employee();
}
In this we are having array of Employee type as message header. When this converted to
SOAP Header it looks as shown below.
<Department>
<DepartmentID>PRO1243</DepartmentID>
<DepartmentName>Production</DepartmentName>
<Employees>
<Employee>Sam</Employee>
<Employee>Ram</Employee>
<Employee>Raja</Employee>
</Employees>
</Department>
Suppose you want to show the all employee detail in same level. We can use
MessageHeaderArray attribute which will serialize the array element independently. If
you use the MessageHeaderArray attribute of Employees, SOAP message will look as
shown below.
<Department>
59. <DepartmentID>PRO1243</DepartmentID>
<DepartmentName>Production</DepartmentName>
<Employee>Sam</Employee>
<Employee>Ram</Employee>
<Employee>Raja</Employee>
</Department>
Note: MessageHeaderArray Attribute is applicable only for Array, not for collection.
Message Contract Properties
ProtectionLevel
You can mention the MessageHeader or MessageBodyMember to be signed or Encrypted
using ProtectionLevel property.
Example
using System.Net.Security;
[MessageContract]
public class EmployeeDetails
{
[MessageHeader(ProtectionLevel=ProtectionLevel.None)]
public string EmpID;
[MessageBodyMember(ProtectionLevel = ProtectionLevel.Sign )]
public string Name;
[MessageBodyMember(ProtectionLevel = ProtectionLevel.Sign )]
public string Designation;
[MessageBodyMember(ProtectionLevel=ProtectionLevel.EncryptAndSi
gn)]
public int Salary;
}
In the above type definition, we have made the different protection level for body. But
the protection level of the body is determind by the highest ProtectionLevel property. By
default if you are not specifying the protection level it takes 'EncryptAndSign'. So it good
if you specify minimum ProtectionLevel required.
Name and Namespace:
SOAP representation of the message element can be change by mentioning Name and
Namespace property of the Header and Body member. By default namespace is the same
as the namespace of the service contract that the message is participating. In the below
example, I have mention the Name property to the EmpID and Name.
[MessageContract]
public class EmployeeDetails
60. {
[MessageHeader(Name="ID")]
public string EmpID;
[MessageBodyMember(Name="EmployeeName")]
public string Name;
[MessageBodyMember()]
public string Designation;
[MessageBodyMember()]
public int Salary;
}
When SOAP message representation, its name is changed to ID and EmployeeName.
<EmployeeDetails>
<ID>45634</ID>
<EmployeeName>Sam</EmployeeName>
<Designation>Software Engineer</Designation>
<Salary>25000</Salary>
</EmployeeDetails>
Order
The order of the body elements are alpehabetical by default. But you can control the
order, usiing Order property in the MessageBody attribute.
[MessageContract]
public class EmployeeDetails
{
[MessageHeader()]
public string EmpID;
[MessageBodyMember(Order=2)]
public string Name;
[MessageBodyMember(Order=3)]
public string Designation;
[MessageBodyMember(Order=1)]
public int Salary;
}
Fault Contract
Service that we develop might get error in come case. This error should be reported to the
client in proper manner. Basically when we develop managed application or service, we
will handle the exception using try- catch block. But these exceptions handlings are
technology specific.
In order to support interoperability and client will also be interested only, what wents
wrong? not on how and where cause the error.
61. By default when we throw any exception from service, it will not reach the client side.
WCF provides the option to handle and convey the error message to client from service
using SOAP Fault contract.
Suppose the service I consumed is not working in the client application. I want to know
the real cause of the problem. How I can know the error? For this we are having Fault
Contract. Fault Contract provides documented view for error accorded in the service to
client. This help as to easy identity the what error has accord. Let us try to understand the
concept using sample example.
Step 1: I have created simple calculator service with Add operation which will throw
general exception as shown below
//Service interface
[ServiceContract()]
public interface ISimpleCalculator
{
[OperationContract()]
int Add(int num1, int num2);
}
//Service implementation
public class SimpleCalculator : ISimpleCalculator
{
public int Add(int num1, int num2)
{
//Do something
throw new Exception("Error while adding number");
}
}
Step 2: On client side code. Exceptions are handled using try-Catch block. Even though I
have capture the exception when I run the application. I got the message that exceptions
are not handled properly.
try
{
MyCalculatorServiceProxy.MyCalculatorServiceProxy proxy
= new MyCalculatorServiceProxy.MyCalculatorServiceProxy();
Console.WriteLine("Client is running at " +
DateTime.Now.ToString());
Console.WriteLine("Sum of two numbers... 5+5 =" + proxy.Add(5,
5));
Console.ReadLine();
}
catch (Exception ex)
{
Console.WriteLine(ex.Message);
Console.ReadLine();
}
62. Step 3: Now if you want to send exception information form service to client, you have
to use FaultException as shown below.
public int Add(int num1, int num2)
{
//Do something
throw new FaultException("Error while adding number");
}
Step 4: Output window on the client side is show below.
Step 5: You can also create your own Custom type and send the error information to the
client using FaultContract. These are the steps to be followed to create the fault contract.
• Define a type using the data contract and specify the fields you want to return.
• Decorate the service operation with the FaultContract attribute and specify the
type name.
• Raise the exception from the service by creating an instance and assigning
properties of the custom exception.
Step 6: Defining the type using Data Contract
[DataContract()]
public class CustomException
{
[DataMember()]
63. public string Title;
[DataMember()]
public string ExceptionMessage;
[DataMember()]
public string InnerException;
[DataMember()]
public string StackTrace;
}
Step 7: Decorate the service operation with the FaultContract
[ServiceContract()]
public interface ISimpleCalculator
{
[OperationContract()]
[FaultContract(typeof(CustomException))]
int Add(int num1, int num2);
}
Step 8: Raise the exception from the service
public int Add(int num1, int num2)
{
//Do something
CustomException ex = new CustomException();
ex.Title = "Error Funtion:Add()";
ex.ExceptionMessage = "Error occur while doing add
function.";
ex.InnerException = "Inner exception message from serice";
ex.StackTrace = "Stack Trace message from service.";
throw new FaultException(ex,"Reason: Testing the Fault
contract") ;
}
Step 9: On client side, you can capture the service exception and process the information,
as shown below.
try
{
MyCalculatorServiceProxy.MyCalculatorServiceProxy proxy
= new MyCalculatorServiceProxy.MyCalculatorServiceProxy();
Console.WriteLine("Client is running at " +
DateTime.Now.ToString());
Console.WriteLine("Sum of two numbers... 5+5 =" + proxy.Add(5,
5));
Console.ReadLine();
}
catch (FaultException<MyCalculatorService.CustomException> ex)
{
//Process the Exception
}
64. Instance Management
Instance management refers to the way a service handles a request from a client. Instance
management is set of techniques WCF uses to bind client request to service instance,
governing which service instance handles which client request. It is necessary because
application will differ in their need for scalability, performance, durability, transaction
and queued calls.
Basically there are three instance modes in WCF:
• Per-Call instance mode
• Per-Session instance mode
• Singleton Instance Mode
Configuration:
Instance mode can be configured using ServiceBehavior attribute. This can be specified
at implementing the service contract as shown below.
[ServiceContract()]
public interface IMyService
{
[OperationContract]
int MyMethod();
}
[ServiceBehavior(InstanceContextMode=InstanceContextMode.Single)]
public class MyService:IMyService
{
public int MyMethod()
{
//Do something
65. }
}
Per-Call Service
When WCF service is configured for Per-Call instance mode, Service instance will be
created for each client request. This Service instance will be disposed after response is
sent back to client.
Following diagram represent the process of handling the request from client using Per-
Call instance mode.
66. Let as understand the per-call instance mode using example.
Step 1: Create the service contract called IMyService and implement the interface. Add
service behavior attribute to the service class and set the InstanceContextMode property
to PerCall as show below.
[ServiceContract()]
public interface IMyService
{
[OperationContract]
int MyMethod();
}
Step 2: In this implementation of MyMethod operation, increment the static
variable(m_Counter). Each time while making call to the service, m_Counter variable is
incremented and return the value to the client.
[ServiceBehavior(InstanceContextMode=InstanceContextMode.PerCall)]
public class MyService:IMyService
{
static int m_Counter = 0;
public int MyMethod()
{
m_Counter++;
return m_Counter;
67. }
}
Step 3: Client side, create the proxy for the service and call "myMethod" operation
multiple time.
static void Main(string[] args)
{
Console.WriteLine("Service Instance mode: Per-Call");
Console.WriteLine("Client making call to service...");
//Creating the proxy on client side
MyCalculatorServiceProxy.MyServiceProxy proxy =
new MyCalculatorServiceProxy.MyServiceProxy();
Console.WriteLine("Counter: " + proxy.MyMethod());
Console.WriteLine("Counter: " + proxy.MyMethod());
Console.WriteLine("Counter: " + proxy.MyMethod());
Console.WriteLine("Counter: " + proxy.MyMethod());
Console.ReadLine();
}
Surprisingly, all requests to service return '1', because we configured the Instance mode
to Per-Call. Service instance will created for each request and value of static variable will
be set to one. While return back, service instance will be disposed. Output is shown
below.
Fig: PercallOutput.
Per-Session Service
When WCF service is configured for Per-Session instance mode, logical session between
client and service will be maintained. When the client creates new proxy to particular
service instance, a dedicated service instance will be provided to the client. It is
independent of all other instance.
68. Following diagram represent the process of handling the request from client using Per-
Session instance mode.
Let as understand the Per-Session instance mode using example.
Step 1: Create the service contract called IMyService and implement the interface. Add
service behavior attribute to the service class and set the InstanceContextMode property
to PerSession as show below.
[ServiceContract()]
public interface IMyService
{
[OperationContract]
int MyMethod();
}
Step 2: In this implementation of MyMethod operation, increment the static variable
(m_Counter). Each time while making call to the service, m_Counter variable will be
incremented and return the value to the client.
[ServiceBehavior(InstanceContextMode=InstanceContextMode.PerSession
)]
public class MyService:IMyService
{
static int m_Counter = 0;
public int MyMethod()
{
m_Counter++;
return m_Counter;
}
}
69. Step 3: Client side, create the proxy for the service and call "myMethod" operation
multiple time.
static void Main(string[] args)
{
Console.WriteLine("Service Instance mode: Per-Session");
Console.WriteLine("Client making call to service...");
//Creating the proxy on client side
MyCalculatorServiceProxy.MyServiceProxy proxy =
new MyCalculatorServiceProxy.MyServiceProxy();
Console.WriteLine("Counter: " + proxy.MyMethod());
Console.WriteLine("Counter: " + proxy.MyMethod());
Console.WriteLine("Counter: " + proxy.MyMethod());
Console.WriteLine("Counter: " + proxy.MyMethod());
Console.ReadLine();
}
All request to service return incremented value (1, 2, 3, 4), because we configured the
instance mode to Per-Session. Service instance will be created once the proxy is created
at client side. So each time request is made to the service, static variable is incremented.
So each call to MyMethod return incremented value. Output is shown below.
Fig: PersessionOutput.
Singleton Service
When WCF service is configured for Singleton instance mode, all clients are
independently connected to the same single instance. This singleton instance will be
created when service is hosted and, it is disposed when host shuts down.
Following diagram represent the process of handling the request from client using
Singleton instance mode.
70. Let as understand the Singleton Instance mode using example.
Step 1: Create the service contract called IMyService and implement the interface. Add
service behavior attribute to the service class and set the InstanceContextMode property
to Single as show below.
[ServiceContract()]
public interface IMyService
{
[OperationContract]
int MyMethod();
}
Step 2: In this implementation of MyMethod operation, increment the static
variable(m_Counter). Each time while making call to the service, m_Counter variable is
incremented and return the value to the client
[ServiceBehavior(InstanceContextMode=InstanceContextMode.Single)]
public class MyService:IMyService
{
static int m_Counter = 0;
public int MyMethod()
{
m_Counter++;
return m_Counter;
}
}
Step 3: Client side, create the two proxies for the service and made a multiple call to
MyMethod.
static void Main(string[] args)
{
Console.WriteLine("Service Instance mode: Singleton");
71. Console.WriteLine("Client 1 making call to service...");
//Creating the proxy on client side
MyCalculatorServiceProxy.MyServiceProxy proxy =
new MyCalculatorServiceProxy.MyServiceProxy();
Console.WriteLine("Counter: " + proxy.MyMethod());
Console.WriteLine("Counter: " + proxy.MyMethod());
Console.WriteLine("Counter: " + proxy.MyMethod());
Console.WriteLine("Client 2 making call to service...");
//Creating new proxy to act as new client
MyCalculatorServiceProxy.MyServiceProxy proxy2 =
new MyCalculatorServiceProxy.MyServiceProxy();
Console.WriteLine("Counter: " + proxy2.MyMethod());
Console.WriteLine("Counter: " + proxy2.MyMethod());
Console.ReadLine();
}
When two proxy class made a request to service, single instance at service will handle it
and it return incremented value (1, 2, 3, 4), because instance mode is configured to
'Single'. Service instance is created when it is hosted. So this instance will remain till host
is shutdown. Output is shown below.
Fig: SingletonOutput.
Instance Deactivation
In Instance Management System tutorial, you learn how to create sessionful service
instance. Basically service instance is hosted in a context. Session actually correlated the
client message not to the instance, but to the context that host it. When session starts,
context is created and when it closes, context is terminated. WCF provides the option of
separating the two lifetimes and deactivating the instance separately from its context.
ReleaseInstanceMode property of the OberationalBehavior attribute used to control the
instance in relation to the method call.
72. Followings are the list Release mode available in the ReleaseInstanceMode
1. RealeaseInstanceMode.None
2. RealeaseInstanceMode.BeforeCall
3. RealeaseInstanceMode.AfterCall
4. RealeaseInstanceMode.BeforeAndAfterCall
Below code show, how to add the 'ReleaseInstanceMode' property to the operational
behavior.
[ServiceContract()]
public interface ISimpleCalculator
{
[OperationContract()]
int Add(int num1, int num2);
}
[OperationBehavior(ReleaseInstanceMode=ReleaseInstanceMode.BeforeCal
l]
public int Add(int num1, int num2)
{
return num1 + num2;
}
ReleaseInstanceMode.None
This property means that it will not affect the instance lifetime. By default
ReleaseInstanceMode property is set to 'None'.
ReleaseInstanceMode.BeforeCall
This property means that it will create new instance before a call is made to the operation.
If the instance is already exist,WCF deactivates the instance and calls Dispose() before
the call is done. This is designed to optimize a method such as Create()
73. ReleaseInstanceMode.AfterCall
This property means that it will deactivate the instance after call is made to the method.
This is designed to optimize a method such a Cleanup()
ReleaseInstanceMode.BeforeAndAfterCall
This is means that it will create new instance of object before a call and deactivates the
instance after call. This has combined effect of using ReleaseInstanceMode.BeforeCall
and ReleaseInstanceMode.AfterCall
Explicit Deactivate
74. You can also explicitly deactivate instance using InstanceContext object as shown below.
[ServiceContract()]
public interface IMyService
{
[OperationContract]
void MyMethod();
}
[ServiceBehavior(InstanceContextMode=InstanceContextMode.Single)]
public class MyService:IMyService
{
public void MyMethod()
{
//Do something
OperationContext.Current.InstanceContext.ReleaseServiceInsta
nce();
}
}
Durable Service
Durable services are WCF services that persist service state information even after
service host is restarted or Client. It means that durable services have the capability to
restore their own state when they are recycled. It can use data store like SQL database for
maintain instance state. It is new feature in .Net 3.5
You might think that we can also maintain session using WCF sessions, but content in the
session environment is not persisted by default. If the service is shut down or client closes
the proxy, data will be lost. But in case of Durable service it is still maintained.
Working:
When Durable service is created with database as data store, it will maintain all its state
information in the table.
When a client make a request to the service, instance of the service is serialized, a new
GUID is generated. This serialized instance xml and key will be saved in the database.
We will call this GUID as instanceID. Service will send the instanceID to the client, so
later it can use this id to get the instance state back. Even when client is shut down,
instanceId will be saved at the client side. So when ever client opening the proxy, it can
get back the previous state.
Defining the Durable Service
75. Durable service can be implemented using [DurableService()] attribute. It takes
'CanCreateInstance' and 'CompletesInstance' property to mention on which operation
instance state has to be saved and destroyed.
• CanCreateInstance = true: Calling this operation results in creating the
serialization and inserting it into the datastore.
• CompletesInstance = true: Calling this operation results in deleting the persisted
instance from the datastore.
[Serializable]
[DurableService()]
public class MyService :IMyservice
{
[DurableOperation(CanCreateInstance = true)]
public int StartPersistance()
{
//Do Something
}
[DurableOperation(CompletesInstance = true)]
public void EndPersistence()
{
//Do Something
}
}
How to Create Durable Service
Let us understand more about the durable service by creating Simple Calculator service
which persist the instance state in SQL server database.
Step 1: Start the Visual Studio 2008 and click File->New->Web Site. Select the 'WCF
Service' as shown below.
76. Step 2: Create interface and decorate with Service and Operation contract.
[ServiceContract()]
public interface ISimpleCalculator
{
[OperationContract]
int Add(int num);
[OperationContract]
int Subtract(int num);
[OperationContract]
int Multiply(int num);
[OperationContract]
void EndPersistence();
}
Step 3: You need to add [Serializable] And [DurableService()] attribute to the service
implementation. Set CanCreateInstance = true property to the operation in which instance
state has to be persisted and set CompletesInstance = true when state has to be destroyed.
In this implementation, we are going to persist the 'currentValue' variable value to the
database.