
Recommandé
Contenu connexe
Tendances
Tendances (18)
Similaire à Band Images Manipulation
Similaire à Band Images Manipulation (20)
Plus de alexhughesss
Plus de alexhughesss (15)
Dernier
Dernier (20)
Band Images Manipulation
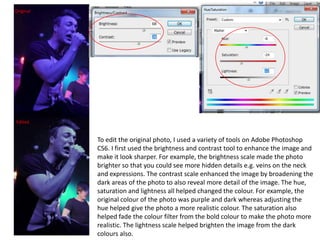
- 1. To edit the original photo, I used a variety of tools on Adobe Photoshop CS6. I first used the brightness and contrast tool to enhance the image and make it look sharper. For example, the brightness scale made the photo brighter so that you could see more hidden details e.g. veins on the neck and expressions. The contrast scale enhanced the image by broadening the dark areas of the photo to also reveal more detail of the image. The hue, saturation and lightness all helped changed the colour. For example, the original colour of the photo was purple and dark whereas adjusting the hue helped give the photo a more realistic colour. The saturation also helped fade the colour filter from the bold colour to make the photo more realistic. The lightness scale helped brighten the image from the dark colours also. Original Edited
- 2. The hue tool was the first I used to edit this image. It helped balance out the unrealistic colour in the photo e.g. purple and red and helped the artist look more real. The saturation helped fade the left over red and purple that still remained in the photo. The lightness was only adjusted a bit to lighten the image and help the subjects (the artist) face stand out. The brightness also did the same. The contrast however, helped darken certain aspects of the image and also sharpened areas e.g. facial expressions. The colour filter was used to balance out the yellow and left over unreal colours. This again, helped the artist look more natural.
- 3. The hue was the first editing tool I used to get my outcome. For example, the hue helped remove the dark purple colour upon the artists face. Also, the hue helped remove some of the bright light in the background and make the photo more realistic. The saturation also helped remove some of the bold and vivid colour upon the image. The photo filter was used to balance out the left over dark blue colours that still remained in the photo and helped them blend in. The brightness scale was used to enhance the image and to remove the darker areas that were still shown, it also helped to brighten the artists face so we are able to see the facial expression. The contrast helps enhances and sharpens the image.
- 4. These images were taken and edited on an iPhone 4S. They were taken during two concerts. I edited them using an app called VSCO cam which helped change the saturation, contrast, brightness and tint.