
Recommandé
Contenu connexe
Similaire à Ben parsons gcse product design.ppt
Similaire à Ben parsons gcse product design.ppt (20)
Dernier
Dernier (20)
Ben parsons gcse product design.ppt
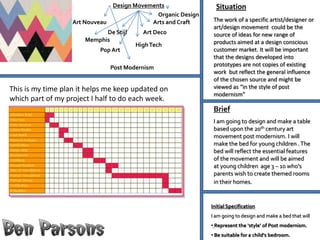
- 1. Design Movements Situation Organic Design Art Nouveau Arts and Craft The work of a specific artist/designer or art/design movement could be the De Stijl Art Deco source of ideas for new range of Memphis products aimed at a design conscious High Tech Pop Art customer market. It will be important that the designs developed into Post Modernism prototypes are not copies of existing work but reflect the general influence of the chosen source and might be This is my time plan it helps me keep updated on viewed as “in the style of post modernism” which part of my project I half to do each week. Brief I am going to design and make a table based upon the 20th century art movement post modernism. I will make the bed for young children . The bed will reflect the essential features of the movement and will be aimed at young children age 3 – 10 who's parents wish to create themed rooms in their homes. Initial Specification I am going to design and make a bed that will • Represent the ‘style’ of Post modernism. • Be suitable for a child's bedroom.
- 2. Karim Rashid is a famous post modernism designer. He was born in Cairo in the year 1960. he lived in England and Canada with his Egyptian and English parents. He started his carrier when he was just 19. He then went and achieved a bachelor in industrial design from Carleton university in Ottawa . Then went and completed his post graduate studies in Italy Canada in the year 1982. Karim now works in new york in his own private studio. He has at least 2000 products in production. His work has also been placed in some museums such as the museum of modern art in new York and the San Francisco museum. He also exhibits his art work in the Pompidou in Paris.
- 3. Aesthetics – the dolls house furniture is quite small and easy so you C £6.00 can move it around and fit together and there are other things you can add to it like colour stickers. A Function – the dolls house furniture is easy to put together with slots F and easy for children's use and easy to carry around. Ergonomics- it looks really small and safe for children to play with. It E still looks fragile and but it wouldn't be hard to break. Q The quality of the dolls house furniture is quite poor and looks like it might break easy but I think it would still be stable for children. U Environment - you would be able to recycle the dolls house as it is made of wood. E User- the user of this product would be children because it is something to play with. C £300 A F Aesthetics – the bed is quite big and bulky. It may be hard to move around but at the same time be safe and suitable for a bedroom. E Function – to go in a childs bedroom and it is an object for a child to Q use everyday to sleep in. Ergonomics- it looks quite big and safe and would be safe to children U and good for everyday use. The quality – the quality of this product will be a very high standard E and will be suitable to sleep in. Environment- the bed can be made from wood which you can reuse. User- children will use it to sleep in.
- 4. Name: James Phillips Age:7 Location: 45 halls road Kingswood , Bristol Hobbies: swimming / playing Fav colour: red/green/blue Fav animal: meerkats and cats Fav room: bedroom Fav style: dressing up clothes / children's clothes Fav place to visit: park/garden/@Bristol/beach/pool Fav drink & food: coke/ milkshake & pasta/beans/chocolate Fav book: star warrs/alieans love underpants Fav music: Pop/R&B Fav clothes shop: Debenhams/ Primark / M&S Fav piece of jewellery: Lego watch Fav news paper: n/a Fav season: summer & winter Transport: mums car & scooter. Fav piece of furniture: bed/trampoline From this information I have collected I can tell that James ideal bed would have maybe a meerKat or animal theme. It could also have a drawer to put dressing up clothes in. there could also be some kind of holder for food and drinks. It could also have some kind of space theme and have a place in it to store toys (Lego). If I could incorporate all of this into one bed I believe this would be the perfect bed for James.
- 5. This is my mood board I have taken images off the internet which I found when I was researching the post modernism influence. I choose these images because of the bright colours which were used and the artist I have picked Karim Rashid has designed a Varity of these images. To get influence when i was designing my bed on pro desktop and sketching i would come back to my mood board so i can get ideas the make my work relate to my artist.
- 6. My influence was post modernism ( Karim Rashid) I chose this style and era because I think it looks new and different. I like the different shapes and colours used. I feel having different shapes and colours designed into my child's modern themed bed that it would look suitable in a child's room and it would also look appealing to the child that would be using it. Size/Dimensions- Shape-when I design my child's bed I think it should have fun funky shapes so it will fit in to a Childs bedroom theme and I feel if it’s a funky design it would look modern. Material- I am going to use plastic because its easy to model and move around and shape User-I am making my bed in the style for a child's bedroom so it will be used by children. Finish- my final child's bed I believe should have a smooth soft shiny look so I may polish wish would look appealing and would fit into a child's room. Ergonomics- it should not be easy to break because children would be playing on it so it should be very stable it should also not be to heavy and easy to move. Quality Assurance – Possible BS ( British Standards) my child’s bed will be suitable for children because it will not have Sharpe edges and it will be comfy and would not cause any harm to anybody using it. Environmental consideration (Environmental concerns regarding material) I will be using plastic when making my bed and I believe this may cause harm to the environment because it is bio-degradable. Environment (In which the product will be used i.e. fixed to wall and therefore needs to encompass a fitting) my child's themed bed will be on the floor so it will no need to have any fittings.
- 7. I have researched into the different products made from the post modernism influence and what i have found out is that most of the designs which have been produced were actually made out of timber like hard or soft wood. Because of this I have decided to look at some of the reasons around the process of cutting down the trees, and converting it for commercial use.
- 8. The product will be made from plastic. The shape will be designed to be a box shape and the inside walls will be slanted There will be no Sharp so it doesn't feel so edges so there is no enclosed. safety hazard. The bed will be set in a cube It would be shape. built by wood The bed so would be would be well sturdy. built and sturdy so it wouldn't collapse. There would be a slide on the Different to all side for children of my other The bars designs. This to play on. There would be around the top The material one is a that i would a ladder at the will help the circular shape. used would front of the bed child stay safe. be plastic & by the slide. wood.
- 9. This is going to be the design which I have chosen to carry on with through out the rest of my process of building my bed. I have drawn this sketch using the 3 point perspective. I think this would be a good sketch to The material will be all build on because the bed itself isn't to made out of ply wood complicated but still fits into the because it will be able The curves will postmodernism idea. be soft and the to hold more weight. I got my idea to make my sketch look like bed will be more There will be safe for this from the different product images curves in the wood children's use. on my mood board which were created to make it look from my chosen artist karim rashid. I funky and modern. feel that the simple yet modern design gives me scope to be able to add things to my design later on when I actually come to make the bed. Made in a oval shape. Made from plastic The plastic and wood. All the edges will be which I'm using soft and smooth. will be curved round. I would be using bright red plastic Because the plastics curved so you can see there will be no sharp edges. the karim rashid theme.
- 10. I put my hand drawn design into pro desktop and then it is cut out onto I started off some card board to make with my a prototype. design which I also changed my pro I hand drew desktop drawing into a in 3 point DXF file. perspective. I carried on Cut out the gluing it laser cuttings until it and glue it became together with In this picture here you one of my the hot glue can see the DXF file final gun. being cut out on the prototypes. laser cutter to make my After I designed my drawing components for one of on pro desktop i cut out my my prototypes. design on the laser cutter. In my first picture i started In my second picture you can In my third picture you can I will make my thickness of my plywood: 12 with an original bed then I see it is a basic design bed see two basic mm. developed it and you can with the same sides but in postmodernism beds with When I used it I needed to use 3 sheets of it. see this from the unique my opinion it looks more dull the same sides on both shape but you can also see than modern and it does not beds i think that because The ply wood that I have used was purchased the changes I have made follow the postmodernism they both match the type of from Avon ply. e.g. Wholes & different influence enough to be my style in looking for that i The length of the sheets are 8ft by 4 ft. fsc sides. final design which I would should combine then like to carry on with. together to be my final design which I would like to carry on with.
- 11. In theses images i have taken screen shots from pro desktop. This is of my design being extruded which you can see is highlighted in yellow is being made thicker by ( 3mm) so I can have a better view of what my bed would look like in real life 3d. In these images you can see that I have print screened shots of what I am going through for the different stages of what I done on pro desktop to get to my final assembly drawing.
- 12. Anthropometric and Ergonomic Data In the three images on the right hand side you can see the complete anthropometric measurements of one seven year old child. I have decided to choose the 7 year old child for measurements for my product. The two main measurements I have to take into account are the main height of the child and how far they can reach. The measurement's will The measurements will help me to find out the help me when i start to average height of my product as well as making sure 2 year old reach: 14.5” 36.8cm design my product so it that the children can reach all parts of the different is made to the right 5 year old reach: 17.2” 43.7cm parts of my product the child is using it. dimensions and the 2 year old height: 37.5” 95.25cm ergonomics of my product is right so my 5 year old height:41.8” 106.2cm user can get full use out of my product.
- 13. I drew a design to I then put my design I made my design 3d in make. into pro-desktop. pro-desktop. And then I went back to Next I made a rough I made an assembly pro-desktop so I could cut I stuck it together cut out with a piece drawing. out on the laser cutter. using glue and tape. of card. Sharpe knife. My drawing was The dxf file was then put through galad and then converted to a then sent through to the laser cut to be cut out After the laser had cut my card I dxf file. of card. Turn on the fan because of fire hazard. had to fix the slots together with a Next i cut out what I hot glue gun. Risks or burning from thought would be my final hot glue. design before I moved on to the cnc router. I then sent my bed to get cut out on the cnc router. Use ear protection from loud noise. Make sure protective shield is closed. Next I took my design and put it into the cnc router. After cutting my final design out of cardboard i decided that i should redesign the layout of the bed so it would suit the situation better.
- 14. then having cut out on the cnc router After I had cut out my My next move was to find i needed to sand down the edges but I placed a sheet of card underneath so I bed into five different the images i wanted to i also wanted to add a image onto my could make a mark of where to put in my parts on the cnc router engrave onto my bed bed so this had to be done on the wood cut outs so they are in the right I was left with rough through the laser cutter. laser cutter but to do this I needed a places for it to engrave on. edged parts. dxf file. Must make sure the extraction is on. My next step was to just press Once I had seen the laser had I had to wait for about twenty go on the laser cutter after finally engraved my images onto Then once I found out where to place minutes to watch my images setting up on the computer my pieces of wood I had to wait for my wood i slotted everything down engrave on to my parts. what images to engrave and the laser to come to a full stop so I into the laser cutter so its ready. then it started engraving. could take out my parts to fix Stay with laser cutter and watch together. Must make sure the extraction is on. it so the laser doesn't fail or Must make sure the extraction is on. cause an accident. After i cut out my Because i needed to slot After fitting the parts parts and my parts together together with pva glue i engraved into before i glue it so its had to clamp it together them I had to fixed together properly i so its all held tight in the place my bed needed to chisel away right place. together using the the uneven grooves in I left my bed clamped slots which i had the slots so i used a together for over designed and cut hammer and chisel to twenty-four hours so it out on the cnc make sure that all my would be fully fixed. router. parts fitted together Once this is done i nicely and so there was will be able to no excess wood. Be carful when using the clamp because it is very heavy and make Always use a move on to sure you do not clamp it to tight or it will break the wood. apron while in sanding my bed Always wear an apron and hold the chisel Also make sure you are wearing a apron when in the workshop and the workshop. down. correctly because the end is sharp. especially when using the pva glue.
- 15. My next step was moving on from the hand sander to the sanding machine. The machine is called a belt sander and its a faster way of sanding wood. Wear an apron while in the When the glue had dried i came back workshop. Make sure you are with sand paper to sort out all of the wearing protective goggles. And do rough edges. not get your fingers to close to the sand paper when its turned on. Wear a apron while sanding in the workshop.