SlideShare une entreprise Scribd logo
1  sur  16
Télécharger pour lire hors ligne
Quick Reference
© 2008 SMART Technologies Inc. SMART Board, Notebook, Bridgit and the SMART logo are trademarks of SMART Technologies Inc. All rights reserved. All other third-party product and company names
may be trademarks of their respective owners. 03/2008.
SMART Board™ Welcome Center for the Microsoft®
Windows®
Operating System
Welcome Center is a compact, movable toolbar that contains your most frequently used SMART Board features and
applications. You can also configure this toolbar to include any third-party software.
Opening the Welcome Center
To open the Welcome Center, press the SMART Board icon in the Windows Notification Area at the bottom right of your
screen, and select Welcome to Notebook... from the menu. The Welcome Center provides several tabs, each with options
to launch commonly used applications and tools.
Quick Start
This tab provides options designed to get you up and running
quickly, with the most frequently used actions at your
fingertips.
You can create a new Notebook file, open a previously
created file, start a conference, change languages, orient
your SMART Board, and access the Control Panel to
configure a variety of software and hardware options.
Tabs
Select to have Welcome
Center launched
automatically when
Notebook is started
Action options
Quick Reference
© 2008 SMART Technologies Inc. SMART Board, Notebook, Bridgit and the SMART logo are trademarks of SMART Technologies Inc. All rights reserved. All other third-party product and company names
may be trademarks of their respective owners. 03/2008.
Tools
The Tools tab provides direct access to each of the functions
that help you operate the SMART Board interactive whiteboard
more effectively.
In addition to basic functions such as the On-Screen Keyboard
and Floating Tools, you will also find multimedia tools that allow
you to create and present dynamic content.
Teacher’s Hub
Your single destination for all the resources you need
to get started. Use the Teacher's Hub to help you
seamlessly integrate your SMART Board interactive
whiteboard into your classroom.
1 Training - Online training sessions, Printable
materials, Two-Minute Tutorials, Training
events, Learning path for teachers
2 Curriculum resources - SMART-created lesson
activities, Create your own lesson activities,
Notebook interactive viewer, Lesson Activity
Toolkit
3 Professional development - ED Compass
newsletter, Bulletin board, Case studies,
Showcase schools
Help/Support
The Help/Support tab provides access to a wide array of
support sources, from self-directed troubleshooting to
one-on-one help from an expert..
You will also find your software version information here.
Quick Reference
Hardware Basics for Front Projection SMART Board Interactive
Whiteboards
The SMART Board™ interactive whiteboard is touch sensitive and operates as part of a system that includes a computer
and a projector.
It may help you to think of your interactive whiteboard the same way you think of your mouse or keyboard – it is an input
device that enables you to control applications on your computer. Setup instructions depend on the model of SMART Board
interactive whiteboard. Specific instructions on how to setup your SMART Board can be found at www.smarttech.com/
support/product/index.asp.
The SMART Pen Tray
The SMART Pen Tray consists of four color-coded slots for pens and one slot for the eraser. Each slot has an optical sensor
to identify when the pens and eraser have been picked up. You can write with the pen or with your finger, as long as the pen
slot is empty. The technology in the pen tray is smart enough to know which tool was removed from its slot most recently. If
you remove the eraser from its slot while you are still holding a pen, the pen tray will assume you want to erase. The lights
above the tool slots indicate which tool was removed last.
TIP: If someone accidentally takes a pen or the eraser home, simply cover the optical sensor with a pen lid or a sticky note
to continue using your interactive whiteboard until the tool is returned.
• The computer sends an image of an
application to the projector.
• The projector casts the image onto the
interactive whiteboard.
• The interactive whiteboard acts as
both the monitor and input device,
allowing you to control any application
by touching the screen.
© 2008 SMART Technologies ULC. All rights reserved. SMART Board, Whisper-tip and the SMART logo are trademarks of SMART Technologies Inc. All other third-party product
and company names may be tradmarks of their respective owners. Printed in Canada 03/2008.
The Pen-Tray Buttons
The pen tray has at least two pen-tray buttons. One button is used to launch the On-Screen Keyboard. The second button
is used to make your next touch on the interactive whiteboard a right-click. Some interactive whiteboards have a third button;
this button is used to quickly access the Help Center.
The Pens
The SMART Board interactive whiteboard comes with four Whisper-tip™ pens
(black, red, green and blue) and one eraser. Although you do not need to use
the pens to write on you interactive whiteboard, the pens do make writing more
intuitive. Pick up a pen from the pen tray and write on the SMART Board. To
erase your digital ink, remove the eraser from the pen tray and move it in a
smooth motion over your notes. Your notes will disappear.
TIP: To clear a large area of digital ink, draw a circle around the area you want
to erase with the eraser and tap once inside that area. All handwritten notes
inside that circle will disappear.
The Ready Light
The Ready Light indicates the status of your interactive whiteboard. Depending on the model of the SMART Board
interactive whiteboard you are using, the Ready Light is located either on the right side of the pen tray or the lower-right of
the frame bezel.
If the Ready Light is a solid green, your system is functioning properly. If the Ready Light is flashing or is a color other than
green for an extended period of time, you should check the User’s Guide that came with your SMART Board interactive
whiteboard for guidance on troubleshooting.
NOTE: After you turn on your computer, the Ready Light will be red while the SMART Board interactive whiteboard and the
computer are establishing communication.
Pen tray buttons
Pen tray buttons
Ready Light on lower-right
of frame bezel
Ready Light on right
side of pen tray
Quick Reference
Orienting the SMART Board interactive whiteboard
Orientation ensures your touch is registered accurately when you are using the SMART Board™ interactive whiteboard. If
you press the interactive whiteboard with your finger and your cursor appears somewhere other than where you are
pressing, try orienting the interactive whiteboard.
Quick Orientation
1 To orient the interactive whiteboard, press and hold the Keyboard and Right Mouse buttons simultaneously until the
Orientation screen appears.
2 Begin the orientation process at the upper left corner of the Orientation screen. Press your finger or pen firmly on the
center of each cross in the order indicated by the white, diamond-shaped graphic.
TIP: If you are not satisfied with the precision of a particular orientation point while orienting, press one of the pen tray
buttons or the left arrow key on your keyboard to redo the previous orientation point.
Changing Orientation Settings
Increase the detail of calibration for applications that require a greater amount of precision.
1 Press the SMART Board icon in the Windows Notification Area, and select
Control Panel from the SMART Tool menu.
2 From the Control Panel window, press the SMART Hardware Settings button.
Pen tray buttons
Pen tray buttons
Orientation screen
Windows Notification Area
© 2008 SMART Technologies Inc. All rights reserved. SMART Board and the SMART logo are trademarks of SMART Technologies Inc. All other third-party product and company
names may be tradmarks of their respective owners. Printed in Canada 03/2008.
3 The SMART Hardware Settings window will open. Select Orientation/Alignment Settings from the drop-down menu.
4 Select Fine (20 Points) and press OK to apply the new orientation and alignment settings.
5 From the Control Panel window, press the Orient button to begin the orientation process.
Quick Reference
Notebook software Version 10 Toolbars
Notebook software toolbar
The Notebook™ software toolbar gives you access to a number of tools to help you work with your Notebook file. By default,
the toolbar appears at the top of the Notebook page. When you are working at the SMART Board™ interactive whiteboard
and you prefer to sit, or are working with young students, it may be more convenient to move the toolbar to the bottom of
the page. To do this, press the double-ended, vertical arrow on the far right of the toolbar.
Display the previous
Notebook page
Display the next
Notebook page
Insert a blank page directly
after the active Notebook page
Open an existing
Notebook file
Save your Notebook file Paste
Undo the last action you performed Redo the action you last performed
Delete any selected object Show or Hide the Screen Shade
on the current Notebook page
Open Full Screen view Toggle dual page mode
Launch the Screen Capture
toolbar
Activate SMART Document Camera
Insert Question Create a table
Toggle
move
toolbar
© 2008 SMART Technologies ULC. All rights reserved. Notebook and the SMART logo are trademarks of SMART Technologies ULC. All other third-
party products and company names may be trademarks of their respective owners. Printed in Canada 04/2006.
Full Screen Toolbar
The Full Screen toolbar allows you to work with your Notebook file while in full screen mode.
Select any object on the page
with your mouse
Write or draw on the Notebook page
with the pen tool
Write or draw on the Notebook page
with the creative pen tool
Erase digital ink on the
Notebook page
Draw a line Create a shape
Draw a perfect shape (e.g., circle,
square, rectangle, etc.)
Write or draw with the Magic Pen tool
in disappearing ink, zoom and spotlight
Fill an object or shape Create a text-entry box for typing
Launch the Properties
side tab
Move the toolbar
to the bottom of the Notebook page
Adjust volume Instant conferencing
Display the previous Notebook page Display a menu of more options, for example the
Screen Shade, shapes or pen options
Display the next Notebook page Exit full screen
Quick Reference
Side Tabs
There are four tabs on the side of the Notebook interface (shown below on the right-hand side of the work area). Click the
double-ended horizontal arrow to move the tabs from one side of the work area to the other.
You can hide the side tabs from view when you have finished working with them by checking the Auto-hide check box.
Click the double-ended, horizontal arrow to move these four tabs from one side of the page to the other. The tabs below are
shown on the left-hand side of the work area.
Page thumbnail
Move tabs to
the other side
of the work
area
Page Sorter tab
Attachments tab
Gallery tab
Properites tab
Auto-hide check box
Work area
© 2008 SMART Technologies ULC. All rights reserved. Notebook and the SMART logo are trademarks of SMART Technologies ULC. All other third-
party products and company names may be trademarks of their respective owners. Printed in Canada 04/2006.
Click the Page Sorter tab to allow you to see a thumbnail image of each page in the Notebook file, navigate to
a different page, create page groups or reorder the pages.
Click the Gallery tab to access collections of SMART’s custom pages, clip art, Adobe® Flash® animations,
audio and video you can add to the Notebook file.
Click the Attachments tab to add hyperlinks to or attachments from other software applications to the file.
Click the Properties tab to format shapes, objects and text.
Quick Reference
Working with Notebook Software Gallery Collections
What is the Notebook Software Gallery?
The Notebook™ software Gallery helps you quickly develop and deliver lesson activities and presentations in rich graphic
detail. Thousands of high-resolution images, audio, video, Macromedia® Flash® and entire Notebook files are organized into
searchable collections that allow you to create attractive, reusable content.
Select a folder to display its
contents in the search
results area
Drag the thumbnail image to
the work area
Enter a keyword into the search field to
quickly find related Gallery items
Show additional Gallery
actions
Press to return to previous search
results – works like an Internet
browser’s back button
Press the Gallery tab to
open the Gallery
Press the Search button
to initiate search
Search results area
Show the onscreen
keyboard
© 2008 SMART Technologies ULC. All rights reserved. SMART Board, Notebook and the SMART logo are trademarks of SMART Technologies ULC. All
other third-party product and company names may be tradmarks of their respective owners. Printed in Canada 03/2008.
Searching for Gallery Content
There are two ways to find Gallery content. You can browse through the
Gallery collections and select a folder, or you can enter a keyword into
the search field, as you would when using an Internet search engine.
If you were building a mathematics lesson activity about shapes, for
example, you may decide to browse by topic for all Gallery items relating
to Shapes, Space and Measure. However, if you were looking for a
specific shape in the middle of class, you may want to type the keyword
triangle into the search field to save time.
To look for Gallery items using the search field
1 Press once inside the search field
2 Type a keyword related to the type of object(s) you are looking for
3 Press the Search button to display your results
TIP: Press the icon to the left of the search field to use the On-Screen
Keyboard to type your keyword.
Using Online Resources
Select Online Resources to access a list of Internet links to lesson activities, curriculum standards, classroom resources
or additional Gallery content. Instead of interrupting the flow of your presentation by leaving Notebook software, you can
seamlessly launch a Web page with supporting content at the same time you deliver your material.
NOTE: You will require an active Internet connection and a Web browser to
use Online Resources.
Quick Reference
Viewing Search Results
Search results are graphically displayed as thumbnail images that match
your search criteria. These thumbnail images, or Gallery items, are
organized into four content types: Related Folders, Pictures and
Backgrounds, Interactive and Multimedia, and Notebook Files and
Pages.
If you search for the keyword triangle for example, Related Folders will
display all Gallery items associated with the keyword, providing you with
additional content to help supplement learning activities. Double-press a
folder thumbnail to view its contents.
The thumbnails displayed in Pictures and Backgrounds include clip art
and photographs. Drag an item to the work area to use as part of a lesson
or to modify its properties.
Interactive and Multimedia contains three types of content: Flash files,
video files and objects with attached sounds. Items from this section of
the Gallery are used to add rich media content to a lesson or presentation
and engage reluctant learners with multimedia elements.
Additional content can be found in Notebook Files and Pages.
Notebook file thumbnails are recognized by the coil binding on the left of
the thumbnail image. Drag the thumbnail image to the work area to add
a page or series of pages, such as a complete lesson activity, to your
existing content. Notebook files will be inserted directly after the active
Notebook page.
Notebook page thumbnails are identified by the folded edge in the top-
right corner. Drag the thumbnail image to the work area to create a new
page with a background for students to write over, such as an exercise
in identifying shapes.
Quick Reference
© 2008 SMART Technologies ULC. All rights reserved. SMART Board, Notebook and the SMART logo are trademarks of SMART Technologies ULC. Printed in
Canada 03/2008.
The Floating Tools toolbar
The features you use most are literally at your fingertips with the Floating Tools toolbar.
If it is not already on your screen, you can launch the Floating Tools by selecting the SMART Board™ icon located in
Windows Notification Area at the bottom right of your screen, and choosing Show Floating Tools from the menu.
Button What the button does
Stop using other tools and return the cursor to
mouse mode
Write or draw in digital ink, and select the ink
color
Highlight an area of the screen with translucent
ink for emphasis, and select the ink color
Erase digital ink, and select the size of the
eraser
Draw a line, and select the format of the line
Draw a pre-formed shape, and select the shape
Make your next press on the interactive
whiteboard a right-click
Launch the on-screen keyboard
Launch Notebook software
Undo your previous action.
Open the Customize Floating Tools menu to
personalize toolbar functions
Floating Tools
toolbar
(default settings)
Hide/Reveal
toolbar
Move toolbar
© 2008 SMART Technologies ULC. All rights reserved. SMART Board, Notebook and the SMART logo are trademarks of SMART Technologies ULC. Printed in
Canada 03/2008.
Customizing Floating Tools
Press the Customize button in the Floating Tools toolbar to choose from a variety of toolbar buttons. You can choose
as many buttons as you like to fully customize Floating Tools with the buttons you need.
To add a button to the Floating Tools drag and drop the icon onto the toolbar. To remove a button, ensure the Customize
button has been pressed, and drag the button off the Floating Tools toolbar.
To return the toolbar to its original configuration press the Restore Defaults button.
When you are finished customizing the toolbar press the Done button.
Quick Reference
© 2008 SMART Technologies ULC. All rights reserved. SMART Board, Notebook and the SMART logo are trademarks of SMART Technologies ULC. Printed in
Canada 03/2008.
The buttons that have side menus
can be further customized.
Right click on the side menu. The
Properties dialog box will appear
where you can change the settings
for the tool.
You can save the new settings so
they become the default for that tool
by clicking the Save Tool Settings
button at the bottom of the dialog box
after you’ve set the parameters
above.
Example of Pen tool’s Properties dialog box
side menu Properties dialog box

Contenu connexe

Tendances

Tendances (20)

Computerand mother board parts and fungations
Computerand mother board  parts and fungationsComputerand mother board  parts and fungations
Computerand mother board parts and fungations
 
INPUT DEVICES.doc.p
INPUT DEVICES.doc.pINPUT DEVICES.doc.p
INPUT DEVICES.doc.p
 
Ipad how to_jessica_and_louise_v1
Ipad how to_jessica_and_louise_v1Ipad how to_jessica_and_louise_v1
Ipad how to_jessica_and_louise_v1
 
13a.Computer Systems Extra Input
13a.Computer Systems   Extra Input13a.Computer Systems   Extra Input
13a.Computer Systems Extra Input
 
Computer Basics
Computer BasicsComputer Basics
Computer Basics
 
Driver english
Driver englishDriver english
Driver english
 
Computer basics
Computer basicsComputer basics
Computer basics
 
3671 explore windows-8.1_update_wsg_external
3671 explore windows-8.1_update_wsg_external3671 explore windows-8.1_update_wsg_external
3671 explore windows-8.1_update_wsg_external
 
E3 chap-02
E3 chap-02E3 chap-02
E3 chap-02
 
Introduction to Information Technology
Introduction to Information TechnologyIntroduction to Information Technology
Introduction to Information Technology
 
Computer basics
Computer basicsComputer basics
Computer basics
 
Computre Basics and Hardware
Computre Basics and HardwareComputre Basics and Hardware
Computre Basics and Hardware
 
Meet the New Microsoft Windows 8 - User Guide
Meet the New Microsoft Windows 8 - User GuideMeet the New Microsoft Windows 8 - User Guide
Meet the New Microsoft Windows 8 - User Guide
 
HCI - Chapter 3
HCI - Chapter 3HCI - Chapter 3
HCI - Chapter 3
 
Smart Board+Tools
Smart Board+ToolsSmart Board+Tools
Smart Board+Tools
 
Mobiview getting started guide
Mobiview getting started guideMobiview getting started guide
Mobiview getting started guide
 
Computer Lecture 2
Computer  Lecture 2Computer  Lecture 2
Computer Lecture 2
 
Basic computer class 1
Basic computer class 1Basic computer class 1
Basic computer class 1
 
Form 1 Term 1 Week 11.1
Form 1   Term 1  Week 11.1Form 1   Term 1  Week 11.1
Form 1 Term 1 Week 11.1
 
HCI 3e - Ch 2: The computer
HCI 3e - Ch 2:  The computerHCI 3e - Ch 2:  The computer
HCI 3e - Ch 2: The computer
 

En vedette

SIAULIU "ROMUVOS" GIMNAZIJAPPt on History EN / Lithuanian to become an app
SIAULIU "ROMUVOS" GIMNAZIJAPPt on History EN / Lithuanian to become an appSIAULIU "ROMUVOS" GIMNAZIJAPPt on History EN / Lithuanian to become an app
SIAULIU "ROMUVOS" GIMNAZIJAPPt on History EN / Lithuanian to become an appCharo Cuart
 
Bibliografía
BibliografíaBibliografía
Bibliografíasnsd9sone
 
Geografia pequena historia critica.pdf 3
Geografia pequena historia critica.pdf 3Geografia pequena historia critica.pdf 3
Geografia pequena historia critica.pdf 3Luis Hamilton Arruda
 
Jgar m4 u1_presentacion proyecto
Jgar m4 u1_presentacion proyectoJgar m4 u1_presentacion proyecto
Jgar m4 u1_presentacion proyectoJgabriel ar
 
Art Appreciation: Art of Africa and the Pacific Islands
Art Appreciation: Art of Africa and the Pacific IslandsArt Appreciation: Art of Africa and the Pacific Islands
Art Appreciation: Art of Africa and the Pacific IslandsPaige Prater
 

En vedette (7)

SIAULIU "ROMUVOS" GIMNAZIJAPPt on History EN / Lithuanian to become an app
SIAULIU "ROMUVOS" GIMNAZIJAPPt on History EN / Lithuanian to become an appSIAULIU "ROMUVOS" GIMNAZIJAPPt on History EN / Lithuanian to become an app
SIAULIU "ROMUVOS" GIMNAZIJAPPt on History EN / Lithuanian to become an app
 
Bibliografía
BibliografíaBibliografía
Bibliografía
 
Geografia pequena historia critica.pdf 3
Geografia pequena historia critica.pdf 3Geografia pequena historia critica.pdf 3
Geografia pequena historia critica.pdf 3
 
Jgar m4 u1_presentacion proyecto
Jgar m4 u1_presentacion proyectoJgar m4 u1_presentacion proyecto
Jgar m4 u1_presentacion proyecto
 
Overtrading
OvertradingOvertrading
Overtrading
 
Art Appreciation: Art of Africa and the Pacific Islands
Art Appreciation: Art of Africa and the Pacific IslandsArt Appreciation: Art of Africa and the Pacific Islands
Art Appreciation: Art of Africa and the Pacific Islands
 
20120219
2012021920120219
20120219
 

Similaire à Presentation about the use of Smart Tecnologies

foredumed:Smart board tastersession_m-ed 07_16
foredumed:Smart board tastersession_m-ed 07_16foredumed:Smart board tastersession_m-ed 07_16
foredumed:Smart board tastersession_m-ed 07_16farahsyed9
 
SmartBoard Care and Feeding.
SmartBoard Care and Feeding.SmartBoard Care and Feeding.
SmartBoard Care and Feeding.Rene Torres Visso
 
Smart board cuidados
Smart board   cuidadosSmart board   cuidados
Smart board cuidadosSsindhy
 
Smart board cuidados
Smart board   cuidadosSmart board   cuidados
Smart board cuidadosyizelt16
 
Smart board cuidados
Smart board   cuidadosSmart board   cuidados
Smart board cuidadosVicky Ta
 
Smart board cuidados
Smart board   cuidadosSmart board   cuidados
Smart board cuidadosMaiisa
 
Smart board cuidados
Smart board   cuidadosSmart board   cuidados
Smart board cuidadosemmysss
 
Smart board cuidados
Smart board   cuidadosSmart board   cuidados
Smart board cuidadosgiovanna2011
 
Smart board cuidados
Smart board   cuidadosSmart board   cuidados
Smart board cuidadosVanessa
 
Smart board cuidados
Smart board   cuidadosSmart board   cuidados
Smart board cuidadosPaola1721
 
Smart board cuidados
Smart board   cuidadosSmart board   cuidados
Smart board cuidadosSsindhy
 
Smart board cuidados
Smart board   cuidadosSmart board   cuidados
Smart board cuidadosDeysi Lucho
 
Smart board cuidados
Smart board   cuidadosSmart board   cuidados
Smart board cuidadoscdchclaudia
 
Smart board cuidados
Smart board cuidadosSmart board cuidados
Smart board cuidadosDeysi Lucho
 

Similaire à Presentation about the use of Smart Tecnologies (20)

foredumed:Smart board tastersession_m-ed 07_16
foredumed:Smart board tastersession_m-ed 07_16foredumed:Smart board tastersession_m-ed 07_16
foredumed:Smart board tastersession_m-ed 07_16
 
SmartBoard Care and Feeding.
SmartBoard Care and Feeding.SmartBoard Care and Feeding.
SmartBoard Care and Feeding.
 
Cuidados
CuidadosCuidados
Cuidados
 
Smart board cuidados
Smart board   cuidadosSmart board   cuidados
Smart board cuidados
 
Smart board
Smart board  Smart board
Smart board
 
Smart board cuidados
Smart board   cuidadosSmart board   cuidados
Smart board cuidados
 
Smart board cuidados
Smart board   cuidadosSmart board   cuidados
Smart board cuidados
 
Smart board cuidados
Smart board   cuidadosSmart board   cuidados
Smart board cuidados
 
Smart board
Smart board   Smart board
Smart board
 
Smart board cuidados
Smart board   cuidadosSmart board   cuidados
Smart board cuidados
 
Smart board cuidados
Smart board   cuidadosSmart board   cuidados
Smart board cuidados
 
Smart board cuidados
Smart board   cuidadosSmart board   cuidados
Smart board cuidados
 
memorias
memoriasmemorias
memorias
 
Smart board cuidados
Smart board   cuidadosSmart board   cuidados
Smart board cuidados
 
Smart board cuidados
Smart board   cuidadosSmart board   cuidados
Smart board cuidados
 
Smart board cuidados
Smart board   cuidadosSmart board   cuidados
Smart board cuidados
 
Smart board cuidados
Smart board   cuidadosSmart board   cuidados
Smart board cuidados
 
Smart board cuidados
Smart board   cuidadosSmart board   cuidados
Smart board cuidados
 
Smart board cuidados
Smart board   cuidadosSmart board   cuidados
Smart board cuidados
 
Smart board cuidados
Smart board cuidadosSmart board cuidados
Smart board cuidados
 

Plus de Charo Cuart

EMWOFA- workbook - Spanish - Español
EMWOFA- workbook - Spanish - Español EMWOFA- workbook - Spanish - Español
EMWOFA- workbook - Spanish - Español Charo Cuart
 
Newsletter Euapps4 us training meeting in Turkey
Newsletter  Euapps4 us training meeting in Turkey Newsletter  Euapps4 us training meeting in Turkey
Newsletter Euapps4 us training meeting in Turkey Charo Cuart
 
Newsletter e uapps4us barcelona
Newsletter e uapps4us barcelonaNewsletter e uapps4us barcelona
Newsletter e uapps4us barcelonaCharo Cuart
 
Tema 1 crea tu app educativa
Tema 1 crea tu app educativa Tema 1 crea tu app educativa
Tema 1 crea tu app educativa Charo Cuart
 
Newsletter 2-word
Newsletter 2-wordNewsletter 2-word
Newsletter 2-wordCharo Cuart
 
Dissemination event - Euapps4us Lithuania
Dissemination event - Euapps4us Lithuania Dissemination event - Euapps4us Lithuania
Dissemination event - Euapps4us Lithuania Charo Cuart
 
Modal Verbs, Past Simple,Past Continuous, Comparatives in Business English eu...
Modal Verbs, Past Simple,Past Continuous, Comparatives in Business English eu...Modal Verbs, Past Simple,Past Continuous, Comparatives in Business English eu...
Modal Verbs, Past Simple,Past Continuous, Comparatives in Business English eu...Charo Cuart
 
El agua y el suelo : ppt that will be an app- Stucom
El agua y el suelo : ppt that will be an app- Stucom El agua y el suelo : ppt that will be an app- Stucom
El agua y el suelo : ppt that will be an app- Stucom Charo Cuart
 
The water and the ground. ppt to become an app. Stucom
The water and the ground. ppt to become an app. Stucom The water and the ground. ppt to become an app. Stucom
The water and the ground. ppt to become an app. Stucom Charo Cuart
 
Revolución Industrial : ppt que será un app - Stucom
Revolución Industrial : ppt que será un app - Stucom Revolución Industrial : ppt que será un app - Stucom
Revolución Industrial : ppt que será un app - Stucom Charo Cuart
 
Pdf version of euapps4 us.pdf industrial revolution
Pdf version of euapps4 us.pdf industrial revolutionPdf version of euapps4 us.pdf industrial revolution
Pdf version of euapps4 us.pdf industrial revolutionCharo Cuart
 
Island business article
Island business articleIsland business article
Island business articleCharo Cuart
 
Minutes last meeting in POland may2014
Minutes last meeting in POland may2014 Minutes last meeting in POland may2014
Minutes last meeting in POland may2014 Charo Cuart
 

Plus de Charo Cuart (20)

EMWOFA- workbook - Spanish - Español
EMWOFA- workbook - Spanish - Español EMWOFA- workbook - Spanish - Español
EMWOFA- workbook - Spanish - Español
 
History lt
History ltHistory lt
History lt
 
Newsletter Euapps4 us training meeting in Turkey
Newsletter  Euapps4 us training meeting in Turkey Newsletter  Euapps4 us training meeting in Turkey
Newsletter Euapps4 us training meeting in Turkey
 
Newsletter e uapps4us barcelona
Newsletter e uapps4us barcelonaNewsletter e uapps4us barcelona
Newsletter e uapps4us barcelona
 
Tema 7
Tema 7Tema 7
Tema 7
 
Tema6 potx
Tema6 potxTema6 potx
Tema6 potx
 
Tema5 potx
Tema5 potxTema5 potx
Tema5 potx
 
Tema4 potx
Tema4 potxTema4 potx
Tema4 potx
 
Tema3 potx
Tema3 potxTema3 potx
Tema3 potx
 
Tema 2 apps
Tema 2 apps Tema 2 apps
Tema 2 apps
 
Tema 1 crea tu app educativa
Tema 1 crea tu app educativa Tema 1 crea tu app educativa
Tema 1 crea tu app educativa
 
Newsletter 2-word
Newsletter 2-wordNewsletter 2-word
Newsletter 2-word
 
Dissemination event - Euapps4us Lithuania
Dissemination event - Euapps4us Lithuania Dissemination event - Euapps4us Lithuania
Dissemination event - Euapps4us Lithuania
 
Modal Verbs, Past Simple,Past Continuous, Comparatives in Business English eu...
Modal Verbs, Past Simple,Past Continuous, Comparatives in Business English eu...Modal Verbs, Past Simple,Past Continuous, Comparatives in Business English eu...
Modal Verbs, Past Simple,Past Continuous, Comparatives in Business English eu...
 
El agua y el suelo : ppt that will be an app- Stucom
El agua y el suelo : ppt that will be an app- Stucom El agua y el suelo : ppt that will be an app- Stucom
El agua y el suelo : ppt that will be an app- Stucom
 
The water and the ground. ppt to become an app. Stucom
The water and the ground. ppt to become an app. Stucom The water and the ground. ppt to become an app. Stucom
The water and the ground. ppt to become an app. Stucom
 
Revolución Industrial : ppt que será un app - Stucom
Revolución Industrial : ppt que será un app - Stucom Revolución Industrial : ppt que será un app - Stucom
Revolución Industrial : ppt que será un app - Stucom
 
Pdf version of euapps4 us.pdf industrial revolution
Pdf version of euapps4 us.pdf industrial revolutionPdf version of euapps4 us.pdf industrial revolution
Pdf version of euapps4 us.pdf industrial revolution
 
Island business article
Island business articleIsland business article
Island business article
 
Minutes last meeting in POland may2014
Minutes last meeting in POland may2014 Minutes last meeting in POland may2014
Minutes last meeting in POland may2014
 

Dernier

Sanyam Choudhary Chemistry practical.pdf
Sanyam Choudhary Chemistry practical.pdfSanyam Choudhary Chemistry practical.pdf
Sanyam Choudhary Chemistry practical.pdfsanyamsingh5019
 
Measures of Central Tendency: Mean, Median and Mode
Measures of Central Tendency: Mean, Median and ModeMeasures of Central Tendency: Mean, Median and Mode
Measures of Central Tendency: Mean, Median and ModeThiyagu K
 
Kisan Call Centre - To harness potential of ICT in Agriculture by answer farm...
Kisan Call Centre - To harness potential of ICT in Agriculture by answer farm...Kisan Call Centre - To harness potential of ICT in Agriculture by answer farm...
Kisan Call Centre - To harness potential of ICT in Agriculture by answer farm...Krashi Coaching
 
Beyond the EU: DORA and NIS 2 Directive's Global Impact
Beyond the EU: DORA and NIS 2 Directive's Global ImpactBeyond the EU: DORA and NIS 2 Directive's Global Impact
Beyond the EU: DORA and NIS 2 Directive's Global ImpactPECB
 
Introduction to ArtificiaI Intelligence in Higher Education
Introduction to ArtificiaI Intelligence in Higher EducationIntroduction to ArtificiaI Intelligence in Higher Education
Introduction to ArtificiaI Intelligence in Higher Educationpboyjonauth
 
mini mental status format.docx
mini    mental       status     format.docxmini    mental       status     format.docx
mini mental status format.docxPoojaSen20
 
SOCIAL AND HISTORICAL CONTEXT - LFTVD.pptx
SOCIAL AND HISTORICAL CONTEXT - LFTVD.pptxSOCIAL AND HISTORICAL CONTEXT - LFTVD.pptx
SOCIAL AND HISTORICAL CONTEXT - LFTVD.pptxiammrhaywood
 
Paris 2024 Olympic Geographies - an activity
Paris 2024 Olympic Geographies - an activityParis 2024 Olympic Geographies - an activity
Paris 2024 Olympic Geographies - an activityGeoBlogs
 
Industrial Policy - 1948, 1956, 1973, 1977, 1980, 1991
Industrial Policy - 1948, 1956, 1973, 1977, 1980, 1991Industrial Policy - 1948, 1956, 1973, 1977, 1980, 1991
Industrial Policy - 1948, 1956, 1973, 1977, 1980, 1991RKavithamani
 
Z Score,T Score, Percential Rank and Box Plot Graph
Z Score,T Score, Percential Rank and Box Plot GraphZ Score,T Score, Percential Rank and Box Plot Graph
Z Score,T Score, Percential Rank and Box Plot GraphThiyagu K
 
Hybridoma Technology ( Production , Purification , and Application )
Hybridoma Technology  ( Production , Purification , and Application  ) Hybridoma Technology  ( Production , Purification , and Application  )
Hybridoma Technology ( Production , Purification , and Application ) Sakshi Ghasle
 
Student login on Anyboli platform.helpin
Student login on Anyboli platform.helpinStudent login on Anyboli platform.helpin
Student login on Anyboli platform.helpinRaunakKeshri1
 
The Most Excellent Way | 1 Corinthians 13
The Most Excellent Way | 1 Corinthians 13The Most Excellent Way | 1 Corinthians 13
The Most Excellent Way | 1 Corinthians 13Steve Thomason
 
“Oh GOSH! Reflecting on Hackteria's Collaborative Practices in a Global Do-It...
“Oh GOSH! Reflecting on Hackteria's Collaborative Practices in a Global Do-It...“Oh GOSH! Reflecting on Hackteria's Collaborative Practices in a Global Do-It...
“Oh GOSH! Reflecting on Hackteria's Collaborative Practices in a Global Do-It...Marc Dusseiller Dusjagr
 
microwave assisted reaction. General introduction
microwave assisted reaction. General introductionmicrowave assisted reaction. General introduction
microwave assisted reaction. General introductionMaksud Ahmed
 

Dernier (20)

Sanyam Choudhary Chemistry practical.pdf
Sanyam Choudhary Chemistry practical.pdfSanyam Choudhary Chemistry practical.pdf
Sanyam Choudhary Chemistry practical.pdf
 
Measures of Central Tendency: Mean, Median and Mode
Measures of Central Tendency: Mean, Median and ModeMeasures of Central Tendency: Mean, Median and Mode
Measures of Central Tendency: Mean, Median and Mode
 
TataKelola dan KamSiber Kecerdasan Buatan v022.pdf
TataKelola dan KamSiber Kecerdasan Buatan v022.pdfTataKelola dan KamSiber Kecerdasan Buatan v022.pdf
TataKelola dan KamSiber Kecerdasan Buatan v022.pdf
 
Kisan Call Centre - To harness potential of ICT in Agriculture by answer farm...
Kisan Call Centre - To harness potential of ICT in Agriculture by answer farm...Kisan Call Centre - To harness potential of ICT in Agriculture by answer farm...
Kisan Call Centre - To harness potential of ICT in Agriculture by answer farm...
 
Beyond the EU: DORA and NIS 2 Directive's Global Impact
Beyond the EU: DORA and NIS 2 Directive's Global ImpactBeyond the EU: DORA and NIS 2 Directive's Global Impact
Beyond the EU: DORA and NIS 2 Directive's Global Impact
 
Introduction to ArtificiaI Intelligence in Higher Education
Introduction to ArtificiaI Intelligence in Higher EducationIntroduction to ArtificiaI Intelligence in Higher Education
Introduction to ArtificiaI Intelligence in Higher Education
 
mini mental status format.docx
mini    mental       status     format.docxmini    mental       status     format.docx
mini mental status format.docx
 
SOCIAL AND HISTORICAL CONTEXT - LFTVD.pptx
SOCIAL AND HISTORICAL CONTEXT - LFTVD.pptxSOCIAL AND HISTORICAL CONTEXT - LFTVD.pptx
SOCIAL AND HISTORICAL CONTEXT - LFTVD.pptx
 
Paris 2024 Olympic Geographies - an activity
Paris 2024 Olympic Geographies - an activityParis 2024 Olympic Geographies - an activity
Paris 2024 Olympic Geographies - an activity
 
INDIA QUIZ 2024 RLAC DELHI UNIVERSITY.pptx
INDIA QUIZ 2024 RLAC DELHI UNIVERSITY.pptxINDIA QUIZ 2024 RLAC DELHI UNIVERSITY.pptx
INDIA QUIZ 2024 RLAC DELHI UNIVERSITY.pptx
 
Industrial Policy - 1948, 1956, 1973, 1977, 1980, 1991
Industrial Policy - 1948, 1956, 1973, 1977, 1980, 1991Industrial Policy - 1948, 1956, 1973, 1977, 1980, 1991
Industrial Policy - 1948, 1956, 1973, 1977, 1980, 1991
 
Z Score,T Score, Percential Rank and Box Plot Graph
Z Score,T Score, Percential Rank and Box Plot GraphZ Score,T Score, Percential Rank and Box Plot Graph
Z Score,T Score, Percential Rank and Box Plot Graph
 
Mattingly "AI & Prompt Design: The Basics of Prompt Design"
Mattingly "AI & Prompt Design: The Basics of Prompt Design"Mattingly "AI & Prompt Design: The Basics of Prompt Design"
Mattingly "AI & Prompt Design: The Basics of Prompt Design"
 
Hybridoma Technology ( Production , Purification , and Application )
Hybridoma Technology  ( Production , Purification , and Application  ) Hybridoma Technology  ( Production , Purification , and Application  )
Hybridoma Technology ( Production , Purification , and Application )
 
Student login on Anyboli platform.helpin
Student login on Anyboli platform.helpinStudent login on Anyboli platform.helpin
Student login on Anyboli platform.helpin
 
The Most Excellent Way | 1 Corinthians 13
The Most Excellent Way | 1 Corinthians 13The Most Excellent Way | 1 Corinthians 13
The Most Excellent Way | 1 Corinthians 13
 
“Oh GOSH! Reflecting on Hackteria's Collaborative Practices in a Global Do-It...
“Oh GOSH! Reflecting on Hackteria's Collaborative Practices in a Global Do-It...“Oh GOSH! Reflecting on Hackteria's Collaborative Practices in a Global Do-It...
“Oh GOSH! Reflecting on Hackteria's Collaborative Practices in a Global Do-It...
 
microwave assisted reaction. General introduction
microwave assisted reaction. General introductionmicrowave assisted reaction. General introduction
microwave assisted reaction. General introduction
 
Código Creativo y Arte de Software | Unidad 1
Código Creativo y Arte de Software | Unidad 1Código Creativo y Arte de Software | Unidad 1
Código Creativo y Arte de Software | Unidad 1
 
Mattingly "AI & Prompt Design: Structured Data, Assistants, & RAG"
Mattingly "AI & Prompt Design: Structured Data, Assistants, & RAG"Mattingly "AI & Prompt Design: Structured Data, Assistants, & RAG"
Mattingly "AI & Prompt Design: Structured Data, Assistants, & RAG"
 

Presentation about the use of Smart Tecnologies

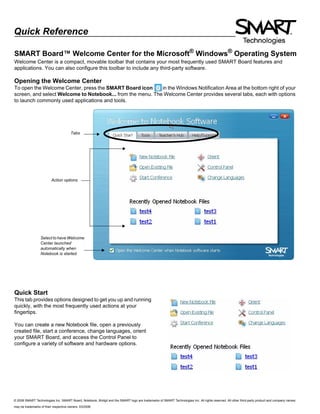
  • 1. Quick Reference © 2008 SMART Technologies Inc. SMART Board, Notebook, Bridgit and the SMART logo are trademarks of SMART Technologies Inc. All rights reserved. All other third-party product and company names may be trademarks of their respective owners. 03/2008. SMART Board™ Welcome Center for the Microsoft® Windows® Operating System Welcome Center is a compact, movable toolbar that contains your most frequently used SMART Board features and applications. You can also configure this toolbar to include any third-party software. Opening the Welcome Center To open the Welcome Center, press the SMART Board icon in the Windows Notification Area at the bottom right of your screen, and select Welcome to Notebook... from the menu. The Welcome Center provides several tabs, each with options to launch commonly used applications and tools. Quick Start This tab provides options designed to get you up and running quickly, with the most frequently used actions at your fingertips. You can create a new Notebook file, open a previously created file, start a conference, change languages, orient your SMART Board, and access the Control Panel to configure a variety of software and hardware options. Tabs Select to have Welcome Center launched automatically when Notebook is started Action options
  • 2. Quick Reference © 2008 SMART Technologies Inc. SMART Board, Notebook, Bridgit and the SMART logo are trademarks of SMART Technologies Inc. All rights reserved. All other third-party product and company names may be trademarks of their respective owners. 03/2008. Tools The Tools tab provides direct access to each of the functions that help you operate the SMART Board interactive whiteboard more effectively. In addition to basic functions such as the On-Screen Keyboard and Floating Tools, you will also find multimedia tools that allow you to create and present dynamic content. Teacher’s Hub Your single destination for all the resources you need to get started. Use the Teacher's Hub to help you seamlessly integrate your SMART Board interactive whiteboard into your classroom. 1 Training - Online training sessions, Printable materials, Two-Minute Tutorials, Training events, Learning path for teachers 2 Curriculum resources - SMART-created lesson activities, Create your own lesson activities, Notebook interactive viewer, Lesson Activity Toolkit 3 Professional development - ED Compass newsletter, Bulletin board, Case studies, Showcase schools Help/Support The Help/Support tab provides access to a wide array of support sources, from self-directed troubleshooting to one-on-one help from an expert.. You will also find your software version information here.
  • 3. Quick Reference Hardware Basics for Front Projection SMART Board Interactive Whiteboards The SMART Board™ interactive whiteboard is touch sensitive and operates as part of a system that includes a computer and a projector. It may help you to think of your interactive whiteboard the same way you think of your mouse or keyboard – it is an input device that enables you to control applications on your computer. Setup instructions depend on the model of SMART Board interactive whiteboard. Specific instructions on how to setup your SMART Board can be found at www.smarttech.com/ support/product/index.asp. The SMART Pen Tray The SMART Pen Tray consists of four color-coded slots for pens and one slot for the eraser. Each slot has an optical sensor to identify when the pens and eraser have been picked up. You can write with the pen or with your finger, as long as the pen slot is empty. The technology in the pen tray is smart enough to know which tool was removed from its slot most recently. If you remove the eraser from its slot while you are still holding a pen, the pen tray will assume you want to erase. The lights above the tool slots indicate which tool was removed last. TIP: If someone accidentally takes a pen or the eraser home, simply cover the optical sensor with a pen lid or a sticky note to continue using your interactive whiteboard until the tool is returned. • The computer sends an image of an application to the projector. • The projector casts the image onto the interactive whiteboard. • The interactive whiteboard acts as both the monitor and input device, allowing you to control any application by touching the screen.
  • 4. © 2008 SMART Technologies ULC. All rights reserved. SMART Board, Whisper-tip and the SMART logo are trademarks of SMART Technologies Inc. All other third-party product and company names may be tradmarks of their respective owners. Printed in Canada 03/2008. The Pen-Tray Buttons The pen tray has at least two pen-tray buttons. One button is used to launch the On-Screen Keyboard. The second button is used to make your next touch on the interactive whiteboard a right-click. Some interactive whiteboards have a third button; this button is used to quickly access the Help Center. The Pens The SMART Board interactive whiteboard comes with four Whisper-tip™ pens (black, red, green and blue) and one eraser. Although you do not need to use the pens to write on you interactive whiteboard, the pens do make writing more intuitive. Pick up a pen from the pen tray and write on the SMART Board. To erase your digital ink, remove the eraser from the pen tray and move it in a smooth motion over your notes. Your notes will disappear. TIP: To clear a large area of digital ink, draw a circle around the area you want to erase with the eraser and tap once inside that area. All handwritten notes inside that circle will disappear. The Ready Light The Ready Light indicates the status of your interactive whiteboard. Depending on the model of the SMART Board interactive whiteboard you are using, the Ready Light is located either on the right side of the pen tray or the lower-right of the frame bezel. If the Ready Light is a solid green, your system is functioning properly. If the Ready Light is flashing or is a color other than green for an extended period of time, you should check the User’s Guide that came with your SMART Board interactive whiteboard for guidance on troubleshooting. NOTE: After you turn on your computer, the Ready Light will be red while the SMART Board interactive whiteboard and the computer are establishing communication. Pen tray buttons Pen tray buttons Ready Light on lower-right of frame bezel Ready Light on right side of pen tray
  • 5. Quick Reference Orienting the SMART Board interactive whiteboard Orientation ensures your touch is registered accurately when you are using the SMART Board™ interactive whiteboard. If you press the interactive whiteboard with your finger and your cursor appears somewhere other than where you are pressing, try orienting the interactive whiteboard. Quick Orientation 1 To orient the interactive whiteboard, press and hold the Keyboard and Right Mouse buttons simultaneously until the Orientation screen appears. 2 Begin the orientation process at the upper left corner of the Orientation screen. Press your finger or pen firmly on the center of each cross in the order indicated by the white, diamond-shaped graphic. TIP: If you are not satisfied with the precision of a particular orientation point while orienting, press one of the pen tray buttons or the left arrow key on your keyboard to redo the previous orientation point. Changing Orientation Settings Increase the detail of calibration for applications that require a greater amount of precision. 1 Press the SMART Board icon in the Windows Notification Area, and select Control Panel from the SMART Tool menu. 2 From the Control Panel window, press the SMART Hardware Settings button. Pen tray buttons Pen tray buttons Orientation screen Windows Notification Area
  • 6. © 2008 SMART Technologies Inc. All rights reserved. SMART Board and the SMART logo are trademarks of SMART Technologies Inc. All other third-party product and company names may be tradmarks of their respective owners. Printed in Canada 03/2008. 3 The SMART Hardware Settings window will open. Select Orientation/Alignment Settings from the drop-down menu. 4 Select Fine (20 Points) and press OK to apply the new orientation and alignment settings. 5 From the Control Panel window, press the Orient button to begin the orientation process.
  • 7. Quick Reference Notebook software Version 10 Toolbars Notebook software toolbar The Notebook™ software toolbar gives you access to a number of tools to help you work with your Notebook file. By default, the toolbar appears at the top of the Notebook page. When you are working at the SMART Board™ interactive whiteboard and you prefer to sit, or are working with young students, it may be more convenient to move the toolbar to the bottom of the page. To do this, press the double-ended, vertical arrow on the far right of the toolbar. Display the previous Notebook page Display the next Notebook page Insert a blank page directly after the active Notebook page Open an existing Notebook file Save your Notebook file Paste Undo the last action you performed Redo the action you last performed Delete any selected object Show or Hide the Screen Shade on the current Notebook page Open Full Screen view Toggle dual page mode Launch the Screen Capture toolbar Activate SMART Document Camera Insert Question Create a table Toggle move toolbar
  • 8. © 2008 SMART Technologies ULC. All rights reserved. Notebook and the SMART logo are trademarks of SMART Technologies ULC. All other third- party products and company names may be trademarks of their respective owners. Printed in Canada 04/2006. Full Screen Toolbar The Full Screen toolbar allows you to work with your Notebook file while in full screen mode. Select any object on the page with your mouse Write or draw on the Notebook page with the pen tool Write or draw on the Notebook page with the creative pen tool Erase digital ink on the Notebook page Draw a line Create a shape Draw a perfect shape (e.g., circle, square, rectangle, etc.) Write or draw with the Magic Pen tool in disappearing ink, zoom and spotlight Fill an object or shape Create a text-entry box for typing Launch the Properties side tab Move the toolbar to the bottom of the Notebook page Adjust volume Instant conferencing Display the previous Notebook page Display a menu of more options, for example the Screen Shade, shapes or pen options Display the next Notebook page Exit full screen
  • 9. Quick Reference Side Tabs There are four tabs on the side of the Notebook interface (shown below on the right-hand side of the work area). Click the double-ended horizontal arrow to move the tabs from one side of the work area to the other. You can hide the side tabs from view when you have finished working with them by checking the Auto-hide check box. Click the double-ended, horizontal arrow to move these four tabs from one side of the page to the other. The tabs below are shown on the left-hand side of the work area. Page thumbnail Move tabs to the other side of the work area Page Sorter tab Attachments tab Gallery tab Properites tab Auto-hide check box Work area
  • 10. © 2008 SMART Technologies ULC. All rights reserved. Notebook and the SMART logo are trademarks of SMART Technologies ULC. All other third- party products and company names may be trademarks of their respective owners. Printed in Canada 04/2006. Click the Page Sorter tab to allow you to see a thumbnail image of each page in the Notebook file, navigate to a different page, create page groups or reorder the pages. Click the Gallery tab to access collections of SMART’s custom pages, clip art, Adobe® Flash® animations, audio and video you can add to the Notebook file. Click the Attachments tab to add hyperlinks to or attachments from other software applications to the file. Click the Properties tab to format shapes, objects and text.
  • 11. Quick Reference Working with Notebook Software Gallery Collections What is the Notebook Software Gallery? The Notebook™ software Gallery helps you quickly develop and deliver lesson activities and presentations in rich graphic detail. Thousands of high-resolution images, audio, video, Macromedia® Flash® and entire Notebook files are organized into searchable collections that allow you to create attractive, reusable content. Select a folder to display its contents in the search results area Drag the thumbnail image to the work area Enter a keyword into the search field to quickly find related Gallery items Show additional Gallery actions Press to return to previous search results – works like an Internet browser’s back button Press the Gallery tab to open the Gallery Press the Search button to initiate search Search results area Show the onscreen keyboard
  • 12. © 2008 SMART Technologies ULC. All rights reserved. SMART Board, Notebook and the SMART logo are trademarks of SMART Technologies ULC. All other third-party product and company names may be tradmarks of their respective owners. Printed in Canada 03/2008. Searching for Gallery Content There are two ways to find Gallery content. You can browse through the Gallery collections and select a folder, or you can enter a keyword into the search field, as you would when using an Internet search engine. If you were building a mathematics lesson activity about shapes, for example, you may decide to browse by topic for all Gallery items relating to Shapes, Space and Measure. However, if you were looking for a specific shape in the middle of class, you may want to type the keyword triangle into the search field to save time. To look for Gallery items using the search field 1 Press once inside the search field 2 Type a keyword related to the type of object(s) you are looking for 3 Press the Search button to display your results TIP: Press the icon to the left of the search field to use the On-Screen Keyboard to type your keyword. Using Online Resources Select Online Resources to access a list of Internet links to lesson activities, curriculum standards, classroom resources or additional Gallery content. Instead of interrupting the flow of your presentation by leaving Notebook software, you can seamlessly launch a Web page with supporting content at the same time you deliver your material. NOTE: You will require an active Internet connection and a Web browser to use Online Resources.
  • 13. Quick Reference Viewing Search Results Search results are graphically displayed as thumbnail images that match your search criteria. These thumbnail images, or Gallery items, are organized into four content types: Related Folders, Pictures and Backgrounds, Interactive and Multimedia, and Notebook Files and Pages. If you search for the keyword triangle for example, Related Folders will display all Gallery items associated with the keyword, providing you with additional content to help supplement learning activities. Double-press a folder thumbnail to view its contents. The thumbnails displayed in Pictures and Backgrounds include clip art and photographs. Drag an item to the work area to use as part of a lesson or to modify its properties. Interactive and Multimedia contains three types of content: Flash files, video files and objects with attached sounds. Items from this section of the Gallery are used to add rich media content to a lesson or presentation and engage reluctant learners with multimedia elements. Additional content can be found in Notebook Files and Pages. Notebook file thumbnails are recognized by the coil binding on the left of the thumbnail image. Drag the thumbnail image to the work area to add a page or series of pages, such as a complete lesson activity, to your existing content. Notebook files will be inserted directly after the active Notebook page. Notebook page thumbnails are identified by the folded edge in the top- right corner. Drag the thumbnail image to the work area to create a new page with a background for students to write over, such as an exercise in identifying shapes.
  • 14. Quick Reference © 2008 SMART Technologies ULC. All rights reserved. SMART Board, Notebook and the SMART logo are trademarks of SMART Technologies ULC. Printed in Canada 03/2008. The Floating Tools toolbar The features you use most are literally at your fingertips with the Floating Tools toolbar. If it is not already on your screen, you can launch the Floating Tools by selecting the SMART Board™ icon located in Windows Notification Area at the bottom right of your screen, and choosing Show Floating Tools from the menu. Button What the button does Stop using other tools and return the cursor to mouse mode Write or draw in digital ink, and select the ink color Highlight an area of the screen with translucent ink for emphasis, and select the ink color Erase digital ink, and select the size of the eraser Draw a line, and select the format of the line Draw a pre-formed shape, and select the shape Make your next press on the interactive whiteboard a right-click Launch the on-screen keyboard Launch Notebook software Undo your previous action. Open the Customize Floating Tools menu to personalize toolbar functions Floating Tools toolbar (default settings) Hide/Reveal toolbar Move toolbar
  • 15. © 2008 SMART Technologies ULC. All rights reserved. SMART Board, Notebook and the SMART logo are trademarks of SMART Technologies ULC. Printed in Canada 03/2008. Customizing Floating Tools Press the Customize button in the Floating Tools toolbar to choose from a variety of toolbar buttons. You can choose as many buttons as you like to fully customize Floating Tools with the buttons you need. To add a button to the Floating Tools drag and drop the icon onto the toolbar. To remove a button, ensure the Customize button has been pressed, and drag the button off the Floating Tools toolbar. To return the toolbar to its original configuration press the Restore Defaults button. When you are finished customizing the toolbar press the Done button.
  • 16. Quick Reference © 2008 SMART Technologies ULC. All rights reserved. SMART Board, Notebook and the SMART logo are trademarks of SMART Technologies ULC. Printed in Canada 03/2008. The buttons that have side menus can be further customized. Right click on the side menu. The Properties dialog box will appear where you can change the settings for the tool. You can save the new settings so they become the default for that tool by clicking the Save Tool Settings button at the bottom of the dialog box after you’ve set the parameters above. Example of Pen tool’s Properties dialog box side menu Properties dialog box