Fuel Air Ratio Controller for Combustion Equipment
•
0 j'aime•1,176 vues

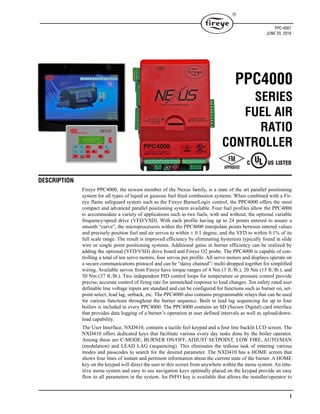
Fireye PPC4000, the newest member of the Nexus family, is a state of the art parallel positioning system for all types of liquid or gaseous fuel fired combustion systems.

Recommandé
Recommandé
Contenu connexe
Tendances
Tendances (20)
En vedette
En vedette (20)
Similaire à Fuel Air Ratio Controller for Combustion Equipment
Similaire à Fuel Air Ratio Controller for Combustion Equipment (20)
Plus de Classic Controls, Inc.
Plus de Classic Controls, Inc. (20)
Dernier
Dernier (20)
Fuel Air Ratio Controller for Combustion Equipment
- 1. 1 DESCRIPTION Fireye PPC4000, the newest member of the Nexus family, is a state of the art parallel positioning system for all types of liquid or gaseous fuel fired combustion systems. When combined with a Fir- eye flame safeguard system such as the Fireye BurnerLogix control, the PPC4000 offers the most compact and advanced parallel positioning system available. Four fuel profiles allow the PPC4000 to accommodate a variety of applications such as two fuels, with and without, the optional variable frequency/speed drive (VFD/VSD). With each profile having up to 24 points entered to assure a smooth “curve”, the microprocessors within the PPC4000 interpolate points between entered values and precisely position fuel and air servos to within ± 0.1 degree, and the VFD to within 0.1% of its full scale range. The result is improved efficiency by eliminating hysteresis typically found in slide wire or single point positioning systems. Additional gains in burner efficiency can be realized by adding the optional (VFD/VSD) drive board and Fireye O2 probe. The PPC4000 is capable of con- trolling a total of ten servo motors, four servos per profile. All servo motors and displays operate on a secure communications protocol and can be “daisy chained”/ multi-dropped together for simplified wiring. Available servos from Fireye have torque ranges of 4 Nm (3 ft./lb.), 20 Nm (15 ft./lb.), and 50 Nm (37 ft./lb.). Two independent PID control loops for temperature or pressure control provide precise, accurate control of firing rate for unmatched response to load changes. Ten safety rated user definable line voltage inputs are standard and can be configured for functions such as burner on, set- point select, lead lag, setback, etc. The PPC4000 also contains programmable relays that can be used for various functions throughout the burner sequence. Built in lead lag sequencing for up to four boilers is included in every PPC4000. The PPC4000 contains an SD (Secure Digital) card interface that provides data logging of a burner’s operation at user defined intervals as well as upload/down- load capability. The User Interface, NXD410, contains a tactile feel keypad and a four line backlit LCD screen. The NXD410 offers dedicated keys that facilitate various every day tasks done by the boiler operator. Among these are C-MODE, BURNER ON/OFF, ADJUST SETPOINT, LOW FIRE, AUTO/MAN (modulation) and LEAD LAG (sequencing). This eliminates the tedious task of entering various modes and passcodes to search for the desired parameter. The NXD410 has a HOME screen that shows four lines of instant and pertinent information about the current state of the burner. A HOME key on the keypad will direct the user to this screen from anywhere within the menu system. An intu- itive menu system and easy to use navigation keys optimally placed on the keypad provide an easy flow to all parameters in the system. An INFO key is available that allows the installer/operator to PPC-4001 JUNE 20, 2016 PPC4000 SERIES FUEL AIR RATIO CONTROLLER
- 2. 2 quickly check key system values while in commissioning mode. The NXD410 is panel mount only and is rated for NEMA 4X indoor environments. When required, the operating system of the PPC4000 and NXD410 will automatically direct the user to the passcode setup screen and when entered correctly will take the user directly to the parameter requested, making the entire system user-friendly. Key features of the PPC4000 system • Four line user interface with direct key functions • 7” and 13” Touchscreen support • Capable of controlling up to 10 servos when application driven • Non-monotonic servo operation • Two independent VFD control channels • Ten line voltage user-defined digital inputs • Voltage free alarm relay contacts (normally open in non-lockout state) • Four user selected line voltage burner profiles • Five 4-20 mA analog transducer inputs • Cold start thermal shock protection limits mechanical stress • Assured low fire cutoff • Sequencing for up to 6 boilers • SD (Secure Digital) interface for backup and restore • Modbus-RTU communications via RS485 with read/write capability • PID operation for precise process control • Intuitive menu driven design • User defined 4-20 mA outputs • Minimal wiring to flame safeguard • Optional O2 trim • Track Modulation • Boiler efficiency calculation • Compatible with BurnerLogix • Compatible with Flame-Monitor • Engineered and manufactured to ACE standards for product excellence • Small footprint: 5.0”(127mm) W x 8.0”(203.2mm) H x 4.0”(101.6mm) D • No wiring base necessary • Expert support from the Fireye team A minimal Nexus system includes the PPC4000 parallel positioning controller, NXD410 User Inter- face, 59-562-2 UI interface cable, appropriate Fireye pressure and/or temperature transducers, and a minimum of two servos for a single fuel application. Optionally an O2 probe and (VFD/VSD) card can be added. Although a BurnerLogix flame safeguard is recommended, the Flame-Monitor pro- vides direct compatibility to the PPC4000.
- 3. 3 This manual describes the installation, commissioning, operation and maintenance of the PPC4000 series fuel air ratio controls. It may be used in conjunction with the following other manuals: • BL-1001 – BurnerLogix Flame Safeguard Bulletin • YZEM-3001 – YZ300 Interlock Annunciator for use with BurnerLogix • E-1101 – Flame-Monitor Flame Safeguard Bulletin • E-3001 – E300 Expansion Module for use with Flame-Monitor • NEXBK-1000 - Nexus bracket and coupling accessories • NEX-3004 - Nexus FX04 series 4Nm servo motor • NEX-3020 - Nexus FX20 series 20Nm servo motor • NEX-3050 - Nexus FX50 series 50Nm servo motor • NXCESO2-1001 - OXYGEN PROBE • 133-750 - O2 mounting flange installation instructions • NXD-4101 - NXD410 User Interface • NXCESVFD - VFD plug-in board installation • NXTSD-4001 - Touchscreen user’s guide • FXIATS-1 - Ambient air temperature transmitter The equipment described in this manual is capable of causing property damage, severe injury, or death. It is the responsibility of the owner or user to ensure that the equipment described is installed, operated and commissioned in compliance with the requirements of all national and local codes. Warning: Electro-mechanical high steam pressure or high water temperature limits must remain in the running interlock circuit of the flame safeguard control.
- 4. 4 Description . . . . . . . . . . . . . . . . . . . . . . . . . . . . . . . . . .1 Key Features of the PPC4000 System. . . . . . . . . . . . . 2 PPC4000 System Specifications . . . . . . . . . . . . . . . . . .5 Approvals . . . . . . . . . . . . . . . . . . . . . . . . . . . . . . . . . . .7 Part Numbers and Approvals. . . . . . . . . . . . . . . . . . . . 8 Ordering Information . . . . . . . . . . . . . . . . . . . . . . . . . 9 Installation Procedure . . . . . . . . . . . . . . . . . . . . . . . . 10 NXD410 User Interface . . . . . . . . . . . . . . . . . . . . . . 10 PPC4000 Installation. . . . . . . . . . . . . . . . . . . . . . . . . 14 Wiring Connections . . . . . . . . . . . . . . . . . . . . . . . . . 15 PPC4000 Mounting and Wiring . . . . . . . . . . . . . . . . 17 Pressure and Temperature Sensors . . . . . . . . . . . . . . 17 Wiring Pressure and Temperature Sensors . . . . . . . . 19 Servo Motor Setup and Wiring . . . . . . . . . . . . . . . . . 20 NXCESO2 Oxygen Probe. . . . . . . . . . . . . . . . . . . . . 22 NXD410 User Interface . . . . . . . . . . . . . . . . . . . . . . 24 Navigating Through Display Menus. . . . . . . . . . . . . 25 PPC4000 Control Operation . . . . . . . . . . . . . . . . . . . 27 Passcode . . . . . . . . . . . . . . . . . . . . . . . . . . . . . . . . . . 28 Real Time Clock . . . . . . . . . . . . . . . . . . . . . . . . . . . . 28 Servo Setup . . . . . . . . . . . . . . . . . . . . . . . . . . . . . . . . 29 Sensor Setup . . . . . . . . . . . . . . . . . . . . . . . . . . . . . . . 31 Sensor Setpoint Setup . . . . . . . . . . . . . . . . . . . . . . . . 32 Profile Setup . . . . . . . . . . . . . . . . . . . . . . . . . . . . . . . 35 Digital Inputs. . . . . . . . . . . . . . . . . . . . . . . . . . . . . . . 35 Keypad Setup . . . . . . . . . . . . . . . . . . . . . . . . . . . . . . 36 Variable Frequency Drive . . . . . . . . . . . . . . . . . . . . . 37 Commissioning with VFD. . . . . . . . . . . . . . . . . . . . . 41 Oxygen Probe Setup . . . . . . . . . . . . . . . . . . . . . . . . . 42 Setting Trim Limits . . . . . . . . . . . . . . . . . . . . . . . . . . 44 General Rules for O2 Alarm Notification . . . . . . . . . 45 Flue Temperature Alarm Limits . . . . . . . . . . . . . . . . .46 Gain Terms . . . . . . . . . . . . . . . . . . . . . . . . . . . . . . . . .47 Understanding O2 Error Codes . . . . . . . . . . . . . . . . .47 Commissioning Procedure . . . . . . . . . . . . . . . . . . . . .49 Profile Setpoints . . . . . . . . . . . . . . . . . . . . . . . . . . . . .49 Commissioning Rules. . . . . . . . . . . . . . . . . . . . . . . . .50 Commissioning O2 Trim with the O2 Probe . . . . . . .56 Operation with O2 Trim . . . . . . . . . . . . . . . . . . . . . . .57 Adjust Ratio Procedure . . . . . . . . . . . . . . . . . . . . . . .58 Boiler Efficiency . . . . . . . . . . . . . . . . . . . . . . . . . . . .59 Cold Start Thermal Shock Protection. . . . . . . . . . . . .60 Communications Setup. . . . . . . . . . . . . . . . . . . . . . . .62 Setback Operation . . . . . . . . . . . . . . . . . . . . . . . . . . .63 Standby Water. . . . . . . . . . . . . . . . . . . . . . . . . . . . . . .64 Track Modulation . . . . . . . . . . . . . . . . . . . . . . . . . . . .65 Operating Sequence . . . . . . . . . . . . . . . . . . . . . . . . . .65 Sequence of Operation . . . . . . . . . . . . . . . . . . . . . . . .68 PPC4000 System Wiring Diagram. . . . . . . . . . . . . . 70 Boiler Sequencing . . . . . . . . . . . . . . . . . . . . . . . . . . 74 SD Card Operation . . . . . . . . . . . . . . . . . . . . . . . . . . .78 Backup Operation. . . . . . . . . . . . . . . . . . . . . . . . . . . .78 Restore Operation. . . . . . . . . . . . . . . . . . . . . . . . . . . .80 Delete Operation. . . . . . . . . . . . . . . . . . . . . . . . . . . . .81 Format Operation . . . . . . . . . . . . . . . . . . . . . . . . . . . .82 Profile Setup Work Sheet . . . . . . . . . . . . . . . . . . . . . .83 Lockouts . . . . . . . . . . . . . . . . . . . . . . . . . . . . . . . . . . .85 Error Messages. . . . . . . . . . . . . . . . . . . . . . . . . . . . . .85 Marginal Alarms. . . . . . . . . . . . . . . . . . . . . . . . . . . . .96 Fault History. . . . . . . . . . . . . . . . . . . . . . . . . . . . . . . .96 Notice . . . . . . . . . . . . . . . . . . . . . . . . . . . . . . . . . . .96 Warranties. . . . . . . . . . . . . . . . . . . . . . . . . . . . . . . . . .96 TABLE OF CONTENTS
- 5. 5 PPC4000 SYSTEM SPECIFICATIONS PPC4000 Control: Supply Voltage: PPC4000 120 VAC (+10%, -15%) 50/60 Hz PPC4000-230V 230 VAC (+10%, -15%) 50/60 Hz Power Consumption: 15 VA Temperature Rating: Operating: 32°F to 140°F (0°C to 60°C) Storage: -4°F to 158°F (-20°C to 70°C) Humidity Rating: 85% RH, non-condensing Protection Category: NEMA 1 (IP01) Unit Dimensions: 5.0" (127 mm) W x 8.0" (203.2mm) H x 4.0” (101.6mm) D Shipping Weight: PPC4000: Approx. 3.2 lbs. (1.45 kg) NXD410 User Interface: Supply Voltage: NXD410 24 VDC @ 250 mA (supplied by PPC4000) Power Consumption: 6 VA Temperature Rating: Operating: 32°F to 140°F (0°C to 60°C) Storage: -4°F to 158°F (-20°C to 70°C) Humidity Rating: 85% RH, non-condensing Protection Category: NEMA 4X indoors only, IP65 Unit Dimensions: Panel Cutout: 5.35 (136mm)W x 3.78 (96mm)H Shipping Weight: NXD410: Approx. 1.0 lbs. (.45 kg) NXTSD407 Touchscreen Interface: Supply Voltage: 24 VDC @ 0.65A Power Consumption: 15.6 VA Temperature Rating: Operating: 32°F to 122°F (0°C to 50°C) Storage: -4°F to 158°F (-20°C to 70°C) Humidity Rating: 85% RH, non-condensing Protection Category: NEMA 4X indoors only, IP66 (front) Unit Dimensions: Panel Cutout: 7.36 (187mm)L x 5.79 (147mm)H Shipping Weight: Approx. 2.2 lbs. (1 kg) NXTSD413 Touchscreen Interface: Supply Voltage: 24 VDC @ 1.15A Power Consumption: 27.6 VA Temperature Rating: Operating: 32°F to 122°F (0°C to 50°C) Storage: -4°F to 158°F (-20°C to 70°C) Humidity Rating: 85% RH, non-condensing
- 6. 6 Protection Category: NEMA 4X indoors only, IP66 (front) Unit Dimensions: Panel Cutout: 13.22 (336mm)L x 10.51 (267mm)H Shipping Weight: Approx. 6.2 lbs. (2.8 kg) NXCESO2 Oxygen Probe: Supply Voltage: 24 VDC ± 10% Power Consumption: 27 VA, 13 VA (steady state) Temperature Rating: Operating: 32°F to 140°F (0°C to 60°C) Storage: -4°F to 158°F (-20°C to 70°C) Humidity Rating: 85% RH, non-condensing Protection Category: NEMA 1 (IP01) Unit Dimension: see Figure 6 on page 23 Shipping Weight: NXCES02-8: 8.1 lbs (3.67 kg) NXCES02-16: 9.2 lbs (4.17kg) NXCES02-30: 11.4 lbs (5.17kg) Servos: Supply Voltage: FX04: 24 VDC ±10% FX20: 24 VDC ±10% FX50: 24 VDC ±10% Power Consumption (Peak): FX04: 5 VA Nominal, 7.5 VA peak FX20: 15 VA nominal, 35 VA peak FX50: 20 VA nominal, 38 VA peak Temperature Rating: Operating: -4°F to 140°F (-20°C to 60°C) Storage: -4°F to 158°F (-20°C to 70°C) Humidity Rating: 85% RH, non-condensing Protection Rating: NEMA 4, IP65 Torque Rating: FX04: 4 Nm, 3.0 ft./lb. FX20: 20 Nm, 15 ft./lb. FX50: 50 Nm, 37 ft./lb. Rotational Span: 1 degree to 99.9 degrees Actuating time of 90 degree rotation: min = 30 seconds, max = 120 seconds Accuracy: 0.1 degree Shipping Weight: FX04: Approx. 2.27 lbs (1.1 kg) FX20: Approx. 5.43 lbs (2.5 kg) FX50: Approx. 6.10 lbs (2.77 kg)
- 7. 7 Temperature Sensors: Temperature Measurement Range: FXIATS-140: -40°F to 140°F (-40°C to 60°C) - see FXIATS-1 bulletin for technical info TS350-X: 32°F to 350°F (0°C to 176°C) TS752-X: 32°F to 752°F (0°C to 400°C) RTD Type: Platinum, 100 ohms ± 0.1% @32°F (0°C) Temperature Coefficient:.00385 ohms/°C Output: 4-20 mA, linear with temperature Operating Temperature Range: -13°F to 185°F (-25°C to 85°C) Accuracy: ± 0.75% of span Thermowell Case: 300 Series stainless steel Mechanical Fittings: 1/2”-14 NPT Pressure Sensors: Pressure Measurement Range: 0 to 15, -14.7 to 25, 0 to 30, 0 to 200, 0 to 300 PSI Excitation Voltage: 9-30Vdc (supplied by PPC4000 control) Accuracy: ± 0.25% Full Scale (at 25°C) Output: 4-20 mA, linear with pressure Maximum Over Pressure: 200% of full scale Maximum Burst Pressure: 800% of full scale Operating Temperature Range: -40°F to 185°F (-40°C to 85°C) Fitting: 1/4” NPT Male Electrical: 1/2” Conduit and Terminal Strip APPROVALS Underwriter’s Laboratories Inc.: File MJAT.MH10808, UL353 • LISTED SECTION OF A FUEL AIR RATIO SYSTEM File MJAT2.MH10808, UL353 - COMPONENT File MJAT7.MH10808, CSA-C22.2 No 24 • LISTED SECTION OF A FUEL AIR RATIO SYSTEM File MJAT8.MH10808, CSA-C22.2 No 24 Factory Mutual: FM Class 7610 WARNING: This equipment generates and can radiate radio frequency energy, and if not installed and used in accordance with the instruction manual may cause interfer- ence to radio communications. It has been tested and found to comply with the limits for a Class A computing device pursuant to Subpart J of part 15 of FCC Rules, which are designed to provide reasonable protection against such interference when operated in a commercial environment. Operation of this equipment in a residential area is likely to cause interference in which case the user, at his own expense, will be required to take whatever measures which may be required to correct the interference.
- 8. 8 PART NUMBERS AND APPROVALS Table 1: Agency Approvals X = CERTIFICATION IN HAND Fireye Part Number Control PPC4000 X X X PPC4000-230V User Interface NXD410 X NXTSD407 X NXTSD413 X Servos FX04, FX04-1 X X X FX20, FX20-1 X X X FX50, FX50-1 X X X Oxygen Probe NXCESO2-8 NXCESO2-16 NXCESO2-30 Transducers BLPS-15 X X BLPS-25 X X BLPS-30 X X BLPS-200 X X BLPS-300 X X TS350-2, -4, -8 X X TS-752-2, -4, -8 X X FXIATS-140 X Flame Safeguard YB110UV X X X X X X YB110UVSC X X X X X X YB110IR X X X X X X YB110FR X X X X X X YB110DC X X X X X X NOTE: The PPC4000 is compatible and agency approved with existing E110 Flame Monitor systems
- 9. 9 ORDERING INFORMATION Control PPC4000 Parallel positioning system, 120 VAC input. Used with flame safeguard control. PPC4000-230V Parallel positioning system, 230 VAC input. Used with flame safeguard control. NXCESVFD Plug-in assembly provides variable frequency (VFD/VSD) capability 60-2926 Enclosure, 12.5” x 10.5” x 6.5”, UL listed, fitted for PPC4000 129-190 Kit, fan replacement Display NXD410 User Interface with keypad, 24 VDC operation, 4 line back lit LCD display, panel mount only, includes mounting brack- ets. 59-562-2 Cable assembly, 10 feet length, for interfacing NXD410 to PPC4000 NXTSD407/NXTSD413 7” TFT or 13.3” wide color Touchscreen display, 800x480 or 1280x800 pixel (WVGA) resolution, LED backlight, 24VDC, includes mounting brackets 129-196-2 Replacement cable kit. Contains one 12’ communications, one 12’ power cable, and DB9 connector plug. Servos FX04 Servo motor, 24 VDC operation, 4Nm, 3 lb.-ft. torque, without connectors, accepts 1/2 inch NPT fitting, minimum travel time of 30 seconds for 90° FX04-1 Servo motor, 24 VDC operation, 4Nm, 3 lb.-ft. torque, with connectors, minimum travel time of 30 seconds for 90° FX20 Servo motor, 24 VDC operation, 20Nm, 15 lb.-ft. torque, without connectors, accepts 1/2 inch NPT fitting, minimum travel time of 30 seconds for 90° FX20-1 Servo motor, 24 VDC operation, 20Nm, 15 lb.-ft. torque, with connectors, minimum travel time of 30 seconds for 90° FX50 Servo motor, 24 VDC operation, 50Nm, 37 lb.-ft. torque, without connectors, accepts 1/2 inch NPT fitting, minimum travel time of 30 seconds for 90° FX50-1 Servo motor, 24 VDC operation, 50Nm, 37 lb.-ft. torque, with connectors, minimum travel time of 30 seconds for 90° Servo Cables 59-565-6 Cordset, 6 feet, 1/2” NPT connectors on both ends, PVC jacket, temperature rating -40°C to 105°C, meets NEMA 1,3,4,6P and IEC67 59-565-40 Cordset, 40 feet, 1/2” NPT connectors on both ends, PVC jacket, temperature rating -40°C to 105°C, meets NEMA 1,3,4,6P and IEC67 Connector Kit 129-192 Connector, field wireable. Used for FX04-1, FX20-1, FX50-1 servos with connectors. Use cable 59-565 129-194 Male quick disconnect to convert non connector type FX series servos. 59-565 Cable, 1 twisted pair, 2 power wires, suitable for servo and Oxygen probe hookup. O2 Probe NXCESO2-8, -16, -30 O2 probe assembly, insertion length is 8, 16, 30 inches NXCESO2-8,-16,- 30-KIT O2 probe assembly kit includes NXCESO2 probe, 35-381-2 flange and FXIATS-140 sensor NXCES02P42, -1 Cartridge, probe replacement (model -1 for engineering code 00 only) 35-381-2 Flange, O2 probe mounting 129-189 Cover, mounting flange Pressure Transducers BLPS-15, -25, -30 Pressure transducer, 0 to15 PSI (0 to 1030 mb), -14.7 to 25 PSI (-1013 to 1720 mb), 0 to 30 PSI (0 to 2070 mb), 4-20 mA output linear with pressure. ¼” NPTF mounting. Screw terminal connections and conduit adapter cover. BLPS-200 Pressure transducer, 0 to 200PSI (0 to 13.8 Bar), 4-20 mA output linear with pressure. ¼” NPTF mounting. Screw terminal connections and conduit adapter cover. BLPS-300 Pressure transducer, 0 to 300 PSI (0 to 20.7 Bar), 4-20 mA output linear with pressure. ¼” NPTF mounting. Screw terminal connections and conduit adapter cover. Temperature Transducers TS350-2, -4, -8 Temperature sensor, Range 32°F to 350°F (0°C to 176°C), 4-20 mA output, linear with temperature. Insertion length is 2, 4, 8 inches. Stainless steel thermowell included. TS-752-2, -4, -8 Temperature sensor, Range 32°F to 752°F (0°C to 400°C), 4-20 mA output, linear with temperature. Insertion length is 2, 4, 8 inches. Stainless steel thermowell included. FXIATS-140 Ambient air temperature transmitter, -40°F to 140°F, 4-20mA output, 7 to 40VDC, NEMA enclosure
- 10. 10 INSTALLATION PROCEDURE 1) A UL listed fuel/air ratio system is comprised of the following items. a.) PPC4000, fuel/air ratio controller b.) 60-2926, enclosure c.) NXD410, user interface d.) FX series servos 2) Wiring must comply with all applicable codes, ordinances and regulations. 3) Wiring must comply with NEC Class 1 (Line Voltage) wiring. 4) To minimize interference from radio frequency energy generated by the PPC4000 control, it is necessary that all control wiring be placed in conduit. It is recommended that all low voltage sig- nal wiring, i.e. servos, O2 probe, pressure/temperature transducer be placed in a separate conduit from line voltage wiring, i.e. relay outputs, line voltage digital inputs, profile select, flame safe- guard interface signals. 5) Limit switches, interlocks and relay outputs must be rated to simultaneously carry and break current to the ignition transformer, pilot valve(s) and main fuel valve(s) of the flame safeguard control. 6) Recommended wire routing of lead wires: a) Do not run high voltage ignition transformer wires in the same conduit with any other wires. b) Do not route analog transducer cables, display communication cables, modbus cables or servo motor cable in conduit with line voltage circuits. Use separate conduit where necessary. 7) Maximum wire lengths: a) Terminal inputs (Operating limits, interlocks, valves, etc.): 200 feet. (61 meters). b) Line voltage inputs: 500 feet (152 meters) to a normally open remote reset push-button, but should remain within sight and sound of the burner. c) Modbus communications RS-485: 1000 ft (305 meters) for baud rates of 19.2kbps & below. d) Servo & O2 probe: 200 feet (61 meters) e) Sensors: 100 feet (30 meters) A good ground system should be provided to minimize the effects of AC quality problems. A prop- erly designed ground system meeting all the safety requirements will ensure that any AC voltage quality problems, such as spikes, surges and impulses have a low impedance path to ground. A low impedance path to ground is required to ensure that large currents involved with any surge voltages will follow the desired path in preferences to alternative paths where extensive damage to equipment may occur. NXD410 User Interface The NXD410 is a panel mounted device. The device includes a gasket that must be properly seated to assure NEMA 4X (IP65) rating. Packed with every NXD410 device is a gasket and remote mount- ing bracket kit (not sold separately) containing four bracket assemblies as shown. Replacement Fuses 23-227, F1 Main input protection fuse, 5A, 250VAC, radial can 23-197, F3 Safety relay protection fuse, 10A, 250VAC, radial can
- 11. 11 FIGURE 1. Mounting Kit The bracket assembly mounts from the rear of the display with the fastening nut against the backside of the panel. Use the following dimensions for the panel cutout. FIGURE 2. Panel Cutout Use Fireye cable, part number 59-562-2 to connect from the NXD410 to the PPC4000 control. The DA15-FM connector plugs into the PLC port located on the backside of the NXD410. The cable dis- tance from the PPC4000 to the NXD410 is limited to 10 feet (3 meters) wire run. FIGURE 3. NXD410 Rear View The bottom edge of the display must be mounted at least two inches from any cabinet door edge to allow sufficient clearance for the 59-562-2 cable. Gasket Assembly Completed Bracket Fastening Nut Fastening Screw Peel paper from gasket surface Bracket mounting locations (4 places) PLC Port 3.78” (96mm) 5.35” (136mm) 59-562-2 Insert Here Observe Polarity
- 12. 12 P15 P13 P5 P4 P3 P5 STATUS/ALARM SD ACTIVITY P15 1. TBD 2. HIGH 3. LOW 4. AUTO 5. P4 6. P3 7. P2 8. P1 P4 1. ALARM IN 2. ALARM OUT 3. OCRC IN 4. OCRC OUT EARTH P3 L1 - LINE IN L2 - NEUTRAL 10. KS In 9. P 8. TBD 7. TBD 6. TBD 5. TBD 4. TBD 3. AUX 2. 8 1. D P13 1. DI 10 2. DI 9 3. DI 8 4. DI 7 5. DI 6 6. DI 5 7. DI 4 8. DI 3 9. DI 2 10. DI 1 11. TBD 12. TBD
- 13. 13 P13 P15 P4 P3 P11 P14 P2 P11 P12 P12 1. mbus A 2. mbus B 3. seq A 4. seq B 5. servo A 6. servo B 7. dis TX,ye 8. dis TY,bl 9. dis Rb,br 10. dis Ra,or 11. O2 A 12. O2 B 1. 0 2. 24 vdc 3. 24 vdc 4. 0 5. ANA0 6. SENS 5 7. SENS 4 8. SENS 3 (AUX 2) 9. SENS 2 (AUX 1) 10.SENS 1 (PCV) 11. 0 P3 L1 - LINE IN L2 - NEUTRAL EARTH P13 1. DI 10 2. DI 9 3. DI 8 4. DI 7 5. DI 6 6. DI 5 7. DI 4 8. DI 3 9. DI 2 10. DI 1 11. 12. 1 2 3 4 65 7 8 9 10 11 12 P14 top P14 bottom P14 1. encoder (2) 2. encoder (1) 3. 4-20 in (2) 4. 4-20 in (1) 5. 4-20 out (2) 6. 4-20 out (1) P15 1. TBD 2. HIGH 3. LOW 4. AUTO 5. P4 6. P3 7. P2 8. P1 P4 1. ALARM IN 2. ALARM OUT 3. OCRC IN 4. OCRC OUT Connect all Drain wires here P2 1. 24 vdc 2. 24 vdc Servos 3. 24 vdc Servos 4. 0 v 5. 0 v 6. 0 v 7-12 common pin
- 14. 14 PPC4000 INSTALLATION Install the PPC4000 control where the relative humidity never reaches the saturation point. The Nexus PPC4000 system is designed to operate in a maximum 85% relative humidity continuous, non-condensing environment. Do not install the PPC4000 system where it can be subjected to vibra- tion in excess of 0.5G continuous maximum vibration. The PPC4000 system is not a weather tight enclosure. The standard vertical position is recommended. Allow at least one inch clearance around the control for service and installation. Refer to Figure 4 for mounting dimensions. FIGURE 4. Mounting Dimensions 7.56” 192mm 4.31” 109.5mm .38” 9.5mm 5.06” 128.5mm .38” 9.5mm .25” 6.4mm 8.06” 204.7mm .25” 6.4mm TAP FOR 8-32 SCREW BASE PLATE OUT LINE
- 15. 15 The PPC4000 is mounted to the cabinet back plate using 4 X #8-32 screws. Following the mounting dimensions shown in Figure 4, drill and tap 4 mounting holes. Firmly screw the control to the cabinet back plate. WIRING CONNECTIONS Terminal Type Description Rating/wiring P3.1 L1 Line Voltage Supply 120/230 VAC (+10%, -15%) 50/60 Hz P3.2 L2/N Line Voltage Common EARTH (stud) Protective Earth Chassis ground connection P4.1 Input Alarm Relay Input Voltage free contacts P4.2 Output Alarm Relay Output Voltage free contacts, 3A 250VAC P4.3 Input Operating Control Input Connect to recycle limits In P4.4 Output Operating Control Output Connect to recycle limits Out, 16A 250VAC P2.1 Power O2 Probe & User Interface Power 24 VDC, 59-562 - RED P2.2 Power Servo Power, uC controlled 24 VDC, 59-565 - RED P2.3 Power Servo Power, uC controlled 24 VDC, 59-565 - RED P2.4 Common O2, User Interface, Servo VDC Return 0 VDC, 59-562 - BLACK P2.5 Common O2, User Interface, Servo VDC Return 0 VDC, 59-565 - BLACK P2.6 Common O2, User Interface, Servo VDC Return 0 VDC, 59-565 - BLACK P11.1 Common 0 VDC VDC Return P11.2 Power Temp/Pressure Source Voltage 24 VDC Nominal (class 2) P11.3 Power Temp/Pressure Source Voltage 24 VDC Nominal (class 2) P11.4 Common 0 VDC VDC Return P11.5 Output Analog Output 4-20mA output P11.6 Input SENS 5 Sensor Analog Input See Table 2 for sensor type, range and settings P11.7 Input SENS 4 Sensor Analog Input P11.8 Input SENS 3 (AUX2) Sensor Analog Input P11.9 Input SENS 2 (AUX1) Sensor Analog Input P11.10 Input SENS 1 (PCV) Sensor Analog Input P11.11 Common 0 VDC VDC Return P12.1 Modbus-RTU A P12.2 Modbus-RTU B P12.3 SEQUENCING A P12.4 SEQUENCING B P12.5 Servo Comms A1 59-565, ORANGE P12.6 Servo Comms B1 59-565, BROWN P12.7 User Interface, Tx 59-562, YELLOW P12.8 User Interface, Ty 59-562,BLUE P12.9 User Interface, Rb 59-562, BROWN P12.10 User Interface, Ra 59-562, ORANGE P12.11 O2 Comms A1 59-565, ORANGE P12.12 O2 Comms B1 59-565, BROWN
- 16. 16 Terminal Type Description Rating/wiring P13.1 D1 10 Digital Input #10 120/230 VAC @ 1mA P13.2 D1 9 Digital Input #9 120/230 VAC @ 1mA P13.3 D1 8 Digital Input #8 120/230 VAC @ 1mA P13.4 D1 7 Digital Input #7 120/230 VAC @ 1mA P13.5 D1 6 Digital Input #6 120/230 VAC @ 1mA P13.6 D1 5 Digital Input #5 120/230 VAC @ 1mA P13.7 D1 4 Digital Input #4 120/230 VAC @ 1mA P13.8 D1 3 Digital Input #3 120/230 VAC @ 1mA P13.9 D1 2 Digital Input #2 120/230 VAC @ 1mA P13.10 D1 1 Digital Input #1 120/230 VAC @ 1mA P13.11 TBD Reserve 120/230 VAC @ 1mA P13.12 TBD Reserve 120/230 VAC @ 1mA P15.1 TBD 120/230 VAC @ 1mA P15.2 Input HIGH, FSG High Purge Output 120/230 VAC @ 1mA P15.3 Input LOW, FSG Low Fire Start 120/230 VAC @ 1mA P15.4 Input AUTO, FSG Modulation Mode 120/230 VAC @ 1mA P15.5 Input P4, Profile 4 Select 120/230 VAC @ 1mA P15.6 Input P3, Profile 3 Select 120/230 VAC @ 1mA P15.7 Input P2, Profile 2 Select 120/230 VAC @ 1mA P15.8 Input P1, Profile 1 Select 120/230 VAC @ 1mA P5.1 Output To FSG Low Fire Input (D) 120/230 VAC, 8A 250VAC P5.2 Output To FSG Open Damper Input (8) 120/230 VAC, 8A 250VAC P5.3 Output Aux Relay 1 120/230 VAC, 8A 250VAC P5.4 Output Reserve P5.5 Output Reserve P5.6 Output Reserve P5.7 Output Reserve P5.8 Output Reserve P5.9 Output Safety Relay Output (P) 120/230 VAC, connect to non-recycle limits P5.10 Output Safety Relay Input 120/230 VAC, connect to non-recycle limits P14.1 Encoder Input (2) P14.2 Encoder Input (1) P14.3 4-20 mA IN (2) VFD (2) feedback P14.4 4-20 mA IN (1) VFD (1) feedback P14.5 4-20 mA OUT (2) VFD (2) drive P14.6 4-20 mA OUT (1) VFD (1) drive P14.7 - P14.12 Common Signal return
- 17. 17 PPC4000 MOUNTING AND WIRING As a convenience, the PPC4000 is equipped with de-pluggable type terminal blocks. It is recom- mended the PPC4000 be wired with the terminal blocks inserted into the control as shipped. Following the wiring connections table above, make all electrical connections in accordance with the application requirements. The suggested order of wiring is as follows: 1. Power inputs, L1, L2, Earth (AWG 18, 300 vac) P3.1, P3.2 2. NXD410 user interface using Fireye cable 59-562-2 P12.7-P12.10; P2.1, P2.4 3. Servo motors P2.2, P2.3, P2.5, P2.6, P12.5, P12.6, P12.11, P12.12 4. Alarm relay contacts if required (AWG 16-18, 300 vac) 5. Digital inputs (AWG 14-16, 300 vac) P13.1 - P13.10 6. Operating control to limit switches and flame safeguard P4.3, P4.4 7. Flame safeguard inputs to PPC4000 (AWG 18, 300 vac) P15.2, P15.3, P15.4 8. Relay outputs to flame safeguard (AWG 14-16, 300 vac) P5.1, P5.2, P5.9, P5.10 9. Profile select inputs (AWG 18, 300 vac) P15.5-P15.8 10.Pressure / Temperature sensors (shielded cable, Belden 9318) PRESSURE AND TEMPERATURE SENSORS 1. Insure that the range of the selected pressure or temperature sensor is appropriate for the applica- tion. See Table 2. Note: A general rule to follow when selecting the sensor range is that the expected value of the monitored pressure or sensor should fall between 35-75% of the upper range of the sensor. For example, a steam boiler maintains 15 lbs. pressure, select the BLPS-30 Pressure Sensor, with a 0- 30 PSI range 2. The sensors must be located where the ambient temperature will not exceed the maximum ambi- ent operating temperature specified for the sensor. Insure that the pressure range programmed on the PPC4000 Control matches the installed pressure sensor. 3. Vacuum return systems will occassionally pull a positive pressure sensor into a vacuum condition which will cause a “sensor out of range” fault, requiring a manual reset. The BLPS-25’s range is - 14.7 to 25 PSI and will operate normally should the system go to vacuum. Please note however, the available set point range is 1.0 PSI to 23.0 PSI in 0.1 PSI increments. 4. Do not mount any of the sensors where they could be used as a footstep. Installation must be performed by a trained, experienced flame safeguard technician. CAUTION: Ensure that electric power is turned off. Refer to SN-100 for recommended grounding techniques. Be aware that power to some interlocks (operating controls, air flow switches, modulating circuits, etc.) may be derived from sources other than what is controlling the PPC4000.
- 18. 18 Table 2: SENSOR RANGE and SETTINGS MOUNTING PRESSURE SENSORS 1) The steam pressure sensors (BLPS-15, -25, -30, -200, -300) provide a 1/4” NPT female fitting for connection to the steam header. 2) Make sure the boiler is shut down and zero steam pressure exists in the boiler vessel. 3) Disconnect power to the boiler controller so the boiler cannot sequence during installation of the steam pressure sensor. 4) Always mount the steam pressure sensor above the water line of the boiler. 5) Locate the pressure sensors where the ambient temperature will not exceed 185F. 6) Use only a small amount of pipe compound to seal the connection joints. Excess pipe compound may clog the fitting and prevent proper operation of the sensor. 7) Although the unit can withstand substantial vibration without damage or significant output effects, it is good practice to mount the pressure sensor where there is minimum vibration. 8) A steam trap (siphon loop) must be connected between the boiler and the pressure sensor to pre- vent boiler scale and corrosive vapors from affecting the pressure sensor element. 9) Make all pipe connections in accordance with approved standards. 10)When tightening the sensor, apply a wrench to the hex flats located just above the pressure fitting. DO NOT tighten by using a pipe wrench on the housing. Do not tighten the pressure sensor by hand. WARNING: The electro-mechanical high steam limit and/or high hot water temperature limit MUST REMAIN in the 3-P running interlock circuit. Part Number Sensor Type Set Point Range Cut In Cut Out Mod Range Increment Decrement 0 - 15 PSI 1.0 - 14.0p 0 - 6.0p 0.3 - 6.0p 0.3 - 6.0p 0.1p 0 - 1030m 70m - 950m 0 - 410m 20m - 410m 20m - 410m 10m -14.7 - 25 PSI 1.0 - 23.0p 0 - 6.0p 0.3 - 6.0p 0.3 - 6.0p 0.1p -1013 - 1720m 70m - 1500m 0 - 410m 20m - 410m 20m - 410m 10m 0 - 30 PSI 1.0 - 28.0p 0 - 6.0p 0.3 - 6.0p 0.3 - 6.0p 0.1p 0 - 2070m 70m - 1950m 0 - 410m 20m - 410m 20m - 410m 10m 0 - 200 PSI 10 - 190p 0 - 60p 3 - 60p 3 - 60p 1.0p 0 - 13.8B 0.70 - 13.0B 0.0 - 4.1B 0.2 - 4.10B 0.20 - 4.10B .05B 0 - 300 PSI 10 - 280p 0 - 60p 3 - 60p 3 - 60p 1.0p 0 - 20.7B 0.70 - 19.3B 0.0 - 4.1B 0.2B - 4.10B 0.2B - 4.10B .05B 32º - 350ºF 35º - 338ºF 0º - 60ºF 3º - 60ºF 3º - 60ºF 1ºF 0º - 176ºC 4º - 170ºC 0º - 60ºC 3º - 60ºC 3º - 60ºC 1ºC 32º - 752ºF 35º - 725ºF 0º - 60ºF 3º - 60ºF 3º - 60ºF 1ºF 0º - 400ºC 4º - 385ºC 0º - 60ºC 3º - 60ºC 3º - 60ºC 1ºC BLPS-15 BLPS-30 BLPS-200 BLPS-300 m = millibar, p = psi, B= BAR Note: 1 PSI = 68.94757 mbar TS350-X* TS752-X* BLPS-25 *Select Length X = -2”, -4” or -8”
- 19. 19 MOUNTING TEMPERATURE SENSORS The immersion style temperature sensors have a ½” NPT mounting for the 2", 4", and 8" thermowell probes, and a ½” conduit fitting for electrical connections. WIRING PRESSURE AND TEMPERATURE SENSORS 1. All wiring must be in accordance with National Electrical Code and local codes, ordinances, and regulations. 2. Sensor housing provides connection for 1/2” conduit. 3. The pressure and temperature sensors require 2 conductor, 18 gauge, shielded cable. Power lim- ited, rated for 300V @105C. Use Belden 9318 or equivalent. The shield should be connected to the earth ground terminal on the base of the PPC4000 Control. The shield should be taped at the sensor to avoid unintended contact with the sensor housing. 4. All sensor wiring should be in a separate conduit. DO NOT install sensor wiring in any conduit or junction boxes with high voltage wiring. 5. Maximum wiring distance for sensor wiring is 100 feet. WARNING: Location of the temperature sensor to monitor boiler water temperature of a steam boiler is critical. The sensor should be mounted where it is always exposed to the circulation of the boiler water, not too close to a hot or cold inlet or steam coil. Consult the boiler manufacturer for guidance for its location or refer to Bulletin BLZPTS-1 for proper location and wiring of this temperature sensor. CAUTION: Disconnect power supply from the PPC4000 Control before con- necting wires to prevent electrical shock and equipment damage. TS350/TS752 BLPS SENS1 SENS2 SENS3 SENS4 SENS5 1+ +EXC P11.2 P11.2 P11.3 - - 2- -COM P11.10 P11.9 P11.8 - - FXIATS-140 1+ - - - P11.3 P11.3 P11.3 2- - - - P11.8 P11.7 P11.6 BLPS For 4-20 mA output, use + EXC and - COM terminals TS350 / TS752 For 4-20 mA output, use terminals 1 (+) and 2 (-) FXIATS-140
- 20. 20 SERVO MOTOR SETUPAND WIRING The PPC4000 must have a “master servo” in order to generate a valid modulation curve. In a typical setup, without VFD, the AIR servo is selected as the master servo; if a VFD is used, the first fuel servo is then selected as the master servo. The modulation rate, low fire to high fire, and therefore the servo(s) positions are derived from the master servo commissioning values. Each servo is equipped with an internal rotary switch that is used to select its communication address. The address range is 1 to 10. It does not matter what each servo address is but it is required that each servo have its own unique address. The servo addresses are learned during power on. It is recommended that servos be wired to the PPC4000 in a multi-drop configuration. That is, cabling traverses from the control to the first servo, to the second servo, to the third servo, etc. Servo types FX04-1, FX20-1 and FX50-1 are pre-wired to connectors located on the body of the servo. Cordsets having female connectors on both ends are available in 6 and 40 foot lengths. Field wire- able connectors and cable are also available. See ORDERING INFORMATION for part numbers. Servo types FX04, FX20 and FX50 allow the installation of conduit fittings and the user to wire directly to the servos using the terminal strips located inside the servo. Always connect the ground first to eliminate any ESD (electro-static discharge) potential. . Servo Wiring Diagram, internal Refer to bulletins NEX-3004, NEX-3020 and NEX-3050 for operational details, setting the addresses and servo movement. FX04-1 UNIT ADDRESS MANUAL MOVEMENT FX20-1 UNIT ADDRESS MANUAL MOVEMENT CCW CCW CW CW 1 1 4 4 2 2 5 5 WARNING - DO NOT USE THE MANUAL MOVEMENT SWITCHES ON THE SERVO MOTORS DURING AUTOMATIC OPERATION OR THE FIRING CYCLE OF THE BURNER. USE OF THE MANUAL MOVEMENT SWITCHES OPERATES THE SERVOMOTORS INDEPENDENT OF THE PPC4000 CONTROL AND COULD RESULT IN AN OFF-RATIO CONDITION IF OPERATED DURING AUTOMATIC OPERATION OR THE FIRING CYCLE PIN 1 BLACK RS-485 B(-) PIN 2 BLUE 24 VDC RETURN PIN 3 GREEN/YELLOW EARTH GROUND PIN 4 BROWN RS-485 A(+) PIN 5 WHITE 24 VDC SUPPLY To P12.5 To P2.4, P2.5 or P2.6 To P12.6 To P2.2 or P2.3
- 21. 21 Note: The PPC-4000 provides two terminals for 24 Vdc supply for the servos P2.2 & P2.3 (24 Vdc return via P2.4- P2.6). The PPC-4000 can supply approximately 60 VA through these terminals1, for any combination of connected servos. The PPC-4000 can supply up to twelve 4Nm servos or four 20Nm servos, or three 50Nm servos or some com- bination that will result in 60 VA of power2 . If more power than this is required, an external power supply must be used3. See figure 5 for recommended wiring of the external power supply. 1. Power budget for the NXD410 display and oxygen probe does not impact the 60VA budget for the servos. 2. See nominal ratings on page 6. 3. Ratings for external power supply sizing should be based on peak servo ratings Cables and Connectors Cord sets having female connectors on both ends are available in 6 and 40 foot lengths. Field wire- able connectors are available in kit form, 129-192. Fireye recommends cable part number 59-565 to be used for servo wiring. As shown above the cable strip length is specified at 30 mm (1.2 in) and each wire strip length is 7 mm (0.275 in). To use cable 59-565, strip one end as specified. Strip each wire and wire to connector as shown. FIGURE 5. 1 RS485 B(-) (BROWN) 2 24 VDC RETURN (BLACK) 3 EARTH GROUND (DRAIN) RS485 A(+) 4 (ORANGE) 5 24 VDC POWER (RED) Field wireable Connector Rear View (Screw End) To P12.5 To P2.2/P2.3 To P2.5/P2.6 To P12.6 1 1 1 1 1 1 24Vdc External Supply PPC4000 P2 1 2 3 4 5 6 +24V display & O2 Probe +24Vdc (and/or connect to P2-3) 24Vdc coil 24Vdc 24Vdc 24Vdc Return 24Vdc Return NOTE: External power supply must be sufficiently rated to supply total desired servo loads: 4Nm: 7.5VA peak 20Nm: 35VA peak 50Nm: 38VA peak Example: (4) 4Nm + (3) 20Nm servos connected = 4*7.5VA + 3*35VA = 135VA or 24Vdc @ 5.625A PPC-4000 WIRING DIAGRAM FOR EXTERNALLY SUPPLIED POWER FOR SERVO MOTORS NO Relay Contact DAISY CHAIN DAISY CHAIN …… Field wireable connector, 129-192
- 22. 22 NXCES02 OXYGEN PROBE The NXCESO2 oxygen sensing probe is designed to operate with the PPC4000 and provides trimming of the air or fuel servos to maintain predefined O2 target levels resulting in optimum combustion. Refer to Commissioning and Adjust Ratio procedures. The NCESO2 also provides the stack temperature measurement. The user has the option to activate both O2 level and flue temperature level alarms and the alarms can be selected to be warning or lockout. Refer to O2 setup menu parameters later in this bulletin. The NXCESO2 is available in 3 probe lengths, 8, 16, and 30 inches to accommodate most stack diameters. The open end of the probe should be located close to the center of the stack (flue). The NXCESO2 is 24 vdc powered from the PPC4000. Data exchange to and from the probe is done through mod- bus communications @ 57.6 kbaud using a twisted shielded pair. JP1 is a baud rate selector and must be left in place for proper connection to the PPC4000. The NXCESO2 contains an integrated cooling fan that is controlled by the on-board microprocessor. The fan will turn on when the internal temperature exceeds 70°C (158°F) and turn off when the temperature drops below 45°C (113°F). The O2 probe mounts in the stack using Fireye mounting flange kit 35-381-2. See 133-750 for mounting dimensions and instructions. Recommended Oxygen Probe Mounting Positions The probe must be mounted in a manner that ensures that the flue gases pass into the gas tube at its open end and out of the tube at the flange end. Furthermore, if possible, the flange should be vertical with the gas tube angled down- wards to ensure that particulates do not build up within the sample tube. Probe mounting with the flange horizontal is acceptable. Inverted probe mounting is not acceptable. O2 PROBE MOUNTED NOTE ORIENTATION RELATIVE TO FLUE GAS FLOW FLUE GAS FLUE GAS SIDE VIEW VERTICAL FLUE PROBE MOUNTED ON SIDE 1 30° FLUE GAS FLUE GAS SIDE VIEW O2 PROBE MOUNTED NOTE ORIENTATION RELATIVE TO FLUE GAS FLOW CL CL FLUEFLUE TOP VIEW SIDE VIEW FLUE GAS FLUE GAS CL 3 FLUE GAS FLUE GAS TOP VIEW CL FLUE FLUE FLUE GAS SIDE VIEW O2 PROBE MOUNTED NOTE ORIENTATION RELATIVE TO FLUE GAS FLOW HORIZONTAL FLUE PROBE MOUNTED ON SIDE 2 HORIZONTAL FLUE PROBE MOUNTED UNDERNEATH 4 HORIZONTAL FLUE PROBE MOUNTED ON TOP
- 23. 23 NXCESO2 Dimensional Information FIGURE 6. Wiring Connections Refer to Fireye bulletin NXCESO2-1001 for complete details on the O2 probe. MODEL NUMBER DIM "A" DIM "B" DIM "C" DIM "D" DIM "X" DIM "Y" NXCES02-8 ( 44) 1.69 (216) 8.50 (426) 16.75 (324) 12.75 (445)17.50 (121) 4.75 NXCES02-16 (236) 9.22 (407) 16.03 (692) 27.25 (324) 12.75 (637) 25.06 (295) 11.63 NXCES02-30 (586) 23.01 (757) 29.82 (1187) 46.75 (324) 12.75 (648) 25.50 (987) 38.87 NXCESO2 DESCRIPTION 59-565 PPC4000 6 TDB (-) MODBUS - BROWN P12-12 5 TDB (+) MODBUS + ORANGE P12-11 4 N/C - - 3 EARTH DRAIN EARTH 2 DGND RETURN BLACK P2-5 1 +24V POWER RED P2-1 Remove power when servicing SW1 Provides fault reset and forced calibration JP1 Baud rate selector. In is 57600 (PPC4000), Out is 19200 JP2 RS485 termination resistor F1 Heater Fuse 23-231 4A, 125V Type LFMX F2 Input Fuse 4.70 119.4 FROM FACE OF MOUNTING FLANGE SEE DIM "B" 1.50 38.10 SEE DIM "Y" OVERALL VERTICAL DIM SEE DIM "A" SEE DIM "D" CLEARANCE REQUIRED TO REMOVE AND INSTALL. FROM FLUE. SEE DIM "C" CLEARANCE REQUIRED TO REMOVE AND INSTALL FROM FLUE . SEE DIM "X" OVERALL HORIZONTAL DIM FLUE GAS 1/2 NPT CONDUIT ENTRY EARTH DGND +24 V SW 1 INPUT FUSE HEATER FUSE P3 P4 P1 F1 F2 P 2 D1 D2 JP1 D3 TDB - TDA + N/C JP 2 1
- 24. 24 NXD410 User Interface The NXD410 User Interface provides the means to setup, monitor and display all information from the PPC4000 Control and connected accessories. The NXD410 provides a four line backlit LCD dis- play screen and a multi-function tactile feel keypad. The NXD410 is panel mounted and connects directly to the PPC4000 using Fireye cable 59-562-2. Explanation of NXD410 keypad The > and < characters act as alignment indicators. To move to a sub-menu or modify a parameter, the user places the menu line or parameter between these two characters. Several functions of the PPC4000 will cause the LED associated with that function to illuminate on the keypad. For any parameter that requires a passcode, pressing a key on the keypad will direct the user to a passcode screen first where the user will input the appropriate level of passcode. If the passcode is currently enabled, pressing a key will direct the user directly to that parameter.
- 25. 25 The NXD410 and PPC4000 Control contain a number of Quick Keys that allow the user to access that function directly. For these Quick Keys to operate the installer or operator must first access the KEYPAD SETUP menu where the user defines if a Quick Key is used or unused. Quick Keys are also non-volatile meaning the state of the switch function is retained in memory should a power recycle occur. NAVIGATING THROUGH DISPLAY MENUS The PPC4000 and NXD410 present data to the user through menus and sub-menus. The data and information is organized in a logical and easy to access manner. The order of items displayed are arranged to be items most used by the operator and require a minimum of key presses. The UP, DOWN, NEXT, BACK and HOME keys are used to navigate into and out of these menus. The MDFY/SAVE key is used to both modify and save the selected parameter. No LED Key Name Description 1 BURNER ON/OFF KEYPAD SETUP required. Used to turn the burner ON or OFF. Typically there are also other limits in the operating control circuit. The LED indicates the position of the keypad switch and illuminates when the burner is in the ON mode. When turning the burner off via this keypad switch the default method is assured low fire cutoff or move to low fire before OFF. 2 LOW FIRE KEYPAD SETUP required. If in modulation mode, move servos to low fire position (P03). After burner startup, stay in low fire after MTFI. LED will illu- minate when directed to low fire. Pressing AUTO | MAN will turn this off. 3 LEAD LAG Used when SEQUENCING is enabled. If enabled through the sequencing setup sub-menu, selects PPC4000 Control to be MASTER or SLAVE. The LED illu- minated indicates the unit is a MASTER. If the SEQUENCING does not provide for keypad selection then this key has no function. 4 AUTO MAN Switch to automatic control (modulation) mode. LED will illuminate when in manual mode. This can be overridden by LOW FIRE. 5 C-MODE Go to the Commissioning or Adjust Ratio Mode. LED illuminates when C- MODE is enabled (after passcode enabled). While in Commissioning Mode or Adjust Ratio Mode, hitting C-Mode is used to correctly terminate Commis- sioning and Adjust Ratio Mode. 6 ADJUST SETPOINT Directs operator to setpoint currently controlling the burner, SETPOINT1, SETPOINT2, or SETBACK. 7 RESET Allows reset of non-volatile lockout. LED illuminates when control is in lock- out awaiting reset. 8 CHK RUN/ FAULT Fault History Display 9 MODIFY SAVE MDFY: LED illuminates and enters modify mode. UP/DOWN arrows are used to modify current value. SAVE: Save current parameters/setup, extinguish LED 10 UP Move up to the previous menu item. When in MODIFY mode, used to incre- ment numerical value. 11 DOWN Move down to the next menu item. When in MODIFY mode, used to decre- ment numerical value. 12 NEXT When displayed item contains > symbol, direct user to the next submenu. Displayed item must be between > < marks on keypad. (Also, when in servo setup, forces scan for installed servos). 13 BACK When displayed item contains < symbol, direct user to the previous parent menu. Displayed item must be between > < marks on keypad. 14 HOME From anywhere and in any menu or submenu, immediately suspends any modify mode if enabled and directs user to default or main screen. 15 INFO Pressing this key will enter INFO mode. Pressing key while in INFO mode, will exit INFO mode. Useful while in commissioning mode to check values of all parameters, digital inputs, measured value, etc.
- 26. 26 The HOME key is used to bring the user directly back to the top layer menu and display the default items. Any item in the top layer menu that contains a > character indicates there is a sub menu below it. The NEXT key is used to move to the next sub menu showing parameters for that item. The BACK key is used to revert from the sub menu back to the previous level menu. Various menu items may have several sub menus. TOP LAYER MENU *NOTE: Some menu items may not show on the top layer menu. The visibility of the menu items is dependent on the system configuration. F A U L T H I S T O R Y > P A S S C O D E S E T U P > O I L T E M P ( 3 ) 1 4 7 F S T A C K T E M P ( 4 ) 3 2 5 F G A S P R E S ( 5 ) X X . X i n w c 1 1 : 3 6 A M 1 7 - A U G - 1 0 > W A I T F O R P U R G E s 0 6 HOME > S E T P O I N T 1 2 . 0 p s i < HOME M E A S U R E D V A L 1 0 . 6 p s i M O D U L A T I O N R A T E 0 % A I R ( 1 ) 8 3 . 2 G A S ( 2 ) 4 . 3 F G R ( 4 ) 3 . 4 F A N ( V F D 1 ) 9 8 0 O 2 L E V E L 2 0 . 9 % C O 2 L E V E L * * * F L U E T E M P 1 7 2 ° F E F F I C I E N C Y * * * S E R V O S E T U P > S E N S O R S E T U P > S E T P O I N T S E T U P > P R O F I L E S E T U P > D I G I T A L I N P U T S E T U P > O 2 S E T U P > S E Q U E N C I N G S E T U P > T H E R M A L S H O C K S E T U P > S E T B A C K S E T U P > C O M M U N I C A T I O N S E T U P > K E Y P A D S E T U P > S D C A R D O P S S E T U P > A N A L O G O U T S E T U P >
- 27. 27 The UP and DOWN keys are used to scroll forward and backward through the top layer menu. The menu is continuous in both directions. That is, when you reach the bottom and continue with the DOWN key, for example, the very top of the menu will be displayed on the next line. As stated ear- lier, hitting the HOME key from anywhere will bring you back to the HOME screen. The shaded area shown in the Top Layer Menu section on page 25 is the HOME screen. For items that contain the > character, the NEXT key is used to move to a sub menu for that particular item. Also, hitting the BACK key from a sub menu will bring you back to the line item from the menu you left. To move to a sub menu or to modify a parameter, that particular line must lie between the > < characters located on the keypad. For example, assume you scroll down so the following is displayed: Since SERVO SETUP is lying between the > < characters of the keypad, you press the NEXT key to enter the SERVO SETUP sub menu. The shaded area below is an extension of this particular sub menu: Pressing the BACK key from anywhere in this sub menu will take you back to the top layer menu at the place where you exited the top layer menu. Pressing the HOME key will take you back directly to the HOME screen. For the screen shown above, with DISPLAY FORMAT lying between the > < characters, pressing the MDFY/SAVE key will allow you to scroll through options to select the desired value. Pressing the MDFY/SAVE key will save the selected value. Using the DOWN key to display 'SERVO 1 AIR>' between the > < characters and pressing NEXT will direct you to the SERVO 1 sub menu: PPC4000 CONTROL OPERATION This next section will be used to set up a basic low pressure steam boiler system with a single fuel. The application will implement an AIR and GAS servo and use profile 1. The assumption is made that a BLPS sensor is installed and wired, two appropriately sized FX type servos are installed and wired and DI 1 (digital input) is used as the burner limit input. The servos are setup with unique addresses. For this exercise, assume the servo addresses are 1 for AIR and 2 for GAS. System wiring is done in accordance with Figure 10 (page 70). It is recommended the installer record the low and high fire positions of the air damper and gas butterfly valve and be generally knowledgeable about the burner and its operation. F A N ( V F D 1 ) 0 > S E R V O S E T U P > < S E N S O R S E T U P > S E T P O I N T S E T U P > S E R V O S E T U P > D I S P L A Y F O R M A T D E G < S E R V O S P E E D 3 0 S S E R V O S I N S T A L L E D 4 > S E R V O 1 A I R > S E R V O 2 G A S > S E R V O 3 O I L > S E R V O 4 F G R > < S E R V O 1 > S E R V O N A M E U N U S E D < A S S I G N M E N T 0 D I R E C T I O N C W S E R V O P O S I T I O N 1 . 0 °
- 28. 28 On first application of power, with conditions as stated above, the display will indicate: The Operating control relay (OCRC) will remain open and the servos will remain at their respective installed positions. For PASSCODE protected parameters, if the passcode is not enabled, the user will be automatically directed to the PASSCODE setup screen. PASSCODE The passcode setup screen is as follows: At this screen the user scrolls down until the desired passcode level is between the > < characters, presses MDFY to enter modify mode, use the UP / DOWN keys to enter the correct value and presses SAVE to enter the value to the system. A correctly entered passcode will direct the user to the HOME screen as shown above. The system has 3 levels of pass codes. Out of the box settings for internal PASSCODES are as fol- lows: * Level 1 pass code is changeable (0-999) and has a default of 154. Level 1 pass code protection can be turned OFF by setting it to 0. Level 2 and 3 pass codes are fixed. To change Level 1, the user must: 1. Access the PASSCODE menu, enter the C-MODE Level 3 passcode 2. Go back to the PASSCODE menu, now change the SITE CODE Level 1 passcode as desired REAL TIME CLOCK The PPC4000 contains a real time clock that is used to record fault history and implement the set- back schedule. To operate properly, the real time clock should be checked and set correctly. If not correctly set the PPC4000 will use the clock information as it is available. The real time clock infor- mation is displayed in the top layer menu just above the HOME screen. The UP / DOWN keys are used to position the real time clock information to between the > < marks. Note the default time and date are shown. S T A N D B Y s 0 1 > S E T P O I N T U N U S E D < M E A S U R E D V A L U N U S E D M O D U L A T I O N R A T E 0 % P A S S C O D E S E T U P > S I T E C O D E * * * < A D J U S T R A T I O * * * C - M O D E * * * Pass Code Pass Code Level Code* Feature SITE CODE Level 1 154 Setpoint Setup Level 1 154 Sequencing Setup ADJUST RATIO CODE Level 2 256 Adjust Ratio Mode Level 2 256 O2 Setup Level 2 256 Erase Profiles C-MODE Level 3 903 Commissioning Mode Level 3 903 VFD1 and VFD2 Setups Level 3 903 All SD Card Operations Level 3 903 Erase All Data Level 3 903 Sensor Setup P A S S C O D E S E T U P > > 1 2 : 0 0 P M 0 1 - J A N - 2 0 1 1 > < S T A N D B Y s 0 1 S E T P O I N T 1 U N U S E D
- 29. 29 The PPC4000 uses 12 hour format only, AM / PM. If the clock and date need adjustment, the NEXT key is pressed to move to the DATE / TIME SETUP submenu. Use the UP / DOWN keys to position the item to be modified between the > < marks and use the MDFY/SAVE key to modify and save the new value. When done, press the HOME key to move back to the HOME screen. SERVO SETUP From the HOME screen the user scrolls to SERVO SETUP and presses NEXT to enter the sub menu. The following is displayed: The speed of the servos can be selected within the range of 30 to 120 seconds in steps of 5 seconds. This is the speed of the servos to move 90 degrees. Use the UP/DOWN keys to place the item to be modified between the > < characters, press MDFY, use the UP/DOWN keys to select the desired value and then press SAVE. SERVOS INSTALLED is used to direct the control to scan the servo communication port and return the number of servos found. This is done by hitting the NEXT key only. For this example, after doing this, the display should be as follows: Scrolling DOWN will show the two installed servos: The servos must now be configured to operate in the system. This is called naming the servo and tag- ging the servo to a profile. Scroll so that the SERVO 1 is between the > < characters and press NEXT to enter the SERVO 1 sub menu: < D A T E / T I M E S E T U P > S E T Y E A R 2 0 1 1 < S E T M O N T H J A N S E T D A Y 0 1 S E T H O U R 1 2 P M S E T M I N U T E 0 S E T S E C O N D 0 < S E R V O S E T U P > S E R V O S P E E D 3 0 < S E R V O S I N S T A L L E D > S E R V O 1 < S E R V O S E T U P > S E R V O S P E E D 3 0 < S E R V O S I N S T A L L E D 2 > S E R V O 1 < S E R V O S E T U P > S E R V O S I N S T A L L E D 2 > < S E R V O 1 > S E R V O 2 > < S E R V O 1 > S E R V O N A M E U N U S E D < A S S I G N M E N T 0 D I R E C T I O N C W S E R V O P O S I T I O N 1 . 0 °
- 30. 30 The first parameter that must be set is to name the servo. Each servo must be named and at least one servo of each profile must be named AIR. The table below lists the options for naming the servo and also to what profiles the servo is tagged. Place the parameter to be modified between the > < characters and using the MDFY, UP, DOWN and SAVE keys, select AIR and profile 1 for servo 1. The options for the servo direction are CW (clock- wise) and CCW (counter-clockwise). Fireye “D” hole couplings should be used in order to assure a secure connection to the driven mem- ber. Set screws alone are not recommended as they can come loose resulting in a potentially unsafe condition. Motor shafts are hardened generally preventing set screws from “biting” in and thus loos- ening after commissioning. Fireye bulletin NEXBK-1000 provides information on “D” hole cou- plings. Move the servo position parameter to between the > < characters. At all times and while in P00 (STANDBY, burner off), the servo can be moved to any position. This is useful for checking the movement of the servo and driven member. Take care not to overdrive the servo such that the driven member is attempting to move beyond its mechanical end stop. The servo can be left in any position as it will be positioned properly during commissioning for all profile setpoints. It is recommended that all servo positions commissioned by the user be between 3° degrees and 97° degrees. To move PROFILE ASSIGNMENT VALUE NAME DESCRIPTION DISPLAY VALUE PROFILES UNUSED SERVO NOT USED 0 NONE FU1 FUEL1 1 1 FU2 FUEL 2 2 2 GAS GAS 2,1 2+1 OIL OIL 3 3 CUP ROTARY CUP 3,1 3+1 PUM PUMP 3,2 3+2 WAS WASTE FUEL 3,2,1 3+2+1 PRI PRIMARY AIR 4 4 FGR FLUE GAS RECIRCULATION 4,1 4+1 AIR MAIN COMBUSTION AIR 4,2 4+2 FAN MAIN COMBUSTION FAN 4,2,1 4+2+1 SEC SECONDARY AIR 4,3 4+3 SLE BURNER SLEEVE 4,3,1 4+3+1 4,3,2 4+3+2 4,3,2,1 4+3+2+1 (ALL) Note: It is necessary to ensure that each motor travels in the correct direction to match the mechanical configuration of the burner. The CW setting is for a servo to move counter-clockwise (looking toward the shaft) as the motor is driven toward 90°. 0° 90° 0° 90° FX04-1 FX20-1 clockwise rotation shown as viewed from the cover side clockwise rotation shown as viewed from the cover side
- 31. 31 the servo, press MDFY and using the UP and DOWN keys, set the target position. In this example set the target position to 10.0 degrees. Press SAVE and the display will indicate the original position and change as the servo is moving toward its target position. The final display for servo 1 should look like the following: Press the BACK key to return to the SERVO SETUP sub menu. Select SERVO 2 using the NEXT key to move the SERVO 2 sub menu. Set the parameters for SERVO 2. Name this servo as GAS, tag it to profile 1 and test its servo position for proper function and set its final position to 4.2 degrees. When done the display should be as follows: At this point press the BACK twice to move back to the top layer menu at the point at which we left the top layer menu. Pressing the HOME key would have brought you back to the HOME screen. SENSOR SETUP The PPC4000 contains inputs for five analog 4-20 mA transducers. The process control variable or the governing sensor for the boiler can only be SENSOR 1. The SENSOR SETUP menu is used to configure the various sensors in the system as to type of sensor and range of sensor. From the top layer menu move SENSOR SETUP to between the > < characters and press NEXT to enter the SENSOR SETUP sub menu. The parameter UNITS is to select units of measurement for all sensors. The options are ENGLISH and METRIC. ENGLISH is PSI and degrees F. METRIC is BAR and mBar and degrees C. This set- ting is global, meaning it applies to all sensors. Position SENSOR 1 and press the NEXT key to enter the SENSOR 1 sub menu. < S E R V O 1 > S E R V O N A M E A I R < A S S I G N M E N T 1 D I R E C T I O N C W S E R V O P O S I T I O N 1 0 . 0 ° < S E R V O 2 > S E R V O N A M E G A S < A S S I G N M E N T 1 D I R E C T I O N C W S E R V O P O S I T I O N 4 . 2 ° < S E N S O R S E T U P > U N I T S E N G L I S H < S E N S O R 1 > S E N S O R 2 > S E N S O R 3 > S E N S O R 4 > S E N S O R 5 > < S E N S O R 1 > T Y P E U N U S E D < R A N G E U N U S E D CAUTION On a previously commissioned system, care must be taken when replacing a servo motor believed to be defective. Although every effort is made to calibrate each servo, there may be slight differences from servo to servo. It is strongly recommended the installer, equipped with a combustion analyzer, use ADJUST RATIO to step through each profile that uses the replacement servo. Each profile set point should be checked and adjusted for proper combustion.
- 32. 32 For this application, at SENSOR TYPE press MDFY. Use the UP or DOWN keys to select STEAM and press SAVE. At SENSOR RANGE, press MDFY and use the UP or DOWN keys to select 15 PSI and press SAVE. The display will be as follows: See table 2 for sensor range and settings. Press the BACK key twice to get back to the top layer at the point where we left it or press HOME to go directly back to the HOME screen. NOTE: The safety system in the PPC4000 will not allow the sensor configuration to be changed after fully configured, if the sensor is attached to other operating functions like thermal shock or set- back. Sensor assignment to those operating functions must be set to UNUSED before the system will allow changes to the sensor configuration. SENSOR SETPOINT SETUP In the top layer menu, scroll to SETPOINT SETUP and press NEXT to enter this sub menu. From this menu, select what sensor is used for each setpoint and set the values for that setpoint based on the sensor selected. The SETPOINT SETUP menu is as follows: Select SETPOINT 1 and press the NEXT key to enter the sub menu. The values shown are the default values. The values shown above are all default values for SETPOINT 1. For SETPOINT 1 the options for SENSOR are limited to UNUSED and SENSOR 1. Using the MDFY, UP, DOWN and SAVE keys, change SENSOR to 1 and then scroll to change the setpoint to 10.0 PSI. Continue and set cut in, cut out and proportional band (P-BAND) to appropriate values. For SETPOINT 2, the options for SENSOR are limited to UNUSED, SENSOR 1, and SENSOR 2. For SETPOINT 3, the options for SENSOR are limited to UNUSED and SENSOR 3. < S E N S O R 1 > T Y P E S T E A M < R A N G E 0 t o 1 5 p s i < S E T P O I N T S E T U P > S E T P O I N T 1 S E T U P > < S E T P O I N T 2 S E T U P > S E T P O I N T 3 S E T U P > < S E T P O I N T 1 S E T U P > S E N S O R U S E D U N U S E D < L I M I T T Y P E D E V S E T P O I N T N / A C U T I N N / A C U T O U T N / A P - B A N D N / A H I G H M A R G N L N / A H I G H L I M I T N / A I N T E G R A L 0 D E R I V A T I V E 0
- 33. 33 Definitions: LIMIT TYPE DEV - Values that deviated from setpoint. The advantage is these values will float with the setpoint. SETPOINT - The target pressure or target temperature the control will maintain. CUT IN (Cut In Value) - Determines the point in which the steam pressure (or water temperature) must reach to start a burner cycle. In DEV option, this a differential value that is subtracted from the steam pressure or water temperature setpoint. CUT OUT (Cut Out Value) - Determines the point in which the steam pressure (or water tempera- ture) must reach to end a burner cycle and initiate a normal shutdown. In DEV option, this is a differ- ential value that is added to the steam pressure or water temperature setpoint. P-BAND (Modulating Range) - This determines the proportional band and is the range of steam pressure (or water temperature) in which the firing rate motor is commanded from its low fire (0%) to its high fire position (100%). In DEV option, this is a differential value that is subtracted from the steam pressure setpoint or water temperature setpoint. Whenever the steam pressure (or water temperature) is within the P-BAND, an increase in pressure (or temperature) value will reduce the control signal to the AIR/FUEL servos, causing the servos to drive towards its low fire position. Similarly, a decrease in the steam pressure (or water temperature) will increase the control output signal, causing the valves and dampers to move toward their respec- tive high fire positions. The value of the P-BAND determines how the PPC4000 responds to changes in the measured vari- able (steam pressure or water temperature). A small modulating range will cause the control to respond quickly to small changes in steam pressure or water temperature. A small value of P-BAND might result in the SERVOS to move excessively and possibly cause the burner to actually exhibit short cycle. A large value would reduce the movement of the SERVOS, but may cause the system to be somewhat sluggish in response to a change in steam pressure or water temperature. Matching the capacity of the boiler to load system demand are important considerations in setting the P-BAND setpoint. Care should be taken when selecting this variable. HIGH MARGINAL - Provides an indication that the sensor value is approaching the high alarm limit before the alarm limit is actually reached. For example, a Marginal Stack Alarm may be an indication of the burner overfiring, fouled heat exchanger, tube leak in heat exchanger, etc. If the HIGH MARGINAL is exceeded for 4 seconds, the alarm relay will be activated but the system will not go to lockout. LOW FIRE D E STEAM PRESSURE (PSIG) 6 7 8 9 10 11 12 MOD MAX CHIGH FIRE 100% 20mA MOD MAX (e.g.: 80%) 0% 4mA P-BAND = 3 PSIG STM SP = 10 CUT OUT = 2 CUT IN = 0 BOILER FIRING RATE MOTOR OPERATING CONTROL OPENS AT 12 PSIG AND CLOSES AT 10 PSIG FIRING RATE POSITION
- 34. 34 HIGH LIMIT - When this is exceeded, the PPC4000 will proceed to lockout. The user programs both HIGH MARGINAL and HIGH LIMIT for the temperature or pressure sen- sors based on the input signal received. The HIGH MARGINAL cannot be set higher than the HIGH LIMIT nor can either be set lower than the sum of SETPOINT plus CUT OUT. Alarm points for stack monitoring can be set anywhere within the sensor range. Both INTEGRAL and DERIVATIVE terms are used to eliminate steady-state error and reduce over- shoot. They each have a range of 0 to 100%. This value determines how much of the error to factor in the calculation. A value of 0 turns the function off. When completed, press the BACK key to get back to the top layer menu at the point of exiting or press the HOME key to go directly to the home screen.
- 35. 35 PROFILE SETUP In the top layer scroll to PROFILE SETUP and press NEXT to enter this sub menu. This menu pro- vides the means to name the profile, set the maximum modulation rate for this profile and when nec- essary erase the profile setpoints. Using the NEXT key, select PROFILE 1. Using the MDFY, UP, DOWN and SAVE keys, scroll through the choices for naming this profile and select GAS as the name. MAX MODULATION sets the maximum firing rate of the burner or inhib- its the burner from reaching 100% modulation rate. CAUTION: ERASE PROFILE will clear all setpoints from P01 to P23 for the profile selected. Exe- cuting this option will require a new commissioning of the burner. ERASE ALL DATA clears all set- point data and all profiles. A complete control setup (servos, sensors, setpoints, inputs, keypad, etc.) and burner commissioning is required after executing this command. Both ERASE PROFILE and ERASE ALL DATA are pass code protected. Care must be taken before using these commands. DIGITAL INPUTS The PPC4000 provides the user with ten (10) line voltage operated digital inputs. The digital inputs are located on terminal block P13.10 (DI1) through P13.1 (DI10). All digital inputs are user defined from a list of functions. The same function can be tagged to multiple digital inputs. Some of the selectable digital input functions duplicate what is available through the keypad function keys, BURNER CONTROL, MANUAL MODULATE, SEQUENCING and LOW FIRE HOLD. The PPC4000 provides the user with the option of AND’ing or OR’ing these functions with the dedicated keypad functions or with other digital inputs configured as the same function. When selected as AND, it is required that all inputs be active for the function to be realized. The OR function requires either digital input or keypad function to be active for the function to be realized. Each digital input applies to all profiles. From the top layer menu scroll to DIGITAL INPUT SETUP and press the NEXT key to enter the sub menu. < P R O F I L E S E T U P > P R O F I L E 1 N O N E > < P R O F I L E 2 N O N E > P R O F I L E 3 N O N E > P R O F I L E 4 N O N E > E R A S E A L L D A T A N O < P R O F I L E S E T U P > P R O F I L E 1 N O N E < M A X M O D U L A T I O N 1 0 0 % E R A S E P R O F I L E N O < D I G I T A L I N P U T S E T U P > D I 1 > < D I 2 > D I 3 > D I 4 > D I 5 > D I 6 > D I 7 > D I 8 > D I 9 > D I 1 0 >
- 36. 36 The list of general purpose functions for all digital inputs is as follows: If DIGITAL INPUT 1 (DI1) is to be set as BURNER CONTROL, at DI1 press the NEXT key to dis- play the following: AND / OR FUNCTION For functions that duplicate the keypad functions, the user may select if the digital input is AND’ed or OR’ed with this function. 1. Selecting AND requires both or all of the digital inputs of this function to be active along with the keypad function for the function to be realized. 2. Selecting OR requires either the keypad or the digital input to be active for the function to be realized. Should the user select multiple digital inputs for the same function and then choose some of the same inputs to be AND’ed and OR’d, the AND’ed requires these to be active to realize the function. For inputs that are set for logic OR, an active input will cause the function to be realized. Assume the LOW FIRE function on the keypad is set to USED. Assume DI2 is set to LOW FIRE HOLD and its logic state is set to AND. Assume DI3 is set to LOW FIRE HOLD and its logic state is set to OR. To realize the LOW FIRE HOLD function the requirement is the keypad LOW FIRE and DI2 both must be active or DI3 alone must be active. The keypad function can be set to UNUSED and only the digital inputs can be used to realize the function. If only one digital input is used and is set to AND then this alone being active will realize the function. KEYPAD SETUP Several hot keys on the keypad have a default value of UNUSED. If the BURNER ON/OFF switch wants to be used to turn the burner on and off, this must also be set to used. NOTE: If DI1 was previ- ously set to be used as a BURNER CONTROL switch and its ACTION was AND, using the keypad would be in addition to this. That is, both must be on for this action to take place. From the top layer menu scroll to KEYPAD SETUP and press NEXT to enter the sub menu. The options for each function are UNUSED and USED. Using the MDFY, UP, DOWN and SAVE keys, set BURNER ON/OFF to USED. It is now required to have both the BURNER CONTROL switch going to DI1 closed as well as the keypad BURNER ON/OFF button depressed to start the burner. Note: (X) refers to the profile number and only parameters for assigned profiles will be displayed. U N U S E D B U R N E R C O N T R O L > S E T P O I N T 2 S L C T < L O W F I R E H O L D A L A R M R E S E T M A N U A L M O D U L A T E O 2 T R I M D I S A B L E F O R C E D S E T B A C K S E T B A C K O V E R I D E F O R C E S E Q M S T R S E Q U E N C I N G O F F < D I 1 S E T U P > U S E U N U S E D < A C T I O N A N D < K E Y P A D S E T U P > B U R N E R O N / O F F U N U S E D < A U T O / M A N U N U S E D L O W F I R E U N U S E D L E A D / L A G U N U S E D
- 37. 37 VARIABLE FREQUENCY DRIVE In addition to using a precision servo motor to control the air flow into a combustion chamber, the PPC4000 can control one or two variable frequency drives (VFD/VSD) with the result being better control over air flow and improvements in combus- tion. Electrical energy savings and additional gains in efficiency are quickly realized when controlling the combustion blower motor with a VFD. To obtain VFD/VSD control, it is necessary to insert a NXCESVFD plug-in daughter board into the PPC4000. The NXCESVFD provides two indepen- dent VFD/VSD channels with each channel con- taining one precision 4-20 mA output for VFD/ VSD control, one calibrated 4-20 mA input used to monitor feedback from the VFD/VSD and one encoder input used to count pulses from a directly connected shaft encoder. All inputs and outputs are available through connector P14. Shielded cable should be used to connect VFD inputs and outputs to the NXCESVFD. Refer to installation manual NXCESVFD-1001. Connect shield wires to EARTH post located on PPC4000 chassis. Alternatively, since the NXCESVFD board supplies a 4-20 mA output, each channel's output can be designated or mapped to output modulation rate, setpoint, sensor value, servo position and combus- tion parameters derived from the O2 probe. The intent is to provide this output to a chart recorder or some other display device of the user's choice. See ANALOG OUT SETUP submenu. Each VFD channel, if selected to be used as a VFD, is treated in the same manner as a servo motor. Each VFD is setup and configured through the SERVO SETUP submenu. After menu configuration the VFD must be commissioned in the profile assigned. In order to use a VFD output as an indicating device, the VFD channel must not be configured to be used as a servo. Conversely in order for a VFD channel to be available to be used as a servo, its status in the ANALOG OUT SETUP submenu must be set to UNUSED. Shown below is the SERVO SETUP menu after servos have been learned to discover servo 1 and servo 2 and to show that both channels, VFD1 and VFD2, are available to be used to control VFD's. Any VFD channel used other- wise in the ANALOG OUT SETUP menu would not be displayed in the servo setup menu. VFD1 VFD2 Function 4-20 mA Out [To VFD] 4-20 mA In [From VFD] Encoder In 4-20 mA Out [To VFD] 4-20 mA In [From VFD] Encoder In Signal P14.6 P14.4 P14.2 P14.5 P14.3 P14.1 Common P14.12 P14.10 P14.8 P14.11 P14.9 P14.7 NXCESVFD SPECIFICATIONS VFD OUT: 4-20 mA, Input impedance of external device: Max. 750 ohms VFD IN: 4-20 mA, Input impedance: 100 ohms ENCODER IN: 2.4 Kohm pull-up to 24 vdc < S E R V O S E T U P > S E R V O S P E E D 3 0 < S E R V O S I N S T A L L E D 2 S E R V O 1 > S E R V O 2 > V F D 1 > V F D 2 > P14 pin 1 P14 pin 7 P14 pin 1 P14 pin 7
- 38. 38 Each VFD channel has its own separate and independent sub menu. The following assumes that VFD2 is moved between the two tick marks and the NEXT key is pressed to display the following configura- tion menu. Explanation of VFD parameters: 2. User selects name of VFD. The VFD must be named in order to be usable. The default is UNUSED. a.The list of names available is the same as the list available for servo motors. It is required that at least one of the servos be named AIR and the AIR servo is considered the “master/lead” drive, when a VFD is not used in a profile. If a VFD is used in a profile, the FUEL/GAS/OIL servo becomes the “master/lead” drive. A VFD is never the master/lead drive and the VFD name will not impact this rule. 3. The method for profile assignment for VFD's is the same as for servo motors. a. ASSIGNMENT set to a non-zero value prevents the VFD channel from being used as anything but UNUSED in ANALOG OUT SETUP sub menu. 4. DISPLAY FORMAT is used to select the method of feedback used from the VFD. Two methods of feedback can be selected, 4-20 mA or encoder. CNTS and PERCENT FULL SCALE are dependent on 4-20 mA from the VFD. Encoder counts is dependent on the use of an encoder. CNTS is the default and has a range of 0 - 1000 and is derived from the 4-20 mA feedback.%FS translates the 4-20 mA to a scale ranging from 0 - 100.0%. The scale for encoder counts is dependent on the encoder used. a. Total encoder count is determined by the encoder's counts per revolution specification and motor's maximum revolutions per minute, RPM. The allowable range is 300 to 5000 with a default of 1000. The user should refer to the following rule to determine the encoder pulses per second. Max Motor RPM * Pulses per Revolution = encoder pulses per second 60 b. The system will then use this number to scale the counts to a value of 1000. Actual encoder pulses per second can be found in the INFO SCREEN. 5. RUN MODE gives the user the option of using the internal PPC4000 PID (preferred) to control the VFD position or using the internal VFD drive's PID to control the VFD setpoint. The options are AUTO (default) and MANUAL. 6. In AUTO mode, gain and integral terms are used by the VFD plug-in board to control the setpoint of the VFD. The VFD setpoint is the position of the VFD as commanded by the PPC4000. The goal would be to have little difference between the VFD commanded signal (setpoint) and feedback signal. a. Gain is the amplification of the error signal. This error signal is the deviation between feedback and control. A high gain can result in unstable operation and cause overshoot. The range is 1.0% to 100% with an increment of 0.1% and a default of 1.0%. < V F D 2 V F D N A M E F A N 2 A S S I G N M E N T 4 , 3 , 2 , 1 3 D I S P L A Y F O R M A T E N C O D 4 E N C O D E R C O U N T S 1 0 0 0 4a R U N M O D E A U T O 5 G A I N 1 . 0 % 6 I N T E G R A L 0 . 1 6 T O L E R A N C E H I G H 7 A C C E L / D E C E L 3 0 s 8 S T O P T I M E 0 s 9 V F D 2 P O S I T I O N 0 10
- 39. 39 b. Integral is the time between error corrections or updates to the VFD. A high rate of updates (short integral time) to the VFD can result in unstable operation. Conversely too few updates (long integral time) to the VFD can result in large deviations from setpoint. Update time to the VFD output is done at ¼ second intervals. The range of value for INTEGRAL is 0 to 100 in increments of 0.1 with a default of 0.0. The lower the setting, the shorter the integration time will be. The default setting of 0.0 will inhibit integration. A setting of 100.0 will have the lon- gest integration time. NOTE: using the default values, the VFD should never overshoot its target. If overshooting is observed, the VFD drive is using its own PID control. If the user wishes to use the VFD's PID control, the user must set the PPC4000's VFD RUN MODE to MANUAL to disable the PID control. Either the VFD Drive or the PPC4000 can use PID control, not both. Before the user attempts commissioning, the PID control of the VFD system must be set properly or the commissioning process will be very difficult and time consuming waiting for the VFD to stabilize. 7. Tolerance is the acceptable error in feedback signal received from the VFD. Feedback signal can be the VFD’s analog 4-20 mA of encoder pulses. Both feedback types are normalized to a range of 0 - 1000. Tolerance is expressed in terms of percentage of current feedback reading. A LOW tolerance requires the positioning error to be less than 4% of setpoint over a 30 second period. A HIGH toler- ance requires the positioning error be less than 6% of setpoint over a 15 second period. Lockout occurs if the tolerance level is exceeded. Default is HIGH. 8. The ACCELeration / DECELeration time is the time required to move from minimum (0 Hz) to max- imum (60 Hz) and from maximum to minimum speeds. The default value is 30 seconds and has a range of 0-255 seconds. With ACCEL and DECEL specified the rate of change of the 4-20 mA out- put is based on this time. During the accel/decel period, the VFD is allowed to move to its next posi- tion and not be checked for errors until the time has expired. 9. When using flame safeguard controls that require the air flow switch to be proved open before the start of a cycle, the VFD must be nearly stopped before the air flow switch may open. The STOP TIME parameter is the amount of time the PPC4000 will wait between cycles before closing the OCRC relay, allowing large motors to fully coast to a stop. User can adjust STOP TIME between 0 and 100s, with 1s increments. The default value for STOP TIME is 0 seconds. 10. Shows the current position during a burner cycle, of the VFD in units specified by DISPLAY FOR- MAT. Unlike a servo, the VFD position cannot be adjusted or displayed properly in standby. Manual adjustment of the position is prohibited during a burner cycle. ENCODER INPUT 1. The encoder inputs on the NXCESVFD plug-in board are designed to use an encoder that provides an open collector output. The encoder input of the NXCESVFD is a 2.4 Kohm pull-up resistor inter- nally connected to 24 vdc. The encoder selected must be able to handle 10 mA. 2. The PPC4000 tolerates maximum encoder counts over a range of 300 to 5000 counts per second. For a motor with a maximum RPM of 1750, the range of encoder would be 12 to 150 counts per revolu- tion. Likewise for a motor with a maximum RPM of 3600, the range of encoder would be 5 to 80 counts per revolution. 3. Shielded cable should be used to connect the encoder output to the NXCESVFD. The drain wire must be connected to the EARTH post. Operational Notes: 1. Consult the VFD manual for adapting, connecting and configuring the VFD to the combustion blower motor. Be sure all inputs and outputs are compatible with the PPC4000 and NXCESVFD. 2. The VFD is commissioned like any of the servo motors and must have a position for every setpoint for the commissioned profile. 3. For a VFD channel to be used as a VFD controller, the ANALOG OUT SETUP value for that VFD channel must be set to UNUSED. Only then will the VFD channel be displayed in the servo setup sub menu where the user selects that particular VFD channel and configures it for operation.
- 40. 40 4. Making modifications to any of the VFD parameters in the servo setup submenu, requires the Com- missioning pass code to be enabled. 5. Attempting to change a VFD channel to a value other than UNUSED in the ANALOG OUT sub menu while its ASSIGNMENT > 0 in the SERVO SETUP sub menu is not allowed. 6. Removal of a VFD from the commissioning table (set ASSIGNMENT to 0), will require a re-com- missioning without the VFD. That is, lockout will occur if the profile (with the missing VFD) is used during the next burner cycle. 7. VFD's normally require motor start signals. This is usually derived from a relay energized by termi- nal M (combustion blower output) of the flame safeguard. The normally open contacts are connected to the start input terminals located the VFD. 8. Using ACCEL/DECEL prevents step changes in the 4-20 mA output signal to the VFD and should be set appropriately. However, adequate values for ACCEL and DECEL should also be set in the VFD to prevent over current conditions. 9. In VFD setup, DISPLAY FORMAT can be set to either CNT or %FS indicating the 4-20 mA feed- back from the VFD is being used or can be set to ENCOD which requires an encoder connected to the combustion motor shaft and the maximum encoder counts per second value entered for ENCODER COUNTS. All of these options are scaled and normalized to a range of 0 - 1000. There- fore it is possible after commissioning and operating with one method (CNTS), the user can change the VFD setup to an alternate method (ENCOD). The system will treat this change transparently and attempt to control with this new setting. As long as the ENCODER COUNTS value entered is cor- rect or the 4-20 mA is representing full range frequency, the change should be transparent. However, it is strongly recommended DISPLAY FORMAT be changed only if a complete commissioning or adjust ratio procedure is executed immediately after the change and for all profiles using the VFD. Performance notes: 1. When controlling a VFD, setting GAIN and INTEGRAL to incorrect values can cause unstable oper- ation of the VFD and subsequently large variations in the combustion blower motor rotation. When setting GAIN and INTEGRAL, the following is suggested: a. Make certain that the VFD drive is not using its own PID. b. Set the PPC4000's VFD RUN MODE to AUTO, and begin with the INTEGRAL set 0.0 and the GAIN is set to 1%. c. The GAIN and INTEGRAL settings can only be verified by observing the system's reaction to a step input. The best way to get a step response is by entering the Commissioning Mode and cycling between p00 and p01 settings. At p00, the VFD is set to 0Hz. Proceed to p01 by pressing the NEXT key, after entering the Commissioning Mode, and setting the VFD target speed to at least 50% if DISPLAY FORMAT is set to %FS or a count of 500 if it is set to CNTS. Note that the BURNER ON/OFF must also be set to ON and there must be a call for heat to go to p01. To go back to 0Hz, press the BURNER ON/OFF button so that it is OFF. Alternately pressing the BURNER ON/OFF will cycle to unit between p00 and p01 posi- tions. d. Increase the GAIN until the VFD begins to oscillate after it steps to p01. Once oscillation is achieved, reduce the GAIN setting by 50%. For example, if a setting of 20 causes oscillation after the step, reduce the GAIN to 10 then proceed to step (e). Note that with the INTEGRAL set to 0.0, the VFD may not be able to reach the target speed. e. Increase the INTEGRAL setting until the VFD is able to reach the target speed with no oscil- lations. f. The GAIN and INTEGRAL may have to be adjusted several times to achieve the right balance of reaction time and oscillation but following the above method will get the settings close. A steady reading is defined as only the tenths digit changing or the combustion blower motor is not hunting.
- 41. 41 COMMISSIONING WITH VFD The VFD is commissioned like any servo motor and must have a position for every profile setpoint for the commissioned profile. The VFD can be commissioned during the initial commissioning process or added to the current commis- sioning profile. The value shown for VFD in the servo setup table is based on the feedback received from the VFD. During COMMISSIONING and ADJUST RATIO, with MDFY on, this value is the com- manded position. ANALOG OUT SETUP This menu is found in the top layer and is used to map various signal values to 1 of 3 available 4-20 mA outputs: The ANALOG OUTPUT SETUP menus is displayed as follows: Pressing MDFY/SAVE at the > prompt will open the selection menu for items than can be mapped to the selected 4-20 mA analog output channel. Press MDFY/SAVE key again to save selection. < C O M M I S S I O N I N G p 0 3 A I R ( 1 ) 2 0 . 6 G A S ( 2 ) 1 3 . 4 V F D 2 6 5 3 Output Return ANA 0 OUT P11.5 P11.4 VFD 1 OUT P14.6 P14.12 VFD 2 OUT P14.4 P14.10 < A N A L O G O U T S E T U P > A N A 0 O U T U N U S E D < V F D 1 O U T U N U S E D V F D 2 O U T U N U S E D UNUSED SERVO 1 STACK CMD RATE SERVO 2 O2 SETPOINT SERVO 3 CO STBK STPT SERVO 4 SENSOR 1 SERVO 5 SENSOR 2 SERVO 6 SENSOR 3 SERVO 7 SENSOR 4 SERVO 8 SENSOR 5 SERVO 9 SERVO 10
- 42. 42 OXYGEN PROBE SETUP The NXCESO2 oxygen probe provides continuous oxygen (O2) content and stack temperature read- ings from the stack. When properly connected and configured to the PPC4000, it allows the PPC4000 to trim the air or fuel servo to achieve optimum combustion. Refer to earlier sections of this bulletin for information regarding installation and wiring of the NXCESO2. To add O2 trim to the PPC4000 operation the NXCESO2 oxygen probe must be commissioned with the air and fuel servos. Commissioning with O2 can be done after the servos are commissioned or can be done along with the initial servo commissioning. During the commissioning process the PPC4000 will save the target O2 level at each profile setpoint. During normal operation the PPC4000 will trim either the air or fuel servo to maintain this established O2 target level. O2 trim occurs from low fire (p03) through high fire (pHigh). O2 trim will take effect only after all profile setpoints are commissioned with an O2 level. If O2 trim is enabled through the user interface and the system has yet to be commissioned to set the O2 levels, then O2 trim will be ignored. The PPC4000 provides an extensive sub menu where the installing engineer must set a number of key boiler parameters relating to O2 trim operation. The O2 SETUP is passcode protected. All parameters in the O2 SETUP menu are readable but do require at least the Adjust Ratio passcode to be enabled before any parameter can be modified. The passcode will remain enabled for 5 minutes after the last key press. Any change to the O2 SETUP menu will take effect immediately. In the top layer menu scroll to O2 SETUP and press NEXT to enter this sub menu. This menu pro- vides the means to enter all O2 parameters relating to trim. If not enabled, when pressing the MDFY key, the user will be diverted to the passcode screen where at least the Adjust ratio code must be entered. Most menu items are burner / boiler dependent and it is important the installing / commissioning engineer be familiar with the burner / boiler to understand its capabilities and limitations. Menu item Value Description O2 OPERATION DISABLED O2 trim is not enabled. No further menu items are displayed. CONTROL O2 trim enabled for profiles selected. All menu items are displayed. The O2 level is shown in the top layer. MONITOR Allows O2 level to monitored with trim being disabled, but the O2 level is shown in the top layer. CALIBRATE NOW> When the NEXT key is pressed a calibrate signal is sent to the NXCESO2 probe. The function is operational only during STANDBY and PURGE. ASSIGNMENT 4,3,2,1 User selects which profile O2 trim is applied. FUEL TYPE (X) NONE FUEL TYPE for each assigned profile is required to calculate boiler efficiency. The fuel type selected determines the constants used. Default is NONE. NAT.GAS OIL #2 OIL #6 LNG COKE METHANE PROPANE To use oxygen trim properly, the installing personnel must be completely familiar with and know the limitations of the burner / boiler equipment at hand. It is not the purpose of the O2 probe and associ ated trim algorithm in the PPC4000 to extend the burner/boiler to operate beyond its design limita tions. The purpose of O2 trim is to maintain a consistent fuel/air ratio through variations in temperature, humidity and fuel BTU content. When properly setup according to these instructions, O2 trim will result in more heat output per BTU input and increased combustion efficiency and fuel savings will be realized. It is expected the installing personnel read and understand the O2 SETUP menu items and commission the O2 probe in accordance with this bulletin.
- 43. 43 Menu item Value Description HEAT LOSS 0.0% Used to calculate boiler efficiency. Percentage of boiler output lost through the shell of the boiler at high fire. The default is 0% and ranges to 9.9% in 0.1% increment. The PPC4000 will calculate the heat loss at all firing rates and is dependent on burner turndown ratio. TURNDOWN RATIO 3 Used to determine amount of heat loss at all firing rate positions. Calculated value is subtracted from gross efficiency. Default is 3 with a range of 1 to 10 and an increment of 1. A value of 1 will result in a constant heat loss across all firing rate values. TRANSPORT DELAY 0s The range is 0 to 60s. The default is 0s. This is the amount of time it takes for a step change in O2 to be realized after a step change of air/fuel is made. Transport delay value should be calculated or derived at lowest air velocity (Low Fire) TRIM TYPE AIR Default selection is AIR trim. As trimming the FUEL servo is more sensitive than trimming the AIR servo, the user should be cautious when selecting FUEL trim. FUEL TRIM LIMIT RATIO 1 Trim limit ratio is used in determining trim limit. The range of value is 1 to 8 with the default value being 1. See section titled SETTING TRIM LIMITS. TRIM LIMIT DEFAULT Applies to degrees of trim at low fire. Selecting DEFAULT will implement a trim limit of 0.1 degrees at low fire. MANUAL allows users to enter trim limit at low fire for each profile assigned. See section titled SETTING TRIM LIMITS. MANUAL TRIM LIMIT (X) 0.1 Parameter shown if TRIM LIMIT is set to MANUAL. The term (X) refers to profile assignment. The range of trim limit allowed is 0.1 to 3 degrees in 0.1 degree increments. See section titled SETTING TRIM LIMITS. TRIM P-GAIN (X) 6% Sets the proportional gain term. The higher the gain term is, the more aggressive the O2 trim. The range of value is 0 to 100% where 100% is maximum gain. Care should be used when selecting this term. TRIM I-GAIN (X) 95 Sets the integral gain term and is the amount of error signal being fed back. The maximum value is 100% and a faster rate of integration (resets per minute) is realized. The range is 0- to 100%. O2 FAULT ALM WARNING Default value is WARNING and pertains to faults detected in the O2 probe. WARNING will disable O2 trim and burner operation will default to commissioned air and fuel servo settings. A LOCKOUT selection will cause burner shutdown with the lockout message recorded to fault history. LOCKOUT O2 LEVEL ALM UNUSED Action that takes place if programmed O2 levels are exceeded. UNUSED is no action taken. WARNING is alarm energized, burner remains on line. LOCKOUT results in burner shutdown and message recorded to fault history. WARNING LOCKOUT
- 44. 44 SETTING TRIM LIMITS O2 trim limits (expressed in degrees) are derived from trim limit ratio, trim limit at low fire (p3) and the current firing rate of the burner. Care should be exercised when selecting these values. The trim limit applies to both clockwise and counter-clockwise directions and is a deviation from the commis- sioned position. The expression to determine trim limits is as follows: Allowable Trim Limit = Where: RTD = user specified trim limit ratio (RTD>1) MP = present firing rate of burner (0 to 100%) T0 = user specified trim limit at low fire (0% firing rate) A large trim limit ratio will yield a large value of trim limit at the high fire position. Care must be exercised when selecting these values. A trim limit ratio of 1 will yield a constant trim limit from p03 to pHigh. It is of absolute importance to realize that trim limit applies to both clockwise and counter-clockwise direction from the commissioned or untrimmed servo position. The trim limit values must be selected as to not reach the mechanical stop at either end of the trimmed servo travel. See section relating to operating with O2 trim. There is typically a 10:1 ratio between air and fuel in any combustion system and therefore if select- ing fuel as the trimming servo, trim limits should be selected so as to allow only sufficient movement to achieve the desired target. Menu item Value Description O2 LO ALM@LO (X) 0.5% LO refers to O2 level alarm limits below the O2 curve. HI refers to O2 level alarm limits above the O2 curve The values entered are the deviation from the current target value. The default value is 0.5% O2 deviation and the range of values is 0.1% to 5.0% in 0.1% increment. Enter values for each curve for low fire and high fire. The PPC4000 interpolates the alarm value between these points. See section titled GENERAL RULES FOR ALARM NOTIFICATION. O2 LO ALM@HI (X) O2 HI ALM@LO (X) O2 HI ALM@HI (X) FLUE TEMP ALM UNUSED Action that takes place if programmed flue temp levels are exceeded. UNUSED is no action taken. WARNING is alarm energized, burner remains on line. WARNING FLUE TEMP LO (X) 40F Range of value is 40F (4C) to 800F (426C). The values represent the low limit and high limit to define the acceptance zone. The PPC4000 interpolates the alarm value between these points. FLUE TEMP HI (X) 40F FLUE LO TIME 0 min Enables a Low Fire Hold time when the flue temperature, as reported by the oxygen probe, is below the user setting specified in FLUE TEMP LO. Set to 0 to disable. 1 100 10 P TD M RT
- 45. 45 At lower firing rates, a small movement of the servo is required to cause a significant change in the air/fuel ratio as compared to high fire. As can be seen from the above the trim limit is a progressively increasing number from low fire to high fire. The following illustrates the trim limits from the above tables: FIGURE 7. Effect of Trim Limit Ratio on Trim Limits GENERAL RULES FOR O2 ALARM NOTIFICATION The values entered represent the deviation from the current O2 target value. LO alarm refers to O2 levels under the O2 curve. HI alarm values refer to values above the O2 curve. The acceptable zone lies between the LO curve and the HI curve. The following chart illustrates the HI and LO settings for above and below the O2 curve. It is the responsibility of the installing and operating personnel to ensure the trim limits selected do not allow a hazardous combustion condition to occur. In the event of an O2 probe failure the untrimmed commissioned servo setpoints will be used. Trim limit ratio = 3 Trim Limit = 2 degrees Trim limit ratio = 3 Trim Limit = 3 degrees Trim limit ratio = 4 Trim Limit = 3 degrees Firing rate% Trim limit Degrees Firing rate% Trim limit Degrees Firing rate% Trim limit Degrees 0 2.0 0 3.0 0 3.0 10 2.4 10 3.6 10 3.9 20 2.8 20 4.2 20 4.8 30 3.2 30 4.8 30 5.7 40 3.6 40 5.4 40 6.6 50 4.0 50 6.0 50 7.5 60 4.4 60 6.6 60 8.4 70 4.8 70 7.2 70 9.3 80 5.2 80 7.8 80 10.2 90 5.6 90 8.4 90 11.1 100 6.0 100 9.0 100 12.0 0.0 2.0 4.0 6.0 8.0 10.0 12.0 14.0 0 10 20 30 40 50 60 70 80 90 100 D e g r e e s Firing rate 3,2 3,3 4,3
- 46. 46 FIGURE 8. O2 Level Alarm Limits Each profile will have its own set of alarm level values. The alarm value for each succeeding profile setpoint is interpolated from these inputs. Rules for alarm notification: a. The O2 level drops below the absolute value of 0.5% O2 for 30 seconds. b. The O2 level drops below the low alarm limit for 2 minutes. c. The O2 levels drops below twice the low alarm level for 30 seconds. d. The O2 level rises above the high alarm limit for 2 minutes. e. The O2 level rises above twice the high alarm limit of 30 seconds. Note: The O2 level alarm timer is reset to 0 when the actual O2 level returns to within the accept- able zone. FLUE TEMPERATURE ALARM LIMITS The PPC4000 provides flue temperature limits for each profile. Available is the option to activate flue temperature limits as warning. In warning mode, a message will be posted to the display and alarm relay will be energized. To use flue temperature alarm the user must enter the low limit flue temperature and high limit flue temperature. When the burner is firing the flue temperature must remain in the acceptance zone defined by these two limits as shown in the following chart: 2 3 4 5 6 7 8 9 10 0 10 20 30 40 50 60 70 80 90 100 O x y g e n L e v e l Firing Rate O2 ALM@Hi O2 Level O2 ALM@Lo Lo ALM @ LO Lo ALM @ HI Hi ALM @ HI Hi ALM @ LO