9990611130 Find & Book Russian Call Girls In Vijay Nagar
Sport wires loom astra h
1. greeting.
I just finished and turned mounted Sport button. I have a Astra H, enjoy who did not come with factory sport
button, I had only button open / closed doors, and the place where I could make sport button was free.
For a start button that can be understood by sports car, watches the board (IPC's or clocks that show km /
h speed) must be somehow compatible with this function. This must be checked TECH2 (at maiandrei in
principle). Then, it bought the block of buttons, obviously the sport button also have included, besides what
you have in your car from the factory. This block of buttons cost somewhere between U.S. $ 130-150.
Now we begin the steps to be done for. change the button itself.
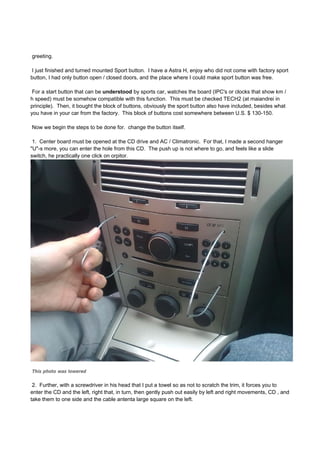
1. Center board must be opened at the CD drive and AC / Climatronic. For that, I made a second hanger
"U"-s more, you can enter the hole from this CD. The push up is not where to go, and feels like a slide
switch, he practically one click on orpitor.
This photo was lowered
2. Further, with a screwdriver in his head that I put a towel so as not to scratch the trim, it forces you to
enter the CD and the left, right that, in turn, then gently push out easily by left and right movements, CD , and
take them to one side and the cable antenta large square on the left.
2. This photo was lowered
3. After I removed the CD, we must not forget nor ashtray. Remove the left side of the tank that small,
black, and then put your hand down toward the ashtray, and by pulling it toward you and stands up.
3. This photo was lowered
4. Going out now to give AC unit / air. It has some clips at the top left and right. They should be less forced
up so that the unit itself can go outside. If you can not remove just one unit lifting clamps are removed and
the second and drive out. After the cables out and back.
4. This photo was lowered
5. Further, the key to undoing the 2 torx screws shown in the picture.
6. This photo was lowered
6. You have to be careful on the left and right on the grid, are two pieces of plastic that will keep the grid as
well. Tap on them, while pulling the starting grid at the bottom, near where the screws you just removed.
7. This photo was lowered
7. What we see in this picture, which is key but I just pulled it back. This is the block of buttons to be
replaced with the new one already purchased. To remove this block of buttons under the picture the 2
revolving wheels. Then, by pressing on the plastic from the mouth through which air enters, carefully
indicate where the four arrows, trying to block out the buttons and pulling up towards the interior finish.
8. This photo was lowered
8. I opened to you by the middle. Now get to watch, board. Here, to be opened on the left and right under
the steering wheel, 2 screws, the head surubelinita cross.
9.
10. 9. Torx Key Then, two screws must be loosened further, that keep the clocks themselves.
11. This photo was lowered
10. Here we plug the cables behind the clocks. In the picture above if you look at the top left of the steering
wheel, you see a plastic substrate. That support you plug in the actual picture. First pull the plug completely
stop firing in the left side of that brown. Then pull the plug. Further, to remove the plastic jack support itself,
deserves expanded sanctuary where you go plug in support. This is pate made with two screwdrivers,
carefully. [I have not succeeded and I broke a hand, a stopper so I stayed not in path]
12. This photo was lowered
11. This is the small plug from the block of buttons on the middle board. Does the same socket system
introduced in a plastic substrate. It has only a single stop, so it will get easier to support.
13. 12. And finally comes the interesting part. Cables to be drawn. For this you need four pins.
Place pin in the positions 8 and 17 on small plug and on the big plug place pins in position 41 and 11. And
go like this: The thread goes from number small8 to large41 and from small17 to large11.
14. Now, if everything was done up here as it should, you would have to switch on the lights.
Lowe: Pull 2 wires from Instrument Cluster Plug pin11 and 41 to Sport Button Cluster pins 8 and 11
Do not rush to pull cables, WITHOUT First verify that the CPI (clocks) understand what you are asking (the
command button sport). THIS IS TO CHECK WITH TECH2 maiandrei.
YOU EXPECT WITH QUESTIONS.
a good day!