Strategies for Landing an Oracle DBA Job as a Fresher
Phase2 developers tip_-_advanced_mesh_regions
1. Developer’s Tip
Using advanced mesh regions in Phase2 8.0 to combine
graded and uniform meshing
Ease of mesh generation and the ability to customize the mesh has always
been a hallmark of Phase2. In Phase2 version 8, an important new capability
has been added to the mesh customization options: it is now possible to define
regions of uniform mesh density within a graded mesh.
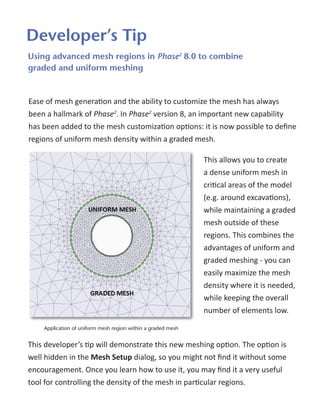
This allows you to create
a dense uniform mesh in
critical areas of the model
(e.g. around excavations),
while maintaining a graded
mesh outside of these
regions. This combines the
advantages of uniform and
graded meshing - you can
easily maximize the mesh
density where it is needed,
while keeping the overall
number of elements low.
Application of uniform mesh region within a graded mesh
This developer’s tip will demonstrate this new meshing option. The option is
well hidden in the Mesh Setup dialog, so you might not find it without some
encouragement. Once you learn how to use it, you may find it a very useful
tool for controlling the density of the mesh in particular regions.
2. To start with we will read in the Tutorial 01 Quick Start.fez file. Start the Phase2 Model
program.
1. Select File > Recent Folders > Tutorials Folder.
2. Open the Tutorial 01 Quick Start.fez file.
3. Since we will be modifying this file, save it with a new file name. Select File > Save As
and save it with a new file name (e.g. advanced mesh region 01.fez).
4. Now let’s add a closed material boundary around the excavation, to define a separate
region which surrounds the excavation.
5. Select Add Material from the toolbar or the Boundaries menu. If the Reset Mesh dialog
appears select OK. In the prompt line enter the following coordinates to define a closed
boundary which surrounds the excavation.
-10, -5
-10, 20
10, 20
10 , -5
-10, -5
The material boundary will be added to the model.
6. Select Discretize and Mesh from the toolbar or the Mesh menu. The model should
appear as follows.
Figure 2 – boundary added to define region around excavation
3. 7. Select Mesh Setup from the toolbar or the Mesh menu.
8. Select the Advanced button in the Mesh Setup dialog. The dialog will expand to reveal
advanced mesh setup options.
9. Select the Use Advanced Mesh Regions checkbox. Select the Add button at the right of
the dialog.
Figure 3 – mesh setup dialog with advanced options displayed
10. The dialog will minimize (roll up) and you will be prompted to select the region of the
model in which you would like to customize the mesh.
11. Click the mouse anywhere inside the region between the excavation boundary and the
material boundary.
12. The mesh setup dialog will automatically maximize again. Note:
You have defined one advanced mesh region.
By default the Mesh Type = Uniform for the advanced mesh region.
Note that the overall Mesh Type = Graded (at the top of the dialog).
13. For the advanced mesh region, a default element length is initially calculated based on
the current geometry. Set the Element Length = 1 as shown in the following figure.
4. Figure 4 – advanced mesh region defined in mesh setup
14. Select OK. The model should now appear as follows:
Figure 5 – uniform mesh region defined around excavation
5. 15. Zoom in to the excavation to get a better look. You have defined a region of uniform
mesh density with average element length approximately equal to 1. Outside of this
region the mesh is graded with larger elements towards the external boundary.
Figure 6 – close-up of uniform mesh region
16. Save this model and we will demonstrate another method of selecting the custom mesh
region.
6. There are two methods of selecting an advanced mesh region:
You can click the mouse inside a closed region (as demonstrated above).
You can click and drag a rectangular window over any region of the model to create an
advanced mesh region.
We will now demonstrate the second method.
1. Select Mesh Setup from the toolbar or the Mesh menu.
2. First delete the existing custom mesh region. In the dialog, click on the grid row
representing the existing advanced mesh region and select the Delete button.
3. Select the Add button.
4. The dialog will minimize (roll up) and you will be prompted to select the region of the
model in which you would like to customize the mesh. Notice that the prompt line
instruction indicates: “Use mouse to click inside a closed region or draw a rectangular
region”.
5. Click and drag a rectangular window which is larger than the green material boundary,
say from about (15, 25) to about (-15, -10).
6. The Mesh Setup dialog will automatically maximize again.
7. You have defined a new advanced mesh region. Set the Element Length = 1.
8. Select OK. If you see a message dialog about re-setting the mesh select Yes. The model
should look similar to the following figure.
Figure 7 – mesh region selected by a rectangular window
7. Notice that the entire region within the rectangular window on the previous page has been remeshed with a uniform mesh with average element length approximately equal to 1.
When you use a rectangular selection window, you can enclose any number of different
boundaries or boundary types (e.g. excavation, material, stage) and the entire region will be
discretized and meshed according to the average element length you have defined for the
region. (See the note below).
You are encouraged to experiment further with this option to get familiar with its capabilities
and results.
For example, if you open Tutorial 02 Materials and Staging.fez, and add a customized mesh
region around the entire excavated area with an average element length = 5, you will get
results similar to the figure below.
Figure 8 – uniform mesh region applied to Tutorial 02
NOTE: the uniformity of the mesh depends on the geometry of your boundaries and the spacing
of vertices on the boundaries with respect to the element length. If you have closely spaced
vertices (i.e. vertex spacing is less than the element length for the advanced mesh region) then
the mesh will not be exactly uniform. Phase2 will do its best to generate a uniform mesh within
the constraints imposed by the boundary geometry and the element length.
8. Users of Phase2 version 7 may recall that a very similar option already existed in the Mesh
Setup dialog. In version 7 the option was referred to as “Discretization Regions” while in version
8 the new option is referred to as “Advanced Mesh Regions”.
Figure 9 – comparison of version 7 (left) and version 8 (right) advanced mesh setup options
The primary difference between the version 7 discretization region and version 8 advanced
mesh region is as follows:
In version 7 only the discretization of the model boundaries was affected. The mesh
within the selected region still remained a graded mesh. You could not directly control
the element size except on the boundaries.
In version 8, the discretization of the model boundaries AND the size of the finite
elements within the region are simultaneously determined by the average element
length, allowing you to define a true uniform mesh within the selected region.
There are also some other differences between version 7 and 8 with respect to this option, but
we will not detail those here. You can obtain the version 7 behaviour using version 8 by
choosing Mesh Type = Graded for an advanced mesh region.
Although both version 7 and version 8 have many different options for customizing the
discretization and the mesh density in selected areas, only version 8 allows you to
simultaneously change both discretization and mesh density in order to obtain a uniform mesh
region within a graded mesh.
9. In the Mesh Setup dialog you may have noticed the following checkbox: “Do not discretize arc
or circle segments” shown below.
Figure 10 – arc and circle discretization option
This checkbox is on by default. If your model includes boundaries which were created using the
Arc or Circle options, the effect of this checkbox is to only allow ONE discretization per line
segment, on a boundary which was originally defined as an arc or circle. (The purpose of this
option is to improve analysis results for liners placed on these boundaries).
If you are using the Advanced Mesh regions option, you should keep this in mind. If the “Do not
discretize arc or circle segments” checkbox is selected, this means that the element size along
circular or arc boundaries, will be determined by the length of the segments of the arc or circle.
This will override the value of Element Length which you enter for an Advanced Mesh region,
and you may notice non-uniform mesh results along arc or circular boundaries, unless the
element length and arc line segment length are approximately equal.
10. The Advanced Mesh Regions option is not something that you will need to use all of the time.
For the majority of models, a good quality graded mesh will give excellent results with a
minimum of user input.
However there are cases where it may be beneficial to create a dense uniform mesh in critical
areas of the model (e.g. around excavations), while maintaining a graded mesh outside of these
regions. For example:
Highly stressed areas supported by rock bolts
Models in which the results may be mesh-dependent
Studies of brittle spalling around excavations, where fine uniform meshes are required
in order to capture the material behaviour
The new Advanced Mesh Regions option in Phase2 8 is a powerful new tool which gives the user
a great deal of flexibility to customize the mesh density in any region of the model with a
minimum of effort. It combines the advantages of uniform and graded meshing - you can easily
maximize the mesh density where it is needed, while keeping the overall number of elements
low.