
Recommandé
Recommandé
Contenu connexe
Similaire à Nokia 3 g hsdpa handset pc suite installation & apn manual
Similaire à Nokia 3 g hsdpa handset pc suite installation & apn manual (20)
Dernier
Dernier (20)
Nokia 3 g hsdpa handset pc suite installation & apn manual
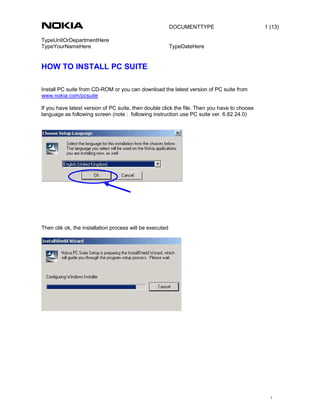
- 1. DOCUMENTTYPE 1 (13) TypeUnitOrDepartmentHere TypeYourNameHere TypeDateHere 1 HOW TO INSTALL PC SUITE Install PC suite from CD-ROM or you can download the latest version of PC suite from www.nokia.com/pcsuite If you have latest version of PC suite, then double click the file. Then you have to choose language as following screen (note : following instruction use PC suite ver. 6.82.24.0) Then clik ok, the installation process will be executed
- 2. DOCUMENTTYPE 2 (13) TypeUnitOrDepartmentHere TypeYourNameHere TypeDateHere 2 Click “Next” in following screen (note : please do not attach the phone to the PC before the installation is finished) Click “I accept the terms in the license agreement”. Then click “Next”
- 3. DOCUMENTTYPE 3 (13) TypeUnitOrDepartmentHere TypeYourNameHere TypeDateHere 3 Then following screen will be shown. Please wait until the installation process is completed. Once the installation is completed, then click “Finish”
- 4. DOCUMENTTYPE 4 (13) TypeUnitOrDepartmentHere TypeYourNameHere TypeDateHere 4 You will be prompted “Get Connection Wizard” screen, then click “Next” For USB connection then you select “cable connection”, then click “next”
- 5. DOCUMENTTYPE 5 (13) TypeUnitOrDepartmentHere TypeYourNameHere TypeDateHere 5 In following screen, you connect your phone to PC. PC suite will detect phone connection automatically Once the PC suite has detected the phone then click “next”
- 6. DOCUMENTTYPE 6 (13) TypeUnitOrDepartmentHere TypeYourNameHere TypeDateHere 6 If the phone connection is detected successfully, the following screen will be shown (e.g : this instruction use Nokia N95) and click “Finish”
- 7. DOCUMENTTYPE 7 (13) TypeUnitOrDepartmentHere TypeYourNameHere TypeDateHere 7 HOW TO CREATE TELKOMSEL BROADBAND CONNECTION Click PC suite icon in your windows screen Make sure the phone is connected to your computer as shown in following screen (e.g : this instruction use Nokia N95)
- 8. DOCUMENTTYPE 8 (13) TypeUnitOrDepartmentHere TypeYourNameHere TypeDateHere 8 Then in following screen, select “Connect to the Internet” Select “setting” in following screen :
- 9. DOCUMENTTYPE 9 (13) TypeUnitOrDepartmentHere TypeYourNameHere TypeDateHere 9 Make sure you are selecting the proper modem in the modem list, then click “Next” Then, select “configure the connection manually” as following screen and click “next”
- 10. DOCUMENTTYPE 10 (13) TypeUnitOrDepartmentHere TypeYourNameHere TypeDateHere 10 Under following screen, then please fill following setting : Access point : flash Note : Please just leave blank for username and password Then click “Finish”
- 11. DOCUMENTTYPE 11 (13) TypeUnitOrDepartmentHere TypeYourNameHere TypeDateHere 11 Then select “connect” to start Telkomsel Broadband connection Please wait until authentication process is completed
- 12. DOCUMENTTYPE 12 (13) TypeUnitOrDepartmentHere TypeYourNameHere TypeDateHere 12 You will get “connected” message if the Telkomsel Broadband connection is established.
- 13. DOCUMENTTYPE 13 (13) TypeUnitOrDepartmentHere TypeYourNameHere TypeDateHere 13