Rad Server Industry Template - Connected Nurses Station - Setup Document
•
2 j'aime•1,170 vues

Setup document for RAD Server connected nurses station

Recommandé
Contenu connexe
Tendances
Tendances (19)
Similaire à Rad Server Industry Template - Connected Nurses Station - Setup Document
Similaire à Rad Server Industry Template - Connected Nurses Station - Setup Document (20)
Plus de Embarcadero Technologies
Plus de Embarcadero Technologies (20)
Dernier
Dernier (20)
Rad Server Industry Template - Connected Nurses Station - Setup Document
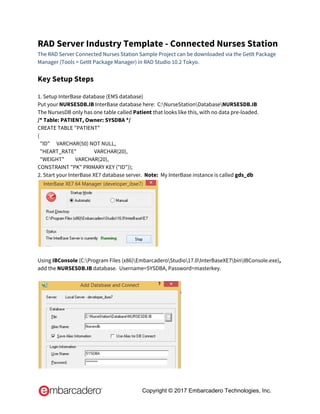
- 1. RAD Server Industry Template - Connected Nurses Station The RAD Server Connected Nurses Station Sample Project can be downloaded via the GetIt Package Manager (Tools > GetIt Package Manager) in RAD Studio 10.2 Tokyo. Key Setup Steps 1. Setup InterBase database (EMS database) Put your NURSESDB.IB InterBase database here: C:NurseStationDatabaseNURSESDB.IB The NursesDB only has one table called Patient that looks like this, with no data pre-loaded. /* Table: PATIENT, Owner: SYSDBA */ CREATE TABLE "PATIENT" ( "ID" VARCHAR(50) NOT NULL, "HEART_RATE" VARCHAR(20), "WEIGHT" VARCHAR(20), CONSTRAINT "PK" PRIMARY KEY ("ID")); 2. Start your InterBase XE7 database server. Note: My InterBase instance is called gds_db Using IBConsole (C:Program Files (x86)EmbarcaderoStudio17.0InterBaseXE7binIBConsole.exe), add the NURSESDB.IB database. Username=SYSDBA, Password=masterkey. Copyright © 2017 Embarcadero Technologies, Inc.
- 5. The emsserver.ini file is located here: C:UsersPublicDocumentsEmbarcaderoEMS Running EMSDevserver.exe again, should now start your EMS Development Server, like this: 3. Part of the setup is to add a new user called nurseuser. For an initial setup, create a few new Users and a new Group for our RAD (EMS) Server. The Nurses App (NurseApp_PatientVitals) expects a User “nurseuser”. Without this user, you will get an error. The Nurse app expects this Login(nurseuser, nursepass): procedure TForm23.FormShow(Sender: TObject); begin // EMS Process NurseStationClientModule.Login('nurseuser', 'nursepass'); PushRegister(); end; Without this nurseuser user, you will get this error: Copyright © 2017 Embarcadero Technologies, Inc.
- 7. Click OK. Click the Users tab, and click Add + Enter: User name = nurseuser, Password = nursepass, Field Name = Description, Field Value = Nancy Nurse. NOTE: It is very important that the Field Name “Description” is spelled with an uppercase “D”. The Patient App (PatientCheckIn2) looks for a field value “Description” with an uppercase D. Click OK, and your new User gets created: Click OK. And another User that you can use as the Patient (test1, test1), with your name “Al Mannarino” as the Field Value. Note: “Description” must be an uppercase “D”. Copyright © 2017 Embarcadero Technologies, Inc.
- 8. Note that the Field Name Description is uppercase as it's needed. You now have two (2) Users created: Note: You do NOT need to create any Groups, Installations or Push. Note: For the Installations tab, you do NOT need to add anything. The running apps that connect to the EMS Server will create the Installations for you. Check if you can Authenticate with Users “nurseuser” and “test1”. Select Authenticate tab. Enter User name = nurseuser and Password = nursepass. Click Login. Verify you can Login. Click OK. Click Log out. Do the same for Username (Test1, test1). You can now CLOSE the EMSManagementConsole. 4. Install SSL libraries. With RAD Studio 10.2 Tokyo, EMS, BaaS and REST clients on iOS, Android, Windows and Mac no longer need to use the OpenSSL libraries. In 10.2 Tokyo, they will use the native library on each OS. But the RAD (EMS) Server requires the OpenSSL libraries to support HTTPS requests and sending push notifications to iOS devices. This will require the Windows OpenSSL libraries. Copyright © 2017 Embarcadero Technologies, Inc.
- 9. For Windows, I installed the Windows OpenSSL from here: http://docwiki.embarcadero.com/RADStudio/Tokyo/en/EMS_Push_Notifications Which tells you to download the latest OpenSSL binaries from: https://www.openssl.org/ For Win32, I used https://www.openssl.org/related/binaries.html And selected “Choose OpenSSL for Windows.” http://slproweb.com/products/Win32OpenSSL.html Using the latest Win32 OpenSSL v1.0.2k Light and letting the installer add the libs to my Windows path worked OK for me. Note: To send EMS Push notification messages to the registered devices in your EMS Server, you need to install the OpenSLL libraries in the system where the EMS Server runs. Note: You need to install the 32-bit or 64-bit OpenSSL binary, depending on the target platform of the EMS Server. If you do not install the OpenSSL libraries and use the EMS Server to send push notification messages to your registered device, the EMS Server shows the following error exception in the EMS Server Window log: {"Error":{"Type":"Other","Exception":"EIdOSSLCouldNotLoadSSLLibrary","Message":"Could not load SSL library.","Thread":5576}} 3. Setup Push Notification Messaging Service for Android and iOS for EMS Backend Service The Remote Notifications for EMS we are using with these applications requires: To allow your applications to receive Remote Notifications, you need: ● For Android apps, a new project on Google Developer Console. ● For iOS apps, a new App-ID on Apple Developer Program. The complete steps are here to set up the messaging service for both Android and iOS apps: http://docwiki.embarcadero.com/RADStudio/Tokyo/en/Setting_Up_the_Messaging_Service For ANDROID, Follow these steps: http://docwiki.embarcadero.com/RADStudio/Tokyo/en/Setting_Up_the_Messaging_Service Create a new Android project and Server Key in the Google Developer Console according to the instructions at http://developer.android.com/google/gcm/gs.html Note: Firebase Cloud Messaging (FCM) is the new version of Google Cloud Messaging (GCM). It inherits the reliable and scalable GCM infrastructure, plus new features! Copyright © 2017 Embarcadero Technologies, Inc.
- 15. 2. The PatientCheckIn2 project is the Patient application. The project has two files; the PatientCheckinUnit2.pas and NurseStationClientModuleU.pas. PatientCheckinUnit2 has three tab screens: Welcome Login PatientBeaconCheckIn ---> ---> NurseStationClientModuleU has the EMS and Push components. The NurseStationClientModuleU is shared by both Patient App and Nurses App: 3. NurseApp_PatientVitals project is the Nurses application. It has two files; the NurseAppMainForm.pas and the SensorMonitorsU.pas The NurseAppMainForm has two tabs screens: GetData StoredData Copyright © 2017 Embarcadero Technologies, Inc.
- 22. Using an Apple iOS iPad, check that you have Bluetooth Turned On, and your HRM is connected: This first time on iPad, you may get this message using Bluetooth: Click OK. 14. Click on Patient Heart Rate “Connect to Device”: Wait a few seconds for the HRM to be detected, and then you will see your HR BPM get displayed on the Nurses App. Click SaveData. Click OK. Copyright © 2017 Embarcadero Technologies, Inc.