Illustrator Tutorials: Florist Flyer
•
1 j'aime•678 vues

Learn how to create a Florist Flyer from beginning to end using Adobe Illustrator.

Recommandé
Recommandé
Contenu connexe
Tendances
Tendances (19)
En vedette
En vedette (9)
Similaire à Illustrator Tutorials: Florist Flyer
Similaire à Illustrator Tutorials: Florist Flyer (20)
Dernier
Dernier (20)
Illustrator Tutorials: Florist Flyer
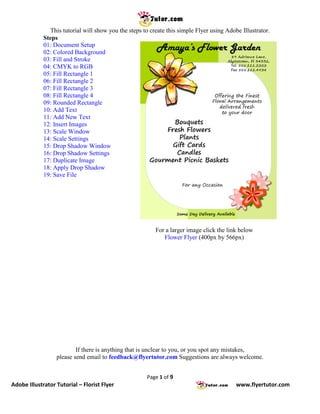
- 1. This tutorial will show you the steps to create this simple Flyer using Adobe Illustrator. Steps 01: Document Setup 02: Colored Background 03: Fill and Stroke 04: CMYK to RGB 05: Fill Rectangle 1 06: Fill Rectangle 2 07: Fill Rectangle 3 08: Fill Rectangle 4 09: Rounded Rectangle 10: Add Text 11: Add New Text 12: Insert Images 13: Scale Window 14: Scale Settings 15: Drop Shadow Window 16: Drop Shadow Settings 17: Duplicate Image 18: Apply Drop Shadow 19: Save File For a larger image click the link below Flower Flyer (400px by 566px) If there is anything that is unclear to you, or you spot any mistakes, please send email to feedback@flyertutor.com Suggestions are always welcome. Page 1 of 9 Adobe Illustrator Tutorial – Florist Flyer www.flyertutor.com
- 2. Step 01: Document Setup To begin, locate the Menu Bar and select File > New. This will bring up the New Document Window. In the Artboard Setup, set Units to "Inches" and set Size to "Letter", which is 8.5 by 11 inches. Select the first button next to Orientation to set the Canvas to Portrait. In Color Mode select "RGB Color". Click OK. Step 02: Colored Background We will construct the Colored Background with 4 Rectangles. Select the Rectangle Tool from the Tool Box. Draw the Rectangles on the page so that they look like this: Page 2 of 9 Adobe Illustrator Tutorial – Florist Flyer www.flyertutor.com
- 3. Step 03: Fill and Stroke Next we will add Color to the Rectangles. To the right of the screen should be the Color Palette. This should be docked with several other Palettes - Swatches, Graphic Styles, Stroke. Double click on the Black Arrows to the left of the Color Palette. This should give you the options to enter "CMYK" Values. Step 04: CMYK to RGB Select the Black Arrow to the right side of the Color Palette and select "RGB" from the menu that appears. Now you can create Custom Colors in RGB Format. Step 05: Fill Rectangle 1 Using the Select Tool , select Rectangle 1. Select the Fill Icon on the Color Palette then set R to "170", G to "212" and B to "0". Click on the canvas or click "Enter" to see the change. Step 06: Fill Rectangle 2 Select Rectangle 2. Set R to "218", to "236" and B to "143". Click on the canvas or click "Enter" to see the change. Step 07: Fill Rectangle 3 Select Rectangle 3. Set R to "239", G to "255" and B to "177". Click on the canvas or click "Enter" to see the change. Page 3 of 9 Adobe Illustrator Tutorial – Florist Flyer www.flyertutor.com
- 4. Step 08: Fill Rectangle 4 Select Rectangle 4. Set R to "209", G to "236" and B to "99". Click on the canvas or click "Enter" to see the change. The Rectangle background should now look like this: Step 09: Rounded Rectangle Using the Rectangle Tool again, draw a Rectangle on the Page. Then go to Effect > Stylize > Rounded Corners. In the Rounded Corners Window enter "210pt" and click OK. Select Preview if you wish to see what the changes will look like. Change the Fill Color to "White" and the Stroke to a "Dark Green". Then place this "White" Rectangle on top of the "Green" Background. It should look like this: Step 10: Add Text Select the Type Tool on the Tool Box and click anywhere on the canvas and start typing your blocks of Text. In this case we will start with the Title which is "Amaya's Flower Garden". The Font Family is "Harlow Solid Italic" and the Font Size is "46". This is what the Flyer Title would look like: Page 4 of 9 Adobe Illustrator Tutorial – Florist Flyer www.flyertutor.com
- 5. Step 11: Add New Text Next add the Company Address - "89 Adrienne Lane, Alyssatown, Fl 34332, Tel. 555.111.2323 Fax 555.111.4434". Use the Font Family "Segoe Print" which is a free Font that was downloaded at www.FontFreak.com. Style is Normal, Size is "24" and Layout is Centered. Some of the Text is made larger and Bold for emphasis. Step 12: Insert Images Here I downloaded the Images of 3 Flowers from www.Clker.com, which is a site where you can download Royalty Free Clipart. Check out www.Public-Domain-Image.com, and OpenClipArt.org as well. To insert an Image go to File > Place. This opens up the Place Window where you select your Image and click Place. Page 5 of 9 Adobe Illustrator Tutorial – Florist Flyer www.flyertutor.com
- 6. Step 13: Scale Window With the Yellow Flower on the canvas, right click it and select Transform > Scale from the menu that appears. Step 14: Scale Settings This will bring up the Scale Window. Set Uniform Scale to "50%" and click OK. You can also check the Preview box to see the change before you make it. Place in the desired spot on Flyer. This is what it should look like: Page 6 of 9 Adobe Illustrator Tutorial – Florist Flyer www.flyertutor.com
- 7. Step 15: Drop Shadow Window Next place the Pink Flower. Scale this Image to "25%". Then with the Image selected go to Effect > Stylize > Drop Shadow. This will bring up the Drop Shadow Window. Step 16: Drop Shadow Settings Set X Offset, Y Offset and Blur to "2pt" and click OK. Step 17: Duplicate Image Now we will make a Duplicate of the Pink Flower. To do this, hold down the Alt Key while the Flower is selected and drag to make another copy. Page 7 of 9 Adobe Illustrator Tutorial – Florist Flyer www.flyertutor.com
- 8. Step 18: Apply Drop Shadow Next place the Red Flower. Scale it to "20%". Add the Drop Shadow with the same settings as the Pink Flower. The Images when put together should look like this: Step 19: Save File Using the Selection Tool place the Image in the desired location on flyer. The result: Go to File > Save. Page 8 of 9 Adobe Illustrator Tutorial – Florist Flyer www.flyertutor.com
- 9. Page 9 of 9 Adobe Illustrator Tutorial – Florist Flyer www.flyertutor.com