SlideShare une entreprise Scribd logo
1  sur  128
Télécharger pour lire hors ligne
Si el promedio de velocidad del disco segun el fabricante es de 10ms, seekt+responset=10ms.
La formula final seria 40ms // I/O = 40I/O ‘s (i/os por segundo)
Pero en la realidad, hay que tener en cuenta tambien el tiempo en espera.

** Dasd: IBM's Direct Access Storage Devices (J Ranade Ibm Series)

El principio de cercanía o principio de localidad, que afirma que las referencias a los datos y el
programa dentro de un proceso tienden a agruparse. Por lo tanto, es válida la suposición de que,
durante cortos períodos de tiempo, se necesitarán sólo unos pocos fragmentos de un proceso.


Effective problem determination starts with a good understanding of the system and its
components.

The more information you have about the normal operation of a system, the better.
   - System configuration
   - Operating system level
   - Applications installed
   - Baseline performance
   - Instalation, configuration and service manuals.
   - Lspv, lscfg, prtconf, lsvg, lsps, lsfs, lsdev.
El lscfg concentra varios comandos, a modo de resumen. De aquí obtenemos datos como
arquitectura, procesadores, memoria, etc

System Model: IBM,9111-520
Machine Serial Number: 10E122F
Processor Type: PowerPC_POWER5
Number Of Processors: 1
Processor Clock Speed: 1656 MHz
CPU Type: 64-bit
Kernel Type: 64-bit
LPAR Info: 12 AIX8
Memory Size: 832 MB
Good Memory Size: 832 MB
Platform Firmware level: SF230_143
Firmware Version: IBM,SF230_143
Console Login: enable
Auto Restart: true
Full Core: false
                                 Cpu speed     lscfg -vl cpucard0 | grep FRU
Model Architecture: chrp - Model Implementation: Multiple Processor, PCI bus

+ sys0                                      System Object
+ sysplanar0                                System Planar
* vio0                                      Virtual I/O Bus
* vscsi2        U9111.520.10E122F-V12-C82-T1             Virtual SCSI Client Adapter
* hdisk2        U9111.520.10E122F-V12-C82-T1-L810000000000 Virtual SCSI Disk Drive
* vscsi1        U9111.520.10E122F-V12-C81-T1             Virtual SCSI Client Adapter
* hdisk1        U9111.520.10E122F-V12-C81-T1-L810000000000 Virtual SCSI Disk Drive
* vscsi0        U9111.520.10E122F-V12-C80-T1             Virtual SCSI Client Adapter
* hdisk0        U9111.520.10E122F-V12-C80-T1-L810000000000 Virtual SCSI Disk Drive
* ent0          U9111.520.10E122F-V12-C2-T1             Virtual I/O Ethernet Adapter (l-lan)
+ L2cache0                                   L2 Cache
+ mem0                                      Memory
+ proc0                                     Processor

bootinfo –p                 bootinfo –k            bootinfo –z            bootinfo -K
chrp                        851968                 1 (1 cpu)              64 (64bits)

getconf Command writes system configuration variables values to standard output. LOTTS!!
bootinfo –r nos muestra la memoria real en kbytes; -p el tipo de plataforma (chrp, rs6k, etc)
snap, para debug… vuelcos de memoria, SNA/TCP ts, nfs info, kernel dumps, pci/xscsi,
hacmp, etc. para los vendor.

1.   Understand/identify the problem.
2.   Define the problem.
3.   Collect system data.
4.   Resolve the problem.


1. Ask questions as:
- Whats the problem?
- Whats the system doing (or not doing)?
- How did you first notice the problem?
- When did it happen?
- Have any changes been made recently?
- Keep them talking until the picture is clear!!
2. Collect data:
   - How is the machine configured?
   - What errors are being produced?
   - What is the state of the OS?
   - Is there a System Dump?
   - What lost files exist?

   3. Problem determination Tools:
   - Check Error logs.
   - Asses LVM Commands.
   - Have Backups.
   - Send the System Dump for diagnostics.
   - Do Diagnostics.
   - Have Booteable media.
   - Check LED Codes.

   4. Resolve the problem:
   - Use the gathered information.
   - Keep logs of taken actions.
   - Use the tools available-commands documentation, fixes and updates.
   - Contact IBM support if necessary.
   - Keep a log of actions taken to correct the problem.

Important Links:
http://publib16.boulder.ibm.com/pseries/en_US/infocenter/base
http://techsupport.services.ibm.com/server/fixes

Hardware family:
New best practices, parches y demas: AIX 5L (aix service strategy)  download always

- Tecnology Level (incluye el CSP) (del TL no se pueden sacar partes, como en los ML)
- Concluding service pack        salen 6 meses y dos semanas despues del tl/ml, el csp cierra el
tl/ml del mismo numero.
- Service pack (mantenimiento, new hardware devices)
- Interim fix (security fix, temporal)
- PTF (PTF Program temporary Fix) (si nos generan un error, abrimos un PMR en IBM)

El ML se usaba en el pasado, actualmente eso cambio a Tecnology Level. = twice year releases
which contain new HW & SW features and services updates. It is displayed with oslevel –s as the
MLs.
Strategy IE:
1H06                   2H06                    1H07
TL4+CSP3      SPs    TL5+CSP4     SPs TL6+CSP5 = AIX Releases.
TL4+SPs      TL5+SPs    TL6 = latest level.
TL3+CSP3      IF   IF   TL4+CSP4       IF   IF   TL5+CSP5 = Maximun OS Stability.
TL4+SPs      PTFs   CSP4    IF    TL6 = Yearly update.

APAR Authorized Program Analisis Report (IX51xxx)           Security. Pueden concluir en una PTF
o parche, ya que son generadas a partir de requerimientos del usuario.
                                                      HIPER/PE: must apply patch (high
impact/pervassive)

** q13xxlabfiles.rar

Si al instalar un PTF, tengo un error, llamo a IBM, abren un PMR, y se genera un APAR;
que puedo invocar por el numero.
SUMA: Creates a task to automate the download of maintenance and technology levels from a fix
server.

Examples
    1 To list the SUMA global configuration settings, type the following:          suma -c

Output similar to the following will be displayed:
        FIXSERVER_PROTOCOL=http
        DOWNLOAD_PROTOCOL=ftp
        DL_TIMEOUT_SEC=180
        MAX_CONCURRENT_DOWNLOADS=5
        HTTP_PROXY=
        HTTPS_PROXY=
        FTP_PROXY=
        SCREEN_VERBOSE=LVL_INFO
        NOTIFY_VERBOSE=LVL_INFO
        LOGFILE_VERBOSE=LVL_VERBOSE
        MAXLOGSIZE_MB=1
        REMOVE_CONFLICTING_UPDATES=yes
        REMOVE_DUP_BASE_LEVELS=yes
        REMOVE_SUPERSEDE=yes
        TMPDIR=/var/suma/tmp

     2 To edit the SUMA global configuration setting to change the maximum log file size to 2
MB, type the following:       suma -c -a MAXLOGSIZE_MB=2
     3 To list the SUMA task defaults, type the following:      suma –D
    4 To list the scheduled tasks, type: suma –l

3.1 Fix types
SUMA allows the flexibility for a policy to be set to retrieve one of eight different “fix types”:
• APAR – Specifies a request to download an APAR. An authorized program analysis
report (APAR) number allows you to obtain an update/fix. Operating system commands
are provided to determine if an APAR is installed on your system.
• PTF – Specifies a request to download a PTF. A program temporary fix (PTF) typically
contains multiple fixes (known as APAR’s) and is associated with a single fileset (for
example, bos.mp64). PTF’s are temporary because they will be incorporated into the
next release of the product or maintenance level.
• Critical – Specifies a request to download the latest critical fixes.
• Security – Specifies a request to download the latest security fixes.
• I/O Server – Specifies a request to download the latest fixes for I/O Server virtualization
software.
• Latest – Specifies a request to download all of the latest fixes.
• Fileset – Specifies a request to download a specific fileset.
• Maintenance Level (ML/TL) – Specifies a request to download a specific maintenance level.

3.2 Action
A policy can be set to perform one of three different actions:
• Preview – Specifies a download preview will be performed. No filesets will be
downloaded. In addition to previewing the filesets that would be downloaded, this option
can also be used to generate an e-mail notification listing the fixes that are available on
the IBM ~ Support Web site.
• Download – Specifies that filesets will be downloaded based on the policy.
• Download and Clean – Specifies that filesets will be downloaded based on the policy,
followed by a clean operation. The clean operation will remove filesets that are not
needed from the download target directory, such as updates that have been superseded by
a newer fix level that has been brought down. This can help manage the size of the fix repository.

3.5 Download summary reports
At the completion of a download operation, SUMA displays, logs, or e-mails a summary report
showing the number of fixes that were downloaded successfully, any fixes that failed to
download, and fixes that were skipped because they were already present on the system. A
preview option is also available if you wish to generate a list of fixes that are available on the
IBM ~ Support Web site.

3.6 Scheduling
SUMA downloads can be scheduled or executed immediately. By scheduling a policy, an
unattended download can be setup to conform to a client’s maintenance window. SUMA also
provides support for scheduling policies at flexible intervals such as: hourly, daily, weekly,
monthly, etc. This allows the download to occur at an optimal time or can be used to establish
the frequency to check for the availability of certain fixes.
Scheduled policies can also be designated as repeating. Repeating policies for certain fix types,
such as APAR, PTF, or Maintenance Level will be repeated according to the selected interval,
and then deleted when the specific fix or maintenance level is found. Other fix types, those
released as a group on an ongoing basis, such as Critical, Security, I/O Server and Latest will be
continually repeated at the specified interval until the policy is unscheduled. Policies can also be
scheduled to be non-repeating, in which case they will be run once and then removed from the
system.

3.7 Logging
Another area where SUMA provides a lot of flexibility is logging. SUMA supports six
different verbosity levels that can be uniquely set for sending information to the screen, a log
file, or as a part of an e-mail notification. The levels are listed below, ordered from the least to
the most amount of information displayed.
• OFF – No information is displayed or logged.
• ERROR – Displays error messages and other highly important messages.
• WARNING – Displays warning messages in addition to ERROR messages.
• INFO – Displays informational messages in addition to WARNING messages.
• VERBOSE – Displays verbose informational messages in addition to INFO messages.
• DEBUG – Displays debug output for debugging purposes. This setting is not used for
normal operations.

4.1 Download specific APAR when available
Clients are often required to monitor when a specific APAR that they are interesting in installing
becomes available. SUMA automates this task by periodically checking for the APAR, sending
an e-mail notification with the APAR status, and downloading it when it becomes available.
For example, a client, who has a support contract, opens a problem management record (PMR) to
report a problem. After a service representative verifies the problem, the client often would be
given an APAR number along with an estimate on when the fix will be available. If the problem
is pervasive, the client may also be given an interim fix to use until the official fix becomes
available. The client can now take the APAR number and use the SMIT SUMA menus to setup
a repeating policy to check for the APAR periodically (for example, once a week on Thursday at
3:00am). When the APAR is available, it will be automatically downloaded and the client can
then install it when desired. The client will also receive an e-mail notification of the download,
and the repeating policy will be automatically deleted.
4.2 Download the latest critical fixes periodically
Critical fixes are issued periodically and are grouped for convenience, although they may also be
obtained individually as specific fixes. They include fixes that address security issues or fix
problems that are pervasive in nature. They do not include interim fixes, which are often
provided for pervasive problems until an official fix is available.
For example, clients who wish to monitor the fix distribution site for the latest critical fixes can
setup a repeating SUMA policy to check for critical fixes once a month (or whatever timeframe
is desirable). When new critical fixes become available, they can be downloaded into a client’s
fix repository automatically, and a corresponding e-mail notification can be sent. This type of
repeating policy will remain active until the client decides to remove it since it is not looking for
specific “one-time” information, such as a specific fix.

4.3 Download an entire maintenance level
A maintenance level is a recommended set of fixes that have received extensive testing together.
Clients who choose to download a specific or the latest maintenance level can do this by using
the SMIT SUMA menus to set a policy to have this done when convenient, for example
Thursday at 3:00am during off-peak hours. Comparisons can be performed against an inventory
of software installed on a system, or a directory containing a repository of fixes, so that only the
fixes needed to bring a system to a particular maintenance level will be downloaded.

4.4 Download the latest fixes periodically
Some clients wish to maintain a fix repository that holds all the latest fixes. They can then use
these fixes to periodically update their system to the latest level.
To establish a process that would allow a system to be up-to-date with the current fixes, a SUMA
policy could be setup that would check for new fixes periodically (for example, once a week on
Saturday at 3:00am). When new fixes are available, an unattended download will occur, placing
the fixes in the system’s designated fix repository, and the client will receive an e-mail
notification with the results of the download. Filtering options allow fixes to be downloaded
only for filesets that are installed on the system.
Additionally, a global SUMA configuration setting can be made to remove all superseded
updates from the fix repository at the completion of the download. This provides space
management of the fix repository by deleting fixes that are no longer needed.

4.5 Download the latest version of a particular fileset
Clients often want to ensure that they are running the latest version of a particular fileset, such as
bos.rte.install. Through the SMIT SUMA menus a policy can be set containing the fileset name
and its version number (or “latest” in this case). This allows periodic checks (for example, once
a week on Wednesday at 3:00am) to be made for the latest level of a particular fileset, and for it
to be automatically downloaded if it is not already present on the system. The client may then
install the new fileset when convenient.

4.6 Download a specific version of a particular fileset
Sometimes clients wish to download a specific version of a particular fileset because it may
contain a fix for a particular problem that they are interested in. Through the SMIT SUMA
menus, clients have the ability to perform downloads immediately or schedule them for another
time.
For example, a client may be interested in downloading a specific fileset and version
immediately, for example bos.rte.alt_disk_install.rte 5.2.0.41. An existing policy containing this
request can be run immediately or scheduled for a later time. Likewise, this request for
immediate download can be handled without even creating a policy since this is a one-time
operation that does not have to save the policy for a future attempt. In this case, the information
would simply be entered through the SMIT SUMA menus (or on the command line) prior to
performing the immediate download.
Interim Fix Guidelines/Policy for Maintenance
We will no longer have CSP’s or six months of interim fix support. Interim fixes will continue
to be used for temporary fixes than can be used until your next maintenance window.
Here are the guidelines that the Service team will be following:
• If a client is at the latest level and finds a problem – they can get an Interim Fix
• If a client finds a problem that is already in a SP - they need to install the latest SP (or, at
a minimum, an SP that includes their fix)
• If it is a critical problem and/or the client can't install a SP - an interim fix can be offered
and support will recommend they move to the latest SP during their next maintenance
window
• If a client finds a new, unique problem at any supported level (within the 24 month
support window for a TL) - they can get an Interim Fix on their current level (if it's
possible)
• If a client finds a new unique problem on a prior SP, has multiple Interim Fixes installed,
which are included in later SP - they must move to the latest SP before getting another
Interim Fix
• If a client has multiple Interim Fixes and only some of them are in a later SP - they must
move to the latest SP and another Interim Fix will be bundled with their prior Interim
Fixes on the current level

Unit 1 Checkpoint.

1. What are the four major problem determination steps?

Identify the problem.
Talk to users.
Collect system data.
Resolve the problem.

2. Who should provide information about the problems?

Always talk to the users about the problem to gather as much information as possible.

3. T or F?: If there is a problem with the software, it is necessary to get the next release of
the product to resolve the problem. False. In most cases it is only necessary to apply fixes
or upgrade microcode.

4. T or F?: Documentation can be viewed or downloaded from the IBM Web site. True.

5. How to list a suma task with ID 2? Suma –l 2

6. T o F?: Virtualizarion is part of power 4 architecture. False.

AIX, Advanced Interactive eXecutive, proviene de un intento de IBM de correr UNIX sobre los
mainframe en 1985. De ahí surge el AIX 1.2

Junto con la ODM, implementada en AIX 2.5, se lanzo el smit, para mejor y mas facil
administracion.
ODM: La informacion de los dispositivos fisicos y logicos se mantienen asociados como elementos
de caracteristicas modificables. Es una base de datos que almacena la informacion del sistema.

The ODM manages the following system data:
• Device configuration data
• Software Vital Product Data (SWVPD)
• System Resource Controller Data (SRC)
• TCP/IP configuration data
• Error Log and Dump information
• NIM (Network Installation Manager) information
• SMIT menus and commands
Our main emphasis in this unit is on devices and ODM files that are used to store vital
software product data. During the course many other ODM classes are described.

ODM Database Files:

Predefined device information (supported): PdDv, PdAt, PdCn
Customized device information (configured): CuDv, CuAt, CuDep, CuDvDr, CuVPD,
Config_Rules
Software vital product data: history, inventory, lpp, product
SMIT menus sm_menu_opt, sm_name_hdr, sm_cmd_hdr, sm_cmd_opt
Error log, alog and dump information SWservAt
System Resource Controller SRCsubsys, SRCsubsvr, ...
Network Installation Manager (NIM) nim_attr, nim_object, nim_pdattr
This page shows the ODM object classes used during the configuration of a device.
When an AIX system boots, the cfgmgr is responsible for configuring devices. There is
one ODM object class which the cfgmgr uses to determine the correct sequence when
configuring devices: Config_Rules

Although cfgmgr gets credit for managing devices (adding, deleting, changing, and so
forth) it is actually the Config_Rules object class that does the work through various
methods files.

Mayor / Minor = 22, 1 >> Privado / Publico.

The ODM is made from object classes, which are broken into individual objects and descriptors
AIX offers a command line interface to work with the ODM files. The device information is held in
the customized and the predefined databases (Cu*, Pd*)
To support diskless, dataless and other workstations, the ODM object classes are held in
three repositories:

/etc/objrepos
Contains the customized devices object classes and the four object classes used by the
Software Vital Product Database (SW-VPD) for the / (root) part of the installable
software product. The root part of the software contains files that must be installed on
the target system. To access information in the other directories this directory contains
symbolic links to the predefined devices object classes. The links are needed because
the ODMDIR variable points to only /etc/objrepos. It contains the part of the product that
cannot be shared among machines. Each client must have its own copy. Most of this
software requiring a separate copy for each machine is associated with the configuration of the
machine or product.

/usr/lib/objrepos
Contains the predefined devices object classes, SMIT menu object classes and the four
object classes used by the SW-VPD for the /usr part of the installable software product.
The object classes in this repository can be shared across the network by /usr clients,
dataless and diskless workstations. Software installed in the /usr-part can be shared among
several machines with compatible hardware architectures.

/usr/share/lib/objrepos
Contains the four object classes used by the SWVPD for the /usr/share part of the
installable software product. The /usr/share part of a software product contains files that
are not hardware dependent. They can be shared among several machines, even if the
machines have a different hardware architecture. An example for this are terminfo files
that describe terminal capabilities. As terminfo is used on many UNIX systems, terminfo
files are part of the /usr/share-part of a system product.
This visual summarizes how ODM classes act together.

1. When a device is defined in AIX, the device must be defined in ODM class PdDv.
2. A device can be defined by either the cfgmgr (if the device is detectable), or by the
mkdev command. Both commands use the define method to generate an instance in
ODM class CuDv. The configure method is used to load a specific device driver and to
generate an entry in the /dev directory.
Notice the link PdDvLn from CuDv back to PdDv.
3. At this point you only have default attribute values in PdAt, which means for a terminal
you could not login (default is disable) and the terminal type is dumb. If you change the
attributes, for example, login to enable and term to ibm3151, you get objects describing
the nondefault values in CuAt.

chdev -l tty0 -a term=ibm3151


1: cfgmgr, reconoce el dispositivo instalado.
2: el dispositivo pasa a estar en la lista de “defined devices”.
3: el dispositivo pasa de estar solo en la base de “defined devices” a estar tambien bajo “available
devices”.
4: Device Drivers (DvDr).
5: con: mkdev -c tty -t tty -s rs232, lo pongo en: /dev/device.
The most common device states are:

Undefined - The device is a supported device but is not configured. It does not reside in the
customized database.
Defined - The device has been added to the customized database. It has been allocated a
logical device name, a location code and attributes have been assigned to it. But, it is still
unavailable for use.
Available - The device resides in the customized database. The device is fully configured and is
ready for use.
When a device is first identified, it is configured and put into the Available state.
If a device that has been configured in the past is powered off and the machine is rebooted, the
device will appear in the Defined state. This indicates that the system knows it is supposed to be
there, but because it was not powered on, it cannot be used.
You can control the device states by using smit or the commands mkdev and rmdev.
To put a defined tape device into an available state:
In the smit devices area, use Configure a Defined Tape Device -or-
# mkdev -l rmt0
To move an available tape device to defined:
In the smit devices area, use Remove a Tape Device and set Delete from Database to no
-or-
# rmdev -l rmt0
To permanently remove an available or define tape device:
In the smit devices area, use Remove a Tape Device and set Delete from Database to yes
-or-
# rmdev -dl rmt0
Remember, most Defined devices are the result of not powering on the device before booting. Or,
it could be the device was physically removed, but you never ran rmdev –dl xxxx to remove the
device from the ODM.
cfgmgr is a program that runs during boot that configures devices. It can also be run safely from
the command line on a system that is up and running. cfgmgr identifies all self-configuring devices
as long as they are powered on and matches them to the information in the predefined database. It
then uses the predefined information to complete a customized database entry for the device.
All devices are self-configuring except for parallel and serial devices. So except for things like
printers and ASCII terminals, configuring a device requires only attaching it and power it on before
booting the machine. Since cfgmgr runs during the boot process, no more intervention is required
by the administrator.
You see that for SCSI devices, you need to set a unique SCSI ID on the device before attaching it.
Once that is done, configuration of the device is handled by AIX.

Every logical device is assigned a location code when it is attached to the system. Location codes
depend on the type of device and the adapter to which it connects.
The location code is another way of identifying the physical device.
The location codes exist to provide the system with a method of locating the device and
establishing relationships between devices and their adapters. If a hardware failure occurs, the
location code is often displayed or referred to in the LED.

The format for location codes is:
AB-CD-EF-GH
The length of the location code depends on the type of device. Two pairs indicate an adapter. Four
pairs indicates a device attached to an adapter.
The devices that have been customized in the system are described in the ODM customized
database. Each device has a logical device name, a status, a location and various attributes.

The lsdev -CH command provides information on the resource name, its status (or state),
the address or location, and a brief description of all devices in the customized database.
This list contains those devices that are found on the system.

lscfg -v provides a verbose detailed output of all of the devices on the machines. It includes vital
product data (VPD) which has information like manufacturer, type and model, and part numbers.
Not all devices have VPD.
lsattr -El sys0 provides attributes for the device. In this example, it is providing the attributes for
the kernel. sys0 is the device name of the kernel. To fully document your system you need to run
this command against all devices configured on your machine. For example, to get the attributes of
a hard drive, you need to run lsattr -El hdisk0. It would probably be helpful to create a shell
script to complete this process for you. getconf -a writes the values of all system configuration
variables to standard output.

The status column will contain:
Available: The device is ready and can be used
Defined: The device is unavailable
Devices may appear in a defined state after a restart. If this is the case, it may be due to the
fact that the device is powered off or the fact that the device no longer exists on the system.
Devices with a location code are physical devices. Devices without a location code are logical
devices. Location codes depend on the type of device and the adapter to which the device is
connected.

The lsattr -E -l [resource name] command provides detailed information on the effective
attributes currently configured for specified devices. In the example, it provides configuration
information on the system itself.
The -C option for lsdev pulls the customized information from the ODM.
The -E option for lsattr shows the effective attributes.
The -l option for both commands is the logical device name.
The -c option for both commands is the class of device.
The -a attribute option for the lsattr command displays information for a specific attribute.

Another command that can be used to list information about devices found in the ODM customized
database is lscfg -v. The listing is sorted by parent, child and device location.
Specific hardware information about devices will be listed such as EC level, FRU number, part
number, and so forth. The output also displays the model architecture and bus type.

The first set of digits, AB, defines the bus type that devices are attached to:
• 00 defines resources attached to the processor bus, such as the system planar, the processor,
memory and the primary PCI bus
• 01 defines resources attached to the ISA bus such as the diskette drive, mouse and
keyboard adapters
• 04 defines resources attached to the PCI bus where either there is only one PCI bus or where the
PCI bus can not be determined.
• XY defines resources attached to the XY parent PCI bus, where XY is a two character identify for
the bus determined by the machine designer. For example, a machine may have several PCI buses
each numbered 10, 20, etc. The second set of digits, CD, identify a slot or adapter number. Again,
how this position is used may vary from machine/model to machine/model.
The integrated devices are on the primary PCI bus (start with 10) or on the ISA bus (01).
Their CD positions are fixed unlike on the Model 140 where the letters are assigned in the
order of discover. So, for example, 01-D1 is always the integrated diskette drive and is
attached on the ISA bus. 10-80 is always the integrated SCSI controller (adapter).
Pluggable cards will be attached to one of the two PCI buses. Slots 2 and 3 are on the
primary bus and will start with 10. Cards in Slots 1, 4 or 5 are on the secondary bus and
start with 1P. Each slot has an assigned location code number. To see the assigned
numbers you need to reference the Service Guide. To give one example, a card in slot 1
will have an address of 1P-08.

Important AIX commands
List all adapters and their AIX location codes:
lsdev -Cc adapter
List all slots and what is in them:
lsslot -c pci
Show information about device including physical location code and the AIX location
code:
lscfg -vl xyz
where xyz is the name of a device such as ent0 or ssa0.

Odmget –q …. > file ; vi file ; modifico lo que necesito ; odmdelete –o lo mismo q use con el
odmget ; odmadd file.

Los tipos de atributo estan definidos en PdAt: defined, undefined, etc.

lsdev -CHF quot;name status physloc location descriptionquot;: listo las ubicaciones del hardware del
equipo.

Dispositivos: AB-CD-EF-GH:
AB: bus type/pci parent bus as asssigned by firmware.
CD: Devfuncion number adapter or physical location.
EF: Identifies a Connector ID.
GH: device /FRU/port ID.

X EJ: 01-D1-00-00     diskette drive

00(01,04,XY)    resources (00 attached to processor), 01 (floppy, mouse, Keyb), 04
(attached to PCI only)

01-99: for pluggable adapters/cards. 00: if HACMP, not usable; SCSI ID 7, unusable by others.
EF: Connector ID.
GH: Port Identifier, address memory, modules, device, FRU of device.

Con estos datos sacamos el FRU, field replacement unit.

** Installation guide, service guide & users guide para el kit de emergencias.
los rhd* son raw devices (caracteres), que en los sistemas estan asociados con el device normal
(hd* de blockes).

Checkpoint

1. In which ODM class do you find the physical volume ID's of your
disks? Customized Attributes Database (CuAt)

2. What is the difference between state defined and available? When a device is defined, there
is an entry in the ODM, class CuDv. When a device is available, the device driver has
been loaded. The device driver can be accessed by the entries in the /dev directory.
Mkdev –l =~ cfgmgr (para pasar de definida a disponible)
Rmdev –l rmt0   para pasar de disponible a definida
Rmdev –dl rmt   elimina permanentemente (queda predefinido)


# lsdev -PHx disk           (la “x”, puede ser [C]lass, [S]ubclass, [T]ype)
 class        type          subclass       description
disk          array         dar            7135 Disk Array Device
disk          mpioosdisk    fcp            MPIO Other FC SCSI Disk Drive
disk          array         fdar           2102-F10 Disk Array Device
disk          1080mbDPEA    ide            1.0 GB IDE Disk Drive
disk          540mb         ide            540 MB IDE Disk Drive
disk          540mbDALA     ide            540 MB IDE Disk Drive
disk          540mbWD       ide            540 MB IDE Disk Drive
disk          720mb         ide            720 MB IDE Disk Drive
disk          730mb         ide            730 MB IDE Disk Drive
disk          730mbWD       ide            730 MB IDE Disk Drive
disk          oidisk        ide            Other IDE Disk Drive
odmget –q quot;uniquetype=disk/scsi/scsdquot; PdDv | more
PdDv:
     type = quot;scsdquot;
     class = quot;diskquot;
     subclass = quot;scsiquot;
     prefix = quot;hdiskquot;
     devid = quot;quot;
     base = 1
     has_vpd = 1
     detectable = 1
     chgstatus = 0
     bus_ext = 0
     fru = 1
     led = 0
     setno = 2
msgno = 0
catalog = quot;scdisk.catquot;
DvDr = quot;scdiskquot;
Define = quot;/etc/methods/definequot;
Configure = quot;/etc/methods/cfgscdiskquot;
Change = quot;/etc/methods/chgdiskquot;
Unconfigure = quot;/etc/methods/ucfgdevicequot;
Undefine = quot;/etc/methods/undefinequot;
Start = quot;quot;
Stop = quot;quot;
inventory_only = 0
uniquetype = quot;disk/scsi/scsdquot;
odmget CuAt | grep -ipw hdisk0
CuAt:
      name = quot;hdisk0quot;
      attribute = quot;pvidquot;
      value = quot;00ce122f3983cdce0000000000000000quot;
      type = quot;Rquot;
      generic = quot;Dquot;
      rep = quot;squot;
      nls_index = 11

ls -l /dev/*disk0
brw------- 1 root system         17, 1 May 22 18:00 /dev/hdisk0
crw------- 2 root system         17, 1 May 22 17:51 /dev/rhdisk0

lsvg -l rootvg
rootvg:
LV NAME             TYPE       LPs PPs PVs LV STATE     MOUNT POINT
hd5              boot       2    2   1 closed/syncd N/A
hd6              paging      64 64 1 open/syncd N/A
hd8              jfs2log    1    1   1 open/syncd N/A
hd4              jfs2      2    2   1 open/syncd /
hd2              jfs2      146 146 1 open/syncd /usr
hd9var            jfs2      2    2   1 open/syncd /var
hd3              jfs2      5    5   1 open/syncd /tmp
hd1              jfs2      6    6   1 open/syncd /home
hd10opt            jfs2      9    9   1 open/syncd /opt

odmget CuDep | grep -ipw rootvg
CuDep:
    name = quot;rootvgquot;
    dependency = quot;hd5quot;
CuDep:
    name = quot;rootvgquot;
    dependency = quot;hd6quot;
CuDep:
    name = quot;rootvgquot;
    dependency = quot;hd8quot;
CuDep:
    name = quot;rootvgquot;
    dependency = quot;hd4quot;
CuDep:
    name = quot;rootvgquot;
    dependency = quot;hd2quot;
CuDep:
    name = quot;rootvgquot;
    dependency = quot;hd9varquot;
CuDep:
    name = quot;rootvgquot;
    dependency = quot;hd3quot;
CuDep:
    name = quot;rootvgquot;
    dependency = quot;hd1quot;
CuDep:
    name = quot;rootvgquot;
    dependency = quot;hd10optquot;
The Predefined Devices (PdDv) object class contains entries for all devices supported by
the system. A device that is not part of this ODM class could not be configured on an AIX
system.

The attributes you should know about are:
Type: Specifies the product name or model number (for example 8mm (tape)).
Class: Specifies the functional class name. A functional class is a group of device instances sharing
the same high-level function.
For example, tape is a functional class name representing all tape devices.
Subclass: Device classes are grouped into subclasses. The subclass scsi specifies all tape devices
that may be attached to an SCSI system. BKM2MIF
Prefix: Specifies the Assigned Prefix in the customized database, which is used to derive the device
instance name and /dev name. For example, rmt is the prefix name assigned to tape devices.
Names of tape devices would then look like rmt0, rmt1, or rmt2.
Base: This descriptor specifies whether a device is a base device or not. A base device is any
device that forms part of a minimal base system. During system boot, a minimal base system is
configured to permit access to the root volume group and hence to the root file system. This
minimal base system can include, for example, the standard I/O diskette adapter and a SCSI hard
drive. The device shown in the picture is not a base device.
This flag is also used by the bosboot and savebase command, which are introduced in the next
unit.
Detectable: Specifies whether the device instance is detectable or undetectable. A device whose
presence and type can be determined by the cfgmgr once it is actually powered on and attached
to the system, is said to be detectable. A value of 1 means that the device is detectable, and a
value of 0 that it is not (for example, a printer or tty).
Led: Indicates the value displayed on the LEDs when the configure method begins to run. The
value stored is decimal, the value shown on the LEDs is hexadecimal (2418 is 972 in hex).
setno, msgno: Each device has a specific description (for example, 4.0 GB 8mm Tape Drive) that
is shown when the device attributes are listed by the lsdev command. These two descriptors are
used to lookup the description in a message catalog.
Catalog: Identifies the file name of the NLS (national language support) catalog. The LANG
variable on a system controls which catalog file is used to show a message. For example, if LANG is
set to en_US, the catalog file /usr/lib/nls/msg/en_US/devices.cat is used. If LANG is de_DE, catalog
/usr/lib/nls/msg/de_DE/devices.cat is used.
DvDr: Identifies the name of the device driver associated with the device (for example, tape).
Usually, device drivers are stored in directory /usr/lib/drivers. Device drivers are loaded into the
AIX kernel when a device is made available.
Define: Names the define method associated with the device type. This program is called when a
device is brought into the defined state.
Configure: Names the configure method associated with the device type. This program is called
when a device is brought into the available state.
Change: Names the change method associated with the device type. This program is called when
a device attribute is changed via the chdev command.
Unconfigure: Names the unconfigure method associated with the device type. This program is
called when a device is unconfigured by rmdev.
Undefine: Names the undefine method associated with the device type. This program is called
when a device is undefined by rmdev.
Start, Stop: Few devices support a stopped state (only logical devices). A stopped state means
that the device driver is loaded, but no application can access the device. These two attributes
name the methods to start or stop a device.
Uniquetype: A key that is referenced by other object classes. Objects use this descriptor as
pointer back to the device description in PdDv. The key is a concatenation of the class, subclass
and type values.
The Predefined Attribute object class contains an entry for each existing attribute for each device
represented in the PdDv object class. An attribute is any device-dependent information, such as
interrupt levels, bus I/O address ranges, baud rates, parity settings or block sizes. The extract out
of PdAt shows three attributes (block size, physical volume identifier and terminal name) and their
default values.
The meanings of the key fields shown on the visual are as follows:
Uniquetype: This descriptor is used as a pointer back to the device defined in the PdDv object
class.
Attribute: Identifies the name of the attribute. This is the name that can be passed to the mkdev
or chdev commands. For example to change the default name of dumb to ibm3151 for a
terminal name, you can issue:
# chdev -l tty0 -a term=ibm3151
deflt Identifies the default value for an attribute. Nondefault values are stored in CuAt.
Values: Identifies the possible values that can be associated with the attribute name. For example,
allowed values for the block_size attribute range from 0 to 245760, with an increment of 1.

The Customized Devices (CuDv) object class contains entries for all device instances defined in the
system. As the name implies, a defined device object is an object that a define method has created
in the CuDv object class. A defined device object may or may not have a corresponding actual
device attached to the system.
CuDv object class contains objects that provide device and connection information for each device.
Each device is distinguished by a unique logical name. The customized database is updated twice,
during system bootup and at run time, to define new devices, remove undefined devices and
update the information for a device that has changed.
The key descriptors in CuDv are:
name A customized device object for a device instance is assigned a unique logical name to
distinguish the device from other devices. The visual shows two devices, a tape device rmt0 and a
tty, tty0.
Status: Identifies the current status of the device instance. Possible values are:
- status = 0: Defined
- status = 1: Available
- status = 2: Stopped
chgstatus: This flag tells whether the device instance has been altered since the last system boot.
The diagnostics facility uses this flag to validate system configuration. The flag can take these
values:
- chgstatus = 0: New device
- chgstatus = 1: Don't care
- chgstatus = 2: Same
- chgstatus = 3: Device is missing
ddins: This descriptor typically contains the same value as the Device Driver Name descriptor in
the Predefined Devices (PdDv) object class. It specifies the name of the device driver that is loaded
into the AIX kernel.
Location: Identifies the physical location of a device. The location code is a path from the system
unit through the adapter to the device. In case of a hardware problem, the location code is used by
technical support to identify a failing device. In many RS/6000 systems the location codes are
labeled in the hardware, to facilitate the finding of devices.
Parent: Identifies the logical name of the parent device. For example, the parent device of rmt0 is
scsi0.
Connwhere: Identifies the specific location on the parent device where the device is connected.
For example, the device rmt0 uses the SCSI address 1,0.
PdDvLn: Provides a link to the device instance's predefined information through the uniquetype
descriptor in the PdDv object class.
Customized Atributes (CuAt)


The Customized Attribute object class contains customized device-specific attribute information.
Devices represented in the Customized Devices (CuDv) object class have attributes found in the
Predefined Attribute (PdAt) object class and the CuAt object class. There is an entry in the CuAt
object class for attributes that take customized values. Attributes taking the default value are
found in the PdAt object class. Each entry describes the current value of the attribute.
These objects out of the CuAt object class show two attributes that take customized values.
The attribute login has been changed to enable. The attribute pvid shows the physical volume
identifier that has been assigned to disk hdisk0.
System Initialization

After powering on a machine the hardware is checked and initialized. This phase is called the POST
(Power-On Self Test). The goal of the POST is to verify the functionality of the hardware.
After the POST is complete, a boot logical volume (BLV or boot image) is located from the
boot list and is loaded into memory. During a normal boot, the location of the BLV is usually a hard
drive. Besides hard drives, the BLV could be loaded from tape or CD-ROM. This is the case when
booting into maintenance or service mode. If working with NIM (network install manager), the BLV
is loaded via the network.
To use an alternate boot location you must invoke the appropriate boot list by depressing f5/f6
function keys during the boot process. There is more information on boot lists, later in the unit.
Passing control to the boot logical volume means that one component of the boot logical volume,
the AIX kernel, gets control over the boot process. The components of the BLV are discussed later
in the unit.
All devices are configured during the boot processes. This is done in different phases by the
cfgmgr.
At the end, the init process is started and processes the /etc/inittab file.

Loading a boot image:


The AIX kernel is the core of the operating system and provides basic services like process,
memory and device management. The AIX kernel is always loaded from the boot logical volume.
There is a copy of the AIX kernel in the hd4 file system (under the name /unix), but this program
has no role in system initialization. Never remove /unix, because it's used for rebuilding the kernel
in the boot logical volume.
The boot commands are programs that are called during the boot process. Examples are bootinfo,
cfgmgr and more.
The boot logical volume contains a reduced copy of the ODM. During the boot process many
devices are configured before hd4 is available. For these devices the corresponding ODM files must
be stored in the boot logical volume.
After starting the kernel, the boot script rc.boot gets control over the boot process. This is
explained in the System Initialization Part II Unit.
You can use the command bootlist or diag from the command line to change or display the boot
lists. You can also use the System Management Services (SMS) programs.
1. bootlist command
The bootlist command is the easiest way to change the boot list. The first example shows how to
change the boot list for a normal boot. In this example, we boot either from hdisk0 or hdisk1. To
query the boot list, you can use the option -o which was introduced in AIX 4.2.
The next example shows how a service boot list can be set.

2. diag command
The diag command is part of the package bos.rte.diag which allows diagnostic tasks.
One part of these diagnostic tasks allows for displaying and changing boot lists. Working with the
diag command is covered later in the course. The custom boot list is the normal boot list set via
the bootlist command, the diag command or the SMS programs. The normal boot list is used
during a normal boot. The default boot list is called when F5 or F6 is pressed during the boot
sequence. Other machines, in addition to the default boot list and the custom boot list, allow for a
customized service boot list. This is set using mode service with the bootlist command. The
default boot list is called when F5 is pressed during boot. The service boot list is called when F6 is
pressed during boot.

You can also change the boot list with the System Management Services. The SMS programs
are integrated into the hardware (they reside on ROM).
The picture shows how to start the System Management Services in graphic mode. After
power-on you need to press F1 to start up the graphic version of the System Management
Services. You must press this key when a graphic logo and some icons appear and the tone is
heard.
If your model does not have a graphic adapter, you need to set up an ASCII terminal on the S1
port. In this case a text version of the System Management Services will be started on your
terminal.
In the System Management Service menu, select Boot or Multiboot (model dependant) to work
with the boot list. The look of the menu differs on the various models and firmware levels.
RS/6000's support up to five boot devices. Some models only support four.
A default boot list is stored with the following sequence:
1. Diskette drive
2. CD-ROM
3. Internal disk
4. Communication adapter (like Ethernet or token-ring)
To set a new boot sequence, type the sequence number in the new column.
Be sure to save your changes before exiting.

IBM's family of SMP servers includes a service processor. This processor allows actions to occur
even when the regular processors are down.
The SMP servers can be set up to automatically call an IBM support center (or any other site) in
case of a boot failure. An automatic transmittal of boot failure information takes place. This
information includes LED codes and service request numbers, that describe the cause of the boot
failure.
If the data is sent to an IBM Service Center, the information is extracted and placed in a problem
record. IBM Service personnel will call the customer to find out if assistance is requested.
A valid service contract is a prerequisite for this dial-out feature of the service processor.
Other features of the service processor are:
• Console mirroring to make actions performed by a remote technician visible and controllable by
the customer.
• Remote as well as local control of the system (power-on/off, diagnostics, reconfiguration,
maintenance).
• Run-time hardware and operating system surveillance. If, for example, a CPU fails, the service
processor would detect this, reboot itself automatically and run without the failed CPU.
• Timed power-on and power-off, reboot on crash, reboot on power loss.
Before discussing LED/LCD codes that are shown during the boot process we want to identify how
a system can be accessed that will not boot. The maintenance mode can be started from an AIX
CD, an AIX bootable tape (like an mksysb) or a network device, that has been prepared on a NIM
master. The devices that contain the boot media must be stored in the boot lists.
To boot into maintenance modes:
• Newer PCI systems support the bootlist command and booting from a mksysb tape, but the
tape device is by default not part of the boot sequence.
• Verify your boot list, but do not forget that some machines do not have a service boot list. Check
that your boot device is part of the boot list:
# bootlist -m normal –o
• If you want to boot from your internal tape device you need to change the boot list because the
tape device by default is not part of the boot list. For example:
# bootlist -m normal cd0 rmt0 hdisk0
• Insert the boot media (either tape or CD) into the drive.
• Power on the system. The system begins booting from the installation media. After several
minutes, c31 is displayed in the LED/LCD panel. After a few minutes you will see the Installation
and Maintenance menu.


When booting in maintenance mode you first have to identify the system console that will be used,
for example your lft terminal or a tty that is attached to the S1 port.
After selecting the console the Installation and Maintenance menu is shown.
As we want to work in maintenance mode, we use selection 3 to start up the Maintenance menu.
From this point we access our rootvg to execute any system recovery steps that may be
necessary.
Let’s Review
1. T/F? You must have AIX loaded on your RS/6000 to use the System Management
Services Programs. False
2. Your RS/6000 is currently powered off. AIX is installed on hdisk1 but the boot list is set
to boot from hdisk0. How can you fix the problem and make the machine boot from
hdisk1? bootlist –m normal –o hdisk1
3. Your machine is booted and you are sitting at the # prompt. What is the command that
will display the boot list? How could you change the boot list? bootlist -m normal –o ; bootlist -
m normal cd0 hdisk0 hdisk1
4. What command is used to fix the boot logical volume? bosboot -ad /dev/hdisk0
5. What script controls the boot sequence? rc.boot

** Rs6000 system overview - licensed internal code course… Problem determination tools - SMS
manual.

Elemental que el sysdump/vuelcos de memoria tenga lugar en disco suficiente.
Se pueden subir a la redIBM directamente para ser analizados.

Con el alog puedo ver los codigos de error de booteo.

www-1.ibm.com/servers/eserver/pseries/library/hardware_docs

buscar el boton de reset para cada equipo en los manuales… 520

FRU = Field Replaceable Unit SRN = Service Request Number

El firmware se puede actualizar mediante la SMS, HMC o el sistema operativo. En el tercer caso, el
OS debe ser apagado.

3 tipos de fw upgrade: server, I/O and subsystem…

Hacer simulacros de backup, para entrenamiento de los Hands and Eyes. Booteando con el cd del
OS puesto, gano root.

1. During the AIX boot process, the AIX kernel is loaded from the root file system. True or False?
1. False. The AIX kernel is loaded from hd5, BLV.

2. A service processor allows actions to occur even when the regular processors are down, T or F?
2. True, requiere un modem conectado al puerto serial 2.

3. How do you boot an AIX machine in maintenance mode?
3. You need to boot from AIX para cinta, mksysb para CD o DVD, o NIM server

Abro el manual de instalacion, le digo la ubicación en el edificio, en el rack, el numero de serie, el
CD1 del sistema operativo correspondiente, le digo que abra el cdrom con el clip, prenda la
maquina, y tenga apretado F1, entro a SMS, elijo la opcion 3 y el modo q necesito dentro del SMS.

4. Your machine keeps rebooting and repeating the POST. What can be the reason for this?
4. Lista de booteo invalida o se corrompio el hd5 (bootlist -ad) o fallas de hardware.

During the boot process a boot logical volume is loaded into memory.
Boot devices and sequences can be updated via the bootlist-command and the diag-command.
The boot logical volume contains an AIX kernel, an ODM and a boot script rc.boot that controls
the AIX boot process.
The boot logical volume can be re-created using the bosboot command.
LED codes produced during the boot process can be used to diagnose boot problems. PCIs
additionally use visual boot signals.

Desde WSM, cerrar particion, activar, clickear “abrir ventana”. Esperar secuencia de booteo y
presionar F5/F6 al toque!! *antes hay q desde el WSM / Hypervisor, pasar la unidad de CD a la
maquina que vamos a bootear.;

Diagnostic information for multiple bus systems.

Booteando con el CD, van a salir los carteles de la instalacion, primero:
******* Please define the system console ******
“Type a 1 and press enter to use this terminal as the system console”
y luego:
1 Access a Root Volume Group          Perform corrective actions
2 Copy a System Dump to Media
3 Access Advanced Maintenance
4 Install from a System Backup         Recover data

3: Welcome to Base Operating System
Installation and Maintenance
>>> 1 Start Install Now with Default Settings
2 Change/Show Installation Settings and Install
3 Start Maintenance Mode for System Recovery

1. Access this Volume Group and start a shell – Si elijo la opcion 2, no monta los
filesystems, y por mas que corra el fsck, , el hd5 NUNCA voy a poder chequearlo con
fsck.
Si entre a la opcion 2, no tengo nada! En este punto puedo hacer un fsck y“exit” y tendre los FS
montados otra vez.
# bosboot -ad /dev/hdisk0 ; sync
# shutdown –Fr
Las unidades de cinta pueden estar vinculadas junto con los discos al dispositivo scsi. Hay que
tener mucho cuidado al desvincular una cinta de una LPAR, ya que no es de la misma simpleza que
remover un CDROM, porque al desasignar la rama entera, pueden quedar los discos desvinculados.
REVISAR!!

Unica opcion para no depender del CD del OS booteable (CD1) , seria tener un MKSYSB booteable.

JFS Log almacena los punteros de los inodos a los datos.

El bootlv contiene 3 archivos: ramfs, mini kernel y mini ODM.

Cfgmgr agrega el dispositivo al /dev, con mayor y menor lo sube a memoria, lo que pone el device
available.

RAMFS files are accessed using a prefix of /../ . For example to access the fsck command in the
RAMFS (before the /usr file system is mounted) rc.boot uses /../usr/sbin/fsck.

Puede ser que haya que configurar la terminal: vt100, 3151, lft, etc.
Una vez recibidos los codigos c31-c34, no apareceran mas LEDs…
…Y continua con la ejecucion del initttab:
:
init:2:initdefault:
brc::sysinit:/sbin/rc.boot 3 >/dev/console 2>&1 # Phase 3 of system boot
powerfail::powerfail:/etc/rc.powerfail 2>&1 | alog -tboot > /dev/console # Power Failure Detection

                   (1) /etc/init from ramfs, in the boot image     rc.boot 1 >

cfgmgr  cfgmgr + mkdev   rmdev –l   rmdev –dl
undef def              avail    def        undef

RSPC no puede ejecutar AIX5.3, solo hasta 5.2 igual que todos los *pc (arq PCI). distinto de chrp.

*** El /home es lo utlimo en montarse. ***

                                                         pp_login enable       Launch a recovering login on a
# shconf -E -l prio
sh_pp     disable   Enable Process Priority Problem      console
pp_errlog disable    Record error events in the Error    pp_lto   2         Detection Time-out
Log file                                                 pp_lprio 56         Process Priority
pp_eto    2        Detection Time-out                    pp_lterm /dev/tty0 Terminal Device
pp_eprio 60         Process Priority                     pp_cmd     disable    Launch a command
pp_warning disable     Display a warning message on a    pp_cto   2         Detection Time-out
console                                                  pp_cprio 60         Process Priority
pp_wto     2        Detection Time-out                   pp_cpath /          Script
pp_wprio 60          Process Priority                    pp_reboot disable      Automatically REBOOT system
pp_wterm /dev/console Terminal Device                    pp_rto   5         Detection Time-out
                                                         pp_rprio 39         Process Priority

todo lo que esta como respawn en el inittab, tiene el tiempo de respawn seteado con el shconf en
el shdaemon.                  Physical Volume States
1 From where is rc.boot 3 run?
/sbin/rc.boot in rootvg, and is invoked by inittab

2 Your system stops bootin with led 557:in which rc.boot phase does the system stop?
Rc.boot 2
What are some reasons for this problem?
Damaged filesystem, corrupted JFS Log, Corrupted BLV.

3 Which ODM file is used by the cfmgr during boot to configure the devices in the correct
sequence?
Config_rules

4 What does the line init:2:initdefault: in /etc/inittab mean?
This line is used by default the init process., to determine the initial run level
(2=multiuser)

After the BLV is loaded into RAM, the rc.boot script is executed three times to configure the
system.
During rc.boot 1 devices to varyon the rootvg are configured.
During rc.boot 2 the rootvg is varied on.
In rc.boot 3 the remaining devices are configured.
Processes defined in /etc/inittab file are initiated by the init process
1. File system full?
A full / or /tmp file system might cause a boot problem. This is very easy to fix. Boot in
maintenance mode, access the rootvg with file systems and cleanup or increase the file
system sizes.
2. /etc/inittab corrupt? /etc/environment corrupt?
A LED of 553 mostly indicates a corrupted /etc/inittab file, but in some cases a bad
/etc/environment may also lead to a 553. To fix this problem boot in maintenance mode
and check both files. Consider using a mksysb to retrieve these files from a backup tape.
3. Boot logical volume corrupt? JFS log corrupt?
The next thing to try if your machine does not boot, is to check the boot logical volume
and JFS log.
To fix a corrupted boot logical volume, boot in maintenance mode and use the bosboot
command:
# bosboot -ad /dev/hdisk0
To fix a corrupted JFS log, boot in maintenance mode and access the rootvg but do not
mount the file systems. In the maintenance shell issue the logform command and do a
file system check for all file systems that use this JFS log:
# logform /dev/hd8
# fsck -y /dev/hd4
# fsck -y /dev/hd2
# fsck -y /dev/hd3
# fsck -y /dev/hd1
# fsck -y /dev/hd9var
exit
The logform command initializes a new JFS transaction log and this may result in loss
of data, because JFS transactions may be destroyed. But, your machine will boot afterwards,
because the JFS log has been repaired.
4. Superblock corrupt?
Another thing you can try is to check the superblocks of your rootvg file systems. If you
boot in maintenance mode and you get error messages like Not an AIX file system or
Not a recognized file system type it is probably due to a corrupt superblock in the file
system.
Each file system has two super blocks, one in logical block 1 and a copy in logical block
31. To copy the superblock from block 31 to block 1 for the root file system, issue the
following command:
# dd count=1 bs=4k skip=31 seek=1 if=/dev/hd4 of=/dev/hd4
5. rootvg locked?
Many LVM commands place a lock into the ODM to prevent other commands working on
the same time. If a lock remains in the ODM due to a crash of a command, this may lead
to a hanging system.
To unlock the rootvg, boot in maintenance mode and access the rootvg with file systems,
And issue the following command to unlock the rootvg:
# chvg -u rootvg
6. ODM files missing?
If you see LED codes in the range 523 to 534 ODM files are missing on your machine.
Use a mksysb tape of the system to restore the missing files.
7. Mount of /usr or /var failed?
An LED of 518 indicates that the mount of the /usr or /var file system failed. If /usr is
mounted from a network, check the network connection. If /usr or /var are locally
mounted, use fsck to check the consistency of the file systems. If this does not help
check the hardware (diag).
Two different volume group types are available:
• Normal volume groups: When creating a volume group with smit or using the mkvg
command, without specifying option -B, a normal volume group is created.
The maximum number of logical volumes in a normal volume group is 256.
• Big volume groups: This volume group type has been introduced with AIX 4.3.2. A big
volume group must be created with mkvg -B.
A big volume group cannot be imported into an AIX 4.3.1 or lower versions.
The maximum number of logical volumes in a big volume group is 512.
Volume groups are created with the mkvg command. Here are some examples:

1. Create a normal volume group datavg, that contains a disk hdisk2:
# mkvg -s 16 -t 2 -y datavg hdisk2

• The option -s 16 specifies a partition size of 16 MB.
• The option -t 2 is a factor that must be multiplied by 1016. In this case the option indicates that
the maximum number of partitions on a disk is 2032. That means that the volume group can
have up to 16 disks. Each disk must be less than 4064 megabytes (2032 x 2).
• The option -y specifies the name of the volume group (datavg).

2. Create a big volume group bigvg with three disks:
# mkvg -B -t 16 -y bigvg hdisk2 hdisk3 hdisk4

• The option -B specifies that we are creating a big volume group.
• The option -t 16 indicates that the maximum number of partitions on a disk is 16256.
That means that the volume group can have up to 8 disks.
• The option -y specifies the name of the volume group.
Volume groups characteristics could be changed with the chvg command. For example, to
change a normal volume group datavg into a big volume group, the following command
must be executed:
# chvg -B datavg

Logical volumes can be mirrored, that means each logical partition gets more than one associated
physical partition. The maximum ratio is 1:3; that means one logical partition has three associated
physical partitions.
The picture shows a two-disk mirroring of a logical volume. An application writes data to the disk
which is always handled by the LVM. The LVM recognizes that this partition is mirrored. The data
will be written to both physical partitions. If one of the disks fails, there will be at least one good
copy of the data.
Striping is an LVM feature where the partitions of the logical volume are spread across different
disks. The number of disks involved is called stripe width.
Striping works by splitting write and read requests to a finer granularity, named stripe size.
Strip sizes may vary from 4 KB to 128 KB. A single application write or read request is divided into
parallel physical I/O requests. The LVM fits the pieces together by tricky buffer management.
Striping makes good sense, when the following conditions are true:
• The disks use separate adapters. Striping on the same adapter does not improve the performance
very much.
• The disks are equal in size and speed.
• The disks contain striped logical volumes only.
• Accessing large sequential files. For writing or reading small files striping does not improve the
performance.
The LVM uses three different disk control blocks.

1. The Volume Group Descriptor Area (VGDA) is the most important data structure of the LVM.
It is kept redundant on each disk that is contained in a volume group. Each disk contains the
complete allocation information of the entire volume group.
2. The Volume Group Status Area (VGSA) is always present, but is only used when mirroring
has been setup. It tracks the state of the mirrored copies, that means whether the copies are
synchronized or stale.
3. The Logical Volume Control Blocks (LVCB) resides at the first 512 bytes of each logical
volume. If raw devices are used (for example, many database systems use raw logical volumes), be
careful that these programs do not destroy the LVCB.

The LVM uses identifiers for disks, volume groups, and logical volumes. As volume groups could be
exported and imported between systems, these identifiers must be unique worldwide.
The volume groups identifiers (VGID) have a length of 32 bytes.
Hard disk identifiers have a length of 32 bytes, but currently the last 16 bytes are unused and are
all set to 0 in the ODM.
If you ever have to manually update the disk identifiers in the ODM, do not forget to add 16 zeros
to the physical volume ID.
The logical volume identifiers consist of the volume group identifier, a period and the minor number
of the logical volume.
All identifiers are based on the CPU ID of the creating host and a timestamp.

Use these values with smit mklv:

Logical Volume NAME mirrorlv
Number of LOGICAL PARTITIONS: 2
Number of COPIES of each logical partition: 2
[Allocate each logical partition copy on a SEPARATE physical volume]**
**You may need to set this to no if you only have one physical volume in your volume group.

To see the partitions:
lslv -m mirrorlv
To remove the logical volume:
rmlv mirrorlv
2. Use these values with smit mklv:
Logical Volume NAME                                lvtmp1
Number of LOGICAL PARTITIONS                       1
POSITION on physical volume ***
***Select a region that is available. You determined this with lspv -p hdiskX.
To check the position of lvtmp1: lspv -p hdiskX
3. Change the value of POSITION on physical volume. Use smit chlv.
Did the partitions move? lspv -p hdiskX
Reorganize the logical volume: reorgvg rootvg lvtmp1
4. To create the logical volume using an allocation map:
Create the map file: vi /tmp/lvtmp2map
Add the free partitions that you identified into the allocation file. For example, hdisk0:22-23
Next, use smit mklv and modify the screen to use your map file:
File containing ALLOCATION MAP /tmp/lvtmp2map
The LVM uses three different disk control blocks.
1. The Volume Group Descriptor Area (VGDA) is the most important data structure of the
LVM. It is kept redundant on each disk that is contained in a volume group. Each disk contains the
complete allocation information of the entire volume group.
2. The Volume Group Status Area (VGSA) is always present, but is only used when mirroring
has been setup. It tracks the state of the mirrored copies, that means whether the copies are
synchronized or stale.
3. The Logical Volume Control Blocks (LVCB) resides at the first 512 bytes of each logical
volume. If raw devices are used (for example, many database systems use raw logical volumes), be
careful that these programs do not destroy the LVCB.

Object Data Manager (ODM)
Physical volumes, volume groups and logical volumes are represented as devices (Customized
devices) CuDv, CuAt, CuDvDr, CuDep
AIX Files
/etc/vg/vgVGID Handle to the VGDA copy in memory
/dev/hdiskX Special file for a disk
/dev/VGname Special file for administrative access to a VG
/dev/LVname Special file for a logical volume
/etc/filesystems Used by the mount command to associate LV name, JFS log and mount point


The most important data structure is the physical partition map. It maps each logical partition to a
physical partition. The size of the physical partition map is determined at volume group creation
time (depending on the number of disks that can be in the volume group, specified by mkvg -d).
This size is a hard limit when trying to extend the volume group.
The command lqueryvg is a low-level command that shows an extract from the VGDA on a disk,
for example hdisk1. As you notice, the visual is not complete. Use the following unordered
expressions and try to put each expression to the corresponding number in the picture.
•   VGDA count on disk
•   3 VGDAs in VG
•   Automatic varyon during boot
•   3 LVs in VG
•   PP size = 16 MB
•   Quorum check on
•   LVIDs (VGID.minor_number)
•   2 PVs in VG
•   PVIDs

The LVCB stores attributes of a logical volume. The command getlvcb queries an LVCB, for
example the logical volume hd2. For example:
• Intrapolicy (c = Center)
• Number of copies (1 = No mirroring)
• Interpolicy (m = Minimum)
• LVID
• LV name (hd2)
• Number of logical partitions (103)
• Can the partitions be reorganized ? (relocatable = y)
• Each mirror copy on a separate disk (strict = y)
• Number of disks involved in striping (stripe width)
• Stripe size
• Logical volume type (type = jfs)
• JFS file system information
• Creation and last update time
ODM Entries for Volume Groups

# odmget -q quot;name like hdisk?quot; CuDv
CuDv:
name = quot;hdisk0quot;
status = 1
chgstatus = 2
ddins = quot;scdiskquot;
location = quot;04-C0-00-2,0quot;
parent = quot;scsi0quot;
connwhere = quot;2,0quot;
PdDvLn = quot;disk/scsi/osdiskquot;
CuDv:
name = quot;hdisk1quot;
status = 1
chgstatus = 2
ddins = quot;scdiskquot;
location = quot;04-C0-00-3,0quot;
parent = quot;scsi0quot;
connwhere = quot;3,0quot;
PdDvLn = quot;disk/scsi/osdiskquot;

# odmget -q quot;name=hdisk0 and attribute=pvidquot; CuAt
CuAt:
name = quot;hdisk0quot;
attribute = quot;pvidquot;
value = quot;250000010700040b000c0d0000000000quot;
type = quot;Rquot;
generic = quot;Dquot;
rep = quot;squot;
nls_index = 2

The disk’s most important attribute is the PVID.
The PVID has a length of 32 bytes, where the last 16 bytes are set to zeros in the ODM.
Whenever you must manually update a PVID in the ODM you must specify the complete 32-byte
PVID of the disk.
Other attributes (for example, SCSI command queue depth, timeout values) may occur in CuAt.

# odmget -q quot;value3 like hdisk?quot; CuDvDr
CuDvDr:
resource = quot;devnoquot;
value1 = quot;12quot;
value2 = quot;1quot;
value3 = quot;hdisk0quot;
CuDvDr:
resource = quot;devnoquot;
value1 = quot;12quot;
value2 = quot;2quot;
value3 = quot;hdisk1quot;
# ls -l /dev/hdisk*
brw------- 1 root system 12, 1 08 Jan 06:56 /dev/hdisk0
brw------- 1 root system 12, 2 08 Jan 07:12 /dev/hdisk1
The ODM class CuDvDr is used to store the major and minor numbers of the devices.
Applications or system programs use the special files to access a certain device.

# odmget -q quot;name=rootvgquot; CuDv
CuDv:
name = quot;rootvgquot;
status = 0
chgstatus = 1
ddins = quot;quot;
location = quot;quot;
parent = quot;quot;
connwhere = quot;quot;
PdDvLn = quot;logical_volume/vgsubclass/vgtypequot;

# odmget -q quot;name=rootvgquot; CuAt
CuAt:
name = quot;rootvgquot;
attribute = quot;vgserial_idquot;
value = quot;0009301300004c00000000e63a42b585quot;
type = quot;Rquot;
generic = quot;Dquot;
rep = quot;squot;
nls_index = 2

# odmget -q quot;name=rootvgquot; CuAt
CuAt:
name = quot;rootvgquot;
attribute = quot;pvquot;
value = quot;00008371d667a44b0000000000000000quot;
type = quot;Rquot;
generic = quot;Dquot;
rep = quot;squot;
nls_index = 2
CuAt:
name = quot;rootvgquot;
attribute = quot;pvquot;
value = quot;00008371d11226670000000000000000quot;
type = quot;Rquot;
generic = quot;Dquot;
rep = quot;squot;
nls_index = 2

The existence of a volume group is stored in CuDv, that means all volume groups must have an
object in this class.
One of the most important pieces of information is the VGID, which is stored in CuAt.
All disks that belong to a volume group are stored in CuAt.

Attributes of a logical volume, for example its LVID, are stored in the object class CuAt.
Other attributes that belong to a logical volume are the intra-policy, stripe_width or the size.

All logical volumes have an object in CuDvDr that is used to create the special file entries in /dev.
The ODM class CuDep (customized dependencies) stores dependency information for software
devices, for example, the logical volume hd2 is contained in the rootvg volume group.
If you detect ODM problems you must identify whether the volume group is the rootvg or not.
Because the rootvg cannot be varied off, this procedure applies only to non-rootvg volume groups.
1. In the first step, you vary off the volume group, which requires that all file systems must be
unmounted first. To vary off a volume group, use the varyoffvg command.
2. In the next step, you export the volume group by using the exportvg command. This
command removes the complete volume group from the ODM. The VGDA and LVCB are not
touched by exportvg.
3. In the last step, you import the volume group by using the importvg command. Specify
the volume group name with option -y, otherwise AIX creates a new volume group name.
You need to specify only one intact physical volume of the volume group that you import.
The importvg command reads the VGDA and LVCB on that disk and creates completely new ODM
objects.

If the ODM problem is in the rootvg, use rvgrecover:
PV=hdisk0
VG=rootvg
cp /etc/objrepos/CuAt /etc/objrepos/CuAt.$$
cp /etc/objrepos/CuDep /etc/objrepos/CuDep.$$
cp /etc/objrepos/CuDv /etc/objrepos/CuDv.$$
cp /etc/objrepos/CuDvDr /etc/objrepos/CuDvDr.$$
lqueryvg -Lp $PV | awk '{print $2}' | while read LVname;
do
odmdelete -q quot;name=$LVnamequot; -o CuAt
odmdelete -q quot;name=$LVnamequot; -o CuDv
odmdelete -q quot;value3=$LVnamequot; -o CuDvDr
done
odmdelete -q quot;name=$VGquot; -o CuAt
odmdelete -q quot;parent=$VGquot; -o CuDv
odmdelete -q quot;name=$VGquot; -o CuDv
odmdelete -q quot;name=$VGquot; -o CuDep
odmdelete -q quot;dependency=$VGquot; -o CuDep
odmdelete -q quot;value1=10quot; -o CuDvDr
odmdelete -q quot;value3=$VGquot; -o CuDvDr
importvg -y $VG $PV # ignore lvaryoffvg errors
varyonvg $VG

Export rootvg by odmdeletes
Import rootvg by Importvg

If you detect ODM problems in rootvg use the shell script rvgrecover. This procedure is described
in the AIX 4.3 Problem Solving Guide and Reference. Create this script in /bin and mark it
executable.
The script rvgrecover removes all ODM entries that belong to your rootvg by using odmdelete.
That's the same way exportvg works.
After deleting all ODM objects from rootvg it imports the rootvg by reading the VGDA and
LVCB from the boot disk. This results in completely new ODM objects that describe your rootvg.
Mirror Write Consistency (MWC)
Problem:
Parallel scheduling policy and ...
... system crashes before the write to all mirrors have been completed
Mirrors of the logical volume are in an inconsistent state
Solution: Mirror Write Consistency
Allows identifying the correct physical partition after reboot Separate area of each disk (outer edge)
Place logical volumes with mirror write consistency on the outer edger

When working with parallel scheduling policy, the LVM starts the write operation for the physical
partition at the same time. If a system crashes (for example, due to a power failure) before the
write to all mirrors has been completed, the mirrors of the logical volume are in an inconsistent
state.
To avoid this situation, always use mirror write consistency when working with parallel
scheduling policy.
When the volume group is varied back online for use, this information is used to make logical
partitions consistent again.
Active mirror write consistency is implemented as a cache on the disk and behaves similarly to the
JFS and JFS2 log devices. The physical write operation proceeds when the MWC cache has been
updated. The disk cache resides in the outer edge area. Therefore, always try to place a logical
volume that uses active MWC in the same area as the MWC.
This improves disk access times.
                                        Here is a description of the MWC options:

AIX 5L introduces the new
passive option to the mirror
write consistency (MWC)
algorithm for mirrored logical
volumes. This option only
applies to big volume groups.
Big volume groups allow up to
512 logical volumes and 128
physical volumes per volume
group.
Without the big volume group
format up to 256 logical
volumes and 32 physical
volumes can exist within a
volume group.
Passive MWC reduces the
problem of having to update the
MWC log on the disk. This
method logs that the logical
volume has been opened but
does not log writes. If the
system crashes, then the LVM
starts a forced synchronization
of the entire logical volume
when the system restarts.
The following syntax is used with either the mklv or chlv command to set MWC options:
mklv -w y|a|p|n
chlv -w y|a|p|n
Using the mklvcopy command or the smit fastpath smit mklvcopy you can add mirrors to
existing logical volumes. You need to specify the new total number of logical partition copies and
the disks where the physical partitions reside. If you work with active MWC, use edge as the
position policy to increase performance.
If there are many LVs to synchronize it's better not to synchronize the new copies immediately after
the creation (that's the default).
Here are some examples for the mklvcopy command:
1. Add a copy for logical volume lv01 on disk hdisk7:
# mklvcopy lv01 2 hdisk7
2. Add a copy for logical volume lv02 on disk hdisk4. The copies should reside in the outer
edge area. The synchronization will be done immediately:
# mklvcopy -a e -k lv02 2 hdisk4
To remove copies from a logical volume use rmlvcopy or the smit fastpath smit rmlvcopy.

Mirroring rootvg:
1. extendvg
2. chvg -Qn
3. mklvcopy
4. syncvg
5. bosboot
6. bootlist
7. shutdown -Fr

What is the reason to mirror the rootvg?
If your rootvg is on one disk, you get a single point of failure; that means, if this disk fails,
your machine is not available any longer.
If you mirror rootvg to a second (or third) disk, and one disk fails, there will be another disk
that contains the mirrored rootvg. You increase the availability of your system.
The following steps show how to mirror the rootvg.
• Add the new disk to the volume group (for example, hdisk1):
# extendvg rootvg hdisk1
• If you use one mirror disk, be sure that a quorum is not required for varyon:
# chvg -Qn rootvg

Add the mirrors for all rootvg logical volumes:
# mklvcopy hd1 2 hdisk1 ; # mklvcopy hd2 2 hdisk1 ; # mklvcopy hd3 2 hdisk1 ; #
mklvcopy hd4 2 hdisk1 ; # mklvcopy hd5 2 hdisk1 ; # mklvcopy hd6 2 hdisk1 ; #
mklvcopy hd8 2 hdisk1 ; # mklvcopy hd9var 2 hdisk1 ; # mklvcopy hd10opt 2 hdisk1
OR
# mirrorvg -s –c’x’ rootvg ; smit       o: mirrorvg –m datavg hdiskX hdiskY
If you have other logical volumes in your rootvg, be sure to create copies for them as
well.
An alternative to running multiple mklvcopy commands is to use mirrorvg. This command
was added in version 4.2 to simplify mirroring VGs. The mirrorvg command by default will disable
quorum and mirror the existing LVs in the specified VG. To mirror rootvg, use the command:
mirrorvg -s –c ‘x’ rootvg
• Now synchronize the new copies you created:
# syncvg -v rootvg
• As we want to be able to boot from different disks, we need to do a bosboot:
# bosboot -a
As hd5 is mirrored, there is no need to do it for each disk.
• Update the boot list. In case of a disk failure we must be able to boot from different disks.
# bootlist -m normal hdisk0 hdisk1
• Because we disabled quorum, the system must be rebooted for that to take effect.

For rootvg, you need to execute: bosboot ; bootlist -m normal


Each disk that is contained in a volume group contains at least one VGDA. The LVM always reserves
space for two VGDAs on each disk.
If a volume group consists of two disks, one disk contains two VGDAs, the other one contains only
one. If the disk with the two VGDAs fails, we have only 33 percent of VGDAs available, that means
we have less than 50 percent of VGDAs. In this case the quorum, which needs more than 50% of
VGDAs must be available, is not fulfilled.
If a volume group consists of more than two disks, each disk contains one VGDA. If one disk fails,
we still have 66% of VGDAs available and the quorum is fulfilled.

What happens if a quorum is not available?
Si tenemos solo dos discos, y se cae uno, debemos bootear en mantainance mode (chvg –Qn
workVG), sacar el quorum, y correr bosboot, bootlist, y rebootear.
Cuando falla el 1er disco del VG, la VGDA se regenera en el 2do. Cuando falla ese segundo disco
con 2 VGDA, el primero seguira teniendo 1 VGDA, asi que se vuelve a perder el 66% del quorum.
(varyonvg)

En un disco, 2VGDA, en 2discos, 3VGDA, en 3 discos, 3VGDA (si hay mirroring, la VGSA acompana
a cada VGDA)

Answer True or False to the following statements:
1. All LVM information is stored in the ODM. False
2. You detect that a physical volume hdisk1 that is contained in your rootvg is missing in the ODM.
This problem can be fixed by exporting and importing the rootvg? False – Run rvgrecover
(rootvg recover)
3. The LVM supports RAID-5 without separate hardware. False

What happens if a quorum is not available in a volume group? Consider the following example.
In a two-disk volume group datavg, the disk hdisk1 is not available due to a hardware defect.
hdisk1 is the disk that contains the two VGDAs; that means the volume group does not have a
quorum of VGDAs. If the volume group is not varied on and the administrator tries to vary on
datavg, the varyonvg command will fail.
If the volume group is already varied on when losing the quorum, the LVM will deactivate the
volume group. There is no more access to any logical volume that is part of this volume group. At
this point the system sometimes shows strange behavior. This situation is posted to the error log,
which shows an error entry LVM_SA_QUORCLOSE. After losing the quorum, the volume group
may still be listed as active (lsvg -o), however, all application data access and LVM functions
requiring data access to the volume group will fail. The volume group is dropped from the active list
as soon as the last logical volume is closed.
You can still use fuser -k /dev/LVname and umount /dev/LVname, but no data is actually
written to the disk.

With single mirroring, always disable the quorum:
chvg -Qn datavg ; varyoffvg datavg ; varyonvg datavg
Additional considerations for rootvg:
chvg -Qn rootvg ; bosboot -ad /dev/hdiskX ; reboot

Turning off the quorum does not allow a normal varyonvg without a quorum
It prevents closing the volume group when losing the quorum


When a nonquorum volume group loses its quorum it will not be deactivated, it will be active until it
loses all of its physical volumes.
When working with single mirroring, always disable the quorum using the command chvg -Qn. For
data volume groups you must vary off and vary on the volume group to make the change work.
When turning off the quorum for rootvg, you must do a bosboot (or a savebase), to reflect
the change in the ODM in the boot logical volume. Afterwards reboot the machine.
It's important that you know that turning off the quorum does not allow a varyonvg without a
quorum. It just prevents the closing of an active volume group when losing its quorum.

Use procedure 1 when the disk that must be replaced is mirrored.
This procedure requires that the disk state be either missing or removed. Refer to Physical
Volume States in Unit 5: Disk Management Theory for more information on disk states. Use lspv
hdiskX to check the state of your physical volume. If the disk is still in the active state you cannot
remove any copies or logical volumes from the failing disk. In this case the only way to bring the
disk into a removed or missing state is to reboot your system. During the next varyon the LVM
will detect the failing disk. Remember to disable the quorum check if you have only two disks in
your volume group. The goal of each disk replacement is to remove all logical volumes from a disk.
1. Start removing all logical volume copies from the disk. Use either the smit fastpath smit
unmirrorvg or the unmirrorvg command as shown. This must be done for each logical volume
that is mirrored on the disk. If you have additional unmirrored logical volumes on the disk you have
to either move them to another disk (migratepv), or remove them if the disk cannot be accessed
(rmlv). As mentioned the latter will only work if the disk state is either missing or removed.
2. If the disk is completely empty, remove the disk from the volume group. Use smit fastpath smit
reducevg or the reducevg command.
3. After the disk has been removed from the volume group, you can remove it from the ODM. Use
the rmdev command as shown. If the disk must be removed from the system, shut down the
machine and then remove it.
4. Connect the new disk to the system and reboot your system. The cfgmgr will configure the new
disk. If using hot-swappable disks, a reboot is not necessary.
5. Add the new disk to the volume group. Use either the smit fastpath smit extendvg or the
extendvg command.
6. Finally create the new copies for each logical volume on the new disk. Use either the smit
fastpath smit mirrorvg or the mirrorvg command. Synchronize the volume group (or each logical
volume) afterwards, using the varyonvg command.

Procedure 2 applies to a disk replacement where the disk is unmirrored but could be accessed.
The goal is the same as always. Before we can replace a disk we must remove everything from the
disk.
1. Shut down your system if you need to physically attach a new disk to the system. Boot the
system so that cfgmgr will configure the new disk.
2. Add the new disk to the volume group. Use either the smit fastpath smit extendvg or the
extendvg command.
3. Before executing the next step it is necessary to distinguish between the rootvg and a non-
rootvg volume group.
If the disk that is replaced is in rootvg execute the steps that are shown on page
Procedure 2: Special Steps for rootvg.
If the disk that is replaced is not in the rootvg, use the migratepv command:
# migratepv hdisk_old hdisk_new
This command moves all logical volumes from one disk to another. You can do this
during normal system activity. The command migratepv requires that the disks are in the
same volume group.
4. If the old disk has been completely migrated, remove it from the volume group. Use either the
smit fastpath smit reducevg or the reducevg command.
5. If you need to remove the disk from the system, remove it from the ODM using the rmdev
command as shown. Finally remove the physical disk from the system.
Note:
If the disk that must be replaced is in rootvg, follow the instructions on the next page.

Procedure 2 requires some additional steps if the disk that must be replaced is in rootvg.
1. Connect the new disk to the system as described in procedure 2.
2. Add the new disk to the volume group. Use smit extendvg or the extendvg command.
3. This step requires special considerations for rootvg:
• Check whether your disk contains the boot logical volume (default is /dev/hd5).
Use command lspv -l to check the logical volumes on the disk that must be replaced.
If the disk contains the boot logical volume, migrate the logical volume to the new disk and
update the boot logical volume on the new disk. To avoid a potential boot from the old disk, clear
the old boot record, by using the chpv -c command. Then change your boot list:
# migratepv -l hd5 hdiskX hdiskY
# bosboot -ad /dev/hdiskY
# chpv -c hdiskX
# bootlist -m normal hdiskY
If the disk contains the primary dump device, you must deactivate the dump before
migrating the corresponding logical volume:
# sysdumpdev -p /dev/sysdumpnull
• Migrate the complete old disk to the new one:
# migratepv hdiskX hdiskY
If the primary dump device has been deactivated, you have to activate it again:
# sysdumpdev -p /dev/hdX (Default is /dev/hd6 in AIX 4)
4. After the disk has been migrated, remove it from the volume group as described in procedure
2.
5. If the disk must be removed from the system, remove it from the ODM (use the rmdev
command), shut down your AIX, and remove the disk from the system afterwards.

Procedure 3 applies to a disk replacement where a disk could not be accessed but the volume
group is intact. The failing disk is either in a state (not device state) of missing (normal varyonvg
worked) or removed (forced varyonvg was necessary to bring the volume group online).
If the failing disk is in an active state (this is not a device state), this procedure will not work. In
this case you have to force a new vary on by rebooting the system. The reboot is necessary
because you cannot vary off a volume group with open logical volumes.
Because the failing disk is active there is no way to unmount file systems.
If the failing disk is in a missing or removed state, start the procedure:
1. Identify all logical volumes and file systems on the failing disk. Use commands like lspv,
lslv or lsfs to provide this information. These commands will work on a failing disk.
2. If you have mounted file systems on a logical volume on the failing disk, you must unmount
them. Use the umount command.
3. Remove all file systems from the failing disk, using smit rmfs or the rmfs command. If you
remove a file system, the corresponding logical volume and stanza in /etc/filesystems is
removed as well.
4. Remove the remaining logical volumes (those not associated with a file system) from the failing
disk using smit rmlv or the rmlv command.
5. Remove the disk from the volume group, using the smit fastpath smit reducevg or the
reducevg command.
6. Remove the disk from the ODM (rmdev) and from the system.
7. Add the new disk to the system and extend your volume group. Use smit extendvg or the
extendvg command.
8. Re-create all logical volumes and file systems that have been removed due to the disk failure.
Use smit mklv, smit crfs or the commands directly.
9. Due to the total disk failure, you lost all data on the disk. This data has to be restored, either by
the restore command or any other tool you use to restore data (for example, TSM).


Procedure 4 applies to a total rootvg failure without mirroring.
This situation might come up when your rootvg consists of one disk that fails. Or your rootvg is
installed on two disks and the disk fails that contains operating system logical volumes (for
example, /dev/hd4).
1. Replace the bad disk and boot your system in maintenance mode.
2. Restore your system from a mksysb tape, CD/DVD or NIM.
Remember that if any rootvg file systems were not mounted when the mksysb was made, those file
systems are not included on the backup image. You will need to create and restore those as a
separate step.
If your mksysb media does not contain user volume group definitions (for example, you created a
volume group after saving your rootvg), you have to import the user volume group after restoring
the mksysb. For example:
# importvg -y datavg hdisk9
Only one disk from the volume group (in our example hdisk9), needs to be selected.

Procedure 5 applies to a total failure of a non-rootvg volume group. This situation might come up
if your volume group consists of only one disk that fails. Before starting this procedure make sure
this is not just a temporary disk failure (for example, a power failure).
1. To fix this problem, export the volume group from the system. Use the command exportvg as
shown. During the export of the volume group all ODM objects that are related to the volume
group will be deleted.
2. Check your /etc/filesystems. There should be no references to logical volumes or filesystems
from the exported volume group.
3. Remove the bad disk from the ODM (Use rmdev as shown). Shut down your system and
remove the physical disk from the system.
4. Connect the new drive and boot the system. The cfgmgr will configure the new disk.
5. If you have a volume group backup available (created by the savevg command), you can
restore the complete volume group with the restvg command (or the smit fastpath smit restvg).
All logical volumes and file systems are recovered.
If you have more than one disk that should be used during restvg you must specify these disks:
# restvg -f /dev/rmt0 hdiskY hdiskZ
We will talk more about savevg and restvg in a future chapter.
6. If you have no volume group backup available, you have to re-create everything that was part
of the volume group.
Re-create the volume group (mkvg or smit mkvg), all logical volumes (mklv or smit mklv) and
all file systems (crfs or smit crfs).
Finally, restore the lost data from backups, for example with the restore command or any other
tool you use to restore data in your environment.

** Si el varyoff se hace para el rootvg, necesita reboot, de lo contrario, no es necesario!
* bosboot –ad /dev/hdiskX genera el boostrap, chpv –c hdisk lo LIMPIA del hdisk
** El rmlv se usa para remover: paging, sysdump, RAW, que no tienen filesystems.

Frequent disk replacement errors:

A common problem seen after a migration of the rootvg is that the machine will not boot.
On a microchannel system you get alternating LED codes 223-229, on a PCI system the LED
codes cycle. This loop indicates that the firmware is not able to find a bootstrap code to boot from.
This problem is usually easy to fix. Boot in maintenance mode and check your boot list
(use the bootlist command). If the boot list is correct, update the boot logical volume
(use the bosboot command).

Note: Throughout this discussion the physical volume ID is abbreviated in the visuals for simplicity.
The physical volume id is actually 32 characters.
Another frequent error comes up when administrators remove a disk from the ODM (by executing
rmdev) and physically remove the disk from the system, but do not remove entries from the
volume group descriptor area.
Before discussing the fix for this problem, remember that the VGDA stores information about all
physical volumes of the volume group. Each disk has at least one VGDA.
Disk information is also stored in the ODM, for example, the physical volume identifiers are stored
in the ODM class CuAt.
What happens if a disk is removed from the ODM but not from the volume group?
After removing the disk from the ODM you still have a reference in the VGDA to the removed disk.
In early AIX versions the fix for this problem was difficult. You had to add ODM objects that
described the attributes of the removed disk.
Fix this problem by executing the reducevg command. Instead of passing the disk name you pass
the physical volume ID of the removed disk.
Execute the lspv command to identify the missing disk. Write down the physical volume ID of
the missing disk and compare this id with the contents of the VGDA. Use the following command
to query the VGDA on a disk:
# lqueryvg -p hdisk4 -At (Use any disk from the volume group)
If you are sure that you found the missing pvid, pass this pvid to the reducevg command.

After an incorrect disk replacement you might detect ODM failures. A typical error message is
shown:
Unable to find device id 00837734 in device configuration database
In this case a device could not be found in the ODM. Before starting any fixes check
the command you typed in. Maybe it just contains a typo.
Analyze the failure. Find out what device corresponds to the ID that is shown in the
error message.
If you are not sure what caused the problem, remember the two ways you learned
already to fix an ODM problem.
• If the ODM problem is related to the rootvg, execute the rvgrecover procedure. If the
ODM problem is not related to the rootvg, export the volume group and import it again.
Export and import will be explained in more detail in the next topic.

1. Although everything seems to be working fine, you detect error log entries for disk hdisk0 in
your rootvg. The disk is not mirrored to another disk. You decide to replace this disk. Which
procedure would you use to migrate this disk?
1. Procedure 2.
2. You detect an unrecoverable disk failure in volume group datavg. This volume group consists of
two disks that are completely mirrored. Because of the disk failure you are not able to vary on
datavg. How do you recover from this situation?
2. varyonvg –F ; chpv –va – procedure 1 for mirrored disks
3. After disk replacement you recognize that a disk has been removed from the system but not
from the volume group. How do you fix this problem?
3. reducevg vgname PVID (use PVID beside disk name)

Different procedures are available that can be used to fix disk problems under any circumstance:

Procedure 1: Mirrored Disk.                          Procedure 3: Total disk failure.
Procedure 2: Disk Still Working (+ rootvg            Procedure 4: Total rootvg failure.
specials)                                            Procedure 5: Total non-rootvg failure.


Bajar: aix LVM from a-z troubleshooting and commands.
AIX Advanced Administration Knowledge Share

Contenu connexe

Tendances

IBM Spectrum Scale for File and Object Storage
IBM Spectrum Scale for File and Object StorageIBM Spectrum Scale for File and Object Storage
IBM Spectrum Scale for File and Object StorageTony Pearson
 
IBM general parallel file system - introduction
IBM general parallel file system - introductionIBM general parallel file system - introduction
IBM general parallel file system - introductionIBM Danmark
 
Linux kernel Architecture and Properties
Linux kernel Architecture and PropertiesLinux kernel Architecture and Properties
Linux kernel Architecture and PropertiesSaadi Rahman
 
LF_DPDK_Mellanox bifurcated driver model
LF_DPDK_Mellanox bifurcated driver modelLF_DPDK_Mellanox bifurcated driver model
LF_DPDK_Mellanox bifurcated driver modelLF_DPDK
 
how to install VMware
how to install VMwarehow to install VMware
how to install VMwarertchandu
 
AIXpert - AIX Security expert
AIXpert - AIX Security expertAIXpert - AIX Security expert
AIXpert - AIX Security expertdlfrench
 
Multiple Shared Processor Pools In Power Systems
Multiple Shared Processor Pools In Power SystemsMultiple Shared Processor Pools In Power Systems
Multiple Shared Processor Pools In Power SystemsAndrey Klyachkin
 
z/OS Encryption Readiness Technology (zERT)
z/OS Encryption Readiness Technology (zERT) z/OS Encryption Readiness Technology (zERT)
z/OS Encryption Readiness Technology (zERT) zOSCommserver
 
3. CPU virtualization and scheduling
3. CPU virtualization and scheduling3. CPU virtualization and scheduling
3. CPU virtualization and schedulingHwanju Kim
 
Dave Gilbert - KVM and QEMU
Dave Gilbert - KVM and QEMUDave Gilbert - KVM and QEMU
Dave Gilbert - KVM and QEMUDanny Abukalam
 
Linux Troubleshooting
Linux TroubleshootingLinux Troubleshooting
Linux TroubleshootingKeith Wright
 
Embedded Linux from Scratch to Yocto
Embedded Linux from Scratch to YoctoEmbedded Linux from Scratch to Yocto
Embedded Linux from Scratch to YoctoSherif Mousa
 
Virtual Infrastructure Overview
Virtual Infrastructure OverviewVirtual Infrastructure Overview
Virtual Infrastructure Overviewvalerian_ceaus
 
Linux monitoring and Troubleshooting for DBA's
Linux monitoring and Troubleshooting for DBA'sLinux monitoring and Troubleshooting for DBA's
Linux monitoring and Troubleshooting for DBA'sMydbops
 

Tendances (20)

IBM Spectrum Scale for File and Object Storage
IBM Spectrum Scale for File and Object StorageIBM Spectrum Scale for File and Object Storage
IBM Spectrum Scale for File and Object Storage
 
Linux
LinuxLinux
Linux
 
IBM general parallel file system - introduction
IBM general parallel file system - introductionIBM general parallel file system - introduction
IBM general parallel file system - introduction
 
Linux kernel Architecture and Properties
Linux kernel Architecture and PropertiesLinux kernel Architecture and Properties
Linux kernel Architecture and Properties
 
LF_DPDK_Mellanox bifurcated driver model
LF_DPDK_Mellanox bifurcated driver modelLF_DPDK_Mellanox bifurcated driver model
LF_DPDK_Mellanox bifurcated driver model
 
how to install VMware
how to install VMwarehow to install VMware
how to install VMware
 
AIXpert - AIX Security expert
AIXpert - AIX Security expertAIXpert - AIX Security expert
AIXpert - AIX Security expert
 
Multiple Shared Processor Pools In Power Systems
Multiple Shared Processor Pools In Power SystemsMultiple Shared Processor Pools In Power Systems
Multiple Shared Processor Pools In Power Systems
 
z/OS Encryption Readiness Technology (zERT)
z/OS Encryption Readiness Technology (zERT) z/OS Encryption Readiness Technology (zERT)
z/OS Encryption Readiness Technology (zERT)
 
IBM PowerVC Introduction and Configuration
IBM PowerVC Introduction and ConfigurationIBM PowerVC Introduction and Configuration
IBM PowerVC Introduction and Configuration
 
ZFS
ZFSZFS
ZFS
 
3. CPU virtualization and scheduling
3. CPU virtualization and scheduling3. CPU virtualization and scheduling
3. CPU virtualization and scheduling
 
Dave Gilbert - KVM and QEMU
Dave Gilbert - KVM and QEMUDave Gilbert - KVM and QEMU
Dave Gilbert - KVM and QEMU
 
Ibm aix
Ibm aixIbm aix
Ibm aix
 
VMware vSphere
VMware vSphereVMware vSphere
VMware vSphere
 
Linux Troubleshooting
Linux TroubleshootingLinux Troubleshooting
Linux Troubleshooting
 
Installing Aix
Installing AixInstalling Aix
Installing Aix
 
Embedded Linux from Scratch to Yocto
Embedded Linux from Scratch to YoctoEmbedded Linux from Scratch to Yocto
Embedded Linux from Scratch to Yocto
 
Virtual Infrastructure Overview
Virtual Infrastructure OverviewVirtual Infrastructure Overview
Virtual Infrastructure Overview
 
Linux monitoring and Troubleshooting for DBA's
Linux monitoring and Troubleshooting for DBA'sLinux monitoring and Troubleshooting for DBA's
Linux monitoring and Troubleshooting for DBA's
 

En vedette

Aix student guide system administrations part 2 problem determination
Aix student guide system administrations part 2   problem determinationAix student guide system administrations part 2   problem determination
Aix student guide system administrations part 2 problem determinationYogesh Sharma
 
Aix操作系统培训文档
Aix操作系统培训文档Aix操作系统培训文档
Aix操作系统培训文档lwj2012
 
IBM PowerVM Virtualization Introduction and Configuration
IBM PowerVM Virtualization Introduction and ConfigurationIBM PowerVM Virtualization Introduction and Configuration
IBM PowerVM Virtualization Introduction and ConfigurationIBM India Smarter Computing
 
tuningfor_oracle
 tuningfor_oracle tuningfor_oracle
tuningfor_oraclestyxyx
 
Ibm power vc version 1.2.3 introduction and configuration
Ibm power vc version 1.2.3 introduction and configurationIbm power vc version 1.2.3 introduction and configuration
Ibm power vc version 1.2.3 introduction and configurationgagbada
 
Public Training Power System for AIX : AIX Implementation & Administration (A...
Public Training Power System for AIX : AIX Implementation & Administration (A...Public Training Power System for AIX : AIX Implementation & Administration (A...
Public Training Power System for AIX : AIX Implementation & Administration (A...Hany Paulina
 
Presentation common task differences between sdmc and hmc
Presentation   common task differences between sdmc and hmcPresentation   common task differences between sdmc and hmc
Presentation common task differences between sdmc and hmcxKinAnx
 
AIX Administator Resume.
AIX Administator Resume.AIX Administator Resume.
AIX Administator Resume.Shamsher Singh
 
Navisphere manager resume
Navisphere manager resumeNavisphere manager resume
Navisphere manager resume.Gastón. .Bx.
 
Veritas Software Foundations
Veritas Software FoundationsVeritas Software Foundations
Veritas Software Foundations.Gastón. .Bx.
 
IBM POWER Systems
IBM POWER SystemsIBM POWER Systems
IBM POWER Systemstcp cloud
 
Compliance and Event Monitoring with PowerSC Tools for IBM i
Compliance and Event Monitoring with PowerSC Tools for IBM iCompliance and Event Monitoring with PowerSC Tools for IBM i
Compliance and Event Monitoring with PowerSC Tools for IBM itaford
 
How To Install and Configure SUDO on RHEL 7
How To Install and Configure SUDO on RHEL 7How To Install and Configure SUDO on RHEL 7
How To Install and Configure SUDO on RHEL 7VCP Muthukrishna
 

En vedette (19)

Aix student guide system administrations part 2 problem determination
Aix student guide system administrations part 2   problem determinationAix student guide system administrations part 2   problem determination
Aix student guide system administrations part 2 problem determination
 
Aix操作系统培训文档
Aix操作系统培训文档Aix操作系统培训文档
Aix操作系统培训文档
 
IBM PowerVM Virtualization Introduction and Configuration
IBM PowerVM Virtualization Introduction and ConfigurationIBM PowerVM Virtualization Introduction and Configuration
IBM PowerVM Virtualization Introduction and Configuration
 
tuningfor_oracle
 tuningfor_oracle tuningfor_oracle
tuningfor_oracle
 
Ibm power vc version 1.2.3 introduction and configuration
Ibm power vc version 1.2.3 introduction and configurationIbm power vc version 1.2.3 introduction and configuration
Ibm power vc version 1.2.3 introduction and configuration
 
Public Training Power System for AIX : AIX Implementation & Administration (A...
Public Training Power System for AIX : AIX Implementation & Administration (A...Public Training Power System for AIX : AIX Implementation & Administration (A...
Public Training Power System for AIX : AIX Implementation & Administration (A...
 
Presentation common task differences between sdmc and hmc
Presentation   common task differences between sdmc and hmcPresentation   common task differences between sdmc and hmc
Presentation common task differences between sdmc and hmc
 
IBM PowerVM Best Practices
IBM PowerVM Best PracticesIBM PowerVM Best Practices
IBM PowerVM Best Practices
 
Red Hat Cluster
Red Hat ClusterRed Hat Cluster
Red Hat Cluster
 
Aix install
Aix installAix install
Aix install
 
AIX Administator Resume.
AIX Administator Resume.AIX Administator Resume.
AIX Administator Resume.
 
IBM Power VC
IBM Power VCIBM Power VC
IBM Power VC
 
Symm basics
Symm basicsSymm basics
Symm basics
 
Navisphere manager resume
Navisphere manager resumeNavisphere manager resume
Navisphere manager resume
 
Replistor Resume
Replistor ResumeReplistor Resume
Replistor Resume
 
Veritas Software Foundations
Veritas Software FoundationsVeritas Software Foundations
Veritas Software Foundations
 
IBM POWER Systems
IBM POWER SystemsIBM POWER Systems
IBM POWER Systems
 
Compliance and Event Monitoring with PowerSC Tools for IBM i
Compliance and Event Monitoring with PowerSC Tools for IBM iCompliance and Event Monitoring with PowerSC Tools for IBM i
Compliance and Event Monitoring with PowerSC Tools for IBM i
 
How To Install and Configure SUDO on RHEL 7
How To Install and Configure SUDO on RHEL 7How To Install and Configure SUDO on RHEL 7
How To Install and Configure SUDO on RHEL 7
 

Similaire à AIX Advanced Administration Knowledge Share

It04 roshan basnet
It04 roshan basnetIt04 roshan basnet
It04 roshan basnetrosu555
 
Spectre meltdown performance_tests - v0.3
Spectre meltdown performance_tests - v0.3Spectre meltdown performance_tests - v0.3
Spectre meltdown performance_tests - v0.3David Pasek
 
Best Practices and Performance Studies for High-Performance Computing Clusters
Best Practices and Performance Studies for High-Performance Computing ClustersBest Practices and Performance Studies for High-Performance Computing Clusters
Best Practices and Performance Studies for High-Performance Computing ClustersIntel® Software
 
How to Use GSM/3G/4G in Embedded Linux Systems
How to Use GSM/3G/4G in Embedded Linux SystemsHow to Use GSM/3G/4G in Embedded Linux Systems
How to Use GSM/3G/4G in Embedded Linux SystemsToradex
 
Linux Server Deep Dives (DrupalCon Amsterdam)
Linux Server Deep Dives (DrupalCon Amsterdam)Linux Server Deep Dives (DrupalCon Amsterdam)
Linux Server Deep Dives (DrupalCon Amsterdam)Amin Astaneh
 
Computer technicians-quick-reference-guide
Computer technicians-quick-reference-guideComputer technicians-quick-reference-guide
Computer technicians-quick-reference-guideShathees Rao
 
Installing tivoli system automation for high availability of db2 udb bcu on a...
Installing tivoli system automation for high availability of db2 udb bcu on a...Installing tivoli system automation for high availability of db2 udb bcu on a...
Installing tivoli system automation for high availability of db2 udb bcu on a...Banking at Ho Chi Minh city
 
Optimizing Servers for High-Throughput and Low-Latency at Dropbox
Optimizing Servers for High-Throughput and Low-Latency at DropboxOptimizing Servers for High-Throughput and Low-Latency at Dropbox
Optimizing Servers for High-Throughput and Low-Latency at DropboxScyllaDB
 
LPAR2RRD on CZ/SK common 2014
LPAR2RRD on CZ/SK common 2014LPAR2RRD on CZ/SK common 2014
LPAR2RRD on CZ/SK common 2014Pavel Hampl
 
Deploying ibm sametime 9 on aix 7.1
Deploying ibm sametime 9 on aix 7.1Deploying ibm sametime 9 on aix 7.1
Deploying ibm sametime 9 on aix 7.1a8us
 
Von A bis Z-itrix: Installieren Sie den stabilsten und schnellsten HCL Notes-...
Von A bis Z-itrix: Installieren Sie den stabilsten und schnellsten HCL Notes-...Von A bis Z-itrix: Installieren Sie den stabilsten und schnellsten HCL Notes-...
Von A bis Z-itrix: Installieren Sie den stabilsten und schnellsten HCL Notes-...panagenda
 
Centralized Fog Server with OpenLDAP
Centralized Fog Server with OpenLDAP Centralized Fog Server with OpenLDAP
Centralized Fog Server with OpenLDAP tare
 
The post release technologies of Crysis 3 (Slides Only) - Stewart Needham
The post release technologies of Crysis 3 (Slides Only) - Stewart NeedhamThe post release technologies of Crysis 3 (Slides Only) - Stewart Needham
The post release technologies of Crysis 3 (Slides Only) - Stewart NeedhamStewart Needham
 
X64 Workshop Linux Information Gathering
X64 Workshop Linux Information GatheringX64 Workshop Linux Information Gathering
X64 Workshop Linux Information GatheringAero Plane
 
Important cisco-chow-commands
Important cisco-chow-commandsImportant cisco-chow-commands
Important cisco-chow-commandsssusere31b5c
 
Positive Hack Days. Pavlov. Network Infrastructure Security Assessment
Positive Hack Days. Pavlov. Network Infrastructure Security AssessmentPositive Hack Days. Pavlov. Network Infrastructure Security Assessment
Positive Hack Days. Pavlov. Network Infrastructure Security AssessmentPositive Hack Days
 

Similaire à AIX Advanced Administration Knowledge Share (20)

It04 roshan basnet
It04 roshan basnetIt04 roshan basnet
It04 roshan basnet
 
Spectre meltdown performance_tests - v0.3
Spectre meltdown performance_tests - v0.3Spectre meltdown performance_tests - v0.3
Spectre meltdown performance_tests - v0.3
 
The Domino 10 RHEL 7 Primer
The Domino 10 RHEL 7 PrimerThe Domino 10 RHEL 7 Primer
The Domino 10 RHEL 7 Primer
 
Best Practices and Performance Studies for High-Performance Computing Clusters
Best Practices and Performance Studies for High-Performance Computing ClustersBest Practices and Performance Studies for High-Performance Computing Clusters
Best Practices and Performance Studies for High-Performance Computing Clusters
 
How to Use GSM/3G/4G in Embedded Linux Systems
How to Use GSM/3G/4G in Embedded Linux SystemsHow to Use GSM/3G/4G in Embedded Linux Systems
How to Use GSM/3G/4G in Embedded Linux Systems
 
Linux Server Deep Dives (DrupalCon Amsterdam)
Linux Server Deep Dives (DrupalCon Amsterdam)Linux Server Deep Dives (DrupalCon Amsterdam)
Linux Server Deep Dives (DrupalCon Amsterdam)
 
Computer technicians-quick-reference-guide
Computer technicians-quick-reference-guideComputer technicians-quick-reference-guide
Computer technicians-quick-reference-guide
 
Installing tivoli system automation for high availability of db2 udb bcu on a...
Installing tivoli system automation for high availability of db2 udb bcu on a...Installing tivoli system automation for high availability of db2 udb bcu on a...
Installing tivoli system automation for high availability of db2 udb bcu on a...
 
Optimizing Servers for High-Throughput and Low-Latency at Dropbox
Optimizing Servers for High-Throughput and Low-Latency at DropboxOptimizing Servers for High-Throughput and Low-Latency at Dropbox
Optimizing Servers for High-Throughput and Low-Latency at Dropbox
 
Howto Pxeboot
Howto PxebootHowto Pxeboot
Howto Pxeboot
 
Ccna Imp Guide
Ccna Imp GuideCcna Imp Guide
Ccna Imp Guide
 
LPAR2RRD on CZ/SK common 2014
LPAR2RRD on CZ/SK common 2014LPAR2RRD on CZ/SK common 2014
LPAR2RRD on CZ/SK common 2014
 
Deploying ibm sametime 9 on aix 7.1
Deploying ibm sametime 9 on aix 7.1Deploying ibm sametime 9 on aix 7.1
Deploying ibm sametime 9 on aix 7.1
 
Von A bis Z-itrix: Installieren Sie den stabilsten und schnellsten HCL Notes-...
Von A bis Z-itrix: Installieren Sie den stabilsten und schnellsten HCL Notes-...Von A bis Z-itrix: Installieren Sie den stabilsten und schnellsten HCL Notes-...
Von A bis Z-itrix: Installieren Sie den stabilsten und schnellsten HCL Notes-...
 
Centralized Fog Server with OpenLDAP
Centralized Fog Server with OpenLDAP Centralized Fog Server with OpenLDAP
Centralized Fog Server with OpenLDAP
 
The post release technologies of Crysis 3 (Slides Only) - Stewart Needham
The post release technologies of Crysis 3 (Slides Only) - Stewart NeedhamThe post release technologies of Crysis 3 (Slides Only) - Stewart Needham
The post release technologies of Crysis 3 (Slides Only) - Stewart Needham
 
X64 Workshop Linux Information Gathering
X64 Workshop Linux Information GatheringX64 Workshop Linux Information Gathering
X64 Workshop Linux Information Gathering
 
Important cisco-chow-commands
Important cisco-chow-commandsImportant cisco-chow-commands
Important cisco-chow-commands
 
Juniper Trouble Shooting
Juniper Trouble ShootingJuniper Trouble Shooting
Juniper Trouble Shooting
 
Positive Hack Days. Pavlov. Network Infrastructure Security Assessment
Positive Hack Days. Pavlov. Network Infrastructure Security AssessmentPositive Hack Days. Pavlov. Network Infrastructure Security Assessment
Positive Hack Days. Pavlov. Network Infrastructure Security Assessment
 

Dernier

[2024]Digital Global Overview Report 2024 Meltwater.pdf
[2024]Digital Global Overview Report 2024 Meltwater.pdf[2024]Digital Global Overview Report 2024 Meltwater.pdf
[2024]Digital Global Overview Report 2024 Meltwater.pdfhans926745
 
Breaking the Kubernetes Kill Chain: Host Path Mount
Breaking the Kubernetes Kill Chain: Host Path MountBreaking the Kubernetes Kill Chain: Host Path Mount
Breaking the Kubernetes Kill Chain: Host Path MountPuma Security, LLC
 
What Are The Drone Anti-jamming Systems Technology?
What Are The Drone Anti-jamming Systems Technology?What Are The Drone Anti-jamming Systems Technology?
What Are The Drone Anti-jamming Systems Technology?Antenna Manufacturer Coco
 
CNv6 Instructor Chapter 6 Quality of Service
CNv6 Instructor Chapter 6 Quality of ServiceCNv6 Instructor Chapter 6 Quality of Service
CNv6 Instructor Chapter 6 Quality of Servicegiselly40
 
TrustArc Webinar - Stay Ahead of US State Data Privacy Law Developments
TrustArc Webinar - Stay Ahead of US State Data Privacy Law DevelopmentsTrustArc Webinar - Stay Ahead of US State Data Privacy Law Developments
TrustArc Webinar - Stay Ahead of US State Data Privacy Law DevelopmentsTrustArc
 
EIS-Webinar-Prompt-Knowledge-Eng-2024-04-08.pptx
EIS-Webinar-Prompt-Knowledge-Eng-2024-04-08.pptxEIS-Webinar-Prompt-Knowledge-Eng-2024-04-08.pptx
EIS-Webinar-Prompt-Knowledge-Eng-2024-04-08.pptxEarley Information Science
 
Scaling API-first – The story of a global engineering organization
Scaling API-first – The story of a global engineering organizationScaling API-first – The story of a global engineering organization
Scaling API-first – The story of a global engineering organizationRadu Cotescu
 
Artificial Intelligence: Facts and Myths
Artificial Intelligence: Facts and MythsArtificial Intelligence: Facts and Myths
Artificial Intelligence: Facts and MythsJoaquim Jorge
 
IAC 2024 - IA Fast Track to Search Focused AI Solutions
IAC 2024 - IA Fast Track to Search Focused AI SolutionsIAC 2024 - IA Fast Track to Search Focused AI Solutions
IAC 2024 - IA Fast Track to Search Focused AI SolutionsEnterprise Knowledge
 
How to Troubleshoot Apps for the Modern Connected Worker
How to Troubleshoot Apps for the Modern Connected WorkerHow to Troubleshoot Apps for the Modern Connected Worker
How to Troubleshoot Apps for the Modern Connected WorkerThousandEyes
 
A Call to Action for Generative AI in 2024
A Call to Action for Generative AI in 2024A Call to Action for Generative AI in 2024
A Call to Action for Generative AI in 2024Results
 
Real Time Object Detection Using Open CV
Real Time Object Detection Using Open CVReal Time Object Detection Using Open CV
Real Time Object Detection Using Open CVKhem
 
04-2024-HHUG-Sales-and-Marketing-Alignment.pptx
04-2024-HHUG-Sales-and-Marketing-Alignment.pptx04-2024-HHUG-Sales-and-Marketing-Alignment.pptx
04-2024-HHUG-Sales-and-Marketing-Alignment.pptxHampshireHUG
 
The Codex of Business Writing Software for Real-World Solutions 2.pptx
The Codex of Business Writing Software for Real-World Solutions 2.pptxThe Codex of Business Writing Software for Real-World Solutions 2.pptx
The Codex of Business Writing Software for Real-World Solutions 2.pptxMalak Abu Hammad
 
Strategies for Unlocking Knowledge Management in Microsoft 365 in the Copilot...
Strategies for Unlocking Knowledge Management in Microsoft 365 in the Copilot...Strategies for Unlocking Knowledge Management in Microsoft 365 in the Copilot...
Strategies for Unlocking Knowledge Management in Microsoft 365 in the Copilot...Drew Madelung
 
08448380779 Call Girls In Diplomatic Enclave Women Seeking Men
08448380779 Call Girls In Diplomatic Enclave Women Seeking Men08448380779 Call Girls In Diplomatic Enclave Women Seeking Men
08448380779 Call Girls In Diplomatic Enclave Women Seeking MenDelhi Call girls
 
How to convert PDF to text with Nanonets
How to convert PDF to text with NanonetsHow to convert PDF to text with Nanonets
How to convert PDF to text with Nanonetsnaman860154
 
Factors to Consider When Choosing Accounts Payable Services Providers.pptx
Factors to Consider When Choosing Accounts Payable Services Providers.pptxFactors to Consider When Choosing Accounts Payable Services Providers.pptx
Factors to Consider When Choosing Accounts Payable Services Providers.pptxKatpro Technologies
 
GenCyber Cyber Security Day Presentation
GenCyber Cyber Security Day PresentationGenCyber Cyber Security Day Presentation
GenCyber Cyber Security Day PresentationMichael W. Hawkins
 
Advantages of Hiring UIUX Design Service Providers for Your Business
Advantages of Hiring UIUX Design Service Providers for Your BusinessAdvantages of Hiring UIUX Design Service Providers for Your Business
Advantages of Hiring UIUX Design Service Providers for Your BusinessPixlogix Infotech
 

Dernier (20)

[2024]Digital Global Overview Report 2024 Meltwater.pdf
[2024]Digital Global Overview Report 2024 Meltwater.pdf[2024]Digital Global Overview Report 2024 Meltwater.pdf
[2024]Digital Global Overview Report 2024 Meltwater.pdf
 
Breaking the Kubernetes Kill Chain: Host Path Mount
Breaking the Kubernetes Kill Chain: Host Path MountBreaking the Kubernetes Kill Chain: Host Path Mount
Breaking the Kubernetes Kill Chain: Host Path Mount
 
What Are The Drone Anti-jamming Systems Technology?
What Are The Drone Anti-jamming Systems Technology?What Are The Drone Anti-jamming Systems Technology?
What Are The Drone Anti-jamming Systems Technology?
 
CNv6 Instructor Chapter 6 Quality of Service
CNv6 Instructor Chapter 6 Quality of ServiceCNv6 Instructor Chapter 6 Quality of Service
CNv6 Instructor Chapter 6 Quality of Service
 
TrustArc Webinar - Stay Ahead of US State Data Privacy Law Developments
TrustArc Webinar - Stay Ahead of US State Data Privacy Law DevelopmentsTrustArc Webinar - Stay Ahead of US State Data Privacy Law Developments
TrustArc Webinar - Stay Ahead of US State Data Privacy Law Developments
 
EIS-Webinar-Prompt-Knowledge-Eng-2024-04-08.pptx
EIS-Webinar-Prompt-Knowledge-Eng-2024-04-08.pptxEIS-Webinar-Prompt-Knowledge-Eng-2024-04-08.pptx
EIS-Webinar-Prompt-Knowledge-Eng-2024-04-08.pptx
 
Scaling API-first – The story of a global engineering organization
Scaling API-first – The story of a global engineering organizationScaling API-first – The story of a global engineering organization
Scaling API-first – The story of a global engineering organization
 
Artificial Intelligence: Facts and Myths
Artificial Intelligence: Facts and MythsArtificial Intelligence: Facts and Myths
Artificial Intelligence: Facts and Myths
 
IAC 2024 - IA Fast Track to Search Focused AI Solutions
IAC 2024 - IA Fast Track to Search Focused AI SolutionsIAC 2024 - IA Fast Track to Search Focused AI Solutions
IAC 2024 - IA Fast Track to Search Focused AI Solutions
 
How to Troubleshoot Apps for the Modern Connected Worker
How to Troubleshoot Apps for the Modern Connected WorkerHow to Troubleshoot Apps for the Modern Connected Worker
How to Troubleshoot Apps for the Modern Connected Worker
 
A Call to Action for Generative AI in 2024
A Call to Action for Generative AI in 2024A Call to Action for Generative AI in 2024
A Call to Action for Generative AI in 2024
 
Real Time Object Detection Using Open CV
Real Time Object Detection Using Open CVReal Time Object Detection Using Open CV
Real Time Object Detection Using Open CV
 
04-2024-HHUG-Sales-and-Marketing-Alignment.pptx
04-2024-HHUG-Sales-and-Marketing-Alignment.pptx04-2024-HHUG-Sales-and-Marketing-Alignment.pptx
04-2024-HHUG-Sales-and-Marketing-Alignment.pptx
 
The Codex of Business Writing Software for Real-World Solutions 2.pptx
The Codex of Business Writing Software for Real-World Solutions 2.pptxThe Codex of Business Writing Software for Real-World Solutions 2.pptx
The Codex of Business Writing Software for Real-World Solutions 2.pptx
 
Strategies for Unlocking Knowledge Management in Microsoft 365 in the Copilot...
Strategies for Unlocking Knowledge Management in Microsoft 365 in the Copilot...Strategies for Unlocking Knowledge Management in Microsoft 365 in the Copilot...
Strategies for Unlocking Knowledge Management in Microsoft 365 in the Copilot...
 
08448380779 Call Girls In Diplomatic Enclave Women Seeking Men
08448380779 Call Girls In Diplomatic Enclave Women Seeking Men08448380779 Call Girls In Diplomatic Enclave Women Seeking Men
08448380779 Call Girls In Diplomatic Enclave Women Seeking Men
 
How to convert PDF to text with Nanonets
How to convert PDF to text with NanonetsHow to convert PDF to text with Nanonets
How to convert PDF to text with Nanonets
 
Factors to Consider When Choosing Accounts Payable Services Providers.pptx
Factors to Consider When Choosing Accounts Payable Services Providers.pptxFactors to Consider When Choosing Accounts Payable Services Providers.pptx
Factors to Consider When Choosing Accounts Payable Services Providers.pptx
 
GenCyber Cyber Security Day Presentation
GenCyber Cyber Security Day PresentationGenCyber Cyber Security Day Presentation
GenCyber Cyber Security Day Presentation
 
Advantages of Hiring UIUX Design Service Providers for Your Business
Advantages of Hiring UIUX Design Service Providers for Your BusinessAdvantages of Hiring UIUX Design Service Providers for Your Business
Advantages of Hiring UIUX Design Service Providers for Your Business
 

AIX Advanced Administration Knowledge Share

  • 1. Si el promedio de velocidad del disco segun el fabricante es de 10ms, seekt+responset=10ms. La formula final seria 40ms // I/O = 40I/O ‘s (i/os por segundo) Pero en la realidad, hay que tener en cuenta tambien el tiempo en espera. ** Dasd: IBM's Direct Access Storage Devices (J Ranade Ibm Series) El principio de cercanía o principio de localidad, que afirma que las referencias a los datos y el programa dentro de un proceso tienden a agruparse. Por lo tanto, es válida la suposición de que, durante cortos períodos de tiempo, se necesitarán sólo unos pocos fragmentos de un proceso. Effective problem determination starts with a good understanding of the system and its components. The more information you have about the normal operation of a system, the better. - System configuration - Operating system level - Applications installed - Baseline performance - Instalation, configuration and service manuals. - Lspv, lscfg, prtconf, lsvg, lsps, lsfs, lsdev.
  • 2.
  • 3.
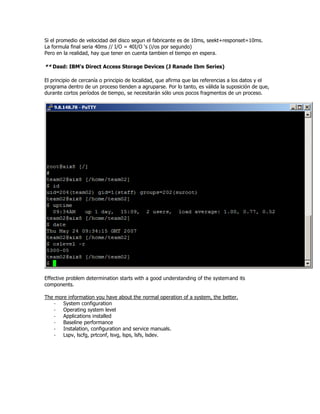
  • 4. El lscfg concentra varios comandos, a modo de resumen. De aquí obtenemos datos como arquitectura, procesadores, memoria, etc System Model: IBM,9111-520 Machine Serial Number: 10E122F Processor Type: PowerPC_POWER5 Number Of Processors: 1
  • 5. Processor Clock Speed: 1656 MHz CPU Type: 64-bit Kernel Type: 64-bit LPAR Info: 12 AIX8 Memory Size: 832 MB Good Memory Size: 832 MB Platform Firmware level: SF230_143 Firmware Version: IBM,SF230_143 Console Login: enable Auto Restart: true Full Core: false Cpu speed lscfg -vl cpucard0 | grep FRU Model Architecture: chrp - Model Implementation: Multiple Processor, PCI bus + sys0 System Object + sysplanar0 System Planar * vio0 Virtual I/O Bus * vscsi2 U9111.520.10E122F-V12-C82-T1 Virtual SCSI Client Adapter * hdisk2 U9111.520.10E122F-V12-C82-T1-L810000000000 Virtual SCSI Disk Drive * vscsi1 U9111.520.10E122F-V12-C81-T1 Virtual SCSI Client Adapter * hdisk1 U9111.520.10E122F-V12-C81-T1-L810000000000 Virtual SCSI Disk Drive * vscsi0 U9111.520.10E122F-V12-C80-T1 Virtual SCSI Client Adapter * hdisk0 U9111.520.10E122F-V12-C80-T1-L810000000000 Virtual SCSI Disk Drive * ent0 U9111.520.10E122F-V12-C2-T1 Virtual I/O Ethernet Adapter (l-lan) + L2cache0 L2 Cache + mem0 Memory + proc0 Processor bootinfo –p bootinfo –k bootinfo –z bootinfo -K chrp 851968 1 (1 cpu) 64 (64bits) getconf Command writes system configuration variables values to standard output. LOTTS!! bootinfo –r nos muestra la memoria real en kbytes; -p el tipo de plataforma (chrp, rs6k, etc) snap, para debug… vuelcos de memoria, SNA/TCP ts, nfs info, kernel dumps, pci/xscsi, hacmp, etc. para los vendor. 1. Understand/identify the problem. 2. Define the problem. 3. Collect system data. 4. Resolve the problem. 1. Ask questions as: - Whats the problem? - Whats the system doing (or not doing)? - How did you first notice the problem? - When did it happen? - Have any changes been made recently? - Keep them talking until the picture is clear!!
  • 6. 2. Collect data: - How is the machine configured? - What errors are being produced? - What is the state of the OS? - Is there a System Dump? - What lost files exist? 3. Problem determination Tools: - Check Error logs. - Asses LVM Commands. - Have Backups. - Send the System Dump for diagnostics. - Do Diagnostics. - Have Booteable media. - Check LED Codes. 4. Resolve the problem: - Use the gathered information. - Keep logs of taken actions. - Use the tools available-commands documentation, fixes and updates. - Contact IBM support if necessary. - Keep a log of actions taken to correct the problem. Important Links: http://publib16.boulder.ibm.com/pseries/en_US/infocenter/base http://techsupport.services.ibm.com/server/fixes Hardware family:
  • 7. New best practices, parches y demas: AIX 5L (aix service strategy)  download always - Tecnology Level (incluye el CSP) (del TL no se pueden sacar partes, como en los ML) - Concluding service pack salen 6 meses y dos semanas despues del tl/ml, el csp cierra el tl/ml del mismo numero. - Service pack (mantenimiento, new hardware devices) - Interim fix (security fix, temporal) - PTF (PTF Program temporary Fix) (si nos generan un error, abrimos un PMR en IBM) El ML se usaba en el pasado, actualmente eso cambio a Tecnology Level. = twice year releases which contain new HW & SW features and services updates. It is displayed with oslevel –s as the MLs. Strategy IE: 1H06 2H06 1H07 TL4+CSP3 SPs TL5+CSP4 SPs TL6+CSP5 = AIX Releases. TL4+SPs TL5+SPs TL6 = latest level. TL3+CSP3 IF IF TL4+CSP4 IF IF TL5+CSP5 = Maximun OS Stability. TL4+SPs PTFs CSP4 IF TL6 = Yearly update. APAR Authorized Program Analisis Report (IX51xxx) Security. Pueden concluir en una PTF o parche, ya que son generadas a partir de requerimientos del usuario. HIPER/PE: must apply patch (high impact/pervassive) ** q13xxlabfiles.rar Si al instalar un PTF, tengo un error, llamo a IBM, abren un PMR, y se genera un APAR; que puedo invocar por el numero.
  • 8. SUMA: Creates a task to automate the download of maintenance and technology levels from a fix server. Examples 1 To list the SUMA global configuration settings, type the following: suma -c Output similar to the following will be displayed: FIXSERVER_PROTOCOL=http DOWNLOAD_PROTOCOL=ftp DL_TIMEOUT_SEC=180 MAX_CONCURRENT_DOWNLOADS=5 HTTP_PROXY= HTTPS_PROXY= FTP_PROXY= SCREEN_VERBOSE=LVL_INFO NOTIFY_VERBOSE=LVL_INFO LOGFILE_VERBOSE=LVL_VERBOSE MAXLOGSIZE_MB=1 REMOVE_CONFLICTING_UPDATES=yes REMOVE_DUP_BASE_LEVELS=yes REMOVE_SUPERSEDE=yes TMPDIR=/var/suma/tmp 2 To edit the SUMA global configuration setting to change the maximum log file size to 2 MB, type the following: suma -c -a MAXLOGSIZE_MB=2 3 To list the SUMA task defaults, type the following: suma –D 4 To list the scheduled tasks, type: suma –l 3.1 Fix types SUMA allows the flexibility for a policy to be set to retrieve one of eight different “fix types”: • APAR – Specifies a request to download an APAR. An authorized program analysis report (APAR) number allows you to obtain an update/fix. Operating system commands are provided to determine if an APAR is installed on your system. • PTF – Specifies a request to download a PTF. A program temporary fix (PTF) typically contains multiple fixes (known as APAR’s) and is associated with a single fileset (for example, bos.mp64). PTF’s are temporary because they will be incorporated into the next release of the product or maintenance level. • Critical – Specifies a request to download the latest critical fixes. • Security – Specifies a request to download the latest security fixes. • I/O Server – Specifies a request to download the latest fixes for I/O Server virtualization software. • Latest – Specifies a request to download all of the latest fixes. • Fileset – Specifies a request to download a specific fileset. • Maintenance Level (ML/TL) – Specifies a request to download a specific maintenance level. 3.2 Action A policy can be set to perform one of three different actions: • Preview – Specifies a download preview will be performed. No filesets will be downloaded. In addition to previewing the filesets that would be downloaded, this option can also be used to generate an e-mail notification listing the fixes that are available on the IBM ~ Support Web site. • Download – Specifies that filesets will be downloaded based on the policy. • Download and Clean – Specifies that filesets will be downloaded based on the policy,
  • 9. followed by a clean operation. The clean operation will remove filesets that are not needed from the download target directory, such as updates that have been superseded by a newer fix level that has been brought down. This can help manage the size of the fix repository. 3.5 Download summary reports At the completion of a download operation, SUMA displays, logs, or e-mails a summary report showing the number of fixes that were downloaded successfully, any fixes that failed to download, and fixes that were skipped because they were already present on the system. A preview option is also available if you wish to generate a list of fixes that are available on the IBM ~ Support Web site. 3.6 Scheduling SUMA downloads can be scheduled or executed immediately. By scheduling a policy, an unattended download can be setup to conform to a client’s maintenance window. SUMA also provides support for scheduling policies at flexible intervals such as: hourly, daily, weekly, monthly, etc. This allows the download to occur at an optimal time or can be used to establish the frequency to check for the availability of certain fixes. Scheduled policies can also be designated as repeating. Repeating policies for certain fix types, such as APAR, PTF, or Maintenance Level will be repeated according to the selected interval, and then deleted when the specific fix or maintenance level is found. Other fix types, those released as a group on an ongoing basis, such as Critical, Security, I/O Server and Latest will be continually repeated at the specified interval until the policy is unscheduled. Policies can also be scheduled to be non-repeating, in which case they will be run once and then removed from the system. 3.7 Logging Another area where SUMA provides a lot of flexibility is logging. SUMA supports six different verbosity levels that can be uniquely set for sending information to the screen, a log file, or as a part of an e-mail notification. The levels are listed below, ordered from the least to the most amount of information displayed. • OFF – No information is displayed or logged. • ERROR – Displays error messages and other highly important messages. • WARNING – Displays warning messages in addition to ERROR messages. • INFO – Displays informational messages in addition to WARNING messages. • VERBOSE – Displays verbose informational messages in addition to INFO messages. • DEBUG – Displays debug output for debugging purposes. This setting is not used for normal operations. 4.1 Download specific APAR when available Clients are often required to monitor when a specific APAR that they are interesting in installing becomes available. SUMA automates this task by periodically checking for the APAR, sending an e-mail notification with the APAR status, and downloading it when it becomes available. For example, a client, who has a support contract, opens a problem management record (PMR) to report a problem. After a service representative verifies the problem, the client often would be given an APAR number along with an estimate on when the fix will be available. If the problem is pervasive, the client may also be given an interim fix to use until the official fix becomes available. The client can now take the APAR number and use the SMIT SUMA menus to setup a repeating policy to check for the APAR periodically (for example, once a week on Thursday at 3:00am). When the APAR is available, it will be automatically downloaded and the client can then install it when desired. The client will also receive an e-mail notification of the download, and the repeating policy will be automatically deleted.
  • 10. 4.2 Download the latest critical fixes periodically Critical fixes are issued periodically and are grouped for convenience, although they may also be obtained individually as specific fixes. They include fixes that address security issues or fix problems that are pervasive in nature. They do not include interim fixes, which are often provided for pervasive problems until an official fix is available. For example, clients who wish to monitor the fix distribution site for the latest critical fixes can setup a repeating SUMA policy to check for critical fixes once a month (or whatever timeframe is desirable). When new critical fixes become available, they can be downloaded into a client’s fix repository automatically, and a corresponding e-mail notification can be sent. This type of repeating policy will remain active until the client decides to remove it since it is not looking for specific “one-time” information, such as a specific fix. 4.3 Download an entire maintenance level A maintenance level is a recommended set of fixes that have received extensive testing together. Clients who choose to download a specific or the latest maintenance level can do this by using the SMIT SUMA menus to set a policy to have this done when convenient, for example Thursday at 3:00am during off-peak hours. Comparisons can be performed against an inventory of software installed on a system, or a directory containing a repository of fixes, so that only the fixes needed to bring a system to a particular maintenance level will be downloaded. 4.4 Download the latest fixes periodically Some clients wish to maintain a fix repository that holds all the latest fixes. They can then use these fixes to periodically update their system to the latest level. To establish a process that would allow a system to be up-to-date with the current fixes, a SUMA policy could be setup that would check for new fixes periodically (for example, once a week on Saturday at 3:00am). When new fixes are available, an unattended download will occur, placing the fixes in the system’s designated fix repository, and the client will receive an e-mail notification with the results of the download. Filtering options allow fixes to be downloaded only for filesets that are installed on the system. Additionally, a global SUMA configuration setting can be made to remove all superseded updates from the fix repository at the completion of the download. This provides space management of the fix repository by deleting fixes that are no longer needed. 4.5 Download the latest version of a particular fileset Clients often want to ensure that they are running the latest version of a particular fileset, such as bos.rte.install. Through the SMIT SUMA menus a policy can be set containing the fileset name and its version number (or “latest” in this case). This allows periodic checks (for example, once a week on Wednesday at 3:00am) to be made for the latest level of a particular fileset, and for it to be automatically downloaded if it is not already present on the system. The client may then install the new fileset when convenient. 4.6 Download a specific version of a particular fileset Sometimes clients wish to download a specific version of a particular fileset because it may contain a fix for a particular problem that they are interested in. Through the SMIT SUMA menus, clients have the ability to perform downloads immediately or schedule them for another time. For example, a client may be interested in downloading a specific fileset and version immediately, for example bos.rte.alt_disk_install.rte 5.2.0.41. An existing policy containing this request can be run immediately or scheduled for a later time. Likewise, this request for immediate download can be handled without even creating a policy since this is a one-time operation that does not have to save the policy for a future attempt. In this case, the information would simply be entered through the SMIT SUMA menus (or on the command line) prior to performing the immediate download.
  • 11. Interim Fix Guidelines/Policy for Maintenance We will no longer have CSP’s or six months of interim fix support. Interim fixes will continue to be used for temporary fixes than can be used until your next maintenance window. Here are the guidelines that the Service team will be following: • If a client is at the latest level and finds a problem – they can get an Interim Fix • If a client finds a problem that is already in a SP - they need to install the latest SP (or, at a minimum, an SP that includes their fix) • If it is a critical problem and/or the client can't install a SP - an interim fix can be offered and support will recommend they move to the latest SP during their next maintenance window • If a client finds a new, unique problem at any supported level (within the 24 month support window for a TL) - they can get an Interim Fix on their current level (if it's possible) • If a client finds a new unique problem on a prior SP, has multiple Interim Fixes installed, which are included in later SP - they must move to the latest SP before getting another Interim Fix • If a client has multiple Interim Fixes and only some of them are in a later SP - they must move to the latest SP and another Interim Fix will be bundled with their prior Interim Fixes on the current level Unit 1 Checkpoint. 1. What are the four major problem determination steps? Identify the problem. Talk to users. Collect system data. Resolve the problem. 2. Who should provide information about the problems? Always talk to the users about the problem to gather as much information as possible. 3. T or F?: If there is a problem with the software, it is necessary to get the next release of the product to resolve the problem. False. In most cases it is only necessary to apply fixes or upgrade microcode. 4. T or F?: Documentation can be viewed or downloaded from the IBM Web site. True. 5. How to list a suma task with ID 2? Suma –l 2 6. T o F?: Virtualizarion is part of power 4 architecture. False. AIX, Advanced Interactive eXecutive, proviene de un intento de IBM de correr UNIX sobre los mainframe en 1985. De ahí surge el AIX 1.2 Junto con la ODM, implementada en AIX 2.5, se lanzo el smit, para mejor y mas facil administracion.
  • 12. ODM: La informacion de los dispositivos fisicos y logicos se mantienen asociados como elementos de caracteristicas modificables. Es una base de datos que almacena la informacion del sistema. The ODM manages the following system data: • Device configuration data • Software Vital Product Data (SWVPD) • System Resource Controller Data (SRC) • TCP/IP configuration data • Error Log and Dump information • NIM (Network Installation Manager) information • SMIT menus and commands Our main emphasis in this unit is on devices and ODM files that are used to store vital software product data. During the course many other ODM classes are described. ODM Database Files: Predefined device information (supported): PdDv, PdAt, PdCn Customized device information (configured): CuDv, CuAt, CuDep, CuDvDr, CuVPD, Config_Rules Software vital product data: history, inventory, lpp, product SMIT menus sm_menu_opt, sm_name_hdr, sm_cmd_hdr, sm_cmd_opt Error log, alog and dump information SWservAt System Resource Controller SRCsubsys, SRCsubsvr, ... Network Installation Manager (NIM) nim_attr, nim_object, nim_pdattr
  • 13. This page shows the ODM object classes used during the configuration of a device. When an AIX system boots, the cfgmgr is responsible for configuring devices. There is one ODM object class which the cfgmgr uses to determine the correct sequence when configuring devices: Config_Rules Although cfgmgr gets credit for managing devices (adding, deleting, changing, and so forth) it is actually the Config_Rules object class that does the work through various methods files. Mayor / Minor = 22, 1 >> Privado / Publico. The ODM is made from object classes, which are broken into individual objects and descriptors AIX offers a command line interface to work with the ODM files. The device information is held in the customized and the predefined databases (Cu*, Pd*)
  • 14.
  • 15. To support diskless, dataless and other workstations, the ODM object classes are held in three repositories: /etc/objrepos Contains the customized devices object classes and the four object classes used by the Software Vital Product Database (SW-VPD) for the / (root) part of the installable software product. The root part of the software contains files that must be installed on the target system. To access information in the other directories this directory contains symbolic links to the predefined devices object classes. The links are needed because the ODMDIR variable points to only /etc/objrepos. It contains the part of the product that cannot be shared among machines. Each client must have its own copy. Most of this software requiring a separate copy for each machine is associated with the configuration of the machine or product. /usr/lib/objrepos Contains the predefined devices object classes, SMIT menu object classes and the four object classes used by the SW-VPD for the /usr part of the installable software product. The object classes in this repository can be shared across the network by /usr clients, dataless and diskless workstations. Software installed in the /usr-part can be shared among several machines with compatible hardware architectures. /usr/share/lib/objrepos Contains the four object classes used by the SWVPD for the /usr/share part of the installable software product. The /usr/share part of a software product contains files that are not hardware dependent. They can be shared among several machines, even if the machines have a different hardware architecture. An example for this are terminfo files that describe terminal capabilities. As terminfo is used on many UNIX systems, terminfo files are part of the /usr/share-part of a system product.
  • 16. This visual summarizes how ODM classes act together. 1. When a device is defined in AIX, the device must be defined in ODM class PdDv. 2. A device can be defined by either the cfgmgr (if the device is detectable), or by the mkdev command. Both commands use the define method to generate an instance in ODM class CuDv. The configure method is used to load a specific device driver and to generate an entry in the /dev directory. Notice the link PdDvLn from CuDv back to PdDv. 3. At this point you only have default attribute values in PdAt, which means for a terminal you could not login (default is disable) and the terminal type is dumb. If you change the attributes, for example, login to enable and term to ibm3151, you get objects describing the nondefault values in CuAt. chdev -l tty0 -a term=ibm3151 1: cfgmgr, reconoce el dispositivo instalado. 2: el dispositivo pasa a estar en la lista de “defined devices”. 3: el dispositivo pasa de estar solo en la base de “defined devices” a estar tambien bajo “available devices”. 4: Device Drivers (DvDr). 5: con: mkdev -c tty -t tty -s rs232, lo pongo en: /dev/device.
  • 17.
  • 18. The most common device states are: Undefined - The device is a supported device but is not configured. It does not reside in the customized database. Defined - The device has been added to the customized database. It has been allocated a logical device name, a location code and attributes have been assigned to it. But, it is still unavailable for use. Available - The device resides in the customized database. The device is fully configured and is ready for use. When a device is first identified, it is configured and put into the Available state. If a device that has been configured in the past is powered off and the machine is rebooted, the device will appear in the Defined state. This indicates that the system knows it is supposed to be there, but because it was not powered on, it cannot be used. You can control the device states by using smit or the commands mkdev and rmdev. To put a defined tape device into an available state: In the smit devices area, use Configure a Defined Tape Device -or- # mkdev -l rmt0 To move an available tape device to defined: In the smit devices area, use Remove a Tape Device and set Delete from Database to no -or- # rmdev -l rmt0 To permanently remove an available or define tape device: In the smit devices area, use Remove a Tape Device and set Delete from Database to yes -or- # rmdev -dl rmt0 Remember, most Defined devices are the result of not powering on the device before booting. Or, it could be the device was physically removed, but you never ran rmdev –dl xxxx to remove the device from the ODM. cfgmgr is a program that runs during boot that configures devices. It can also be run safely from the command line on a system that is up and running. cfgmgr identifies all self-configuring devices as long as they are powered on and matches them to the information in the predefined database. It then uses the predefined information to complete a customized database entry for the device. All devices are self-configuring except for parallel and serial devices. So except for things like printers and ASCII terminals, configuring a device requires only attaching it and power it on before booting the machine. Since cfgmgr runs during the boot process, no more intervention is required by the administrator. You see that for SCSI devices, you need to set a unique SCSI ID on the device before attaching it. Once that is done, configuration of the device is handled by AIX. Every logical device is assigned a location code when it is attached to the system. Location codes depend on the type of device and the adapter to which it connects. The location code is another way of identifying the physical device. The location codes exist to provide the system with a method of locating the device and establishing relationships between devices and their adapters. If a hardware failure occurs, the location code is often displayed or referred to in the LED. The format for location codes is: AB-CD-EF-GH The length of the location code depends on the type of device. Two pairs indicate an adapter. Four pairs indicates a device attached to an adapter.
  • 19.
  • 20. The devices that have been customized in the system are described in the ODM customized database. Each device has a logical device name, a status, a location and various attributes. The lsdev -CH command provides information on the resource name, its status (or state), the address or location, and a brief description of all devices in the customized database. This list contains those devices that are found on the system. lscfg -v provides a verbose detailed output of all of the devices on the machines. It includes vital product data (VPD) which has information like manufacturer, type and model, and part numbers. Not all devices have VPD. lsattr -El sys0 provides attributes for the device. In this example, it is providing the attributes for the kernel. sys0 is the device name of the kernel. To fully document your system you need to run this command against all devices configured on your machine. For example, to get the attributes of a hard drive, you need to run lsattr -El hdisk0. It would probably be helpful to create a shell script to complete this process for you. getconf -a writes the values of all system configuration variables to standard output. The status column will contain: Available: The device is ready and can be used Defined: The device is unavailable Devices may appear in a defined state after a restart. If this is the case, it may be due to the fact that the device is powered off or the fact that the device no longer exists on the system. Devices with a location code are physical devices. Devices without a location code are logical devices. Location codes depend on the type of device and the adapter to which the device is connected. The lsattr -E -l [resource name] command provides detailed information on the effective attributes currently configured for specified devices. In the example, it provides configuration information on the system itself. The -C option for lsdev pulls the customized information from the ODM. The -E option for lsattr shows the effective attributes. The -l option for both commands is the logical device name. The -c option for both commands is the class of device. The -a attribute option for the lsattr command displays information for a specific attribute. Another command that can be used to list information about devices found in the ODM customized database is lscfg -v. The listing is sorted by parent, child and device location. Specific hardware information about devices will be listed such as EC level, FRU number, part number, and so forth. The output also displays the model architecture and bus type. The first set of digits, AB, defines the bus type that devices are attached to: • 00 defines resources attached to the processor bus, such as the system planar, the processor, memory and the primary PCI bus • 01 defines resources attached to the ISA bus such as the diskette drive, mouse and keyboard adapters • 04 defines resources attached to the PCI bus where either there is only one PCI bus or where the PCI bus can not be determined. • XY defines resources attached to the XY parent PCI bus, where XY is a two character identify for the bus determined by the machine designer. For example, a machine may have several PCI buses each numbered 10, 20, etc. The second set of digits, CD, identify a slot or adapter number. Again, how this position is used may vary from machine/model to machine/model. The integrated devices are on the primary PCI bus (start with 10) or on the ISA bus (01).
  • 21. Their CD positions are fixed unlike on the Model 140 where the letters are assigned in the order of discover. So, for example, 01-D1 is always the integrated diskette drive and is attached on the ISA bus. 10-80 is always the integrated SCSI controller (adapter). Pluggable cards will be attached to one of the two PCI buses. Slots 2 and 3 are on the primary bus and will start with 10. Cards in Slots 1, 4 or 5 are on the secondary bus and start with 1P. Each slot has an assigned location code number. To see the assigned numbers you need to reference the Service Guide. To give one example, a card in slot 1 will have an address of 1P-08. Important AIX commands List all adapters and their AIX location codes: lsdev -Cc adapter List all slots and what is in them: lsslot -c pci Show information about device including physical location code and the AIX location code: lscfg -vl xyz where xyz is the name of a device such as ent0 or ssa0. Odmget –q …. > file ; vi file ; modifico lo que necesito ; odmdelete –o lo mismo q use con el odmget ; odmadd file. Los tipos de atributo estan definidos en PdAt: defined, undefined, etc. lsdev -CHF quot;name status physloc location descriptionquot;: listo las ubicaciones del hardware del equipo. Dispositivos: AB-CD-EF-GH: AB: bus type/pci parent bus as asssigned by firmware. CD: Devfuncion number adapter or physical location. EF: Identifies a Connector ID. GH: device /FRU/port ID. X EJ: 01-D1-00-00 diskette drive 00(01,04,XY) resources (00 attached to processor), 01 (floppy, mouse, Keyb), 04 (attached to PCI only) 01-99: for pluggable adapters/cards. 00: if HACMP, not usable; SCSI ID 7, unusable by others. EF: Connector ID. GH: Port Identifier, address memory, modules, device, FRU of device. Con estos datos sacamos el FRU, field replacement unit. ** Installation guide, service guide & users guide para el kit de emergencias.
  • 22. los rhd* son raw devices (caracteres), que en los sistemas estan asociados con el device normal (hd* de blockes). Checkpoint 1. In which ODM class do you find the physical volume ID's of your disks? Customized Attributes Database (CuAt) 2. What is the difference between state defined and available? When a device is defined, there is an entry in the ODM, class CuDv. When a device is available, the device driver has been loaded. The device driver can be accessed by the entries in the /dev directory.
  • 23. Mkdev –l =~ cfgmgr (para pasar de definida a disponible) Rmdev –l rmt0 para pasar de disponible a definida Rmdev –dl rmt elimina permanentemente (queda predefinido) # lsdev -PHx disk (la “x”, puede ser [C]lass, [S]ubclass, [T]ype) class type subclass description disk array dar 7135 Disk Array Device disk mpioosdisk fcp MPIO Other FC SCSI Disk Drive disk array fdar 2102-F10 Disk Array Device disk 1080mbDPEA ide 1.0 GB IDE Disk Drive disk 540mb ide 540 MB IDE Disk Drive disk 540mbDALA ide 540 MB IDE Disk Drive disk 540mbWD ide 540 MB IDE Disk Drive disk 720mb ide 720 MB IDE Disk Drive disk 730mb ide 730 MB IDE Disk Drive disk 730mbWD ide 730 MB IDE Disk Drive disk oidisk ide Other IDE Disk Drive
  • 24. odmget –q quot;uniquetype=disk/scsi/scsdquot; PdDv | more PdDv: type = quot;scsdquot; class = quot;diskquot; subclass = quot;scsiquot; prefix = quot;hdiskquot; devid = quot;quot; base = 1 has_vpd = 1 detectable = 1 chgstatus = 0 bus_ext = 0 fru = 1 led = 0 setno = 2
  • 25. msgno = 0 catalog = quot;scdisk.catquot; DvDr = quot;scdiskquot; Define = quot;/etc/methods/definequot; Configure = quot;/etc/methods/cfgscdiskquot; Change = quot;/etc/methods/chgdiskquot; Unconfigure = quot;/etc/methods/ucfgdevicequot; Undefine = quot;/etc/methods/undefinequot; Start = quot;quot; Stop = quot;quot; inventory_only = 0 uniquetype = quot;disk/scsi/scsdquot;
  • 26. odmget CuAt | grep -ipw hdisk0 CuAt: name = quot;hdisk0quot; attribute = quot;pvidquot; value = quot;00ce122f3983cdce0000000000000000quot; type = quot;Rquot; generic = quot;Dquot; rep = quot;squot; nls_index = 11 ls -l /dev/*disk0 brw------- 1 root system 17, 1 May 22 18:00 /dev/hdisk0 crw------- 2 root system 17, 1 May 22 17:51 /dev/rhdisk0 lsvg -l rootvg rootvg: LV NAME TYPE LPs PPs PVs LV STATE MOUNT POINT hd5 boot 2 2 1 closed/syncd N/A hd6 paging 64 64 1 open/syncd N/A hd8 jfs2log 1 1 1 open/syncd N/A hd4 jfs2 2 2 1 open/syncd / hd2 jfs2 146 146 1 open/syncd /usr hd9var jfs2 2 2 1 open/syncd /var hd3 jfs2 5 5 1 open/syncd /tmp hd1 jfs2 6 6 1 open/syncd /home hd10opt jfs2 9 9 1 open/syncd /opt odmget CuDep | grep -ipw rootvg CuDep: name = quot;rootvgquot; dependency = quot;hd5quot; CuDep: name = quot;rootvgquot; dependency = quot;hd6quot; CuDep: name = quot;rootvgquot; dependency = quot;hd8quot; CuDep: name = quot;rootvgquot; dependency = quot;hd4quot; CuDep: name = quot;rootvgquot; dependency = quot;hd2quot; CuDep: name = quot;rootvgquot; dependency = quot;hd9varquot; CuDep: name = quot;rootvgquot; dependency = quot;hd3quot; CuDep: name = quot;rootvgquot; dependency = quot;hd1quot; CuDep: name = quot;rootvgquot; dependency = quot;hd10optquot;
  • 27.
  • 28. The Predefined Devices (PdDv) object class contains entries for all devices supported by the system. A device that is not part of this ODM class could not be configured on an AIX system. The attributes you should know about are: Type: Specifies the product name or model number (for example 8mm (tape)). Class: Specifies the functional class name. A functional class is a group of device instances sharing the same high-level function. For example, tape is a functional class name representing all tape devices. Subclass: Device classes are grouped into subclasses. The subclass scsi specifies all tape devices that may be attached to an SCSI system. BKM2MIF Prefix: Specifies the Assigned Prefix in the customized database, which is used to derive the device instance name and /dev name. For example, rmt is the prefix name assigned to tape devices. Names of tape devices would then look like rmt0, rmt1, or rmt2. Base: This descriptor specifies whether a device is a base device or not. A base device is any device that forms part of a minimal base system. During system boot, a minimal base system is configured to permit access to the root volume group and hence to the root file system. This minimal base system can include, for example, the standard I/O diskette adapter and a SCSI hard drive. The device shown in the picture is not a base device. This flag is also used by the bosboot and savebase command, which are introduced in the next unit. Detectable: Specifies whether the device instance is detectable or undetectable. A device whose presence and type can be determined by the cfgmgr once it is actually powered on and attached to the system, is said to be detectable. A value of 1 means that the device is detectable, and a value of 0 that it is not (for example, a printer or tty). Led: Indicates the value displayed on the LEDs when the configure method begins to run. The value stored is decimal, the value shown on the LEDs is hexadecimal (2418 is 972 in hex). setno, msgno: Each device has a specific description (for example, 4.0 GB 8mm Tape Drive) that is shown when the device attributes are listed by the lsdev command. These two descriptors are used to lookup the description in a message catalog. Catalog: Identifies the file name of the NLS (national language support) catalog. The LANG variable on a system controls which catalog file is used to show a message. For example, if LANG is set to en_US, the catalog file /usr/lib/nls/msg/en_US/devices.cat is used. If LANG is de_DE, catalog /usr/lib/nls/msg/de_DE/devices.cat is used. DvDr: Identifies the name of the device driver associated with the device (for example, tape). Usually, device drivers are stored in directory /usr/lib/drivers. Device drivers are loaded into the AIX kernel when a device is made available. Define: Names the define method associated with the device type. This program is called when a device is brought into the defined state. Configure: Names the configure method associated with the device type. This program is called when a device is brought into the available state. Change: Names the change method associated with the device type. This program is called when a device attribute is changed via the chdev command. Unconfigure: Names the unconfigure method associated with the device type. This program is called when a device is unconfigured by rmdev. Undefine: Names the undefine method associated with the device type. This program is called when a device is undefined by rmdev. Start, Stop: Few devices support a stopped state (only logical devices). A stopped state means that the device driver is loaded, but no application can access the device. These two attributes name the methods to start or stop a device. Uniquetype: A key that is referenced by other object classes. Objects use this descriptor as pointer back to the device description in PdDv. The key is a concatenation of the class, subclass and type values.
  • 29. The Predefined Attribute object class contains an entry for each existing attribute for each device represented in the PdDv object class. An attribute is any device-dependent information, such as interrupt levels, bus I/O address ranges, baud rates, parity settings or block sizes. The extract out of PdAt shows three attributes (block size, physical volume identifier and terminal name) and their default values. The meanings of the key fields shown on the visual are as follows: Uniquetype: This descriptor is used as a pointer back to the device defined in the PdDv object class. Attribute: Identifies the name of the attribute. This is the name that can be passed to the mkdev or chdev commands. For example to change the default name of dumb to ibm3151 for a terminal name, you can issue: # chdev -l tty0 -a term=ibm3151 deflt Identifies the default value for an attribute. Nondefault values are stored in CuAt. Values: Identifies the possible values that can be associated with the attribute name. For example, allowed values for the block_size attribute range from 0 to 245760, with an increment of 1. The Customized Devices (CuDv) object class contains entries for all device instances defined in the system. As the name implies, a defined device object is an object that a define method has created in the CuDv object class. A defined device object may or may not have a corresponding actual device attached to the system. CuDv object class contains objects that provide device and connection information for each device. Each device is distinguished by a unique logical name. The customized database is updated twice, during system bootup and at run time, to define new devices, remove undefined devices and update the information for a device that has changed. The key descriptors in CuDv are: name A customized device object for a device instance is assigned a unique logical name to distinguish the device from other devices. The visual shows two devices, a tape device rmt0 and a tty, tty0. Status: Identifies the current status of the device instance. Possible values are: - status = 0: Defined - status = 1: Available - status = 2: Stopped chgstatus: This flag tells whether the device instance has been altered since the last system boot. The diagnostics facility uses this flag to validate system configuration. The flag can take these values: - chgstatus = 0: New device - chgstatus = 1: Don't care - chgstatus = 2: Same - chgstatus = 3: Device is missing ddins: This descriptor typically contains the same value as the Device Driver Name descriptor in the Predefined Devices (PdDv) object class. It specifies the name of the device driver that is loaded into the AIX kernel. Location: Identifies the physical location of a device. The location code is a path from the system unit through the adapter to the device. In case of a hardware problem, the location code is used by technical support to identify a failing device. In many RS/6000 systems the location codes are labeled in the hardware, to facilitate the finding of devices. Parent: Identifies the logical name of the parent device. For example, the parent device of rmt0 is scsi0. Connwhere: Identifies the specific location on the parent device where the device is connected. For example, the device rmt0 uses the SCSI address 1,0. PdDvLn: Provides a link to the device instance's predefined information through the uniquetype descriptor in the PdDv object class.
  • 30. Customized Atributes (CuAt) The Customized Attribute object class contains customized device-specific attribute information. Devices represented in the Customized Devices (CuDv) object class have attributes found in the Predefined Attribute (PdAt) object class and the CuAt object class. There is an entry in the CuAt object class for attributes that take customized values. Attributes taking the default value are found in the PdAt object class. Each entry describes the current value of the attribute. These objects out of the CuAt object class show two attributes that take customized values. The attribute login has been changed to enable. The attribute pvid shows the physical volume identifier that has been assigned to disk hdisk0.
  • 31. System Initialization After powering on a machine the hardware is checked and initialized. This phase is called the POST (Power-On Self Test). The goal of the POST is to verify the functionality of the hardware. After the POST is complete, a boot logical volume (BLV or boot image) is located from the boot list and is loaded into memory. During a normal boot, the location of the BLV is usually a hard drive. Besides hard drives, the BLV could be loaded from tape or CD-ROM. This is the case when booting into maintenance or service mode. If working with NIM (network install manager), the BLV is loaded via the network. To use an alternate boot location you must invoke the appropriate boot list by depressing f5/f6 function keys during the boot process. There is more information on boot lists, later in the unit. Passing control to the boot logical volume means that one component of the boot logical volume, the AIX kernel, gets control over the boot process. The components of the BLV are discussed later in the unit. All devices are configured during the boot processes. This is done in different phases by the cfgmgr. At the end, the init process is started and processes the /etc/inittab file. Loading a boot image: The AIX kernel is the core of the operating system and provides basic services like process, memory and device management. The AIX kernel is always loaded from the boot logical volume. There is a copy of the AIX kernel in the hd4 file system (under the name /unix), but this program has no role in system initialization. Never remove /unix, because it's used for rebuilding the kernel in the boot logical volume. The boot commands are programs that are called during the boot process. Examples are bootinfo, cfgmgr and more. The boot logical volume contains a reduced copy of the ODM. During the boot process many devices are configured before hd4 is available. For these devices the corresponding ODM files must be stored in the boot logical volume. After starting the kernel, the boot script rc.boot gets control over the boot process. This is explained in the System Initialization Part II Unit.
  • 32. You can use the command bootlist or diag from the command line to change or display the boot lists. You can also use the System Management Services (SMS) programs.
  • 33. 1. bootlist command The bootlist command is the easiest way to change the boot list. The first example shows how to change the boot list for a normal boot. In this example, we boot either from hdisk0 or hdisk1. To query the boot list, you can use the option -o which was introduced in AIX 4.2. The next example shows how a service boot list can be set. 2. diag command The diag command is part of the package bos.rte.diag which allows diagnostic tasks. One part of these diagnostic tasks allows for displaying and changing boot lists. Working with the diag command is covered later in the course. The custom boot list is the normal boot list set via the bootlist command, the diag command or the SMS programs. The normal boot list is used during a normal boot. The default boot list is called when F5 or F6 is pressed during the boot sequence. Other machines, in addition to the default boot list and the custom boot list, allow for a customized service boot list. This is set using mode service with the bootlist command. The default boot list is called when F5 is pressed during boot. The service boot list is called when F6 is pressed during boot. You can also change the boot list with the System Management Services. The SMS programs are integrated into the hardware (they reside on ROM). The picture shows how to start the System Management Services in graphic mode. After power-on you need to press F1 to start up the graphic version of the System Management Services. You must press this key when a graphic logo and some icons appear and the tone is heard. If your model does not have a graphic adapter, you need to set up an ASCII terminal on the S1 port. In this case a text version of the System Management Services will be started on your terminal. In the System Management Service menu, select Boot or Multiboot (model dependant) to work with the boot list. The look of the menu differs on the various models and firmware levels. RS/6000's support up to five boot devices. Some models only support four. A default boot list is stored with the following sequence: 1. Diskette drive 2. CD-ROM 3. Internal disk 4. Communication adapter (like Ethernet or token-ring) To set a new boot sequence, type the sequence number in the new column. Be sure to save your changes before exiting. IBM's family of SMP servers includes a service processor. This processor allows actions to occur even when the regular processors are down. The SMP servers can be set up to automatically call an IBM support center (or any other site) in case of a boot failure. An automatic transmittal of boot failure information takes place. This information includes LED codes and service request numbers, that describe the cause of the boot failure. If the data is sent to an IBM Service Center, the information is extracted and placed in a problem record. IBM Service personnel will call the customer to find out if assistance is requested. A valid service contract is a prerequisite for this dial-out feature of the service processor. Other features of the service processor are: • Console mirroring to make actions performed by a remote technician visible and controllable by the customer. • Remote as well as local control of the system (power-on/off, diagnostics, reconfiguration, maintenance). • Run-time hardware and operating system surveillance. If, for example, a CPU fails, the service processor would detect this, reboot itself automatically and run without the failed CPU. • Timed power-on and power-off, reboot on crash, reboot on power loss.
  • 34. Before discussing LED/LCD codes that are shown during the boot process we want to identify how a system can be accessed that will not boot. The maintenance mode can be started from an AIX CD, an AIX bootable tape (like an mksysb) or a network device, that has been prepared on a NIM master. The devices that contain the boot media must be stored in the boot lists. To boot into maintenance modes:
  • 35. • Newer PCI systems support the bootlist command and booting from a mksysb tape, but the tape device is by default not part of the boot sequence. • Verify your boot list, but do not forget that some machines do not have a service boot list. Check that your boot device is part of the boot list: # bootlist -m normal –o • If you want to boot from your internal tape device you need to change the boot list because the tape device by default is not part of the boot list. For example: # bootlist -m normal cd0 rmt0 hdisk0 • Insert the boot media (either tape or CD) into the drive. • Power on the system. The system begins booting from the installation media. After several minutes, c31 is displayed in the LED/LCD panel. After a few minutes you will see the Installation and Maintenance menu. When booting in maintenance mode you first have to identify the system console that will be used, for example your lft terminal or a tty that is attached to the S1 port. After selecting the console the Installation and Maintenance menu is shown. As we want to work in maintenance mode, we use selection 3 to start up the Maintenance menu. From this point we access our rootvg to execute any system recovery steps that may be necessary.
  • 36. Let’s Review 1. T/F? You must have AIX loaded on your RS/6000 to use the System Management Services Programs. False 2. Your RS/6000 is currently powered off. AIX is installed on hdisk1 but the boot list is set to boot from hdisk0. How can you fix the problem and make the machine boot from hdisk1? bootlist –m normal –o hdisk1 3. Your machine is booted and you are sitting at the # prompt. What is the command that will display the boot list? How could you change the boot list? bootlist -m normal –o ; bootlist - m normal cd0 hdisk0 hdisk1 4. What command is used to fix the boot logical volume? bosboot -ad /dev/hdisk0 5. What script controls the boot sequence? rc.boot ** Rs6000 system overview - licensed internal code course… Problem determination tools - SMS manual. Elemental que el sysdump/vuelcos de memoria tenga lugar en disco suficiente. Se pueden subir a la redIBM directamente para ser analizados. Con el alog puedo ver los codigos de error de booteo. www-1.ibm.com/servers/eserver/pseries/library/hardware_docs buscar el boton de reset para cada equipo en los manuales… 520 FRU = Field Replaceable Unit SRN = Service Request Number El firmware se puede actualizar mediante la SMS, HMC o el sistema operativo. En el tercer caso, el OS debe ser apagado. 3 tipos de fw upgrade: server, I/O and subsystem… Hacer simulacros de backup, para entrenamiento de los Hands and Eyes. Booteando con el cd del OS puesto, gano root. 1. During the AIX boot process, the AIX kernel is loaded from the root file system. True or False? 1. False. The AIX kernel is loaded from hd5, BLV. 2. A service processor allows actions to occur even when the regular processors are down, T or F? 2. True, requiere un modem conectado al puerto serial 2. 3. How do you boot an AIX machine in maintenance mode? 3. You need to boot from AIX para cinta, mksysb para CD o DVD, o NIM server Abro el manual de instalacion, le digo la ubicación en el edificio, en el rack, el numero de serie, el CD1 del sistema operativo correspondiente, le digo que abra el cdrom con el clip, prenda la maquina, y tenga apretado F1, entro a SMS, elijo la opcion 3 y el modo q necesito dentro del SMS. 4. Your machine keeps rebooting and repeating the POST. What can be the reason for this? 4. Lista de booteo invalida o se corrompio el hd5 (bootlist -ad) o fallas de hardware. During the boot process a boot logical volume is loaded into memory. Boot devices and sequences can be updated via the bootlist-command and the diag-command.
  • 37. The boot logical volume contains an AIX kernel, an ODM and a boot script rc.boot that controls the AIX boot process. The boot logical volume can be re-created using the bosboot command. LED codes produced during the boot process can be used to diagnose boot problems. PCIs additionally use visual boot signals. Desde WSM, cerrar particion, activar, clickear “abrir ventana”. Esperar secuencia de booteo y presionar F5/F6 al toque!! *antes hay q desde el WSM / Hypervisor, pasar la unidad de CD a la maquina que vamos a bootear.; Diagnostic information for multiple bus systems. Booteando con el CD, van a salir los carteles de la instalacion, primero: ******* Please define the system console ****** “Type a 1 and press enter to use this terminal as the system console” y luego: 1 Access a Root Volume Group Perform corrective actions 2 Copy a System Dump to Media 3 Access Advanced Maintenance 4 Install from a System Backup Recover data 3: Welcome to Base Operating System Installation and Maintenance >>> 1 Start Install Now with Default Settings 2 Change/Show Installation Settings and Install 3 Start Maintenance Mode for System Recovery 1. Access this Volume Group and start a shell – Si elijo la opcion 2, no monta los filesystems, y por mas que corra el fsck, , el hd5 NUNCA voy a poder chequearlo con fsck. Si entre a la opcion 2, no tengo nada! En este punto puedo hacer un fsck y“exit” y tendre los FS montados otra vez. # bosboot -ad /dev/hdisk0 ; sync # shutdown –Fr Las unidades de cinta pueden estar vinculadas junto con los discos al dispositivo scsi. Hay que tener mucho cuidado al desvincular una cinta de una LPAR, ya que no es de la misma simpleza que remover un CDROM, porque al desasignar la rama entera, pueden quedar los discos desvinculados. REVISAR!! Unica opcion para no depender del CD del OS booteable (CD1) , seria tener un MKSYSB booteable. JFS Log almacena los punteros de los inodos a los datos. El bootlv contiene 3 archivos: ramfs, mini kernel y mini ODM. Cfgmgr agrega el dispositivo al /dev, con mayor y menor lo sube a memoria, lo que pone el device available. RAMFS files are accessed using a prefix of /../ . For example to access the fsck command in the RAMFS (before the /usr file system is mounted) rc.boot uses /../usr/sbin/fsck. Puede ser que haya que configurar la terminal: vt100, 3151, lft, etc. Una vez recibidos los codigos c31-c34, no apareceran mas LEDs…
  • 38. …Y continua con la ejecucion del initttab: : init:2:initdefault: brc::sysinit:/sbin/rc.boot 3 >/dev/console 2>&1 # Phase 3 of system boot powerfail::powerfail:/etc/rc.powerfail 2>&1 | alog -tboot > /dev/console # Power Failure Detection (1) /etc/init from ramfs, in the boot image rc.boot 1 > cfgmgr cfgmgr + mkdev rmdev –l rmdev –dl undef def avail def undef RSPC no puede ejecutar AIX5.3, solo hasta 5.2 igual que todos los *pc (arq PCI). distinto de chrp. *** El /home es lo utlimo en montarse. *** pp_login enable Launch a recovering login on a # shconf -E -l prio sh_pp disable Enable Process Priority Problem console pp_errlog disable Record error events in the Error pp_lto 2 Detection Time-out Log file pp_lprio 56 Process Priority pp_eto 2 Detection Time-out pp_lterm /dev/tty0 Terminal Device pp_eprio 60 Process Priority pp_cmd disable Launch a command pp_warning disable Display a warning message on a pp_cto 2 Detection Time-out console pp_cprio 60 Process Priority pp_wto 2 Detection Time-out pp_cpath / Script pp_wprio 60 Process Priority pp_reboot disable Automatically REBOOT system pp_wterm /dev/console Terminal Device pp_rto 5 Detection Time-out pp_rprio 39 Process Priority todo lo que esta como respawn en el inittab, tiene el tiempo de respawn seteado con el shconf en el shdaemon. Physical Volume States
  • 39. 1 From where is rc.boot 3 run? /sbin/rc.boot in rootvg, and is invoked by inittab 2 Your system stops bootin with led 557:in which rc.boot phase does the system stop? Rc.boot 2 What are some reasons for this problem? Damaged filesystem, corrupted JFS Log, Corrupted BLV. 3 Which ODM file is used by the cfmgr during boot to configure the devices in the correct sequence? Config_rules 4 What does the line init:2:initdefault: in /etc/inittab mean? This line is used by default the init process., to determine the initial run level (2=multiuser) After the BLV is loaded into RAM, the rc.boot script is executed three times to configure the system. During rc.boot 1 devices to varyon the rootvg are configured. During rc.boot 2 the rootvg is varied on. In rc.boot 3 the remaining devices are configured. Processes defined in /etc/inittab file are initiated by the init process
  • 40. 1. File system full? A full / or /tmp file system might cause a boot problem. This is very easy to fix. Boot in maintenance mode, access the rootvg with file systems and cleanup or increase the file system sizes. 2. /etc/inittab corrupt? /etc/environment corrupt? A LED of 553 mostly indicates a corrupted /etc/inittab file, but in some cases a bad /etc/environment may also lead to a 553. To fix this problem boot in maintenance mode and check both files. Consider using a mksysb to retrieve these files from a backup tape. 3. Boot logical volume corrupt? JFS log corrupt? The next thing to try if your machine does not boot, is to check the boot logical volume and JFS log. To fix a corrupted boot logical volume, boot in maintenance mode and use the bosboot command: # bosboot -ad /dev/hdisk0 To fix a corrupted JFS log, boot in maintenance mode and access the rootvg but do not mount the file systems. In the maintenance shell issue the logform command and do a file system check for all file systems that use this JFS log: # logform /dev/hd8 # fsck -y /dev/hd4 # fsck -y /dev/hd2 # fsck -y /dev/hd3 # fsck -y /dev/hd1 # fsck -y /dev/hd9var exit The logform command initializes a new JFS transaction log and this may result in loss of data, because JFS transactions may be destroyed. But, your machine will boot afterwards, because the JFS log has been repaired. 4. Superblock corrupt? Another thing you can try is to check the superblocks of your rootvg file systems. If you boot in maintenance mode and you get error messages like Not an AIX file system or Not a recognized file system type it is probably due to a corrupt superblock in the file system. Each file system has two super blocks, one in logical block 1 and a copy in logical block 31. To copy the superblock from block 31 to block 1 for the root file system, issue the following command: # dd count=1 bs=4k skip=31 seek=1 if=/dev/hd4 of=/dev/hd4 5. rootvg locked? Many LVM commands place a lock into the ODM to prevent other commands working on the same time. If a lock remains in the ODM due to a crash of a command, this may lead to a hanging system. To unlock the rootvg, boot in maintenance mode and access the rootvg with file systems, And issue the following command to unlock the rootvg: # chvg -u rootvg 6. ODM files missing? If you see LED codes in the range 523 to 534 ODM files are missing on your machine. Use a mksysb tape of the system to restore the missing files. 7. Mount of /usr or /var failed? An LED of 518 indicates that the mount of the /usr or /var file system failed. If /usr is mounted from a network, check the network connection. If /usr or /var are locally mounted, use fsck to check the consistency of the file systems. If this does not help check the hardware (diag).
  • 41. Two different volume group types are available: • Normal volume groups: When creating a volume group with smit or using the mkvg command, without specifying option -B, a normal volume group is created. The maximum number of logical volumes in a normal volume group is 256. • Big volume groups: This volume group type has been introduced with AIX 4.3.2. A big volume group must be created with mkvg -B. A big volume group cannot be imported into an AIX 4.3.1 or lower versions. The maximum number of logical volumes in a big volume group is 512. Volume groups are created with the mkvg command. Here are some examples: 1. Create a normal volume group datavg, that contains a disk hdisk2: # mkvg -s 16 -t 2 -y datavg hdisk2 • The option -s 16 specifies a partition size of 16 MB. • The option -t 2 is a factor that must be multiplied by 1016. In this case the option indicates that the maximum number of partitions on a disk is 2032. That means that the volume group can have up to 16 disks. Each disk must be less than 4064 megabytes (2032 x 2). • The option -y specifies the name of the volume group (datavg). 2. Create a big volume group bigvg with three disks: # mkvg -B -t 16 -y bigvg hdisk2 hdisk3 hdisk4 • The option -B specifies that we are creating a big volume group. • The option -t 16 indicates that the maximum number of partitions on a disk is 16256. That means that the volume group can have up to 8 disks. • The option -y specifies the name of the volume group. Volume groups characteristics could be changed with the chvg command. For example, to change a normal volume group datavg into a big volume group, the following command must be executed: # chvg -B datavg Logical volumes can be mirrored, that means each logical partition gets more than one associated physical partition. The maximum ratio is 1:3; that means one logical partition has three associated physical partitions. The picture shows a two-disk mirroring of a logical volume. An application writes data to the disk which is always handled by the LVM. The LVM recognizes that this partition is mirrored. The data will be written to both physical partitions. If one of the disks fails, there will be at least one good copy of the data. Striping is an LVM feature where the partitions of the logical volume are spread across different disks. The number of disks involved is called stripe width. Striping works by splitting write and read requests to a finer granularity, named stripe size. Strip sizes may vary from 4 KB to 128 KB. A single application write or read request is divided into parallel physical I/O requests. The LVM fits the pieces together by tricky buffer management. Striping makes good sense, when the following conditions are true: • The disks use separate adapters. Striping on the same adapter does not improve the performance very much. • The disks are equal in size and speed. • The disks contain striped logical volumes only. • Accessing large sequential files. For writing or reading small files striping does not improve the performance.
  • 42.
  • 43. The LVM uses three different disk control blocks. 1. The Volume Group Descriptor Area (VGDA) is the most important data structure of the LVM. It is kept redundant on each disk that is contained in a volume group. Each disk contains the complete allocation information of the entire volume group. 2. The Volume Group Status Area (VGSA) is always present, but is only used when mirroring has been setup. It tracks the state of the mirrored copies, that means whether the copies are synchronized or stale. 3. The Logical Volume Control Blocks (LVCB) resides at the first 512 bytes of each logical volume. If raw devices are used (for example, many database systems use raw logical volumes), be careful that these programs do not destroy the LVCB. The LVM uses identifiers for disks, volume groups, and logical volumes. As volume groups could be exported and imported between systems, these identifiers must be unique worldwide. The volume groups identifiers (VGID) have a length of 32 bytes. Hard disk identifiers have a length of 32 bytes, but currently the last 16 bytes are unused and are all set to 0 in the ODM. If you ever have to manually update the disk identifiers in the ODM, do not forget to add 16 zeros to the physical volume ID. The logical volume identifiers consist of the volume group identifier, a period and the minor number of the logical volume. All identifiers are based on the CPU ID of the creating host and a timestamp. Use these values with smit mklv: Logical Volume NAME mirrorlv Number of LOGICAL PARTITIONS: 2 Number of COPIES of each logical partition: 2 [Allocate each logical partition copy on a SEPARATE physical volume]** **You may need to set this to no if you only have one physical volume in your volume group. To see the partitions: lslv -m mirrorlv To remove the logical volume: rmlv mirrorlv 2. Use these values with smit mklv: Logical Volume NAME lvtmp1 Number of LOGICAL PARTITIONS 1 POSITION on physical volume *** ***Select a region that is available. You determined this with lspv -p hdiskX. To check the position of lvtmp1: lspv -p hdiskX 3. Change the value of POSITION on physical volume. Use smit chlv. Did the partitions move? lspv -p hdiskX Reorganize the logical volume: reorgvg rootvg lvtmp1 4. To create the logical volume using an allocation map: Create the map file: vi /tmp/lvtmp2map Add the free partitions that you identified into the allocation file. For example, hdisk0:22-23 Next, use smit mklv and modify the screen to use your map file: File containing ALLOCATION MAP /tmp/lvtmp2map The LVM uses three different disk control blocks. 1. The Volume Group Descriptor Area (VGDA) is the most important data structure of the LVM. It is kept redundant on each disk that is contained in a volume group. Each disk contains the complete allocation information of the entire volume group.
  • 44. 2. The Volume Group Status Area (VGSA) is always present, but is only used when mirroring has been setup. It tracks the state of the mirrored copies, that means whether the copies are synchronized or stale. 3. The Logical Volume Control Blocks (LVCB) resides at the first 512 bytes of each logical volume. If raw devices are used (for example, many database systems use raw logical volumes), be careful that these programs do not destroy the LVCB. Object Data Manager (ODM) Physical volumes, volume groups and logical volumes are represented as devices (Customized devices) CuDv, CuAt, CuDvDr, CuDep AIX Files /etc/vg/vgVGID Handle to the VGDA copy in memory /dev/hdiskX Special file for a disk /dev/VGname Special file for administrative access to a VG /dev/LVname Special file for a logical volume /etc/filesystems Used by the mount command to associate LV name, JFS log and mount point The most important data structure is the physical partition map. It maps each logical partition to a physical partition. The size of the physical partition map is determined at volume group creation time (depending on the number of disks that can be in the volume group, specified by mkvg -d). This size is a hard limit when trying to extend the volume group. The command lqueryvg is a low-level command that shows an extract from the VGDA on a disk, for example hdisk1. As you notice, the visual is not complete. Use the following unordered expressions and try to put each expression to the corresponding number in the picture.
  • 45. VGDA count on disk • 3 VGDAs in VG • Automatic varyon during boot • 3 LVs in VG • PP size = 16 MB • Quorum check on • LVIDs (VGID.minor_number) • 2 PVs in VG • PVIDs The LVCB stores attributes of a logical volume. The command getlvcb queries an LVCB, for example the logical volume hd2. For example: • Intrapolicy (c = Center) • Number of copies (1 = No mirroring) • Interpolicy (m = Minimum) • LVID • LV name (hd2) • Number of logical partitions (103) • Can the partitions be reorganized ? (relocatable = y) • Each mirror copy on a separate disk (strict = y) • Number of disks involved in striping (stripe width) • Stripe size • Logical volume type (type = jfs) • JFS file system information • Creation and last update time
  • 46. ODM Entries for Volume Groups # odmget -q quot;name like hdisk?quot; CuDv CuDv: name = quot;hdisk0quot; status = 1 chgstatus = 2 ddins = quot;scdiskquot; location = quot;04-C0-00-2,0quot; parent = quot;scsi0quot; connwhere = quot;2,0quot; PdDvLn = quot;disk/scsi/osdiskquot; CuDv: name = quot;hdisk1quot; status = 1 chgstatus = 2 ddins = quot;scdiskquot; location = quot;04-C0-00-3,0quot; parent = quot;scsi0quot; connwhere = quot;3,0quot; PdDvLn = quot;disk/scsi/osdiskquot; # odmget -q quot;name=hdisk0 and attribute=pvidquot; CuAt CuAt: name = quot;hdisk0quot; attribute = quot;pvidquot; value = quot;250000010700040b000c0d0000000000quot; type = quot;Rquot; generic = quot;Dquot; rep = quot;squot; nls_index = 2 The disk’s most important attribute is the PVID. The PVID has a length of 32 bytes, where the last 16 bytes are set to zeros in the ODM. Whenever you must manually update a PVID in the ODM you must specify the complete 32-byte PVID of the disk. Other attributes (for example, SCSI command queue depth, timeout values) may occur in CuAt. # odmget -q quot;value3 like hdisk?quot; CuDvDr CuDvDr: resource = quot;devnoquot; value1 = quot;12quot; value2 = quot;1quot; value3 = quot;hdisk0quot; CuDvDr: resource = quot;devnoquot; value1 = quot;12quot; value2 = quot;2quot; value3 = quot;hdisk1quot; # ls -l /dev/hdisk* brw------- 1 root system 12, 1 08 Jan 06:56 /dev/hdisk0 brw------- 1 root system 12, 2 08 Jan 07:12 /dev/hdisk1
  • 47. The ODM class CuDvDr is used to store the major and minor numbers of the devices. Applications or system programs use the special files to access a certain device. # odmget -q quot;name=rootvgquot; CuDv CuDv: name = quot;rootvgquot; status = 0 chgstatus = 1 ddins = quot;quot; location = quot;quot; parent = quot;quot; connwhere = quot;quot; PdDvLn = quot;logical_volume/vgsubclass/vgtypequot; # odmget -q quot;name=rootvgquot; CuAt CuAt: name = quot;rootvgquot; attribute = quot;vgserial_idquot; value = quot;0009301300004c00000000e63a42b585quot; type = quot;Rquot; generic = quot;Dquot; rep = quot;squot; nls_index = 2 # odmget -q quot;name=rootvgquot; CuAt CuAt: name = quot;rootvgquot; attribute = quot;pvquot; value = quot;00008371d667a44b0000000000000000quot; type = quot;Rquot; generic = quot;Dquot; rep = quot;squot; nls_index = 2 CuAt: name = quot;rootvgquot; attribute = quot;pvquot; value = quot;00008371d11226670000000000000000quot; type = quot;Rquot; generic = quot;Dquot; rep = quot;squot; nls_index = 2 The existence of a volume group is stored in CuDv, that means all volume groups must have an object in this class. One of the most important pieces of information is the VGID, which is stored in CuAt. All disks that belong to a volume group are stored in CuAt. Attributes of a logical volume, for example its LVID, are stored in the object class CuAt. Other attributes that belong to a logical volume are the intra-policy, stripe_width or the size. All logical volumes have an object in CuDvDr that is used to create the special file entries in /dev. The ODM class CuDep (customized dependencies) stores dependency information for software devices, for example, the logical volume hd2 is contained in the rootvg volume group.
  • 48. If you detect ODM problems you must identify whether the volume group is the rootvg or not. Because the rootvg cannot be varied off, this procedure applies only to non-rootvg volume groups.
  • 49. 1. In the first step, you vary off the volume group, which requires that all file systems must be unmounted first. To vary off a volume group, use the varyoffvg command. 2. In the next step, you export the volume group by using the exportvg command. This command removes the complete volume group from the ODM. The VGDA and LVCB are not touched by exportvg. 3. In the last step, you import the volume group by using the importvg command. Specify the volume group name with option -y, otherwise AIX creates a new volume group name. You need to specify only one intact physical volume of the volume group that you import. The importvg command reads the VGDA and LVCB on that disk and creates completely new ODM objects. If the ODM problem is in the rootvg, use rvgrecover: PV=hdisk0 VG=rootvg cp /etc/objrepos/CuAt /etc/objrepos/CuAt.$$ cp /etc/objrepos/CuDep /etc/objrepos/CuDep.$$ cp /etc/objrepos/CuDv /etc/objrepos/CuDv.$$ cp /etc/objrepos/CuDvDr /etc/objrepos/CuDvDr.$$ lqueryvg -Lp $PV | awk '{print $2}' | while read LVname; do odmdelete -q quot;name=$LVnamequot; -o CuAt odmdelete -q quot;name=$LVnamequot; -o CuDv odmdelete -q quot;value3=$LVnamequot; -o CuDvDr done odmdelete -q quot;name=$VGquot; -o CuAt odmdelete -q quot;parent=$VGquot; -o CuDv odmdelete -q quot;name=$VGquot; -o CuDv odmdelete -q quot;name=$VGquot; -o CuDep odmdelete -q quot;dependency=$VGquot; -o CuDep odmdelete -q quot;value1=10quot; -o CuDvDr odmdelete -q quot;value3=$VGquot; -o CuDvDr importvg -y $VG $PV # ignore lvaryoffvg errors varyonvg $VG Export rootvg by odmdeletes Import rootvg by Importvg If you detect ODM problems in rootvg use the shell script rvgrecover. This procedure is described in the AIX 4.3 Problem Solving Guide and Reference. Create this script in /bin and mark it executable. The script rvgrecover removes all ODM entries that belong to your rootvg by using odmdelete. That's the same way exportvg works. After deleting all ODM objects from rootvg it imports the rootvg by reading the VGDA and LVCB from the boot disk. This results in completely new ODM objects that describe your rootvg.
  • 50.
  • 51.
  • 52. Mirror Write Consistency (MWC) Problem: Parallel scheduling policy and ... ... system crashes before the write to all mirrors have been completed Mirrors of the logical volume are in an inconsistent state Solution: Mirror Write Consistency Allows identifying the correct physical partition after reboot Separate area of each disk (outer edge) Place logical volumes with mirror write consistency on the outer edger When working with parallel scheduling policy, the LVM starts the write operation for the physical partition at the same time. If a system crashes (for example, due to a power failure) before the write to all mirrors has been completed, the mirrors of the logical volume are in an inconsistent state. To avoid this situation, always use mirror write consistency when working with parallel scheduling policy. When the volume group is varied back online for use, this information is used to make logical partitions consistent again. Active mirror write consistency is implemented as a cache on the disk and behaves similarly to the JFS and JFS2 log devices. The physical write operation proceeds when the MWC cache has been updated. The disk cache resides in the outer edge area. Therefore, always try to place a logical volume that uses active MWC in the same area as the MWC. This improves disk access times. Here is a description of the MWC options: AIX 5L introduces the new passive option to the mirror write consistency (MWC) algorithm for mirrored logical volumes. This option only applies to big volume groups. Big volume groups allow up to 512 logical volumes and 128 physical volumes per volume group. Without the big volume group format up to 256 logical volumes and 32 physical volumes can exist within a volume group. Passive MWC reduces the problem of having to update the MWC log on the disk. This method logs that the logical volume has been opened but does not log writes. If the system crashes, then the LVM starts a forced synchronization of the entire logical volume when the system restarts. The following syntax is used with either the mklv or chlv command to set MWC options: mklv -w y|a|p|n chlv -w y|a|p|n
  • 53. Using the mklvcopy command or the smit fastpath smit mklvcopy you can add mirrors to existing logical volumes. You need to specify the new total number of logical partition copies and the disks where the physical partitions reside. If you work with active MWC, use edge as the position policy to increase performance. If there are many LVs to synchronize it's better not to synchronize the new copies immediately after the creation (that's the default). Here are some examples for the mklvcopy command: 1. Add a copy for logical volume lv01 on disk hdisk7: # mklvcopy lv01 2 hdisk7 2. Add a copy for logical volume lv02 on disk hdisk4. The copies should reside in the outer edge area. The synchronization will be done immediately: # mklvcopy -a e -k lv02 2 hdisk4 To remove copies from a logical volume use rmlvcopy or the smit fastpath smit rmlvcopy. Mirroring rootvg: 1. extendvg 2. chvg -Qn 3. mklvcopy 4. syncvg 5. bosboot 6. bootlist 7. shutdown -Fr What is the reason to mirror the rootvg? If your rootvg is on one disk, you get a single point of failure; that means, if this disk fails, your machine is not available any longer. If you mirror rootvg to a second (or third) disk, and one disk fails, there will be another disk that contains the mirrored rootvg. You increase the availability of your system. The following steps show how to mirror the rootvg. • Add the new disk to the volume group (for example, hdisk1): # extendvg rootvg hdisk1 • If you use one mirror disk, be sure that a quorum is not required for varyon: # chvg -Qn rootvg Add the mirrors for all rootvg logical volumes: # mklvcopy hd1 2 hdisk1 ; # mklvcopy hd2 2 hdisk1 ; # mklvcopy hd3 2 hdisk1 ; # mklvcopy hd4 2 hdisk1 ; # mklvcopy hd5 2 hdisk1 ; # mklvcopy hd6 2 hdisk1 ; # mklvcopy hd8 2 hdisk1 ; # mklvcopy hd9var 2 hdisk1 ; # mklvcopy hd10opt 2 hdisk1 OR # mirrorvg -s –c’x’ rootvg ; smit o: mirrorvg –m datavg hdiskX hdiskY If you have other logical volumes in your rootvg, be sure to create copies for them as well. An alternative to running multiple mklvcopy commands is to use mirrorvg. This command was added in version 4.2 to simplify mirroring VGs. The mirrorvg command by default will disable quorum and mirror the existing LVs in the specified VG. To mirror rootvg, use the command: mirrorvg -s –c ‘x’ rootvg • Now synchronize the new copies you created: # syncvg -v rootvg • As we want to be able to boot from different disks, we need to do a bosboot: # bosboot -a As hd5 is mirrored, there is no need to do it for each disk. • Update the boot list. In case of a disk failure we must be able to boot from different disks. # bootlist -m normal hdisk0 hdisk1
  • 54. • Because we disabled quorum, the system must be rebooted for that to take effect. For rootvg, you need to execute: bosboot ; bootlist -m normal Each disk that is contained in a volume group contains at least one VGDA. The LVM always reserves space for two VGDAs on each disk. If a volume group consists of two disks, one disk contains two VGDAs, the other one contains only one. If the disk with the two VGDAs fails, we have only 33 percent of VGDAs available, that means we have less than 50 percent of VGDAs. In this case the quorum, which needs more than 50% of VGDAs must be available, is not fulfilled. If a volume group consists of more than two disks, each disk contains one VGDA. If one disk fails, we still have 66% of VGDAs available and the quorum is fulfilled. What happens if a quorum is not available? Si tenemos solo dos discos, y se cae uno, debemos bootear en mantainance mode (chvg –Qn workVG), sacar el quorum, y correr bosboot, bootlist, y rebootear. Cuando falla el 1er disco del VG, la VGDA se regenera en el 2do. Cuando falla ese segundo disco con 2 VGDA, el primero seguira teniendo 1 VGDA, asi que se vuelve a perder el 66% del quorum. (varyonvg) En un disco, 2VGDA, en 2discos, 3VGDA, en 3 discos, 3VGDA (si hay mirroring, la VGSA acompana a cada VGDA) Answer True or False to the following statements: 1. All LVM information is stored in the ODM. False 2. You detect that a physical volume hdisk1 that is contained in your rootvg is missing in the ODM. This problem can be fixed by exporting and importing the rootvg? False – Run rvgrecover (rootvg recover) 3. The LVM supports RAID-5 without separate hardware. False What happens if a quorum is not available in a volume group? Consider the following example. In a two-disk volume group datavg, the disk hdisk1 is not available due to a hardware defect. hdisk1 is the disk that contains the two VGDAs; that means the volume group does not have a quorum of VGDAs. If the volume group is not varied on and the administrator tries to vary on datavg, the varyonvg command will fail.
  • 55. If the volume group is already varied on when losing the quorum, the LVM will deactivate the volume group. There is no more access to any logical volume that is part of this volume group. At this point the system sometimes shows strange behavior. This situation is posted to the error log, which shows an error entry LVM_SA_QUORCLOSE. After losing the quorum, the volume group may still be listed as active (lsvg -o), however, all application data access and LVM functions requiring data access to the volume group will fail. The volume group is dropped from the active list as soon as the last logical volume is closed. You can still use fuser -k /dev/LVname and umount /dev/LVname, but no data is actually written to the disk. With single mirroring, always disable the quorum: chvg -Qn datavg ; varyoffvg datavg ; varyonvg datavg Additional considerations for rootvg: chvg -Qn rootvg ; bosboot -ad /dev/hdiskX ; reboot Turning off the quorum does not allow a normal varyonvg without a quorum It prevents closing the volume group when losing the quorum When a nonquorum volume group loses its quorum it will not be deactivated, it will be active until it loses all of its physical volumes. When working with single mirroring, always disable the quorum using the command chvg -Qn. For data volume groups you must vary off and vary on the volume group to make the change work. When turning off the quorum for rootvg, you must do a bosboot (or a savebase), to reflect the change in the ODM in the boot logical volume. Afterwards reboot the machine. It's important that you know that turning off the quorum does not allow a varyonvg without a quorum. It just prevents the closing of an active volume group when losing its quorum. Use procedure 1 when the disk that must be replaced is mirrored.
  • 56. This procedure requires that the disk state be either missing or removed. Refer to Physical Volume States in Unit 5: Disk Management Theory for more information on disk states. Use lspv hdiskX to check the state of your physical volume. If the disk is still in the active state you cannot remove any copies or logical volumes from the failing disk. In this case the only way to bring the disk into a removed or missing state is to reboot your system. During the next varyon the LVM will detect the failing disk. Remember to disable the quorum check if you have only two disks in your volume group. The goal of each disk replacement is to remove all logical volumes from a disk. 1. Start removing all logical volume copies from the disk. Use either the smit fastpath smit unmirrorvg or the unmirrorvg command as shown. This must be done for each logical volume that is mirrored on the disk. If you have additional unmirrored logical volumes on the disk you have to either move them to another disk (migratepv), or remove them if the disk cannot be accessed (rmlv). As mentioned the latter will only work if the disk state is either missing or removed. 2. If the disk is completely empty, remove the disk from the volume group. Use smit fastpath smit reducevg or the reducevg command. 3. After the disk has been removed from the volume group, you can remove it from the ODM. Use the rmdev command as shown. If the disk must be removed from the system, shut down the machine and then remove it. 4. Connect the new disk to the system and reboot your system. The cfgmgr will configure the new disk. If using hot-swappable disks, a reboot is not necessary. 5. Add the new disk to the volume group. Use either the smit fastpath smit extendvg or the extendvg command. 6. Finally create the new copies for each logical volume on the new disk. Use either the smit fastpath smit mirrorvg or the mirrorvg command. Synchronize the volume group (or each logical volume) afterwards, using the varyonvg command. Procedure 2 applies to a disk replacement where the disk is unmirrored but could be accessed. The goal is the same as always. Before we can replace a disk we must remove everything from the disk. 1. Shut down your system if you need to physically attach a new disk to the system. Boot the system so that cfgmgr will configure the new disk. 2. Add the new disk to the volume group. Use either the smit fastpath smit extendvg or the extendvg command. 3. Before executing the next step it is necessary to distinguish between the rootvg and a non- rootvg volume group. If the disk that is replaced is in rootvg execute the steps that are shown on page Procedure 2: Special Steps for rootvg. If the disk that is replaced is not in the rootvg, use the migratepv command: # migratepv hdisk_old hdisk_new This command moves all logical volumes from one disk to another. You can do this during normal system activity. The command migratepv requires that the disks are in the same volume group. 4. If the old disk has been completely migrated, remove it from the volume group. Use either the smit fastpath smit reducevg or the reducevg command. 5. If you need to remove the disk from the system, remove it from the ODM using the rmdev command as shown. Finally remove the physical disk from the system. Note: If the disk that must be replaced is in rootvg, follow the instructions on the next page. Procedure 2 requires some additional steps if the disk that must be replaced is in rootvg. 1. Connect the new disk to the system as described in procedure 2. 2. Add the new disk to the volume group. Use smit extendvg or the extendvg command. 3. This step requires special considerations for rootvg: • Check whether your disk contains the boot logical volume (default is /dev/hd5).
  • 57. Use command lspv -l to check the logical volumes on the disk that must be replaced. If the disk contains the boot logical volume, migrate the logical volume to the new disk and update the boot logical volume on the new disk. To avoid a potential boot from the old disk, clear the old boot record, by using the chpv -c command. Then change your boot list: # migratepv -l hd5 hdiskX hdiskY # bosboot -ad /dev/hdiskY # chpv -c hdiskX # bootlist -m normal hdiskY If the disk contains the primary dump device, you must deactivate the dump before migrating the corresponding logical volume: # sysdumpdev -p /dev/sysdumpnull • Migrate the complete old disk to the new one: # migratepv hdiskX hdiskY If the primary dump device has been deactivated, you have to activate it again: # sysdumpdev -p /dev/hdX (Default is /dev/hd6 in AIX 4) 4. After the disk has been migrated, remove it from the volume group as described in procedure 2. 5. If the disk must be removed from the system, remove it from the ODM (use the rmdev command), shut down your AIX, and remove the disk from the system afterwards. Procedure 3 applies to a disk replacement where a disk could not be accessed but the volume group is intact. The failing disk is either in a state (not device state) of missing (normal varyonvg worked) or removed (forced varyonvg was necessary to bring the volume group online). If the failing disk is in an active state (this is not a device state), this procedure will not work. In this case you have to force a new vary on by rebooting the system. The reboot is necessary because you cannot vary off a volume group with open logical volumes. Because the failing disk is active there is no way to unmount file systems. If the failing disk is in a missing or removed state, start the procedure: 1. Identify all logical volumes and file systems on the failing disk. Use commands like lspv, lslv or lsfs to provide this information. These commands will work on a failing disk. 2. If you have mounted file systems on a logical volume on the failing disk, you must unmount them. Use the umount command. 3. Remove all file systems from the failing disk, using smit rmfs or the rmfs command. If you remove a file system, the corresponding logical volume and stanza in /etc/filesystems is removed as well. 4. Remove the remaining logical volumes (those not associated with a file system) from the failing disk using smit rmlv or the rmlv command. 5. Remove the disk from the volume group, using the smit fastpath smit reducevg or the reducevg command. 6. Remove the disk from the ODM (rmdev) and from the system. 7. Add the new disk to the system and extend your volume group. Use smit extendvg or the extendvg command. 8. Re-create all logical volumes and file systems that have been removed due to the disk failure. Use smit mklv, smit crfs or the commands directly. 9. Due to the total disk failure, you lost all data on the disk. This data has to be restored, either by the restore command or any other tool you use to restore data (for example, TSM). Procedure 4 applies to a total rootvg failure without mirroring. This situation might come up when your rootvg consists of one disk that fails. Or your rootvg is installed on two disks and the disk fails that contains operating system logical volumes (for example, /dev/hd4). 1. Replace the bad disk and boot your system in maintenance mode.
  • 58. 2. Restore your system from a mksysb tape, CD/DVD or NIM. Remember that if any rootvg file systems were not mounted when the mksysb was made, those file systems are not included on the backup image. You will need to create and restore those as a separate step. If your mksysb media does not contain user volume group definitions (for example, you created a volume group after saving your rootvg), you have to import the user volume group after restoring the mksysb. For example: # importvg -y datavg hdisk9 Only one disk from the volume group (in our example hdisk9), needs to be selected. Procedure 5 applies to a total failure of a non-rootvg volume group. This situation might come up if your volume group consists of only one disk that fails. Before starting this procedure make sure this is not just a temporary disk failure (for example, a power failure). 1. To fix this problem, export the volume group from the system. Use the command exportvg as shown. During the export of the volume group all ODM objects that are related to the volume group will be deleted. 2. Check your /etc/filesystems. There should be no references to logical volumes or filesystems from the exported volume group. 3. Remove the bad disk from the ODM (Use rmdev as shown). Shut down your system and remove the physical disk from the system. 4. Connect the new drive and boot the system. The cfgmgr will configure the new disk. 5. If you have a volume group backup available (created by the savevg command), you can restore the complete volume group with the restvg command (or the smit fastpath smit restvg). All logical volumes and file systems are recovered. If you have more than one disk that should be used during restvg you must specify these disks: # restvg -f /dev/rmt0 hdiskY hdiskZ We will talk more about savevg and restvg in a future chapter. 6. If you have no volume group backup available, you have to re-create everything that was part of the volume group. Re-create the volume group (mkvg or smit mkvg), all logical volumes (mklv or smit mklv) and all file systems (crfs or smit crfs). Finally, restore the lost data from backups, for example with the restore command or any other tool you use to restore data in your environment. ** Si el varyoff se hace para el rootvg, necesita reboot, de lo contrario, no es necesario! * bosboot –ad /dev/hdiskX genera el boostrap, chpv –c hdisk lo LIMPIA del hdisk ** El rmlv se usa para remover: paging, sysdump, RAW, que no tienen filesystems. Frequent disk replacement errors: A common problem seen after a migration of the rootvg is that the machine will not boot. On a microchannel system you get alternating LED codes 223-229, on a PCI system the LED codes cycle. This loop indicates that the firmware is not able to find a bootstrap code to boot from. This problem is usually easy to fix. Boot in maintenance mode and check your boot list (use the bootlist command). If the boot list is correct, update the boot logical volume (use the bosboot command). Note: Throughout this discussion the physical volume ID is abbreviated in the visuals for simplicity. The physical volume id is actually 32 characters. Another frequent error comes up when administrators remove a disk from the ODM (by executing rmdev) and physically remove the disk from the system, but do not remove entries from the volume group descriptor area.
  • 59. Before discussing the fix for this problem, remember that the VGDA stores information about all physical volumes of the volume group. Each disk has at least one VGDA. Disk information is also stored in the ODM, for example, the physical volume identifiers are stored in the ODM class CuAt. What happens if a disk is removed from the ODM but not from the volume group? After removing the disk from the ODM you still have a reference in the VGDA to the removed disk. In early AIX versions the fix for this problem was difficult. You had to add ODM objects that described the attributes of the removed disk. Fix this problem by executing the reducevg command. Instead of passing the disk name you pass the physical volume ID of the removed disk. Execute the lspv command to identify the missing disk. Write down the physical volume ID of the missing disk and compare this id with the contents of the VGDA. Use the following command to query the VGDA on a disk: # lqueryvg -p hdisk4 -At (Use any disk from the volume group) If you are sure that you found the missing pvid, pass this pvid to the reducevg command. After an incorrect disk replacement you might detect ODM failures. A typical error message is shown: Unable to find device id 00837734 in device configuration database In this case a device could not be found in the ODM. Before starting any fixes check the command you typed in. Maybe it just contains a typo. Analyze the failure. Find out what device corresponds to the ID that is shown in the error message. If you are not sure what caused the problem, remember the two ways you learned already to fix an ODM problem. • If the ODM problem is related to the rootvg, execute the rvgrecover procedure. If the ODM problem is not related to the rootvg, export the volume group and import it again. Export and import will be explained in more detail in the next topic. 1. Although everything seems to be working fine, you detect error log entries for disk hdisk0 in your rootvg. The disk is not mirrored to another disk. You decide to replace this disk. Which procedure would you use to migrate this disk? 1. Procedure 2. 2. You detect an unrecoverable disk failure in volume group datavg. This volume group consists of two disks that are completely mirrored. Because of the disk failure you are not able to vary on datavg. How do you recover from this situation? 2. varyonvg –F ; chpv –va – procedure 1 for mirrored disks 3. After disk replacement you recognize that a disk has been removed from the system but not from the volume group. How do you fix this problem? 3. reducevg vgname PVID (use PVID beside disk name) Different procedures are available that can be used to fix disk problems under any circumstance: Procedure 1: Mirrored Disk. Procedure 3: Total disk failure. Procedure 2: Disk Still Working (+ rootvg Procedure 4: Total rootvg failure. specials) Procedure 5: Total non-rootvg failure. Bajar: aix LVM from a-z troubleshooting and commands.