
Recommandé
Contenu connexe
Tendances
Tendances (20)
Similaire à Evaluation
Similaire à Evaluation (20)
Dernier
Dernier (20)
Evaluation
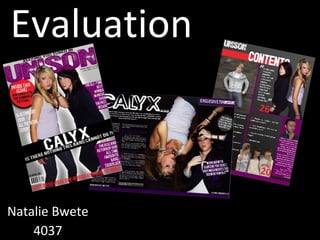
- 1. Evaluation Natalie Bwete 4037
- 2. Here I have placed the masthead at the top of the page as it is a generic convention with all magazines. We put it in a capital sans serif font as it is an informal yet modern style of lettering making it versatile on different styles of magazines and ideal for our product. The word ‘UNISON’ has musical connotations which is what we aimed for. It gives the preferred meaning of a musical magazine. By adding the promotional puff in the top-left corner helps accentuate this offer as we generally read from left to right. This is the ears of the front cover. I used bright colours to highlight the importance of this promotion. I have put the splash through the main image as it shows a link between the text and the photo. I have used a different font for the splash as it is the main attraction of the front cover and is different from the other headlines. The double-decker headline is often conventional with most splashes on front covers as it highlights the stories importance. By placing the bar code and issue number on the front cover I am following the conventional rules of most magazines. I have represented my artists as cutting-edge band. I focused on posture and facial expressions as it was head on shot, therefore they were making eye contact with the reader. I centred them in the middle of the page to be able adjust the other headlines and copy around them. By overlapping the image with the headlines and masthead represents the magazine as being highly confident in the product. In the puffs, I have added superlatives such as ‘ALL TIME BEST’ into the copy as they represent the magazine as being excellent value and high quality. The website, date and price on the cover is a common convention to all magazines. It also has promotional references. On our cover, we added the strap line at the top of the masthead however this convention is still highly common with most music magazines. The copy has musical connotations such as ‘TUNED’ which helps relate to the genre style of our product.
- 4. By adding the masthead logo at the top of the page is adds a sense of continuity through out the magazine. The page numbers are situated next to each image making it clear and easy for the readers to navigate around the magazine. We have out the contents in a simple layout. We haven’t separated the content into sections as we wanted the preferred meaning of simple, clarity and sophistication. We kept to a colour scheme and made all the page numbers the same colour for continuity. The font we used was a serif font as it was modern style and not too over done. We added images of artists and related them to the inside stories. This created a more free flowing page with a lot of diversity. It acts as a little sneak peek preview of what readers expect to see when they read on into the magazine. The use of the pull quote also correlates well with the image. It gives the readers a preview of the inside story. By using the quote it gives an inside view as to what the story is about. We added dividers onto the page to add structure to the page. It makes the page look sophisticated yet modern with all the hard edges. By adding an editors column we added a sense of community to the page. We wrote it in a quirky and fun, with an informal mode of address. The image we used was of a young sophisticated male however we played around with facial expressions as it was only a head shot.
- 5. Contents Page Analysis For my contents page, we didn’t follow all the conventional generics however we did stick to a few. For example we related all our images to the inside stories of the magazines by placing page numbers next to each of them. We also added an editor’s column to the page as we believed it would be relevant and an interesting part to add to the page. We all choose to stick to a colour scheme throughout the whole page which ties in also with the colour scheme on the front cover. This made the page presentable and adds to the sense of continuity, it keeps the page simple yet still appealing and attractive to the target audience. As one of the main conventions of all contents pages, we added the title ‘CONTENTS’ which is common amongst all types of magazines. We also added the magazine logo in the top left-hand corner. This also added to the continuity that we wanted to run throughout the magazine. To promote this issue we have done simple and subtle changes such as using superlatives when describing the storylines, for example ‘BREAKING NEWS’ and ‘INSIDE SCOOP’. Also when I wrote the editor’s column I made sure that it was a positive representation of the issue and using a friendly, humorous and informal mode of address. Next to the image of the same artists that were on the front cover, I added a pull quote to really advertise the article written about them. To make this issue appealing to my target audience, I have made sure that all my stories are relevant to them and of interest. I have added promotional techniques such as a quiz with a prize which links in with the promotional offer on the front cover. This would apply to them as the prize is tickets to an event which is tied in closely with this genre of music. With the stories written about artists, I made sure that if they were existing singers that it was all the latest news about them and that if it was about new artists it was a success story in order the give viewers a chance to know the artists better. In terms of layout, I've kept it simple and not to cluttered with text and images. I’ve maintained a colour scheme which is bright and eye-catching which will be striking to the viewers. On this page I have offered the following uses and gratifications to my target audience: Information and Education = about the issue they are about to read. It tells them about the stories present in the magazine. Social interaction = after reading the articles presented on this page, the viewers will then be educated and tell others of the stories they have read about their musical icons and events. This page gives my audience these solutions to their inadequacies: Clarity = it helps the audience understand what this issue has to offer if they were confused as to what the content of the magazine is about. Excitement = about the stories inside this months issue.
- 6. We followed the conventional rules by adding a headline to the page. I put it in the top-left hand corner as it is generic for all of us to read from left to right. I kept it simple and only added the title of the band. I also kept it white as it connotes peace, youthfulness and purity. I added the superlative ‘EXCLUSIVE’ as it signifies importance. This use of words will help attract a reader and gives the preferred meaning that the interview is the best yet and lets the readers believe they are privileged to be given a chance to read it. When writing my interview, I made sure it was easy for the viewers to read clearly so I used different colours to define the difference between what each artist said. This is a generic convention used in many interviews with more than one artist. I added many generic conventions to this page such as the page numbers, dates and magazine website. These were key in making my product as realistic and possible and also it offers easy navigation from the contents page. By adding this promotion at the bottom of the interview gives the preferred meaning that the magazine are supportive of their artists and will help to promote their albums and singles. It is also another common convention in many different magazines. I placed a pull quote on the page as I felt that this if often a convention found in magazines, whether they represent music or not. It gives a little preview of the interview before the reader actually reads it. I added a graphic behind it as well to accentuate this point further and highlight its importance. For the main image, I made sure it would take up at least ⅔ of the page. I made it the background and fit the copy around the image making it the main focus of the page.
- 7. Double Page Spread Analysis In my double page spread, I have represented my artists in roughly the same way as I had on the front cover. Although for the front cover I needed them to be wild, fun and quirky, I chose a more relaxed and softer image for the double page. Firstly, I have represented them as highly valued to the magazine and as wonderful, free spirited yet youthful artists. I have achieved through the text I have used around them. For example I added ‘EXCLUSIVE TO UNISON’ at the top right-hand corner of the page. This really accentuates the importance of the artists to the magazine. I also added some text in a circle graphic saying ‘ THE HARMONIC DUET SET WITH BEATS AND TUNES AS FLY AS THEIR FASHION SENSE’ , this created a positive and informal representation of the artists. For this page, I kept the models in the same outfits and makeup as before because I wanted to mainly focus the upper half of the models body language and also their facial expressions. I took a high angle shot for the double page spread image as it showed a different side to the artists. This image highlights their innocence and youthfulness and ties in well with their success story. At the bottom of the article, I have added the name, release date and price of their new album. This is to give the target some insight. This appeals to the audience as it is information which is relevant to them. In the interview, some of the questions I made an interest to the target audience. For example, one of the questions I used was: ‘So what should we expect to be hearing from this album?’ as this was a question whereby the audience would be interested in what the answer was. For this page I have followed a lot of the key conventions. I have a masthead, a dominant image, page no.’s, pull quote and journalistic style copy. To link the double page together I choose an image which took up at least ⅔ of the page. This provided as the background to the page and any text was placed over the image. It helped make the double page look together and well-structured. This page offers the following uses and gratifications to the audience: Information and education= the whole interview gives the reader a lot of information(sometimes personal) about the artist. Identify = gives an insight into the artists lives and gives them a chance to relate to them. Social interaction = the interview is about the new album which gives readers a chance to discuss this news with others. Escape = the readers are able to forget about their own lives and focus on others, therefore escaping into another way of life. According to Richard Dyer’s theory of Utopian Solutions, this page offers my target audience clarity to any confusion they had concerning the artists.
- 9. Journalism Analysis continued... When writing the text, I had to be aware of many aspects such as the representation of the artists and magazine and the target audiences personalities. When I was creating the interview I had to be aware of the audiences interests. For our target audience, we had to represent the artists as fun, daring, youthful and passionate about music. ‘UNISON’ therefore had to be represented as a magazine which specialises in all the latest music updates and the promotion of their artists.
- 10. My Use of Technology For the creation of my product, I used Adobe Photoshop Elements 6 and CS4. These are professional programs used by many magazine editing companies and therefore helped me produce a high quality final product. This is the dropper tool. I used this tool throughout all of my pages as it helped me maintain the continuity of a colour theme. The lasso tool. As I had a lot of images cut from their background, this tool was very helpful. I was able to cut with precision around each model in the photo without any hard lines. The red-eye tool. With some of my photographs, the model’s eyes were bright red as this was due to the flash. This tool eliminated the redness and restored it back to the original colour. I found this one very useful at the time. This is the gradient tool. I experimented with the tool on the cover page as I had chosen to cut my images out due to a poor background in the original photograph. I was able to create a gradient between any 2 colours which gave me a lot of choice. This is the colour tool. It allowed me to be able to select from a wide range of different colours for fonts, graphics and many more. The text tool. I used this tool the most frequently as it allowed me to type text anywhere on the page. From this tool, I could select any font, colour and alignment I wished for. The shape tool. This was tool I used to produce a graphic and there was a wide selection from me to choose from. This tool was of great help, for example when I added the graphic behind the pull quote on the double page spread or the promotion on the cover page. This is the spot-healing tool. Although I didn’t use this tool often, it was of great help when I was editing the photos I had taken. It helped rid of any blemishes, scars or spots on the model’s faces which helped create a flawless look. For the production of my magazine, I had to learn to layer all parts of the page. It was a very useful tool and helped me manage every part of the magazine production.
- 11. My Use of Technology - Editing For one of my images on the contents page, I had to cut his image out and then place him onto another background. In order to achieve this I used the magnetic lasso tool to cut his head out of the original background. I then used the spot-healing tool as the model had a few blemishes and I created an even tone over his skin. After that, I used the shape tool and colour tool to make a new background for the image to be against. At first, I found this task to be hardest and most time consuming however with patience the results were incredible. Original Photo Cut and Edited Final Image
- 12. My Use of Technology - Editing Original Photograph Slightly contrasted and saturated Highly contrasted and saturated For the image on my double page spread, I had to use the red-eye tool on one of the model’s eyes. By using this tool I was able to restore the natural eye colour of the model. As it was a head on shot which means they were making eye contact with the audience, I had to make sure their eyes were clear. Contrast and Saturation When taking my photographs, I had to be very aware of the lighting in the room. I didn’t have any professional lighting and therefore had to rely on simple house lights. On Adobe Photoshop I was able to edit the photographs and change the contrast and saturation of each image. For the final image, I slightly contrasted and saturated it which made the photo look rich in colour and emphasised on the key features on the model’s faces. This was a very useful skill that I used and it helped make my images look a lot more professional and more appealing. Red-eye tool
- 13. My Use of Technology - Fonts For the majority of our texts, we downloaded fonts from the website ‘dafont.com’. It was very useful and provided us with many different options. The Adobe This is the font we used for our masthead as it was bold, edgy but still modern. We were able to adapt the colours of the text for each issue making it versatile. The boldness of the text was very suitable for title. We choose this style of font as it was very basic and simple yet it was still sophisticated and modern. We used this font throughout the entire magazine as is was clear and easy to read and worked great on the headlines, titles and even the page numbers. For the editors column, we wanted to personalise the signature so we downloaded this font which matched the handwriting style we were looking for. We felt it added a sense of realism as it is a convention we see in other magazines with editors columns. I choose this font for the title of the band on the double page spread as I felt it represented the band very well. The styling is quirky, modern and a very edgy fashion. These are the representations I wanted the band to have therefore I selected this font. It is also very clear for viewers to see and read which is an added bonus. Photoshop couldn’t provide us with the bold and modern fonts we were looking for therefore ‘dafont.com’ was of assistance. These are the main fonts we had downloaded from the website and which helped complete the style of magazine we all wished for.
- 15. Preliminary magazine to Final production From my preliminary magazine to my final product, I feel as though I have gained so much experience and learnt a lot of new skills. When I was making my school newsletter, it was all new to me and I wasn’t always sure of what I was doing. I didn’t have the right kind of skills, for example photography and graphic, design to make a professional product. Here a few of the new skills I had to learn it order to produce my music magazine and how much of an improvement it was from my preliminary magazine. One of the key achievements I had was with the photography. I had to learn how to use a variety of different angles and locations in order to create a specific style and representation. When I did the photo shoot for the final production, I had to be aware of so many different aspects such as facial expressions, clothing and the background. For the preliminary magazine, these weren’t my biggest concerns and wasn’t an important factor. I simply used a normal digital camera however for my music magazine I made sure I used a professional camera in order for the images to be clearer and of a higher quality. When it came to graphic design, I had briefly used it with the preliminary magazine but only the simple tools such as add some dividing lines. With my final product I used a large variety of different graphic designs. For example, I added a circle graphic behind the promotion on the front cover. This technique helps highlight and accentuate this offer to the target audience as it is clear to see and eye-catching. When I was writing my journalism for my preliminary magazine, I didn’t take into consideration key points such as target audience, representation and mode of address. I simply wrote it out in a journalistic style. For my final product I to address all these points and make sure they were relevant to my audience. I also had to add musical lexis to the text to link it to the type of magazine. Without it, my journalism wouldn’t have been realistic and appealed to my target audience. My viewers were 16-25 year old males and females with a passion and interest in music. Therefore I choose an informal mode of address as I thought it would apply to them better than if it were formally written. I made sure that during the interview, there was always a positive representation of the artists and the magazine. Finally, the software I became accustomed to during the production of my final magazine was very useful and I wouldn’t of been able to create such a high quality piece of work if it wasn’t for that. When creating my preliminary magazine, I only used Microsoft publisher and word. For my final product, those programs would of been to simple for my work. I used Adobe Photoshop Elements 6 and CS4 which gave me all the programs and skills I needed to piece my magazine together. Without it I wouldn’t have been able to learn the new skills and techniques I do now. For the publication of my final product we used Slideshare and BlogSpot. We found these so useful and saved us a lot of time and hassle as it was easy.