1. Illustrated Technique Guide
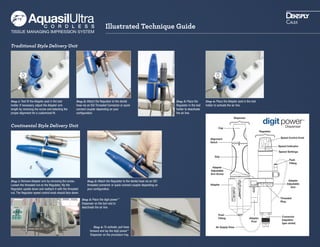
Traditional Style Delivery Unit
Continental Style Delivery Unit
Step 1: Test fit the Adapter post in the tool
holder. If necessary, adjust the Adapter arm
length by removing the screw and selecting the
proper alignment for a customized fit.
Step 1: Remove Adapter arm by removing the screw.
Loosen the threaded nut on the Regulator, flip the
Regulator upside down and reattach it with the threaded
nut. The Regulator speed control knob should face down.
Step 2: Attach the Regulator to the dental
hose via an ISO Threaded Connector or quick
connect coupler depending on your
configuration.
Step 3: Place the
Regulator in the tool
holder to deactivate
the air line.
Step 2: Attach the Regulator to the dental hose via an ISO
threaded connector or quick connect coupler depending on
your configuration.
Step 3: Place the digit power™
Dispenser on the tool rest to
deactivate the air line
Step 4: To activate, pull hose
forward and lay the digit power™
Dispenser on the procedure tray.
Cap
Grip
Adapter
Dispenser
Regulator
Push
Fitting
Push
Fitting
Threaded
Ring
Connector
(regulator
type varies)
Speed Control Knob
Adapter
Post
Adapter
Adjustable
Arm Screw
Adapter
Adjustable
Arm
Speed Indicator
Speed Settings
Air Supply Hose
Alignment
Notch
Step 4: Place the Adapter post in the tool
holder to activate the air line.