Lander DIY Standing Desk Assembly Instructions
•
1 j'aime•7,089 vues

Follow this guide to assemble your DIY Lander Standing Desk.

Recommandé
Recommandé
Contenu connexe
Tendances
Tendances (12)
Similaire à Lander DIY Standing Desk Assembly Instructions
Similaire à Lander DIY Standing Desk Assembly Instructions (20)
Plus de iMovR
Plus de iMovR (18)
Dernier
Dernier (20)
Lander DIY Standing Desk Assembly Instructions
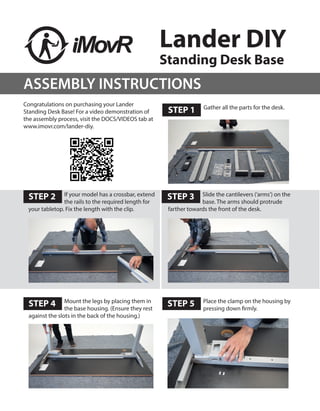
- 1. Lander DIY Standing Desk Base STEP 1 Congratulations on purchasing your Lander Standing Desk Base! For a video demonstration of the assembly process, visit the DOCS/VIDEOS tab at www.imovr.com/lander-diy. Gather all the parts for the desk. If your model has a crossbar, extend the rails to the required length for your tabletop. Fix the length with the clip. Slide the cantilevers (‘arms’) on the base. The arms should protrude farther towards the front of the desk. Mount the legs by placing them in the base housing. (Ensure they rest against the slots in the back of the housing.) Place the clamp on the housing by pressing down firmly. STEP 2 STEP 3 STEP 4 STEP 5 ASSEMBLY INSTRUCTIONS
- 2. Place the lock in the clamp. The arrow on the lock should face the arrow on the clamp. Fix the lock in place by pressing on it firmly with your foot. Ensure your base is positioned properly. Then screw the frame into the tabletop using a drill and the screws provided. Note: pilot holes recommended. Attach the power supply using a screwdriver and the screws provided. Attach the hand controller using a screwdriver and the screws provided. Connect the leg cables, hand controller cable, and the power cord to the power supply. Tuck cables under the crossbar. Attach the feet to the legs using the provided Allen key and hex screws. With a friend, turn over your desk. STEP 6 STEP 7 STEP 8 STEP 9 STEP 10 STEP 11 STEP 12 STEP 13 See full Lander Manual for details including hand controller instructions, troubleshooting, and more. Note: Do not overtighten