Dhcp snooping option 82 configuration
•Télécharger en tant que DOCX, PDF•
1 j'aime•4,243 vues

Dhcp snooping option 82 configuration examples

Recommandé
Contenu connexe
Tendances
Tendances (20)
Similaire à Dhcp snooping option 82 configuration
Similaire à Dhcp snooping option 82 configuration (20)
Plus de IT Tech
Plus de IT Tech (20)
Dernier
Dernier (20)
Dhcp snooping option 82 configuration
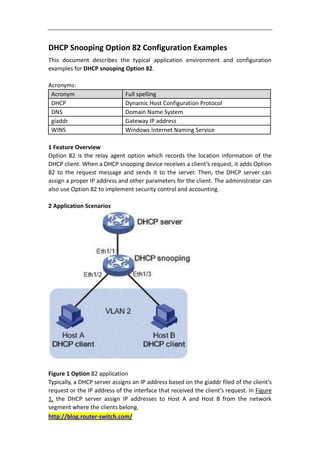
- 1. DHCP Snooping Option 82 Configuration Examples This document describes the typical application environment and configuration examples for DHCP snooping Option 82. Acronyms: Acronym Full spelling DHCP Dynamic Host Configuration Protocol DNS Domain Name System giaddr Gateway IP address WINS Windows Internet Naming Service 1 Feature Overview Option 82 is the relay agent option which records the location information of the DHCP client. When a DHCP snooping device receives a client’s request, it adds Option 82 to the request message and sends it to the server. Then, the DHCP server can assign a proper IP address and other parameters for the client. The administrator can also use Option 82 to implement security control and accounting. 2 Application Scenarios Figure 1 Option 82 application Typically, a DHCP server assigns an IP address based on the giaddr filed of the client’s request or the IP address of the interface that received the client’s request. In Figure 1, the DHCP server assign IP addresses to Host A and Host B from the network segment where the clients belong. http://blog.router-switch.com/
- 2. Traditionally, the DHCP server cannot assign to Host A an IP address that is in a different network segment from the IP address assigned to Host B. However, this can be achieved through Option 82, with which, the DHCP server can assign IP addresses based on the DHCP snooping interface connected to the clients and the giaddr filed in DHCP requests. A client’s ID can be recognized by Option 82. Therefore, the DHCP server can assign a unique IP address to each client, to further implement QoS, security and accounting management. 3 Configuration Guidelines The DHCP snooping Option 82 function can take effect only after you enable DHCP snooping. DHCP snooping does not support link aggregation. If a Layer 2 Ethernet interface is added into an aggregation group, DHCP snooping configuration on it will not take effect. When the interface is removed from the group, DHCP snooping can take effect. The DHCP snooping enabled device does not work if it resides between a DHCP relay agent and DHCP server, and it can work when it resides between a DHCP client and relay agent or between a DHCP client and server. You are recommended to enable the DHCP snooping Option 82 function on the DHCP snooping device closest to the DHCP client for locating the client accurately. The DHCP snooping enabled device cannot act as a DHCP server or DHCP relay agent. You are not recommended to enable the DHCP client, BOOTP client, and DHCP snooping on the same device. Otherwise, DHCP snooping entries may fail to be generated, or the BOOTP client/DHCP client may fail to obtain an IP address. 4 Configuration Examples 4.1 Network Requirements The work area of an enterprise is divided into three groups, group 1, group 2, and group 3, which are located in three rooms. A DHCP server is deployed to assign IP addresses of different segments to the three groups. It is required that: The DHCP server assigns IP addresses on the network segment 192.168.10.0/24 to devices in the work area. The lease time is 12 hours, and the DNS and WINS server addresses are 192.168.100.2 and 192.168.100.3 respectively. Group 1, group 2 and group 3 are connected to the DHCP snooping device through Ethernet1/1, Ethernet1/2 and Ethernet1/3 respectively to communicate with the DHCP server. The DHCP server assigns IP addresses ranging from 192.168.10.2 to 192.168.10.25 to clients in group 1, assigns IP addresses ranging from 192.168.10.100 to 192.168.10.150 to clients in group 2, and assigns IP addresses http://blog.router-switch.com/
- 3. ranging from 192.168.10.151 to 192.168.10.200 to clients in group 3. Figure 2 Network diagram for DHCP snooping 4.2 Configuration Considerations Enable Option 82 support on the DHCP snooping device. Configure the Option 82 sub-option, so that the clients in different groups can send packets carrying different Option 82 information. To do so, you can manually specify the circuit ID sub-option. Configure IP address assignment policy on the DHCP server, so that the DHCP server can assign proper IP addresses to the DHCP clients according to Option 82. 4.3 Software Version Used This example is configured and verified on Comware V500R002B42D001. 4.4 Configuration Procedures Note:The following configurations are made on devices that are using default settings and verified in a lab environment. When using the following configurations on your devices in a live network, make sure they do not conflict with your current configurations to prevent potential negative impact on your network. 4.4.1 Configuration on the DHCP Snooping Device I. Configuration steps # Enable DHCP snooping. <Switch> system-view [Switch] dhcp-snooping # Configure Ethernet 1/4 as a DHCP snooping trusted port. [Switch] interface ethernet 1/4 http://blog.router-switch.com/
- 4. [Switch-Ethernet1/4] dhcp-snooping trust [Switch-Ethernet1/4] quit # Enable Ethernet 1/1 to support Option 82. [Switch] interface ethernet 1/1 [Switch-Ethernet1/1] dhcp-snooping information enable # Pad the Option 82 circuit ID sub-option with group 1. [Switch-Ethernet1/1] dhcp-snooping information circuit-id string group1 [Switch-Ethernet1/1] quit # Enable Ethernet 1/2 to support Option 82. [Switch] interface ethernet 1/2 [Switch-Ethernet1/2] dhcp-snooping information enable # Pad the Option 82 circuit ID sub-option with group 2. [Switch-Ethernet1/2] dhcp-snooping information circuit-id string group2 [Switch-Ethernet1/2] quit # Enable Ethernet 1/3 to support Option 82. [Switch] interface ethernet 1/3 [Switch-Ethernet1/3] dhcp-snooping information enable [Switch-Ethernet1/3] quit # Pad the Option 82 circuit ID sub-option with group 3. [Switch-Ethernet1/3] dhcp-snooping information circuit-id string group3 [Switch-Ethernet1/3] quit II. Configuration file <Switch> display current-configuration # interface Ethernet1/1 port link-mode bridge dhcp-snooping information enable dhcp-snooping information circuit-id string group1 # interface Ethernet1/2 port link-mode bridge dhcp-snooping information enable dhcp-snooping information circuit-id string group2 # interface Ethernet1/3 port link-mode bridge dhcp-snooping information enable dhcp-snooping information circuit-id string group3 # interface Ethernet1/4 port link-mode bridge dhcp-snooping trust # http://blog.router-switch.com/
- 5. 4.4.2 Configuration on the DHCP Server I. Configuration steps You can use the following two methods to configure Option 82: 1. User-defined method: Manually specify the content of Option 82. 2. Non-user-defined method: Pad Option 82 in the default normal or verbose format. For the second method, the circuit ID sub-option format is as shown in Figure 3 . Figure 3 Circuit ID sub-option format For example, for clients connected to Ethernet 1/1, the circuit ID sub-option is padded with group 1. The circuit ID sub-option in DHCP packets should contain the following information: 0x010667726F757031, in which 0106 refers to the number and length of the circuit ID sub-option, and 67726F757031 refers to the hexadecimal value of the character string group 1. In this example, IP addresses are assigned according to the group number; therefore, the DHCP server only needs to assign IP addresses based on the group number padded in the circuit ID sub-option. Note:The DHCP server is configured on a Cisco Catalyst 3745 switch with software version IOS 12.3(11)T2. To configure a device of another type or version as the DHCP server, refer to the related user manual. # Configure the server interface IP address as 192.168.10.1/24. Server> enable Server# configure terminal Server(config)# interface fastethernet 0/0 Server(config-if)# ip address 192.168.10.1 255.255.255.0 Server(config-if)# exit # Enable DHCP server, and configure the DHCP server to assign IP addresses based on Option 82. Server(config)# service dhcp Server(config)# ipdhcp use class # Create a DHCP class for clients in group 1, and specify the corresponding circuit ID sub-option for matching. For the content not to be matched, enter the wildcard ”*”. Server(config)# ipdhcp class group1 Server(dhcp-class)# relay agent information Server(dhcp-class-relayinfo)# relay-information hex 010667726F757031* Server(dhcp-class-relayinfo)# exit http://blog.router-switch.com/
- 6. # Create a DHCP class for clients in group 2, and specify the corresponding circuit ID sub-option for matching. Server(config)# ipdhcp class group2 Server(dhcp-class)# relay agent information Server(dhcp-class-relayinfo)# relay-information hex 010667726F757032* Server(dhcp-class-relayinfo)# exit # Create a DHCP class for clients in group 3 and specify the corresponding circuit ID sub-option for matching. Server(config)# ipdhcp class group3 Server(dhcp-class)# relay agent information Server(dhcp-class-relayinfo)# relay-information hex 010667726F757033* Server(dhcp-class-relayinfo)# exit # Create a DHCP address pool named office, and specify the lease time, gateway address, DNS server address, and WINS server address for clients. Server(config)# ipdhcp pool office Server(dhcp-config)# network 192.168.10.0 Server(dhcp-config)# lease 0 12 Server(dhcp-config)# default-router 192.168.10.1 Server(dhcp-config)# dns-server 192.168.100.2 Server(dhcp-config)# netbios-name-server 192.168.100.3 # Specify address ranges for the three DHCP classes respectively. Server(dhcp-config)# class group1 Server(dhcp-pool-class)# address range 192.168.10.2 192.168.10.25 Server(dhcp-pool-class)# class group2 Server(dhcp-pool-class)# address range 192.168.10.100 192.168.10.150 Server(dhcp-pool-class)# class group3 Server(dhcp-pool-class)# address range 192.168.10.151 192.168.10.200 4.4.3 Verification After completing the above configurations, the DHCP server can automatically assign IP addresses of the specified range, gateway address, DNS server address, and WINS server address for clients of each group in the work area. More Related DHCP Snooping Tips: How to Configure DHCP Snooping? http://blog.router-switch.com/